

【原子样式实践】第12篇 一次搞定微信开发者工具的原子样式扩展
source link: https://blog.51cto.com/u_13556371/5816196
Go to the source link to view the article. You can view the picture content, updated content and better typesetting reading experience. If the link is broken, please click the button below to view the snapshot at that time.
原子样式虽好,在IDE中使用,有扩展辅助就更好。本文介绍如何开发微信开发者工具的原子样式扩展,支持原子样式的自动生成,支持特色功能组合样式,支持特色功能样式使用统计报告。
1 研发背景
(1)集成可视化和实时生成。
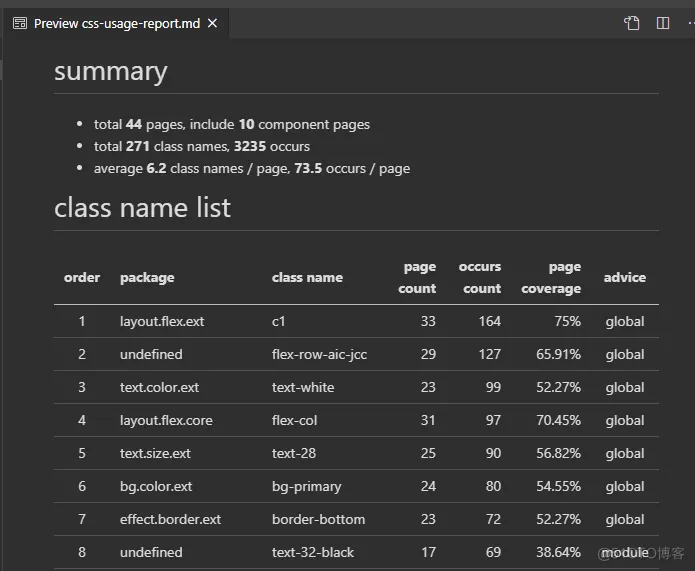
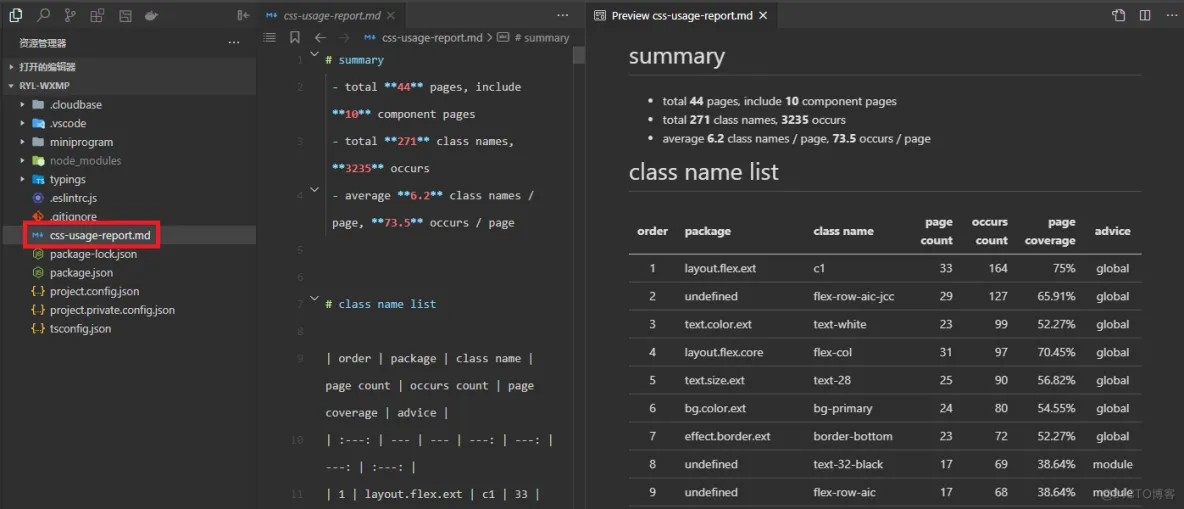
原子样式的规范性或者合理使用必须以统计数据为基础,需要经常查看,以便分析和优化。
页面文件编写完成后,立即生成样式文件,可实时预览。
(2)限制导致的兼容性问题
微信开发者工具是基于 Visual Studio Code 定制的,但其插件管理方式却受到限制。由于并不能清楚的知道受到哪些限制,自研可以保证兼容性最好。
两个关键点:
(1)开发者工具可以兼容运行于 Microsoft Visual Studio Code 1.46.0+ 版本的大部分扩展。某些类别(例如调试)的扩展无法支持。
(2)注 1: 不支持直接安装 vsix 格式的插件。来自 Microsoft Visual Studio Code 已安装的扩展,其解包后的文件夹可以在 ~/.vscode/extensions (macOS 系统) 或 C:\Users\用户名\.vscode\extensions (Microsoft Windows 系统) 下找到。
官方说明参见: 编辑器扩展 | 微信开放文档 (qq.com)
适配的过程在章节 2.4 和 3 中会说明。
2 插件开发
2.1 开发插件基础
如果完全没有开发过插件,可以通过官方的教程 Your First Extension | Visual Studio Code Extension API 进行初步学习。
最主要是了解 package.json 文件、 extension.ts 文件 ,看多一点就要了解 extension api 语法。
2.2 开发插件原型
(1)安装好 nodejs,安装插件开发框架。
根据向导填写好相应信息。
yo 和 generator 是代码生成工具,vsce 是插件打包工具。
按 F5 就可以运行,这就是 hello world 了。
(2)在 package.json 中配置基本信息,包括作者、仓库信息(申请一个公开的 git 仓库)和 vscode 版本信息(参考章节1),即可发布 hello world 了。
名称和版本在发布时都会使用。
"author": {
"name": "foxgst"
},
"publisher": "foxgst",
"repository": {
"type": "git",
"url": "https://gitee.com/foxgst/vscode-wxmp-atomic-css.git"
},
"bugs": {
"url": "https://gitee.com/foxgst/vscode-wxmp-atomic-css/issues"
},
"homepage": "https://gitee.com/foxgst/vscode-wxmp-atomic-css/blob/main/README.md",
2.3 定制开发节点
2.3.1 开发功能函数
(1) 统计 css 使用情况 commandCount
(2)生成完全 css 文件代码 commandFullBuild
(3)开发部分文件更新 css 文件代码 commandPartiallyUpdate
2.3.2 配置激活函数
在 extension.ts 的激活函数 activate 中
(1)通过 FileSystemWatcher 检测 wxml 文件改动,关联 commandPartiallyUpdate, 实现单文件的 css 联动升级。
(2)注册命令 vscode-wxmp-atomic-css.count,关联 commandCount。
(3)注册命令 vscode-wxmp-atomic-css.fullBuild,关联 commandFullBuild。
(4)激活后立即执行 commandFullBuild ,生成全量 css 文件。
// ...
if (vscode.workspace.workspaceFolders) {
const watchDir = vscode.workspace.workspaceFolders[0];
console.debug("watchDir", watchDir);
const fsw: vscode.FileSystemWatcher = vscode.workspace.createFileSystemWatcher(new vscode.RelativePattern(watchDir, '**'));
fsw.onDidChange(e => {
console.debug("fsw.onDidChange", e);
updateDoc("*", e);
});
fsw.onDidCreate(e => {
console.debug("fsw.onDidCreate", e);
updateDoc("+", e);
});
fsw.onDidDelete(e => {
console.debug("fsw.onDidDelete", e);
updateDoc("-", e);
});
}
// The command has been defined in the package.json file
// Now provide the implementation of the command with registerCommand
// The commandId parameter must match the command field in package.json
let disposable = vscode.commands.registerCommand('vscode-wxmp-atomic-css.helloWorld', async () => {
vscode.window.setStatusBarMessage('app.wxss updated', 1000);
});
context.subscriptions.push(disposable);
disposable = vscode.commands.registerCommand('vscode-wxmp-atomic-css.count', async () => {
vscode.window.setStatusBarMessage('[ wxmp-atomic-css ] begin to generate css usage report', 1000);
commandCount(tempDataOption);
vscode.window.setStatusBarMessage(`[ wxmp-atomic-css ] css usage report saved to css-usage-report.md`, 1000);
});
context.subscriptions.push(disposable);
disposable = vscode.commands.registerCommand('vscode-wxmp-atomic-css.fullBuild', async () => {
vscode.window.setStatusBarMessage('[ wxmp-atomic-css ] begin to build css file', 1000);
commandFullBuild(tempDataOption);
vscode.window.setStatusBarMessage(`[ wxmp-atomic-css ] css file saved to mini.wxss`, 1000);
});
context.subscriptions.push(disposable);
{
vscode.window.setStatusBarMessage('[ wxmp-atomic-css ] begin to build css file', 1000);
commandFullBuild(tempDataOption);
vscode.window.setStatusBarMessage(`[ wxmp-atomic-css ] css file saved to mini.wxss`, 1000);
}
vscode.window.setStatusBarMessage('wxmp-atomic-css actived', 5000);
}
2.3.3 配置激活事件
在 package.json 中配置激活事件,其中 onStartupFinished 表示启动后立即执行。
"onCommand:vscode-wxmp-atomic-css.helloWorld",
"onCommand:vscode-wxmp-atomic-css.count",
"onCommand:vscode-wxmp-atomic-css.fullBuild",
"onLanguage:wxml",
"onStartupFinished"
],
2.3.4 配置命令
在 package.json 的 commands 中配置命令,对应的命令需要在 active 函数中注册。配置完成后 ctrl+shift+p 呼叫搜索框按 title 搜索执行。
{
"command": "vscode-wxmp-atomic-css.helloWorld",
"title": "Hello World"
},
{
"command": "vscode-wxmp-atomic-css.count",
"title": "count css usage"
},
{
"command": "vscode-wxmp-atomic-css.fullBuild",
"title": "build full css file"
}
],
2.3.5 配置命令快捷键
在 package.json 的 keybindings 中配置快捷键,对应的命令需要在 active 函数中注册。
{
"command": "vscode-wxmp-atomic-css.helloWorld",
"key": "shift+alt+p"
},
{
"command": "vscode-wxmp-atomic-css.count",
"key": "shift+alt+c"
},
{
"command": "vscode-wxmp-atomic-css.fullBuild",
"key": "shift+alt+b"
}
],
2.3.6 配置命令菜单
在 package.json 的 menus 中配置菜单,对应的命令需要在 active 函数中注册。
启动后,可以在编辑器的右键菜单中可见,菜单名称即 commands 中注册的 title。
"editor/context": [
{
"command": "vscode-wxmp-atomic-css.count",
"group": "wxmp-atomic-css"
},
{
"command": "vscode-wxmp-atomic-css.fullBuild",
"group": "wxmp-atomic-css"
}
]
},
2.3.7 配置自定义属性
在 package.json 的 configuration 中配置属性,用户可以在 IDE 中打开设置进行修改。
{
"title": "wxmp-atomic-css",
"properties": {
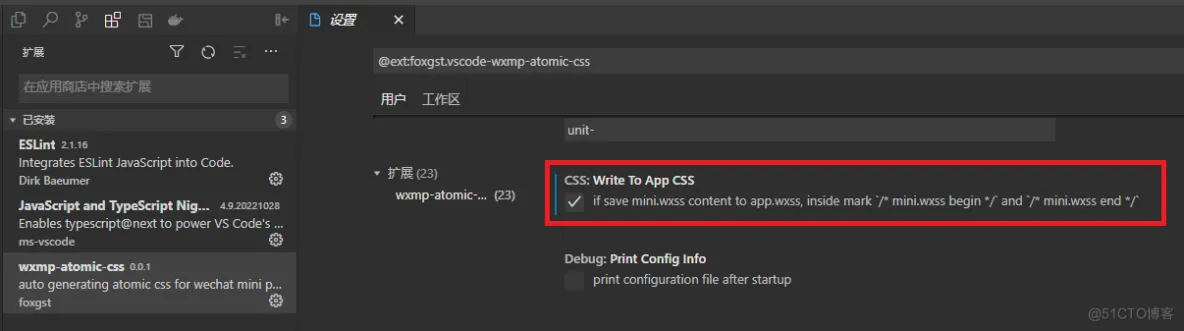
"css.writeToAppCss": {
"type": "boolean",
"default": false,
"description": "save mini.wxss content to app.wxss, inside mark `/* mini.wxss begin */` and `/* mini.wxss end */`"
},
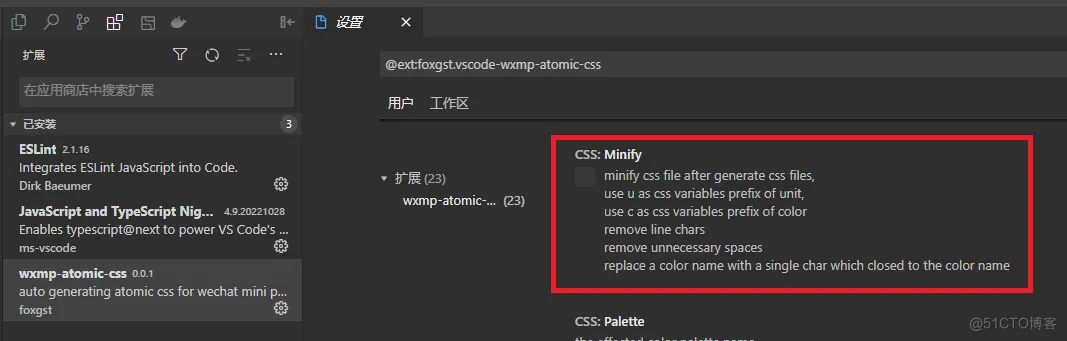
"css.minify": {
"type": "boolean",
"default": false,
"description": "minify css file after generate css files, \nuse u as css variables prefix of unit, \nuse c as css variables prefix of color\nremove line chars\n remove unnecessary spaces\nreplace a color name with a single char which closed to the color name"
},
}
}
},
自定义的属性可以通过下列命令读取。
2.4 打包插件
(1)在 package.json 中设置 vscode 版本为 1.20.0。若按照官方文档使用 1.46.0 在安装时有不兼容的提示。
"vscode": "^1.20.0"
},
"devDependencies": {
"@types/vscode": "^1.20.0",
},
(2)打包插件
打包之前依旧可以按 F5 调试查看效果。
在终端执行命令生成 vsix 文件。
如果需要发布以便其他用户使用,可以参考官方教程注册账号后发布。
当然也可以自己 fork 代码后自行编译安装。
vscode extension for wxmp-atomic-css (gitee.com)
3 使用插件
3.1 安装和卸载插件
(1)安装插件
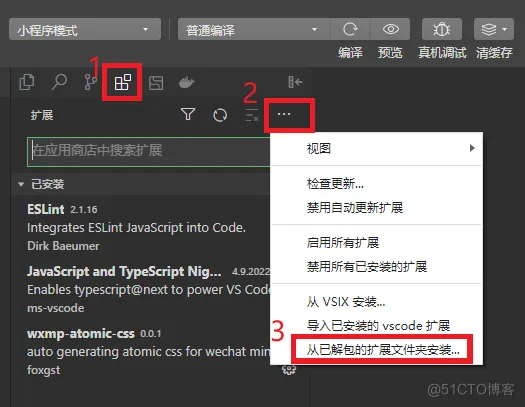
安装插件时,先通过【从 VSIX 安装】安装到 Microsoft Visual Studio 中,然后在微信开发者工具中切换到扩展视图,点击【从已解包的扩展文件夹安装...】选择对应文件夹即可。
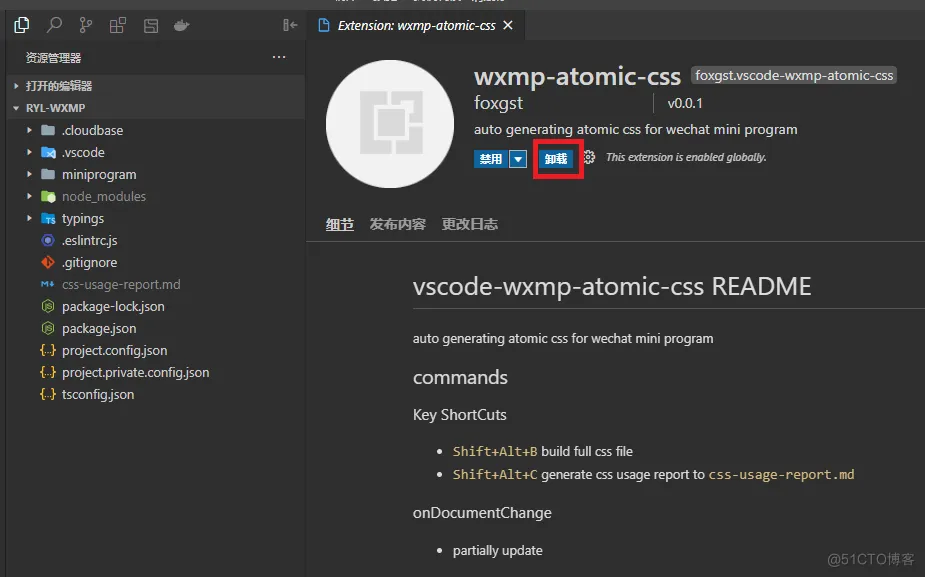
(2)卸载插件
点击插,在信息面板中点击卸载即可。
(3)更新版本
不能通过应用商店更新,需要先卸载后重新安装。
3.2 执行命令
(1)手动执行
在编辑器的右键菜单中可以点击执行命令,也可以通过快捷键执行命令。
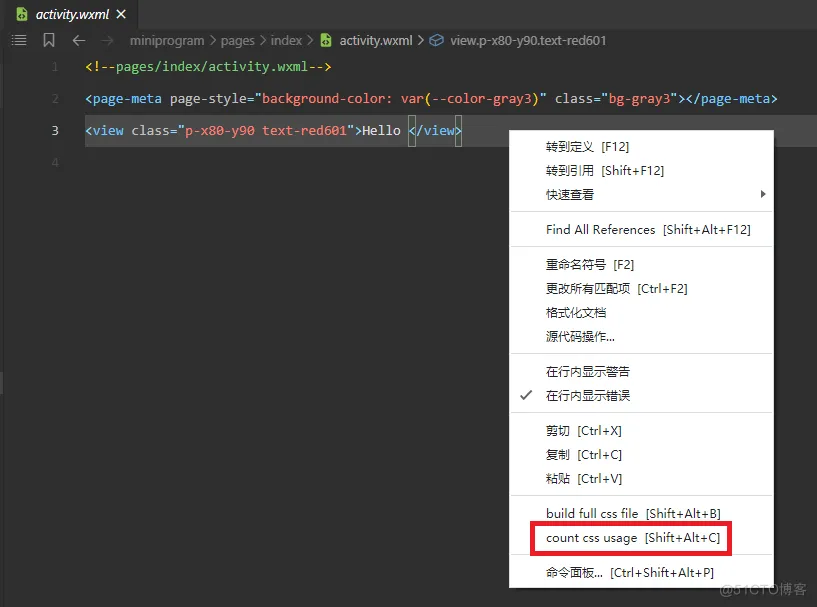
css 使用统计报告文件名为 css-usage-report.md。
(2)编写代码文件后保存,即可调用部分更新。
4 主要功能设置
(1)是否启用压缩
启用压缩后会减少不必要的字符,缩短css 变量名称,删除空格等方式减小 css 文件的大小。压缩后样式的可读性降低。
(2)是否直接将样式保存到 app.wxss
如果保存,则会在 app.wxss 中增加 /* mini.wxss begin / 和 / mini.wxss end */ 的代码区间。
否则,会将变量保存到 var.wxss ,将样式保存到 mini.wxss,并在 app.wxss 中引用。
app.wxss 中可以适量保存重置样式、字体资源、以及其他自定义样式。
作为开发者,开发IDE插件来提高工作效率已然是标配。本文在系列文章的基础上,将原子样式文件生成功能开发为插件,直接安装到微信开发者工具使用。开发过程相对简单,功能较为实用,大家可以根据需要进行功能拓展。
Recommend
About Joyk
Aggregate valuable and interesting links.
Joyk means Joy of geeK