

Android 热修复 Tinker接入及源码浅析
source link: https://blog.csdn.net/lmj623565791/article/details/54882693
Go to the source link to view the article. You can view the picture content, updated content and better typesetting reading experience. If the link is broken, please click the button below to view the snapshot at that time.
Android 热修复 Tinker接入及源码浅析
本文已在我的公众号hongyangAndroid首发。
转载请标明出处:
http://blog.csdn.net/lmj623565791/article/details/54882693
本文出自张鸿洋的博客
放了一个大长假,happy,先祝大家2017年笑口常开。
假期中一行代码没写,但是想着马上要上班了,赶紧写篇博客回顾下技能,于是便有了本文。
热修复这项技术,基本上已经成为项目比较重要的模块了。主要因为项目在上线之后,都难免会有各种问题,而依靠发版去修复问题,成本太高了。
现在热修复的技术基本上有阿里的AndFix、QZone的方案、美团提出的思想方案以及腾讯的Tinker等。
其中AndFix可能接入是最简单的一个(和Tinker命令行接入方式差不多),不过兼容性还是是有一定的问题的;QZone方案对性能会有一定的影响,且在Art模式下出现内存错乱的问题(其实这个问题我之前并不清楚,主要是tinker在MDCC上指出的);美团提出的思想方案主要是基于Instant Run的原理,目前尚未开源,不过这个方案我还是蛮喜欢的,主要是兼容性好。
这么看来,如果选择开源方案,tinker目前是最佳的选择,tinker的介绍有这么一句:
Tinker已运行在微信的数亿Android设备上,那么为什么你不使用Tinker呢?
好了,说了这么多,下面来看看tinker如何接入,以及tinker的大致的原理分析。希望通过本文可以实现帮助大家更好的接入tinker,以及去了解tinker的一个大致的原理。
二、接入Tinker
接入tinker目前给了两种方式,一种是基于命令行的方式,类似于AndFix的接入方式;一种就是gradle的方式。
考虑早期使用Andfix的app应该挺多的,以及很多人对gradle的相关配置还是觉得比较繁琐的,下面对两种方式都介绍下。
(1)命令行接入
接入之前我们先考虑下,接入的话,正常需要的前提(开启混淆的状态)。
对于API
一般来说,我们接入热修库,会在Application#onCreate中进行一下初始化操作。然后在某个地方去调用类似loadPatch这样的API去加载patch文件。
对于patch的生成
简单的方式就是通过两个apk做对比然后生成;需要注意的是:两个apk做对比,需要的前提条件,第二次打包混淆所使用的mapping文件应该和线上apk是一致的。
最后就是看看这个项目有没有需要配置混淆;
有了大致的概念,我们就基本了解命令行接入tinker,大致需要哪些步骤了。
dependencies {
    // ...
    //可选,用于生成application类
    provided('com.tencent.tinker:tinker-android-anno:1.7.7')
    //tinker的核心库
    compile('com.tencent.tinker:tinker-android-lib:1.7.7')
}
顺便加一下签名的配置:
android{
  //...
    signingConfigs {
        release {
            try {
                storeFile file("release.keystore")
                storePassword "testres"
                keyAlias "testres"
                keyPassword "testres"
            } catch (ex) {
                throw new InvalidUserDataException(ex.toString())
            }
        }
    }

    buildTypes {
        release {
            minifyEnabled true
            signingConfig signingConfigs.release
            proguardFiles getDefaultProguardFile('proguard-android.txt'), 'proguard-rules.pro'
        }
        debug {
            debuggable true
            minifyEnabled true
            signingConfig signingConfigs.release
            proguardFiles getDefaultProguardFile('proguard-android.txt'), 'proguard-rules.pro'
        }
    }
}
文末会有demo的下载地址,可以直接参考build.gradle文件,不用担心这些签名文件去哪找。
API引入
API主要就是初始化和loadPacth。
正常情况下,我们会考虑在Application的onCreate中去初始化,不过tinker推荐下面的写法:
@DefaultLifeCycle(application = ".SimpleTinkerInApplication",
        flags = ShareConstants.TINKER_ENABLE_ALL,
        loadVerifyFlag = false)
public class SimpleTinkerInApplicationLike extends ApplicationLike {
    public SimpleTinkerInApplicationLike(Application application, int tinkerFlags, boolean tinkerLoadVerifyFlag, long applicationStartElapsedTime, long applicationStartMillisTime, Intent tinkerResultIntent) {
        super(application, tinkerFlags, tinkerLoadVerifyFlag, applicationStartElapsedTime, applicationStartMillisTime, tinkerResultIntent);
    }

    @Override
    public void onBaseContextAttached(Context base) {
        super.onBaseContextAttached(base);
    }

    @Override
    public void onCreate() {
        super.onCreate();
        TinkerInstaller.install(this);
    }
}
ApplicationLike通过名字你可能会猜,并非是Application的子类,而是一个类似Application的类。
tinker建议编写一个ApplicationLike的子类,你可以当成Application去使用,注意顶部的注解:@DefaultLifeCycle,其application属性,会在编译期生成一个SimpleTinkerInApplication类。
所以,虽然我们这么写了,但是实际上Application会在编译期生成,所以AndroidManifest.xml中是这样的:
 <application
        android:name=".SimpleTinkerInApplication"
        .../>
编写如果报红,可以build下。
这样其实也能猜出来,这个注解背后有个Annotation Processor在做处理,如果你没了解过,可以看下:
通过该文会对一个编译时注解的运行流程和基本API有一定的掌握,文中也会对tinker该部分的源码做解析。
上述,就完成了tinker的初始化,那么调用loadPatch的时机,我们直接在Activity中添加一个Button设置:
public class MainActivity extends AppCompatActivity {

    @Override
    protected void onCreate(Bundle savedInstanceState) {
        super.onCreate(savedInstanceState);
        setContentView(R.layout.activity_main);
    }


    public void loadPatch(View view) {
        TinkerInstaller.onReceiveUpgradePatch(getApplicationContext(),
                Environment.getExternalStorageDirectory().getAbsolutePath() + "/patch_signed.apk");
    }
}
我们会将patch文件直接push到sdcard根目录;
所以一定要注意:添加SDCard权限,如果你是6.x以上的系统,自己添加上授权代码,或者手动在设置页面打开SDCard读写权限。
<uses-permission android:name="android.permission.WRITE_EXTERNAL_STORAGE" />除以以外,有个特殊的地方就是tinker需要在AndroidManifest.xml中指定TINKER_ID。
<application>
  <meta-data
            android:name="TINKER_ID"
            android:value="tinker_id_6235657" />
    //...
</application>
到此API相关的就结束了,剩下的就是考虑patch如何生成。
patch生成
tinker提供了patch生成的工具,源码见:tinker-patch-cli,打成一个jar就可以使用,并且提供了命令行相关的参数以及文件。
命令行如下:
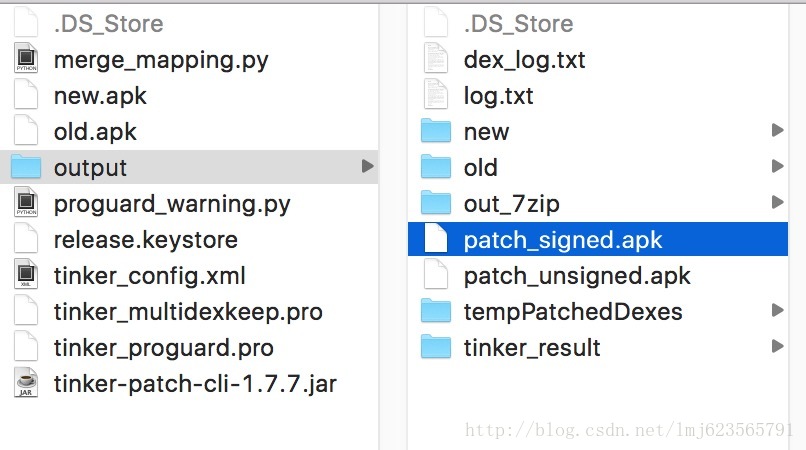
java -jar tinker-patch-cli-1.7.7.jar -old old.apk -new new.apk -config tinker_config.xml -out output需要注意的就是tinker_config.xml,里面包含tinker的配置,例如签名文件等。
这里我们直接使用tinker提供的签名文件,所以不需要做修改,不过里面有个Application的item修改为与本例一致:
<loader value="com.zhy.tinkersimplein.SimpleTinkerInApplication"/>大致的文件结构如下:

可以在tinker-patch-cli中提取,或者直接下载文末的例子。
上述介绍了patch生成的命令,最后需要注意的就是,在第一次打出apk的时候,保留下生成的mapping文件,在/build/outputs/mapping/release/mapping.txt。
可以copy到与proguard-rules.pro同目录,同时在第二次打修复包的时候,在proguard-rules.pro中添加上:
-applymapping mapping.txt保证后续的打包与线上包使用的是同一个mapping文件。
tinker本身的混淆相关配置,可以参考:
如果,你对该部分描述不了解,可以直接查看源码即可。
首先随便生成一个apk(API、混淆相关已经按照上述引入),安装到手机或者模拟器上。
然后,copy出mapping.txt文件,设置applymapping,修改代码,再次打包,生成new.apk。
两次的apk,可以通过命令行指令去生成patch文件。
如果你下载本例,命令需要在[该目录]下执行。
最终会在output文件夹中生成产物:
我们直接将patch_signed.apk push到sdcard,点击loadpatch,一定要观察命令行是否成功。
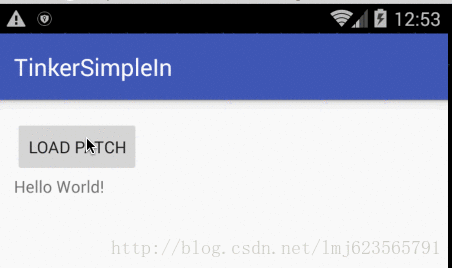
本例修改了title。
点击loadPatch,观察log,如果成功,应用默认为重启,然后再次启动即可达到修复效果。
到这里命令行的方式就介绍完了,和Andfix的接入的方式基本上是一样的。
值得注意的是:该例仅展示了基本的接入,对于tinker的各种配置信息,还是需要去读tinker的文档(如果你确定要使用)tinker-wiki。
(2)gradle接入
gradle接入的方式应该算是主流的方式,所以tinker也直接给出了例子,单独将该tinker-sample-android以project方式引入即可。
引入之后,可以查看其接入API的方式,以及相关配置。
在你每次build时,会在build/bakApk下生成本地打包的apk,R文件,以及mapping文件。
如果你需要生成patch文件,可以通过:
./gradlew tinkerPatchRelease // 或者 ./gradlew tinkerPatchDebug生成目录为:build/outputs/tinkerPatch

需要注意的是,需要在app/build.gradle中设置相比较的apk(即old.apk,本次为new.apk),
ext {
    tinkerEnabled = true
    //old apk file to build patch apk
    tinkerOldApkPath = "${bakPath}/old.apk"
    //proguard mapping file to build patch apk
    tinkerApplyMappingPath = "${bakPath}/old-mapping.txt"
}
提供的例子,基本上展示了tinker的自定义扩展的方式,具体还可以参考:
所以,如果你使用命令行方式接入,也不要忘了学习下其支持哪些扩展。
三、Application是如何编译时生成的
从注释和命名上看:
//可选,用于生成application类
provided('com.tencent.tinker:tinker-android-anno:1.7.7')
明显是该库,其结构如下:
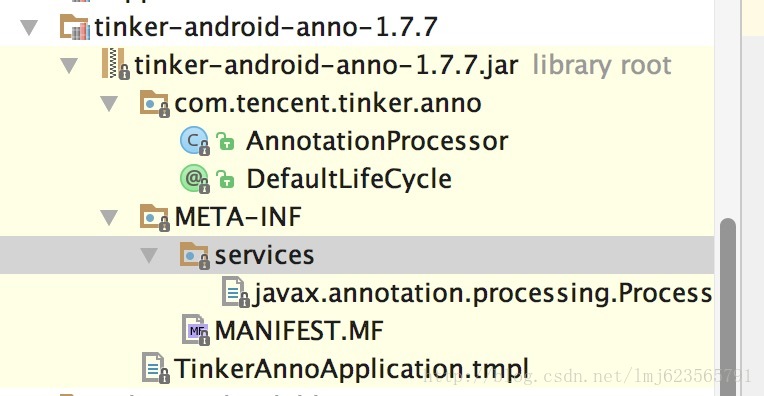
典型的编译时注解的项目,源码见tinker-android-anno。
入口为com.tencent.tinker.anno.AnnotationProcessor,可以在该services/javax.annotation.processing.Processor文件中找到处理类全路径。
再次建议,如果你不了解,简单阅读下Android 如何编写基于编译时注解的项目该文。
直接看AnnotationProcessor的process方法:
@Override
public boolean process(Set<? extends TypeElement> annotations, RoundEnvironment roundEnv) {
    processDefaultLifeCycle(roundEnv.getElementsAnnotatedWith(DefaultLifeCycle.class));
    return true;
}
直接调用了processDefaultLifeCycle:
private void processDefaultLifeCycle(Set<? extends Element> elements) {
        // 被注解DefaultLifeCycle标识的对象
        for (Element e : elements) {
          // 拿到DefaultLifeCycle注解对象
            DefaultLifeCycle ca = e.getAnnotation(DefaultLifeCycle.class);

            String lifeCycleClassName = ((TypeElement) e).getQualifiedName().toString();
            String lifeCyclePackageName = lifeCycleClassName.substring(0, lifeCycleClassName.lastIndexOf('.'));
            lifeCycleClassName = lifeCycleClassName.substring(lifeCycleClassName.lastIndexOf('.') + 1);

            String applicationClassName = ca.application();
            if (applicationClassName.startsWith(".")) {
                applicationClassName = lifeCyclePackageName + applicationClassName;
            }
            String applicationPackageName = applicationClassName.substring(0, applicationClassName.lastIndexOf('.'));
            applicationClassName = applicationClassName.substring(applicationClassName.lastIndexOf('.') + 1);

            String loaderClassName = ca.loaderClass();
            if (loaderClassName.startsWith(".")) {
                loaderClassName = lifeCyclePackageName + loaderClassName;
            }

             // /TinkerAnnoApplication.tmpl
            final InputStream is = AnnotationProcessor.class.getResourceAsStream(APPLICATION_TEMPLATE_PATH);
            final Scanner scanner = new Scanner(is);
            final String template = scanner.useDelimiter("\\A").next();
            final String fileContent = template
                .replaceAll("%PACKAGE%", applicationPackageName)
                .replaceAll("%APPLICATION%", applicationClassName)
                .replaceAll("%APPLICATION_LIFE_CYCLE%", lifeCyclePackageName + "." + lifeCycleClassName)
                .replaceAll("%TINKER_FLAGS%", "" + ca.flags())
                .replaceAll("%TINKER_LOADER_CLASS%", "" + loaderClassName)
                .replaceAll("%TINKER_LOAD_VERIFY_FLAG%", "" + ca.loadVerifyFlag());
                JavaFileObject fileObject = processingEnv.getFiler().createSourceFile(applicationPackageName + "." + applicationClassName);
                processingEnv.getMessager().printMessage(Diagnostic.Kind.NOTE, "Creating " + fileObject.toUri());
          Writer writer = fileObject.openWriter();
            PrintWriter pw = new PrintWriter(writer);
            pw.print(fileContent);
            pw.flush();
            writer.close();

        }
    }
代码比较简单,可以分三部分理解:
- 步骤1:首先找到被DefaultLifeCycle标识的Element(为类对象TypeElement),得到该对象的包名,类名等信息,然后通过该对象,拿到
@DefaultLifeCycle对象,获取该注解中声明属性的值。 - 步骤2:读取一个模板文件,读取为字符串,将各个占位符通过步骤1中的值替代。
- 步骤3:通过JavaFileObject将替换完成的字符串写文件,其实就是本例中的Application对象。
我们看一眼模板文件:
package %PACKAGE%;

import com.tencent.tinker.loader.app.TinkerApplication;

/**
 *
 * Generated application for tinker life cycle
 *
 */
public class %APPLICATION% extends TinkerApplication {

    public %APPLICATION%() {
        super(%TINKER_FLAGS%, "%APPLICATION_LIFE_CYCLE%", "%TINKER_LOADER_CLASS%", %TINKER_LOAD_VERIFY_FLAG%);
    }

}对应我们的SimpleTinkerInApplicationLike,
@DefaultLifeCycle(application = ".SimpleTinkerInApplication",
        flags = ShareConstants.TINKER_ENABLE_ALL,
        loadVerifyFlag = false)
public class SimpleTinkerInApplicationLike extends ApplicationLike {}
主要就几个占位符:
- 包名,如果application属性值以点开始,则同包;否则则截取
- 类名,application属性值中的类名
- %TINKER_FLAGS%对应flags
- %APPLICATION_LIFE_CYCLE%,编写的ApplicationLike的全路径
- “%TINKER_LOADER_CLASS%”,这个值我们没有设置,实际上对应
@DefaultLifeCycle的loaderClass属性,默认值为com.tencent.tinker.loader.TinkerLoader - %TINKER_LOAD_VERIFY_FLAG%对应loadVerifyFlag
于是最终生成的代码为:
/**
 *
 * Generated application for tinker life cycle
 *
 */
public class SimpleTinkerInApplication extends TinkerApplication {

    public SimpleTinkerInApplication() {
        super(7, "com.zhy.tinkersimplein.SimpleTinkerInApplicationLike", "com.tencent.tinker.loader.TinkerLoader", false);
    }

}
tinker这么做的目的,文档上是这么说的:
为了减少错误的出现,推荐使用Annotation生成Application类。
这样大致了解了Application是如何生成的。
接下来我们大致看一下tinker的原理。
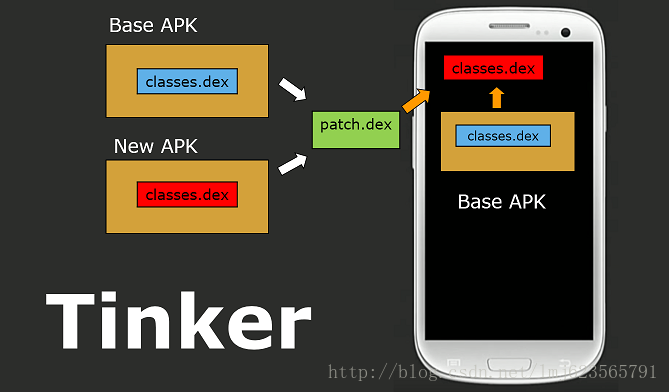
tinker贴了一张大致的原理图。
可以看出:
tinker将old.apk和new.apk做了diff,拿到patch.dex,然后将patch.dex与本机中apk的classes.dex做了合并,生成新的classes.dex,运行时通过反射将合并后的dex文件放置在加载的dexElements数组的前面。
运行时替代的原理,其实和Qzone的方案差不多,都是去反射修改dexElements。
两者的差异是:Qzone是直接将patch.dex插到数组的前面;而tinker是将patch.dex与app中的classes.dex合并后的全量dex插在数组的前面。
tinker这么做的目的还是因为Qzone方案中提到的CLASS_ISPREVERIFIED的解决方案存在问题;而tinker相当于换个思路解决了该问题。
接下来我们就从代码中去验证该原理。
本片文章源码分析的两条线:
- 应用启动时,从默认目录加载合并后的classes.dex
- patch下发后,合成classes.dex至目标目录
五、源码分析
(1)加载patch
加载的代码实际上在生成的Application中调用的,其父类为TinkerApplication,在其attachBaseContext中辗转会调用到loadTinker()方法,在该方法内部,反射调用了TinkerLoader的tryLoad方法。
@Override
public Intent tryLoad(TinkerApplication app, int tinkerFlag, boolean tinkerLoadVerifyFlag) {
    Intent resultIntent = new Intent();

    long begin = SystemClock.elapsedRealtime();
    tryLoadPatchFilesInternal(app, tinkerFlag, tinkerLoadVerifyFlag, resultIntent);
    long cost = SystemClock.elapsedRealtime() - begin;
    ShareIntentUtil.setIntentPatchCostTime(resultIntent, cost);
    return resultIntent;
}tryLoadPatchFilesInternal中会调用到loadTinkerJars方法:
private void tryLoadPatchFilesInternal(TinkerApplication app, int tinkerFlag, boolean tinkerLoadVerifyFlag, Intent resultIntent) {
    // 省略大量安全性校验代码

    if (isEnabledForDex) {
        //tinker/patch.info/patch-641e634c/dex
        boolean dexCheck = TinkerDexLoader.checkComplete(patchVersionDirectory, securityCheck, resultIntent);
        if (!dexCheck) {
            //file not found, do not load patch
            Log.w(TAG, "tryLoadPatchFiles:dex check fail");
            return;
        }
    }

    //now we can load patch jar
    if (isEnabledForDex) {
        boolean loadTinkerJars = TinkerDexLoader.loadTinkerJars(app, tinkerLoadVerifyFlag, patchVersionDirectory, resultIntent, isSystemOTA);
        if (!loadTinkerJars) {
            Log.w(TAG, "tryLoadPatchFiles:onPatchLoadDexesFail");
            return;
        }
    }
}
TinkerDexLoader.checkComplete主要是用于检查下发的meta文件中记录的dex信息(meta文件,可以查看生成patch的产物,在assets/dex-meta.txt),检查meta文件中记录的dex文件信息对应的dex文件是否存在,并把值存在TinkerDexLoader的静态变量dexList中。
TinkerDexLoader.loadTinkerJars传入四个参数,分别为application,tinkerLoadVerifyFlag(注解上声明的值,传入为false),patchVersionDirectory当前version的patch文件夹,intent,当前patch是否仅适用于art。
@TargetApi(Build.VERSION_CODES.ICE_CREAM_SANDWICH)
public static boolean loadTinkerJars(Application application, boolean tinkerLoadVerifyFlag,
    String directory, Intent intentResult, boolean isSystemOTA) {
        PathClassLoader classLoader = (PathClassLoader) TinkerDexLoader.class.getClassLoader();

        String dexPath = directory + "/" + DEX_PATH + "/";
        File optimizeDir = new File(directory + "/" + DEX_OPTIMIZE_PATH);

        ArrayList<File> legalFiles = new ArrayList<>();

        final boolean isArtPlatForm = ShareTinkerInternals.isVmArt();
        for (ShareDexDiffPatchInfo info : dexList) {
            //for dalvik, ignore art support dex
            if (isJustArtSupportDex(info)) {
                continue;
            }
            String path = dexPath + info.realName;
            File file = new File(path);

            legalFiles.add(file);
        }
        // just for art
        if (isSystemOTA) {
            parallelOTAResult = true;
            parallelOTAThrowable = null;
            Log.w(TAG, "systemOTA, try parallel oat dexes!!!!!");

            TinkerParallelDexOptimizer.optimizeAll(
                legalFiles, optimizeDir,
                new TinkerParallelDexOptimizer.ResultCallback() {
                }
            );

        SystemClassLoaderAdder.installDexes(application, classLoader, optimizeDir, legalFiles);
        return true;
    }
找出仅支持art的dex,且当前patch是否仅适用于art时,并行去loadDex。
关键是最后的installDexes:
@SuppressLint("NewApi")
public static void installDexes(Application application, PathClassLoader loader, File dexOptDir, List<File> files)
    throws Throwable {

    if (!files.isEmpty()) {
        ClassLoader classLoader = loader;
        if (Build.VERSION.SDK_INT >= 24) {
            classLoader = AndroidNClassLoader.inject(loader, application);
        }
        //because in dalvik, if inner class is not the same classloader with it wrapper class.
        //it won't fail at dex2opt
        if (Build.VERSION.SDK_INT >= 23) {
            V23.install(classLoader, files, dexOptDir);
        } else if (Build.VERSION.SDK_INT >= 19) {
            V19.install(classLoader, files, dexOptDir);
        } else if (Build.VERSION.SDK_INT >= 14) {
            V14.install(classLoader, files, dexOptDir);
        } else {
            V4.install(classLoader, files, dexOptDir);
        }
        //install done
        sPatchDexCount = files.size();
        Log.i(TAG, "after loaded classloader: " + classLoader + ", dex size:" + sPatchDexCount);

        if (!checkDexInstall(classLoader)) {
            //reset patch dex
            SystemClassLoaderAdder.uninstallPatchDex(classLoader);
            throw new TinkerRuntimeException(ShareConstants.CHECK_DEX_INSTALL_FAIL);
        }
    }
}
这里实际上就是根据不同的系统版本,去反射处理dexElements。
我们看一下V19的实现(主要我看了下本机只有个22的源码~):
private static final class V19 {

    private static void install(ClassLoader loader, List<File> additionalClassPathEntries,
                                File optimizedDirectory)
        throws IllegalArgumentException, IllegalAccessException,
        NoSuchFieldException, InvocationTargetException, NoSuchMethodException, IOException {

        Field pathListField = ShareReflectUtil.findField(loader, "pathList");
        Object dexPathList = pathListField.get(loader);
        ArrayList<IOException> suppressedExceptions = new ArrayList<IOException>();
        ShareReflectUtil.expandFieldArray(dexPathList, "dexElements", makeDexElements(dexPathList,
            new ArrayList<File>(additionalClassPathEntries), optimizedDirectory,
            suppressedExceptions));
        if (suppressedExceptions.size() > 0) {
            for (IOException e : suppressedExceptions) {
                Log.w(TAG, "Exception in makeDexElement", e);
                throw e;
            }
        }
    }
} - 找到PathClassLoader(BaseDexClassLoader)对象中的pathList对象
- 根据pathList对象找到其中的makeDexElements方法,传入patch相关的对应的实参,返回Element[]对象
- 拿到pathList对象中原本的dexElements方法
- 步骤2与步骤3中的Element[]数组进行合并,将patch相关的dex放在数组的前面
- 最后将合并后的数组,设置给pathList
这里其实和Qzone的提出的方案基本是一致的。如果你以前未了解过Qzone的方案,可以参考此文:
(2)合成patch
这里的入口为:
 TinkerInstaller.onReceiveUpgradePatch(getApplicationContext(),
                Environment.getExternalStorageDirectory().getAbsolutePath() + "/patch_signed.apk");
上述代码会调用DefaultPatchListener中的onPatchReceived方法:
# DefaultPatchListener
@Override
public int onPatchReceived(String path) {

    int returnCode = patchCheck(path);

    if (returnCode == ShareConstants.ERROR_PATCH_OK) {
        TinkerPatchService.runPatchService(context, path);
    } else {
        Tinker.with(context).getLoadReporter().onLoadPatchListenerReceiveFail(new File(path), returnCode);
    }
    return returnCode;

}首先对tinker的相关配置(isEnable)以及patch的合法性进行检测,如果合法,则调用TinkerPatchService.runPatchService(context, path);。
public static void runPatchService(Context context, String path) {
    try {
        Intent intent = new Intent(context, TinkerPatchService.class);
        intent.putExtra(PATCH_PATH_EXTRA, path);
        intent.putExtra(RESULT_CLASS_EXTRA, resultServiceClass.getName());
        context.startService(intent);
    } catch (Throwable throwable) {
        TinkerLog.e(TAG, "start patch service fail, exception:" + throwable);
    }
}TinkerPatchService是IntentService的子类,这里通过intent设置了两个参数,一个是patch的路径,一个是resultServiceClass,该值是调用Tinker.install的时候设置的,默认为DefaultTinkerResultService.class。由于是IntentService,直接看onHandleIntent即可,如果你对IntentService陌生,可以查看此文:Android IntentService完全解析 当Service遇到Handler
。
@Override
protected void onHandleIntent(Intent intent) {
    final Context context = getApplicationContext();
    Tinker tinker = Tinker.with(context);


    String path = getPatchPathExtra(intent);

    File patchFile = new File(path);

    boolean result;

    increasingPriority();
    PatchResult patchResult = new PatchResult();

    result = upgradePatchProcessor.tryPatch(context, path, patchResult);

    patchResult.isSuccess = result;
    patchResult.rawPatchFilePath = path;
    patchResult.costTime = cost;
    patchResult.e = e;

    AbstractResultService.runResultService(context, patchResult, getPatchResultExtra(intent));

}
比较清晰,主要关注upgradePatchProcessor.tryPatch方法,调用的是UpgradePatch.tryPatch。ps:这里有个有意思的地方increasingPriority(),其内部实现为:
private void increasingPriority() {
    TinkerLog.i(TAG, "try to increase patch process priority");
    try {
        Notification notification = new Notification();
        if (Build.VERSION.SDK_INT < 18) {
            startForeground(notificationId, notification);
        } else {
            startForeground(notificationId, notification);
            // start InnerService
            startService(new Intent(this, InnerService.class));
        }
    } catch (Throwable e) {
        TinkerLog.i(TAG, "try to increase patch process priority error:" + e);
    }
}如果你对“保活”这个话题比较关注,那么对这段代码一定不陌生,主要是利用系统的一个漏洞来启动一个前台Service。如果有兴趣,可以参考此文:关于 Android 进程保活,你所需要知道的一切。
下面继续回到tryPatch方法:
# UpgradePatch
@Override
public boolean tryPatch(Context context, String tempPatchPath, PatchResult patchResult) {
    Tinker manager = Tinker.with(context);

    final File patchFile = new File(tempPatchPath);

    //it is a new patch, so we should not find a exist
    SharePatchInfo oldInfo = manager.getTinkerLoadResultIfPresent().patchInfo;
    String patchMd5 = SharePatchFileUtil.getMD5(patchFile);

    //use md5 as version
    patchResult.patchVersion = patchMd5;
    SharePatchInfo newInfo;

    //already have patch
    if (oldInfo != null) {
        newInfo = new SharePatchInfo(oldInfo.oldVersion, patchMd5, Build.FINGERPRINT);
    } else {
        newInfo = new SharePatchInfo("", patchMd5, Build.FINGERPRINT);
    }

    //check ok, we can real recover a new patch
    final String patchDirectory = manager.getPatchDirectory().getAbsolutePath();
    final String patchName = SharePatchFileUtil.getPatchVersionDirectory(patchMd5);
    final String patchVersionDirectory = patchDirectory + "/" + patchName;

    //copy file
    File destPatchFile = new File(patchVersionDirectory + "/" + SharePatchFileUtil.getPatchVersionFile(patchMd5));
    // check md5 first
    if (!patchMd5.equals(SharePatchFileUtil.getMD5(destPatchFile))) {
        SharePatchFileUtil.copyFileUsingStream(patchFile, destPatchFile);
    }

    //we use destPatchFile instead of patchFile, because patchFile may be deleted during the patch process
    if (!DexDiffPatchInternal.tryRecoverDexFiles(manager, signatureCheck, context, patchVersionDirectory,
                destPatchFile)) {
        TinkerLog.e(TAG, "UpgradePatch tryPatch:new patch recover, try patch dex failed");
        return false;
    }

    return true;
}拷贝patch文件拷贝至私有目录,然后调用DexDiffPatchInternal.tryRecoverDexFiles:
protected static boolean tryRecoverDexFiles(Tinker manager, ShareSecurityCheck checker, Context context,
                                                String patchVersionDirectory, File patchFile) {
    String dexMeta = checker.getMetaContentMap().get(DEX_META_FILE);
    boolean result = patchDexExtractViaDexDiff(context, patchVersionDirectory, dexMeta, patchFile);
    return result;
}
直接看patchDexExtractViaDexDiff
private static boolean patchDexExtractViaDexDiff(Context context, String patchVersionDirectory, String meta, final File patchFile) {
    String dir = patchVersionDirectory + "/" + DEX_PATH + "/";

    if (!extractDexDiffInternals(context, dir, meta, patchFile, TYPE_DEX)) {
        TinkerLog.w(TAG, "patch recover, extractDiffInternals fail");
        return false;
    }

    final Tinker manager = Tinker.with(context);

    File dexFiles = new File(dir);
    File[] files = dexFiles.listFiles();

    ...files遍历执行:DexFile.loadDex
     return true;
}
核心代码主要在extractDexDiffInternals中:
private static boolean extractDexDiffInternals(Context context, String dir, String meta, File patchFile, int type) {
    //parse meta
    ArrayList<ShareDexDiffPatchInfo> patchList = new ArrayList<>();
    ShareDexDiffPatchInfo.parseDexDiffPatchInfo(meta, patchList);

    File directory = new File(dir);
    //I think it is better to extract the raw files from apk
    Tinker manager = Tinker.with(context);
    ZipFile apk = null;
    ZipFile patch = null;

    ApplicationInfo applicationInfo = context.getApplicationInfo();

    String apkPath = applicationInfo.sourceDir; //base.apk
    apk = new ZipFile(apkPath);
    patch = new ZipFile(patchFile);

    for (ShareDexDiffPatchInfo info : patchList) {

        final String infoPath = info.path;
        String patchRealPath;
        if (infoPath.equals("")) {
            patchRealPath = info.rawName;
        } else {
            patchRealPath = info.path + "/" + info.rawName;
        }

        File extractedFile = new File(dir + info.realName);

        ZipEntry patchFileEntry = patch.getEntry(patchRealPath);
        ZipEntry rawApkFileEntry = apk.getEntry(patchRealPath);

        patchDexFile(apk, patch, rawApkFileEntry, patchFileEntry, info, extractedFile);
    }

    return true;
}
这里的代码比较关键了,可以看出首先解析了meta里面的信息,meta中包含了patch中每个dex的相关数据。然后通过Application拿到sourceDir,其实就是本机apk的路径以及patch文件;根据mate中的信息开始遍历,其实就是取出对应的dex文件,最后通过patchDexFile对两个dex文件做合并。
private static void patchDexFile(
            ZipFile baseApk, ZipFile patchPkg, ZipEntry oldDexEntry, ZipEntry patchFileEntry,
            ShareDexDiffPatchInfo patchInfo,  File patchedDexFile) throws IOException {
    InputStream oldDexStream = null;
    InputStream patchFileStream = null;

    oldDexStream = new BufferedInputStream(baseApk.getInputStream(oldDexEntry));
    patchFileStream = (patchFileEntry != null ? new BufferedInputStream(patchPkg.getInputStream(patchFileEntry)) : null);

    new DexPatchApplier(oldDexStream, patchFileStream).executeAndSaveTo(patchedDexFile);

}
通过ZipFile拿到其内部文件的InputStream,其实就是读取本地apk对应的dex文件,以及patch中对应dex文件,对二者的通过executeAndSaveTo方法进行合并至patchedDexFile,即patch的目标私有目录。
至于合并算法,这里其实才是tinker比较核心的地方,这个算法跟dex文件格式紧密关联,如果有机会,然后我又能看懂的话,后面会单独写篇博客介绍。此外dodola已经有篇博客进行了介绍:
感兴趣的可以阅读下。
好了,到此我们就大致了解了tinker热修复的原理~~
测试demo地址:
当然这里只分析了代码了热修复,后续考虑分析资源以及So的热修、核心的diff算法、以及gradle插件等相关知识~
最后欢迎关注我的公众号~
我的微信公众号:hongyangAndroid
(可以给我留言你想学习的文章,支持投稿)

Recommend
About Joyk
Aggregate valuable and interesting links.
Joyk means Joy of geeK