

Moya Tutorial for iOS: Getting Started
source link: https://www.tuicool.com/articles/hit/RbymQvN
Go to the source link to view the article. You can view the picture content, updated content and better typesetting reading experience. If the link is broken, please click the button below to view the snapshot at that time.
Note : This tutorial uses Xcode 10 and Swift 4.2. The libraries it depends upon are not yet updated for Swift 4.2 but can be used without issue. You’ll need to ignore the single warning telling you that Swift 4.2 conversion is available.

Become a networking super hero with Moya!
There are many moving pieces involved in crafting a beautiful and performant iOS app. One of the most important pieces, if not the most important for a modern app, is networking . As an iOS developer, you may structure your networking layer in many different ways — be it using URLSession or some third-party library.
In this tutorial, you’ll learn about a third-party networking library named Moya , which aims to create a type-safe structure to your network services and requests.
You might ask yourself, “What is this Moya? I already know and love Alamofire!” And if you don’t know and love it, now would be a great time to check out ourawesome tutorial on this subject.
Well, this is the great part: Moya actually uses Alamofire while providing a different approach to structuring your network layer. You’ll learn much more about the relation between Moya and Alamofire later in this tutorial.
In this tutorial, you’ll build a neat little app called ComicCards in which you’ll use the Marvel API to show the user a list of comics released in a given week, along with their cover images and other interesting information. When a user selects a comic, your app will generate an image of a shareable card with the comic’s information and image, letting the user upload it to the Imgur service and share it:

The finished ComicCards app!
Woah — two different API services in one app? Don’t worry! It isn’t as hard as it sounds. Let’s get started!
Note : This tutorial assumes basic knowledge of how HTTP APIs work, though you should be able to easily follow this tutorial even with minimal knowledge. But if you want to know more about HTTP APIs, either refer to the previously mentionedAlamofire tutorial, or refer to this interesting site for more information on REST API basics .
Getting Started
Use the Download Materials button at the top or bottom of this tutorial to download the ComicCards starter project, which already has Moya bundled. Open ComicCards.xcworkspace and not the project file — this is important.
With the project open, check out Main.storyboard to get a general sense of the app structure:

The ComicCards app consists of two different screens:
ComicsViewController
CardViewController
Build and run the project. You should see the following screen:

Unsurprisingly, you’re presented with an error screen since you haven’t yet implemented the logic related to fetching the comics from the server and displaying them in your app. You’ll get to adding all of the required code very soon, but first you need to learn a bit about Moya.
Moya: What Is It?
What Is Moya?

Moya is a networking library focused on encapsulating network requests in a type-safe way, typically by using enumerations (e.g., enum ) to provide compile-time guarantees and confidence when working with your network layer, along with added discoverability.
It was built by Ash Furrow and Orta Therox for Artsy’s Eidolon app and quickly gained popularity. Today, it’s entirely maintained by a passionate community of open-source contributors .
How Is Moya Related to Alamofire?
As mentioned in the introduction to this tutorial, Moya and Alamofire are tightly related simply by the fact that Moya doesn’t really do any networking by itself. It uses Alamofire’s battle-tested networking capabilities and simply provides additional abilities, types and concepts to further abstract Alamofire.
Practically speaking, you are using Alamofire! Instead of using it directly, you use Moya, which uses Alamofire under the hood.
Looking at the starter project’s Podfile.lock reveals just that — Alamofire is a dependency of Moya:

Moya’s Building Blocks
Moya introduces a few unique concepts and building blocks that you should be aware of before starting to write your code. It uses the following building blocks to let you describe your entire networking chain:

Moya’s Building Blocks
- Provider : Moya’s
MoyaProviderwill be the main object that you’ll create and use when interacting with any network service. It’s a generic object that takes a Moya Target upon initialization. - Target : A Moya target usually describes an entire API service; in this case, a Marvel target and an Imgur target. Each of these targets describe the service, its possible endpoints, and the information required by each endpoint to perform a request. You define a target by conforming to the
TargetTypeprotocol. - Endpoint : Moya uses the semi-internal
Endpointobject to describe the basic pieces of information required to perform a network request, e.g., HTTP method, request body, headers and more. Moya’sMoyaProvidertransforms every target to anEndpoint, which is eventually transformed into a rawURLRequest. Endpoints are highly customizable but are out of scope for this tutorial as you won’t need any custom mappings.
Now that you have all of the basic theory out of the way, it’s time for you to write some code!
Marvel API – The API of Heroes
The Marvel API is the world’s largest comic API, created and maintained by Marvel itself.
Start by creating a free account . Once you’re all set, go back to to the My Developer Account page where you’ll find your new public and private keys:

Keep both keys handy; you’ll need them in a few minutes.
Creating Your First Moya Target
Go back to the ComicCards Xcode project. In your project navigator, right-click the ComicCards/Network folder and select New File… Create a new Swift file and name it Marvel.swift :

After import Foundation , add the following code:
import Moya

public enum Marvel {
  // 1
  static private let publicKey = "YOUR PUBLIC KEY"
  static private let privateKey = "YOUR PRIVATE KEY"

  // 2
  case comics
}
You just created a very simple enumeration describing the API service that you’re going to use:
- These are your Marvel public and private keys. You store them alongside the definition of your service to make sure the keys are easily accessible as part of your service configuration. Make sure to replace the placeholders with the actual keys generated in the previous step.
- A single enumeration case named
comics, which represents the only endpoint you’re going to hit in Marvel’s API — GET /v1/public/comics .
Now that you have your basic enumeration configured, it’s time to actually make it a target by conforming to TargetType .
Add the following code to the end of the file (after the closing curly bracket):
extension Marvel: TargetType {
  // 1
  public var baseURL: URL {
    return URL(string: "https://gateway.marvel.com/v1/public")!
  }

  // 2
  public var path: String {
    switch self {
    case .comics: return "/comics"
    }
  }

  // 3
  public var method: Moya.Method {
    switch self {
    case .comics: return .get
    }
  }

  // 4
  public var sampleData: Data {
    return Data()
  }

  // 5
  public var task: Task {
    return .requestPlain // TODO
  }

  // 6
  public var headers: [String: String]? {
    return ["Content-Type": "application/json"]
  }

  // 7
  public var validationType: ValidationType {
    return .successCodes
  }
}
This might seem like a ton of code, but it’s all simply to conform to TargetType . Let’s break this down:
- Every target (e.g., a service) requires a base URL. Moya will use this to eventually build the correct
Endpointobject. - For every case of your target, you need to define the exact
pathyou’ll want to hit, relative to the base URL. Since the comic’s API is at https://gateway.marvel.com/v1/public/comics , the value here is simply/comics. - You need to provide the correct HTTP method for every case of your target. Here,
.getis what you want. -
sampleDatais used to provide a mocked/stubbed version of your API for testing. In your case, you might want to return a fake response with just one or two comics. When creating unit tests, Moya can return this “fake” response to you instead of reaching out to the network. As you won’t be doing unit tests for this tutorial, you return an emptyDataobject. -
taskis probably the most important property of the bunch. You’re expected to return aTaskenumeration case for every endpoint you want to use. There are many options for tasks you could use, e.g., plain request, data request, parameters request, upload request and many more. This is currently marked as “to do” since you’ll deal with this in the next section. -
headersis where you return the appropriate HTTP headers for every endpoint of your target. Since all the Marvel API endpoints return a JSON response, you can safely use aContent-Type: application/jsonheader for all endpoints. -
validationTypeis used to provide your definition of a successful API request. There are many options available and, in your case, you’ll simply use.successCodeswhich means a request will be deemed successful if its HTTP code is between 200 and 299.
Note : Notice that you’re using a switch statement in all of your properties even though you only have a single case ( .comics ). This is a general best practice, since your target might easily evolve and add more endpoints. Any new endpoint will require its own values for the different target properties.
Wow, that was a lot of knowledge to take in! You should feel very proud given the fact that this is most of what you need to know to work with Moya in its most basic form!
There’s only one thing missing in your new Marvel target — the “to do” left in the code, meaning the returned Task .
Authorizing Requests in Marvel’s API
The Marvel API uses a custom authorization scheme where you create a “hash” from a unique identifier (such as a timestamp), the private key and the public key, all concatenated together and hashed using MD5 . You can read the full specification in the API reference under Authentication for Server-Side Applications .
In Marvel.swift , replace task with the following:
public var task: Task {
  let ts = "\(Date().timeIntervalSince1970)"
  // 1
  let hash = (ts + Marvel.privateKey + Marvel.publicKey).md5

  // 2
  let authParams = ["apikey": Marvel.publicKey, "ts": ts, "hash": hash]

  switch self {
  case .comics:
    // 3
    return .requestParameters(
      parameters: [
        "format": "comic",
        "formatType": "comic",
        "orderBy": "-onsaleDate",
        "dateDescriptor": "lastWeek",
        "limit": 50] + authParams,
      encoding: URLEncoding.default)
  }
}
Your task is ready! Here’s what that does:
- You create the required hash, as mentioned earlier, by concatenating your random timestamp, the private key and the public key, then hashing the entire string as MD5. You’re using an
md5helper property found in Helpers/String+MD5.swift . - The
authParamsdictionary contains the required authorization parameters:apikey,tsandhash, which contain the public key, timestamp and hash, respectively. - Instead of the
.requestPlaintask you had earlier, you switch to using a.requestParameterstask type, which handles HTTP requests with parameters. You provide the task with several parameters indicating that you want up to 50 comics from a given week sorted by latestonsaleDate. You add theauthParamsyou created earlier to the parameters dictionary so that they’re sent along with the rest of the request parameters.
At this point, your new Marvel target is ready to go! Next, you’re going to update ComicsViewController to use it.
Using Your Target
Go to ComicsViewController.swift and add the following at the beginning of your view controller class:
let provider = MoyaProvider<Marvel>()
As mentioned earlier, the main class you’ll use to interact with your Moya targets is MoyaProvider , so you start by creating an instance of MoyaProvider that uses your new Marvel target.
Next, inside your viewDidLoad() , replace:
state = .error
With:
// 1
state = .loading

// 2
provider.request(.comics) { [weak self] result in
  guard let self = self else { return }

  // 3
  switch result {
  case .success(let response):
    do {
      // 4
      print(try response.mapJSON())
    } catch {
      self.state = .error
    }
  case .failure:
    // 5
    self.state = .error
  }
}
The new code does the following:
- First, you set the view’s state to
.loading. - Use the provider to perform a request on the
.comicsendpoint. Notice that this is entirely type-safe, since.comicsis anenumcase. So, there’s no worry of mis-typing the wrong option; along with the added value of getting auto-completed cases for every endpoint of your target. - The closure provides a
resultwhich can be either.success(Moya.Response)or.failure(Error). - If the request succeeds, you use Moya’s
mapJSONmethod to map the successful response to a JSON object and then print it to the console. If the conversion throws an exception, you change the view’s state to.error. - If the returned
resultis a.failure, you set the view’s state to.erroras well.
Build and run the app. The Xcode debug console should show something similar to the following:
{
    attributionHTML = "<a href=\"http://marvel.com\">Data provided by Marvel. \U00a9 2018 MARVEL</a>";
    attributionText = "Data provided by Marvel. \U00a9 2018 MARVEL";
    code = 200;
    copyright = "\U00a9 2018 MARVEL";
    data =     {
        count = 19;
        limit = 50;
        offset = 0;
        results =         (
            {comic object},
            {comic object},
            {comic object},
            ...
        )
}
Awesome work, you’ve got a valid JSON response from the backend using Moya and your new Marvel target!
Note : It may take several seconds for result to appear in the debug console.

The last step to complete this view controller is actually mapping the JSON response into proper Data Models — in your case, a pre-configured Comic struct.
This is the perfect time to use a different Moya response mapper that maps a response on to a Decodable instead of raw JSON.
You might’ve noticed the JSON response’s structure looks something like:
data ->
  results ->
      [ Array of Comics ]
Meaning two levels of nesting ( data , results ) before getting to the objects themselves. The starter project already includes the proper Decodable object that takes care of decoding this.
Replace the following:
print(try response.mapJSON())
With:
self.state = .ready(try response.map(MarvelResponse<Comic>.self).data.results)
Instead of mapping the object to a raw JSON response, you use a mapper that takes the MarvelResponse generic Decodable with a Comic struct. This will take care of parsing the two levels of nesting as well, which lets you access the array of comics by accessing data.results .
You set the view’s state to .ready with its associated value being the array of Comic objects returned from the Decodable mapping.
Build and run the project. You should see your first screen fully functional!

On to the detail view then!
When you tap on a comic, the starter project already has the code for showing a CardViewController and passing it the selected Comic to it. But, you might notice that tapping a comics only shows an empty card without any comic details. Let’s take care of that!
Switch to CardViewController.swift and find the layoutCard(comic:) method. Inside the method, add:
// 1
lblTitle.text = comic.title
lblDesc.text = comic.description ?? "Not available"

// 2
if comic.characters.items.isEmpty {
  lblChars.text = "No characters"
} else {
  lblChars.text = comic.characters.items
                       .map { $0.name }
                       .joined(separator: ", ")
}

// 3
lblDate.text = dateFormatter.string(from: comic.onsaleDate)

// 4
image.kf.setImage(with: comic.thumbnail.url)
This code updates the screen with information from the provided Comic struct by:
- Setting the comic’s title and the comic’s description.
- Setting the list of characters for the comic, or, “No characters” if there are no characters.
- Setting the “on sale” date of the comic, using a pre-configured
DateFormatter. - Loading the comic’s image using Kingfisher — a great third-party library for loading web images.
Build and run your app, and tap one of the comics in the list — you should see a beautiful information card:

You have two more features to add: uploading your card to Imgur and letting the user delete the card.
Imgur – Sharing With Friends!
For this, you’ll create another Moya target named Imgur that will let you interact with two different endpoints for image handling: one for uploading and one for deleting.
Similar to the Marvel API, you’ll need to sign up for a free account with Imgur.
After that, you’ll need to create an Imgur Application . You may use any fake URL for the callback, as you won’t be using OAuth here. You can also simply choose **OAuth 2 authorization without a callback URL**.
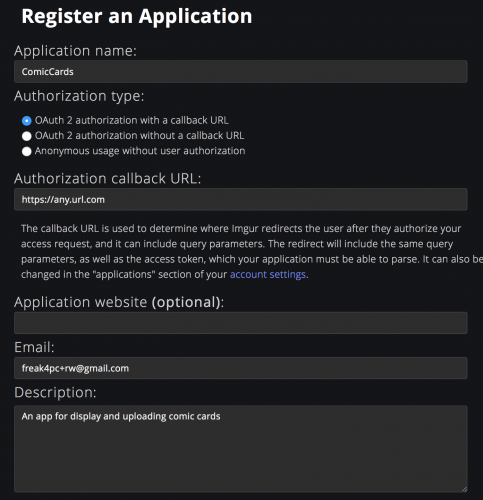
Registering a new Imgur application
Once you submit the form, Imgur will present you with your new Imgur Client ID and Client secret . Save these for the next step.
Creating the Imgur Target
Right-click the ComicCards/Network folder and select New File… Then create a new Swift file and name it Imgur.swift .
Add the following code to define the Imgur endpoints that you’ll implement and use:
import UIKit
import Moya

public enum Imgur {
  // 1
  static private let clientId = "YOUR CLIENT ID"

  // 2
  case upload(UIImage)
  case delete(String)
}
Similar to the Marvel API, you:
- Store your Imgur Client ID in
clientId. Make sure to replace this with the Client ID generated in the previous step (you don’t need the secret). - Define the two endpoints that you’ll be using:
upload, used to upload an image, anddelete, which takes a hash for a previously uploaded image and deletes it from Imgur. These are represented in the Imgur API as POST /image and DELETE /image/{imageDeleteHash} .
Next, you’ll conform to TargetType . Add the following code right below your new enum :
extension Imgur: TargetType {
  // 1
  public var baseURL: URL {
    return URL(string: "https://api.imgur.com/3")!
  }

  // 2
  public var path: String {
    switch self {
    case .upload: return "/image"
    case .delete(let deletehash): return "/image/\(deletehash)"
    }
  }

  // 3
  public var method: Moya.Method {
    switch self {
    case .upload: return .post
    case .delete: return .delete
    }
  }

  // 4
  public var sampleData: Data {
    return Data()
  }

  // 5
  public var task: Task {
    switch self {
    case .upload(let image):
      let imageData = image.jpegData(compressionQuality: 1.0)!

      return .uploadMultipart([MultipartFormData(provider: .data(imageData),
                                                 name: "image",
                                                 fileName: "card.jpg",
                                                 mimeType: "image/jpg")])
    case .delete:
      return .requestPlain
    }
  }

  // 6
  public var headers: [String: String]? {
    return [
      "Authorization": "Client-ID \(Imgur.clientId)",
      "Content-Type": "application/json"
    ]
  }

  // 7
  public var validationType: ValidationType {
    return .successCodes
  }
}
This should look familiar to you by now. Let’s go through the seven protocol properties of the new Imgur target.
- The base URL for the Imgur API is set to
https://api.imgur.com/3. - You return the appropriate endpoint
pathbased on the case./imagefor.upload, and/image/{deletehash}for.delete. - The
methoddiffers based on the case as well:.postfor.uploadand.deletefor.delete. - Just like before, you return an empty
Datastruct forsampleData. - The
taskis where things get interesting. You return a differentTaskfor every endpoint. The.deletecase doesn’t require any parameters or content since it’s a simpleDELETErequest, but the.uploadcase needs some more work.To upload a file, you’ll use the
.uploadMultiparttask type, which takes an array ofMultipartFormDatastructs. You then create an instance ofMultipartFormDatawith the appropriate image data, field name, file name and image mime type. - Like the Marvel API, the
headersproperty returns aContent-Type: application/jsonheader, and an additional header. The Imgur API uses Header authorization, so you’ll need to provide your Client ID in the header of every request, in the form ofAuthorization: Client-ID (YOUR CLIENT ID). - The
.validationTypeis the same as before — valid for any status codes between 200 and 299.
Your Imgur target is done! This concludes the Moya-related code for the ComicCards app. Kudos to you!

The final step is completing CardViewController to have it use your newly created Moya target.
Wrapping Up CardViewController
Go back to CardViewController.swift and add the following lines at the beginning of your CardViewController class, below the comic property:
private let provider = MoyaProvider<Imgur>()
private var uploadResult: UploadResult?
Like before, you create a MoyaProvider instance, this time with the Imgur target. You also define uploadResult — an optional UploadResult property you’ll use to store the result of an upload, which you’ll need when deleting an image.
You have two methods to implement: uploadCard() and deleteCard() .
At the end of uploadCard() , append the following code:
// 1
let card = snapCard()

// 2
provider.request(.upload(card),
  // 3
  callbackQueue: DispatchQueue.main,
  progress: { [weak self] progress in
    // 4
    self?.progressBar.setProgress(Float(progress.progress), animated: true)
  },
  completion: { [weak self] response in
    guard let self = self else { return }

    // 5
    UIView.animate(withDuration: 0.15) {
      self.viewUpload.alpha = 0.0
      self.btnShare.alpha = 0.0
    }

    // 6
    switch response {
    case .success(let result):
      do {
        let upload = try result.map(ImgurResponse<UploadResult>.self)

        self.uploadResult = upload.data
        self.btnDelete.alpha = 1.0

        self.presentShare(image: card, url: upload.data.link)
      } catch {
        self.presentError()
      }
    case .failure:
      self.presentError()
    }
})
This big chunk of code definitely needs some explanation, but worry not — most of it should be relatively familiar.
- You use a helper method called
snapCard()to generate aUIImagefrom the presented card on screen. - Like with the Marvel API, you use your provider to invoke the
uploadendpoint with an associated value of the card image. -
callbackQueueallows providing a queue on which you’ll receive upload progress updates in the next callback. You provide the mainDispatchQueueto ensure progress updates happen on the main thread. - You define a progress closure, which will be invoked as your image is uploaded to Imgur. This sets the progress bar’s progress and will be invoked on the main
DispatchQueueprovided incallbackQueue. - When the request completes, you fade out the upload view and the share button.
- As before, you handle the
successandfailureoptions of the result. If successful, you try to map the response to anImgurResponseand then store the mapped response in the instance property you defined before.You’ll use this property later when finishing up the
deleteCard()method. After storing the upload result, you trigger thepresentSharemethod which will present a proper share alert with the URL to the uploaded image, and the image itself. A failure will trigger thepresentError()method.
And for your final piece of code for the day: Add the following code inside deleteCard() :
// 1
guard let uploadResult = uploadResult else { return }
btnDelete.isEnabled = false

// 2
provider.request(.delete(uploadResult.deletehash)) { [weak self] response in
  guard let self = self else { return }

  let message: String

  // 3
  switch response {
  case .success:
    message = "Deleted successfully!"
    self.btnDelete.alpha = 0.0
  case .failure:
    message = "Failed deleting card! Try again later."
    self.btnDelete.isEnabled = true
  }

  let alert = UIAlertController(title: message, message: nil, preferredStyle: .alert)
  alert.addAction(UIAlertAction(title: "Done", style: .cancel))

  self.present(alert, animated: true, completion: nil)
}
This method is rather simple and works as follows:
- You make sure the
uploadResultis available and disable the delete button so the user doesn’t tap it again. - You use the Imgur provider to invoke the
deleteendpoint with the associated value of the upload result’sdeletehash. This hash uniquely identifies the uploaded image. - In case of a successful or failed deletion, you show an appropriate message.
That is it! Build and run your app one final time. Select a comic and share your image to Imgur. After you’re done with it, you can tap the Delete from Imgur button to remove it.
Note : Something you might notice is that you can only delete the uploaded image as long as you’re in the card view controller. As soon as you leave it, the view controller’s uploadResult will be cleared and the deletehash will be lost. Persisting the hash for any generated images over different sessions is a nice challenge you might want to tackle :].
Taking Moya to the Next Level
Moya is an extremely versatile networking library with too many additional features to fully cover in this tutorial, but they are definitely worth mentioning:
- Reactive Extensions: Moya provides and maintains two excellent reactive additions to Moya for RxSwift and ReactiveSwift , aptly named RxMoya and ReactiveMoya .
- Plugins : Moya lets you create pieces named Plugins , which you can use to modify requests and responses, or to perform side effects. The can be useful, for example, for logging requests and responses or automatically showing a network activity indicator when running network requests.
- Testing : As mentioned earlier, every
TargetTypehas asampleDataproperty wherein you can provide a stubbed response for your endpoints. When creating aMoyaProvider, you can provide astubClosure, which defines if you want Moya to return a stubbed response or a real one (the default). You can learn much more about this in Moya’s testing documentation. - Harvey : Speaking of stubbing responses — some of the team behind Moya are developing a separate framework named Harvey for easy mocking of network responses. It is still in early development but I’d highly recommend following this project .

Moya is a feature-packed networing library
Where to Go From Here?
You can download the completed version of the project using the Download Materials button at the top or bottom of this tutorial. Don’t forget to set your Imgur Client ID and Marvel public and private keys in the project!
In this tutorial, you’ve learned the basics of using Moya and then some! You have everything you need to take your networking layer to the next level.
The best place to continue your exploration of Moya would be its official documentation page , which is very informative and dives into much more detail on every aspect of Moya, and even has a maintained Chinese translation .
In the meantime, if you have any questions or comments about this tutorial or networking in general, please join the forum discussion below.
Recommend
About Joyk
Aggregate valuable and interesting links.
Joyk means Joy of geeK