

Component Testing with Cypress 12 and Next.13 13 Using TypeScript
source link: https://blog.bitsrc.io/component-testing-with-cypress-12-and-nextjs-13-using-typescript-14825ea05f58
Go to the source link to view the article. You can view the picture content, updated content and better typesetting reading experience. If the link is broken, please click the button below to view the snapshot at that time.
Component test
The component in question is this bad boy:
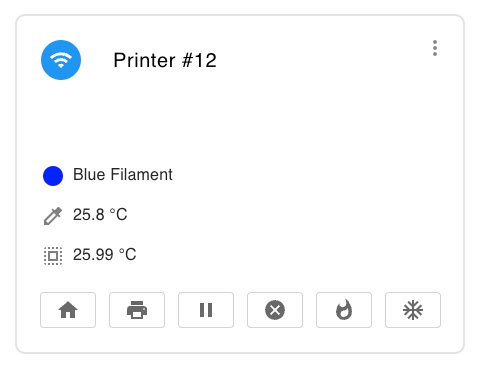
There are quite a few components in this “Printer Card”. Our goal is to test the Preheat button (Whatshot icon). When pressed, they trigger an API call to our server. In our case, what we want to do is test and see how the front end reacts. In our case, we have 2 possible responses. Success and failure. Did the server receive the command, or did it not? This in my mind is most suited for a Component test.
💡 If you were using a platform such as Bitfor publishing, sharing and reusing your UI components, every component you publish would have unit tests associated with it. Using Bit’s Compositions feature, you can automatically create *.spec.* and recognize *.test.* files, and every component you publish and version on Bit will include tests as essentials, giving you confidence in your code.
Learn more here:
This is our <ActionButton/> component:
// ActionButton.tsx

"use client";
import { Tooltip, Button, SvgIconProps } from "@mui/material";
import { CSSProperties, MouseEventHandler } from "react";

export default function ActionButton(props: {
  buttonName: string;
  ButtonIcon: React.ComponentType<SvgIconProps>;
  handleOnClick: MouseEventHandler;
}) {
  const { buttonName, ButtonIcon, handleOnClick } = props;
  const styles: CSSProperties = { color: "#696969" };

return (
    <>
      <Tooltip
        leaveDelay={100}
        title={<div style={{ fontSize: "0.75rem" }}>{buttonName}</div>}
      >
        <Button
          size="small"
          variant="outlined"
          onClick={handleOnClick}
          style={styles}
          sx={{
            border: "1px solid lightgrey",
            minWidth: {
              xs: "36px",
              sm: "56px",
            },
          }}
        >
          <ButtonIcon />
        </Button>
      </Tooltip>
    </>
  );
}
You can see it's a wrapper class that has a tooltip, a button, and a button icon. There is also a click handler. A common question is “Where and how do we test the click handler?”. My answer is to let the component worry about what it needs to survive and let the parent handle everything else.
Following the above, our component test is quite simple:
// ActionButton.cy.tsx
import { Print } from "@mui/icons-material";
import { SvgIconProps } from "@mui/material";
import ActionButton from "./ActionButton";
describe("<ActionButton />", () => {
const iconComponent: React.ComponentType<SvgIconProps> = Print;
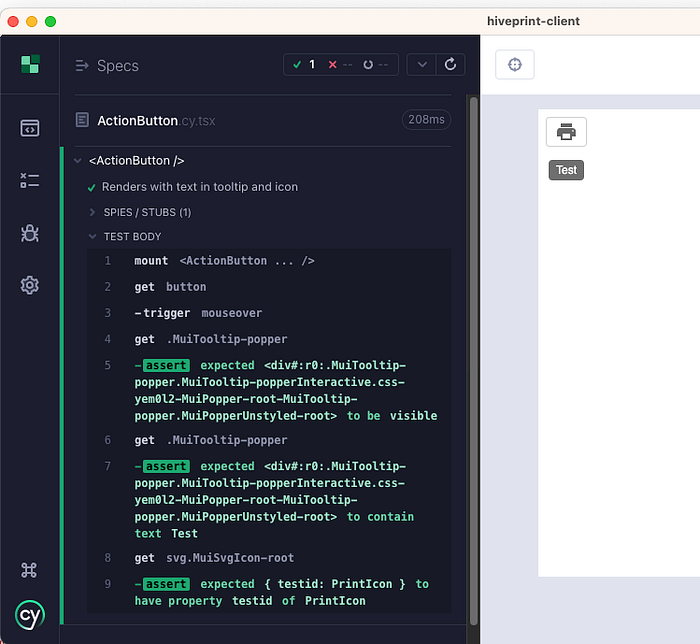
it("Renders with text in tooltip and icon", () => {
const onClick = cy.stub();
cy.mount(
<ActionButton
buttonName="Test"
ButtonIcon={iconComponent}
handleOnClick={onClick}
/>
);
cy.get("button").trigger("mouseover");
cy.get(".MuiTooltip-popper").should("be.visible");
cy.get(".MuiTooltip-popper").should("contain.text", "Test");
cy.get("svg.MuiSvgIcon-root").should("have.data", "testid", "PrintIcon");
});
});
The most important things that I want to check are if the tooltip is populated, if can we click on the button, and does the icon have what we would expect given an Svg.
So where do we test the onClick handler logic? In the parent!
Our parent component is the <PrinterCard/> component. It contains all the buttons, and widgets that are in the screenshot above. Most notably we have to handle our clicks, and render the buttons:
// In the parent <PrinterCard/> component

function handleActionButtons(printerId: String, action: String) {
    const englishName = action.charAt(0).toUpperCase() + action.slice(1);
    fetch(`/api/printers/${printerId}/${action}`, {
      method: "PUT",
      headers: {
        "Content-Type": "application/json",
      },
    })
      .then(async (response) => {
        if (!response.ok) {
          enqueueSnackbar(
            `${englishName} command received but was not successful.`,
            {
              variant: "error",
            }
          );
          return;
        }
        enqueueSnackbar(
          `${englishName} command has been received successfully.`,
          {
            variant: "success",
          }
        );
      })
      .catch((err) => {
        enqueueSnackbar(
          `Unexpected error happened while sending ${englishName} command.`,
          {
            variant: "error",
          }
        );
      });
  }
  return (
    <Card>
      <CardContent>
        ...
        <Box>
            ...
            <ActionButton
              buttonName={"Preheat"}
              ButtonIcon={Whatshot}
              handleOnClick={() => handleActionButtons(printer.id, "preheat")}
            />
            ...
        </Box>
      </CardContent>
    </Card>
  );
The above code allows us to click on a button, and trigger the appropriate API call. Here is the test for our <PrinterCard/>:
// PrinterCard.cy.tsx
import { SnackbarProvider } from "notistack";
import PrinterCard from ".";
describe("<PrinterCard />", () => {
const printerData = {
id: "1",
...
};
it("Preheat button", () => {
let callCount = 0;
cy.intercept("/api/printers/1/preheat", (req) => {
callCount++;
if (callCount === 1) {
req.reply(200);
} else {
req.reply(500);
}
}).as("preheatApi");
cy.mount(
<SnackbarProvider>
<PrinterCard state="idle" printer={printerData} />
</SnackbarProvider>
);
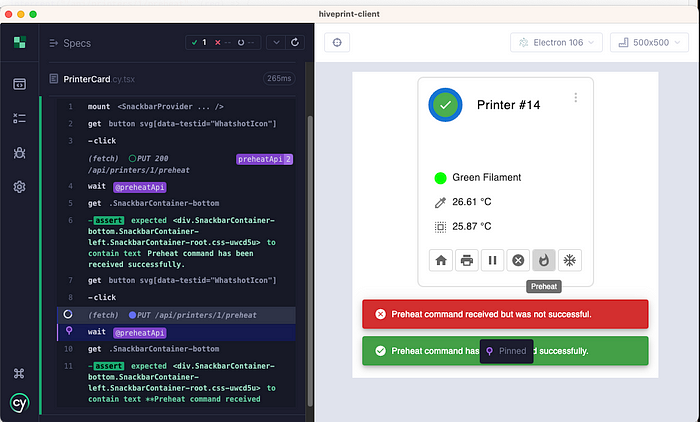
cy.get('button svg[data-testid="WhatshotIcon"]').click();
cy.wait("@preheatApi").then(() => {
cy.get(".SnackbarContainer-bottom").should(
"contain.text",
"Preheat command has been received successfully."
);
});
cy.get('button svg[data-testid="WhatshotIcon"]').click();
cy.wait("@preheatApi").then(() => {
cy.get(".SnackbarContainer-bottom").should(
"contain.text",
"Preheat command received but was not successful."
);
});
});
});
We stub the props that the PrinterCard needs, by using an object called PrinterCard. Our only test (currently) intercepts an API call to /api/printers/1/preheat. Intercepting basically says whenever a call from Cypress hits this endpoint, take it over.
We mount our component, pass it the required props, and then we get to work. Our test will hit the button twice. Once to check the success message, and once more to see the failure.
We are leveraging the Notistack library for displaying snack bar messages to the user. The snack bar will contain the appropriate text, so we can look to see what is present. If it is, we know that our button logic is at least hitting the server and getting only 2 different responses back.
Finally, after running Cypress we see our test completes successfully!
In conclusion, we could have used an E2E test from Cypress to do this flow. It wouldn’t be any more incorrect. We wouldn’t have been able to test this component in isolation, however. In this case, we know that there is a snack bar message after a button is clicked. This in my mind made it suitable for a Component test.
Whether you found this helpful or not, please let me know so I can tailor my posts in the future!
Recommend
About Joyk
Aggregate valuable and interesting links.
Joyk means Joy of geeK