

#打卡不停更# OpenHarmony-ArkUI(TS)声明式开发之列表拖动排列-开源基础软件社区-51...
source link: https://ost.51cto.com/posts/17371
Go to the source link to view the article. You can view the picture content, updated content and better typesetting reading experience. If the link is broken, please click the button below to view the snapshot at that time.
#打卡不停更# OpenHarmony-ArkUI(TS)声明式开发之列表拖动排列 原创 精华
作者:梁青松
本项目基于OpenHarmony的ArkUI框架:TS扩展的声明式开发范式,关于语法和概念直接看官网官方文档地址:基于TS扩展的声明式开发范式,因为OpenHarmony的API相对于HarmonyOS的API,功能上比较完善和成熟的,有些新的技术也早早接触到,所以本项目直接使用OpenHarmony SDK开发。
工具版本: DevEco Studio 3.0 Release
SDK版本: 3.1.7.7(API Version 8 Release)
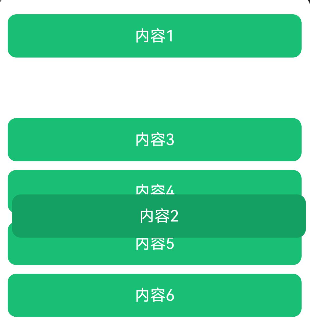
先记录每个index对应的item的y轴坐标;使用属性方法:position() 来设置item的位置;再使用onTouch事件移动选中的item并完成与其他item的位置交换。
1. 页面布局
@Entry
@Component
struct Index {
  // 列表数据
  @State array: Array<string> = ['1', '2', '3', '4', '5', '6', '7', '8', '9']

  build() {
    Column() {
      ForEach(this.array, (item, index) => {
        Text('内容' + item)
          .width('100%')
          .height(50)
          .fontSize(18)
          .fontColor(Color.White)
          .borderRadius(10)
          .margin({ bottom: 10 })
          .textAlign(TextAlign.Center)
          .backgroundColor('#18BF74')
      }, item => item)
    }.width('100%')
    .height('100%')
    .padding(10)
  }
}
2. 记录y轴坐标并设置位置
新增三个变量
- mapOffsetY:存入每一个index对y轴位置
- moveIndex:移动的索引
- moveOffsetY:移动的y轴偏移量
使用onAreaChange方法记录index对应的y轴位置,使用position方法设置item的位置
@Entry
@Component
struct Index {
  // 列表数据
  @State array: Array<string> = ['1', '2', '3', '4', '5', '6', '7', '8', '9']
  // key:索引,value:y轴位置
  private mapOffsetY: Map<number, number> = new Map()
  // 移动的index
  @State moveIndex: number = -2
  // 移动的偏移量
  @State moveOffsetY: number = 0

  build() {
    Column() {
      ForEach(this.array, (item, index) => {
        Text('内容' + item)
          .width('100%')
          .height(50)
          .fontSize(18)
          .fontColor(Color.White)
          .borderRadius(10)
          .margin({ bottom: 10 })
          .textAlign(TextAlign.Center)
		  .backgroundColor('#18BF74')
          .position({
            x: this.moveIndex === index ? 5 : 0,
            y: this.moveIndex === index ? this.moveOffsetY : this.mapOffsetY.get(index)
          })
          .onAreaChange((oldValue: Area, newValue: Area) => {
            if (this.mapOffsetY.size !== this.array.length) {
              // 记录每个item的y坐标
              console.info(`index = ${index} ${JSON.stringify(newValue)}`)
              const height = Number.parseInt(newValue.height.toString())
              this.mapOffsetY.set(index, 10 + (index * 10) + index * height)
              // 更新页面,才能让position起作用
              this.moveIndex = -1
            }
          })
      }, item => item)
    }.width('100%')
    .height('100%')
    .padding(10)
  }
3. 移动选中的item
3.1 zIndex(移动时浮在其他item之上)
3.2 backgroundColor(移动时改变移动中的item背景颜色)
3.3 onTouch(触摸事件,手指移动时,更改选中的item位置)
@Entry
@Component
struct Index {
  ......
  // 按下时自身顶点y轴位置
  private downSelfY = 0
  // 按下时距屏幕的y轴位置
  private downScreenY = 0

  build() {
    Column() {
      ForEach(this.array, (item, index) => {
        Text('内容' + item)
          ......
          .zIndex(this.moveIndex === index ? 1 : 0)
          .backgroundColor(this.moveIndex === index ? '#14a063' : '#18BF74')
          .onTouch((event: TouchEvent) => this.onTouchEvent(event, index))
      }, item => item)
    }.width('100%')
    .height('100%')
    .padding(10)
  }

  onTouchEvent(event: TouchEvent, index: number) {
    switch (event.type) {
      case TouchType.Down: // 手指按下
        {
          // 更新当前移动的index
          this.moveIndex = index
          // 按下时自身顶点y轴位置
          this.downSelfY = event.touches[0].y
          // 按下时距屏幕的y轴位置
          this.downScreenY = event.touches[0].screenY
          // 更改偏移量
          this.moveOffsetY = this.downScreenY - this.downSelfY - 5
        }
        break
      case TouchType.Move: // 手指移动
        {
          // 距离屏幕y坐标
          const screenY = event.touches[0].screenY
          // 更改偏移量
          this.moveOffsetY = screenY - this.downSelfY - 5
        }
        break
      case TouchType.Up: // 手指抬起
        this.moveIndex = -1
        break
      default:
        break;
    }
  }
}
4. 位置交换
位置交换只是视觉上面的改变,列表的索引index还是从0到7,其实改变的是满足交换的两个item内容(列表中数据)主要的逻辑是在以下代码:向下拖动、向上拖动这一部分。
......
onTouchEvent(event: TouchEvent, index: number) {
    switch (event.type) {
      case TouchType.Down: // 手指按下
        {
			......
        }
        break
      case TouchType.Move: // 手指移动
        {
          // 距离屏幕y坐标
          const screenY = event.touches[0].screenY
          // 更改偏移量
          this.moveOffsetY = screenY - this.downSelfY - 5
          ......
          // 向下拖动
          if (screenY - this.downScreenY > 25) {
            // 交换满足条件的两个item内容
            const tempOffsetY = this.array[this.moveIndex+1]
            this.array[this.moveIndex+1] = this.array[this.moveIndex]
            this.array[this.moveIndex] = tempOffsetY
            // 更新按下的y坐标
            this.downScreenY += 60
            // 更新移动的索引,触发页面的更新
            this.moveIndex++
          }
          // 向上拖动
          if (screenY - this.downScreenY < -35) {
            const tempOffsetY = this.array[this.moveIndex-1]
            this.array[this.moveIndex-1] = this.array[this.moveIndex]
            this.array[this.moveIndex] = tempOffsetY
            this.downScreenY -= 60
            this.moveIndex--
          }
        }
        break
      case TouchType.Up: // 手指抬起
        this.moveIndex = -1
        break
      default:
        break;
    }
  }
在上面的代码的基础上加了属性动画animation,让位置交换看起来没有那么生硬。
@Entry
@Component
struct Index {
  // 列表数据
  @State array: Array<string> = ['1', '2', '3', '4', '5', '6', '7', '8', '9']
  // key:索引,value:y轴位置
  private mapOffsetY: Map<number, number> = new Map()
  // 移动的index
  @State moveIndex: number = -2
  // 移动的偏移量
  @State moveOffsetY: number = 0
  // 按下时自身顶点y轴位置
  private downSelfY = 0
  // 按下时距屏幕的y轴位置
  private downScreenY = 0

  build() {
    Column() {
      ForEach(this.array, (item, index) => {
        Text('内容' + item)
          .width('100%')
          .height(50)
          .fontSize(18)
          .fontColor(Color.White)
          .borderRadius(10)
          .margin({ bottom: 10 })
          .textAlign(TextAlign.Center)
          .zIndex(this.moveIndex === index ? 1 : 0)
          .position({
            x: this.moveIndex === index ? 5 : 0,
            y: this.moveIndex === index ? this.moveOffsetY : this.mapOffsetY.get(index)
          })
          .animation({ duration: this.moveIndex === index ? 0 : 100 })
          .backgroundColor(this.moveIndex === index ? '#14a063' : '#18BF74')
          .onTouch((event: TouchEvent) => this.onTouchEvent(event, index))
          .onAreaChange((oldValue: Area, newValue: Area) => {
            if (this.mapOffsetY.size !== this.array.length) {
              // 记录每个item的y坐标
              console.info(`index = ${index} ${JSON.stringify(newValue)}`)
              const height = Number.parseInt(newValue.height.toString())
              this.mapOffsetY.set(index, 10 + (index * 10) + index * height)
              // 更新页面,才能让position起作用
              this.moveIndex = -1
            }
          })
      }, item => item)
    }.width('100%')
    .height('100%')
    .padding(10)
  }

  onTouchEvent(event: TouchEvent, index: number) {
    switch (event.type) {
      case TouchType.Down: // 手指按下
        {
          // 更新当前移动的index
          this.moveIndex = index
          // 按下时自身顶点y轴位置
          this.downSelfY = event.touches[0].y
          // 按下时距屏幕的y轴位置
          this.downScreenY = event.touches[0].screenY
          // 更改偏移量
          this.moveOffsetY = this.downScreenY - this.downSelfY - 5
        }
        break
      case TouchType.Move: // 手指移动
        {
          // 距离屏幕y坐标
          const screenY = event.touches[0].screenY
          // 更改偏移量
          this.moveOffsetY = screenY - this.downSelfY - 5
          // 第一位,不能上移
          if (this.moveIndex === 0 && this.moveOffsetY < 0) {
            this.moveOffsetY = 0
            return
          }
          // 最后一位,不能下移
          if (this.moveIndex === this.array.length - 1 && this.moveOffsetY > this.mapOffsetY.get(this.moveIndex)) {
            this.moveOffsetY = this.mapOffsetY.get(this.moveIndex)
            return
          }
          // 向下拖动
          if (screenY - this.downScreenY > 25) {
            // 交换满足条件的两个item内容
            const tempOffsetY = this.array[this.moveIndex+1]
            this.array[this.moveIndex+1] = this.array[this.moveIndex]
            this.array[this.moveIndex] = tempOffsetY
            // 更新按下的y坐标
            this.downScreenY += 60
            // 更新移动的索引,触发页面的更新
            this.moveIndex++
          }
          // 向上拖动
          if (screenY - this.downScreenY < -35) {
            const tempOffsetY = this.array[this.moveIndex-1]
            this.array[this.moveIndex-1] = this.array[this.moveIndex]
            this.array[this.moveIndex] = tempOffsetY
            this.downScreenY -= 60
            this.moveIndex--
          }
        }
        break
      case TouchType.Up: // 手指抬起
        this.moveIndex = -1
        break
      default:
        break;
    }
  }
}
本项目的难点就是位置交换那块:index的顺序并没有改变,只是更改列表中的数据和移动的中索引。还有就是onAreaChange这个方法,如果没有设置方法position,在其方法内是能拿到每个item的y坐标,设置position后,y坐标是错误的,需要在onAreaChange计算一下item的y坐标,然后再更新页面。这样列表才能展示出来。
每天进步一点点、需要付出努力亿点点。
更多原创内容请关注:中软国际 HarmonyOS 技术团队
入门到精通、技巧到案例,系统化分享HarmonyOS开发技术,欢迎投稿和订阅,让我们一起携手前行共建鸿蒙生态。
Recommend
About Joyk
Aggregate valuable and interesting links.
Joyk means Joy of geeK