
Java开发学习(七)----DI依赖注入之自动装配与集合注入 - |旧市拾荒|
source link: https://www.cnblogs.com/xiaoyh/p/16311042.html
Go to the source link to view the article. You can view the picture content, updated content and better typesetting reading experience. If the link is broken, please click the button below to view the snapshot at that time.
一、自动配置
上一篇博客花了大量的时间把Spring的注入去学习了下,总结起来就两个字麻烦。麻烦在配置文件的编写配置上。那有更简单方式么?有,自动配置
1.1 依赖自动装配
-
IoC容器根据bean所依赖的资源在容器中自动查找并注入到bean中的过程称为自动装配
1.2 自动装配方式
-
按类型(常用)
-
按构造方法
-
不启用自动装配
1.3 环境准备
-
创建一个Maven项目
-
pom.xml添加依赖
-
resources下添加spring的配置文件
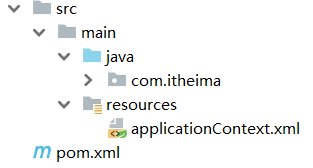
最终项目的结构如下:

(1)项目中添加BookDao、BookDaoImpl、BookService和BookServiceImpl类
public interface BookDao {
public void save();
}
public class BookDaoImpl implements BookDao {
private String databaseName;
private int connectionNum;
public void save() {
System.out.println("book dao save ...");
}
}
public interface BookService {
public void save();
}
public class BookServiceImpl implements BookService{
private BookDao bookDao;
public void setBookDao(BookDao bookDao) {
this.bookDao = bookDao;
}
public void save() {
System.out.println("book service save ...");
bookDao.save();
}
}(2)resources下提供spring的配置文件
<?xml version="1.0" encoding="UTF-8"?>
<beans xmlns="http://www.springframework.org/schema/beans"
xmlns:xsi="http://www.w3.org/2001/XMLSchema-instance"
xsi:schemaLocation="http://www.springframework.org/schema/beans http://www.springframework.org/schema/beans/spring-beans.xsd">
<bean id="bookDao" class="com.itheima.dao.impl.BookDaoImpl"/>
<bean id="bookService" class="com.itheima.service.impl.BookServiceImpl">
<property name="bookDao" ref="bookDao"/>
</bean>
</beans>(3)编写AppForAutoware运行类,加载Spring的IOC容器,并从中获取对应的bean对象
public class AppForAutoware {
    public static void main( String[] args ) {
        ApplicationContext ctx = new ClassPathXmlApplicationContext("applicationContext.xml");
        BookService bookService = (BookService) ctx.getBean("bookService");
        bookService.save();
    }
}
1.4 完成自动装配的配置
接下来,在上面这个环境中来完成自动装配:
自动装配只需要修改applicationContext.xml配置文件即可:
(1)将<property>标签删除
(2)在<bean>标签中添加autowire属性
首先来实现按照类型注入的配置
<?xml version="1.0" encoding="UTF-8"?>
<beans xmlns="http://www.springframework.org/schema/beans"
xmlns:xsi="http://www.w3.org/2001/XMLSchema-instance"
xsi:schemaLocation="http://www.springframework.org/schema/beans http://www.springframework.org/schema/beans/spring-beans.xsd">
<bean class="com.itheima.dao.impl.BookDaoImpl"/>
<!--autowire属性:开启自动装配,通常使用按类型装配-->
<bean id="bookService" class="com.itheima.service.impl.BookServiceImpl" autowire="byType"/>
</beans>注意事项:
-
需要注入属性的类中对应属性的setter方法不能省略
-
被注入的对象必须要被Spring的IOC容器管理
-
按照类型在Spring的IOC容器中如果找到多个对象,会报
NoUniqueBeanDefinitionException
一个类型在IOC中有多个对象,还想要注入成功,这个时候就需要按照名称注入,配置方式为:
<?xml version="1.0" encoding="UTF-8"?>
<beans xmlns="http://www.springframework.org/schema/beans"
xmlns:xsi="http://www.w3.org/2001/XMLSchema-instance"
xsi:schemaLocation="http://www.springframework.org/schema/beans http://www.springframework.org/schema/beans/spring-beans.xsd">
<bean class="com.itheima.dao.impl.BookDaoImpl"/>
<!--autowire属性:开启自动装配,通常使用按类型装配-->
<bean id="bookService" class="com.itheima.service.impl.BookServiceImpl" autowire="byName"/>
</beans>注意事项:
-
按照名称注入中的名称指的是什么?

-
bookDao是private修饰的,外部类无法直接方法
-
外部类只能通过属性的set方法进行访问
-
对外部类来说,setBookDao方法名,去掉set后首字母小写是其属性名
-
为什么是去掉set首字母小写?
-
这个规则是set方法生成的默认规则,set方法的生成是把属性名首字母大写前面加set形成的方法名
-
-
所以按照名称注入,其实是和对应的set方法有关,但是如果按照标准起名称,属性名和set对应的名是一致的
-
-
如果按照名称去找对应的bean对象,找不到则注入Null
-
当某一个类型在IOC容器中有多个对象,按照名称注入只找其指定名称对应的bean对象,不会报错
两种方式介绍完后,以后用的更多的是按照类型注入。
最后对于依赖注入,需要注意一些其他的配置特征:
-
自动装配用于引用类型依赖注入,不能对简单类型进行操作
-
使用按类型装配时(byType)必须保障容器中相同类型的bean唯一,推荐使用
-
使用按名称装配时(byName)必须保障容器中具有指定名称的bean,因变量名与配置耦合,不推荐使用
-
自动装配优先级低于setter注入与构造器注入,同时出现时自动装配配置失效
二、集合注入
上一篇博客我们已经能完成引入数据类型和简单数据类型的注入,但是还有一种数据类型集合,集合中既可以装简单数据类型也可以装引用数据类型,对于集合,在Spring中该如何注入呢?
常见的集合类型有如下几种
-
Properties
针对不同的集合类型,该如何实现注入呢?
2.1 环境准备
-
创建一个Maven项目
-
pom.xml添加依赖
-
resources下添加spring的配置文件applicationContext.xml
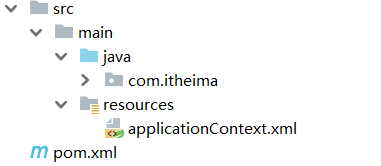
最终项目的结构如下:

(1)项目中添加添加BookDao、BookDaoImpl类
public interface BookDao {
public void save();
}
public class BookDaoImpl implements BookDao {
public class BookDaoImpl implements BookDao {
private int[] array;
private List<String> list;
private Set<String> set;
private Map<String,String> map;
private Properties properties;
public void save() {
System.out.println("book dao save ...");
System.out.println("遍历数组:" + Arrays.toString(array));
System.out.println("遍历List" + list);
System.out.println("遍历Set" + set);
System.out.println("遍历Map" + map);
System.out.println("遍历Properties" + properties);
}
//setter....方法省略,自己使用工具生成
}(2)resources下提供spring的配置文件,applicationContext.xml
<?xml version="1.0" encoding="UTF-8"?>
<beans xmlns="http://www.springframework.org/schema/beans"
xmlns:xsi="http://www.w3.org/2001/XMLSchema-instance"
xsi:schemaLocation="http://www.springframework.org/schema/beans http://www.springframework.org/schema/beans/spring-beans.xsd">
<bean id="bookDao" class="com.itheima.dao.impl.BookDaoImpl"/>
</beans>(3)编写AppForDICollection运行类,加载Spring的IOC容器,并从中获取对应的bean对象
public class AppForDICollection {
    public static void main( String[] args ) {
        ApplicationContext ctx = new ClassPathXmlApplicationContext("applicationContext.xml");
        BookDao bookDao = (BookDao) ctx.getBean("bookDao");
        bookDao.save();
    }
}接下来,在上面这个环境中来完成集合注入:
下面的所以配置方式,都是在bookDao的bean标签中使用<property>进行注入
<?xml version="1.0" encoding="UTF-8"?>
<beans xmlns="http://www.springframework.org/schema/beans"
xmlns:xsi="http://www.w3.org/2001/XMLSchema-instance"
xsi:schemaLocation="http://www.springframework.org/schema/beans http://www.springframework.org/schema/beans/spring-beans.xsd">
<bean id="bookDao" class="com.itheima.dao.impl.BookDaoImpl">
</bean>
</beans>2.2 注入数组类型
<property name="array">
    <array>
        <value>100</value>
        <value>200</value>
        <value>300</value>
    </array>
</property>
2.3 注入List类型
<property name="list">
    <list>
        <value>itcast</value>
        <value>itheima</value>
        <value>boxuegu</value>
        <value>chuanzhihui</value>
    </list>
</property>
2.4 注入Set类型
<property name="set">
    <set>
        <value>itcast</value>
        <value>itheima</value>
        <value>boxuegu</value>
        <value>boxuegu</value>
    </set>
</property>
2.5 注入Map类型
<property name="map">
    <map>
        <entry key="country" value="china"/>
        <entry key="province" value="henan"/>
        <entry key="city" value="kaifeng"/>
    </map>
</property>
2.6 注入Properties类型
<property name="properties">
    <props>
        <prop key="country">china</prop>
        <prop key="province">henan</prop>
        <prop key="city">kaifeng</prop>
    </props>
</property>
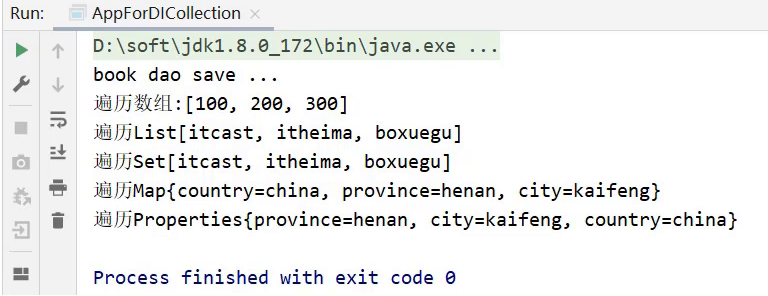
配置完成后,运行下看结果:

说明:
-
property标签表示setter方式注入,构造方式注入constructor-arg标签内部也可以写
<array>、<list>、<set>、<map>、<props>标签 -
List的底层也是通过数组实现的,所以
<list>和<array>标签是可以混用 -
集合中要添加引用类型,只需要把
<value>标签改成<ref>标签,这种方式用的比较少
如果您觉得阅读本文对您有帮助,请点一下“推荐”按钮,您的“推荐”将是我最大的写作动力!欢迎各位转载,但是未经作者本人同意,转载文章之后必须在文章页面明显位置给出作者和原文连接,否则保留追究法律责任的权利。
Recommend
About Joyk
Aggregate valuable and interesting links.
Joyk means Joy of geeK