
Spring XmlBeanFactory 容器的基本实现 - 低吟不作语
source link: https://www.cnblogs.com/Yee-Q/p/16440067.html
Go to the source link to view the article. You can view the picture content, updated content and better typesetting reading experience. If the link is broken, please click the button below to view the snapshot at that time.
容器的基本用法
熟悉 Spring 的朋友应该都很了解下段代码:
一段简单的通过容器获取 Bean 的代码,它所完成的功能无非就是以下几点:
- 读取配置文件 beanFactoryTest.xml
- 根据 beanFactoryTest.xml 中的配置找到对应类的配置,并实例化
- 获取实例化后的实例
接下来我们来分析这段代码的实现原理
Spring 核心类介绍
在开始正式的源码分析之前,有必要先了解 Spring 核心的两个类
1|01. DefaultListableBeanFactory
XmlBeanFactory 继承自 DefaultListableBeanFactory,DefaultListableBeanFactory 是整个 bean 加载的核心部分,是 Spring 注册及加载 bean 的默认实现。XmlBeanFactory 与 DefaultListableBeanFactory 的不同之处就在于 XmlBeanFactory 使用了自定义的 XML 读取器 XmlBeanDefinitionReader
1|02. XmlBeanDefinitionReader
在 XmlBeanDefinitionReader 中主要包含以下几步处理:
- 通过继承自 AbstractBeanDefinitionReader 的方法,使用 ResourceLoader 将资源文件路径转换为对应的 Resoure 文件
- 通过 DocumentLoader 对 Resource 文件进行转换,将 Resource 文件转换为 Document 文件
- 通过实现 BeanDefinitionDocumentReader 的 DefaultBeanDefinitionDocumentReader 类对 Document 进行解析,并使用 BeanDefinitionParserDelegate 对 Element 进行解析
容器基础 XmlBeanFactory
接下来我们将深入分析以下代码的功能实现
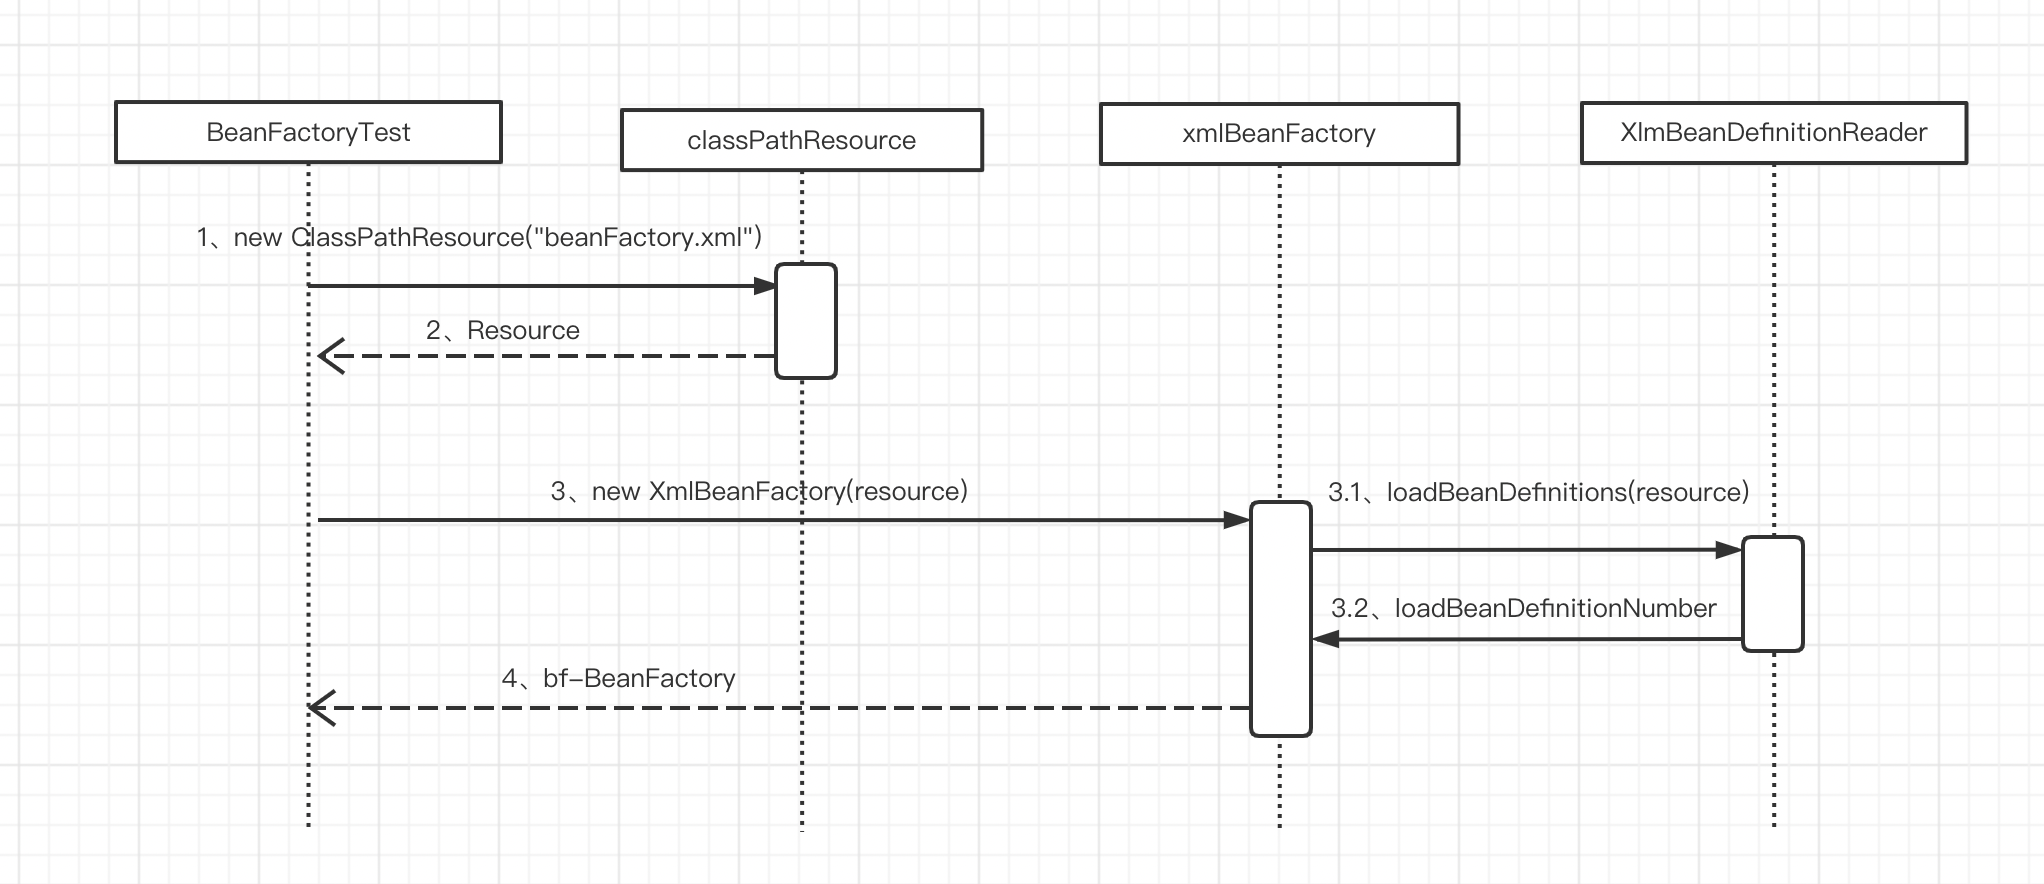
通过 XmlBeanFactory 初始化时序图,我们来看一看上面代码的执行逻辑
1|01. 封装配置文件
Spring 的配置文件读取是通过 ClassPathResource 封装成 Resource,Resource 的结构如下:
Resource 接口抽象了所有 Spring 内部使用的底层资源:File、URL、Classpath 等等,并定义了有关资源操作的方法。对于不同来源的资源文件,都有对应的 Resource 实现:文件(FileSystemResource)、Classpath(ClasspathResource)、URL(UrlResource )、InputStream(InputStreamResource)、Byte(ByteResource)等等,有了 Resource 接口就可以对所有资源文件进行统一处理,至于处理的实现其实很简单,以 ClasspathResource 为例,实现方式就是通过 class 或者 classLoader 提供的底层方式进行调用
1|02. 数据准备阶段
通过 Resource 完成配置文件的封装以后,就将 Resource 作为 XmlBeanFactory 的构造函数参数传入,代码如下:
构造函数内部再次调用内部构造函数:
this.reader.loadBeanDefinitions(resource); 是整个资源加载的切入点,这个方法的处理过程如下:
- 对参数 Resource 使用 EncodedResource 类进行封装
- 从 Resource 获取对应的 InputStream 并构造 InputSource
- 通过构造的 InputSource 实例和 Resource 实例继续调用函数 doLoadBeanDefinitions
我们来看一下 loadBeanDefinitions 函数具体的实现过程:
EncodedResource 的作用是对资源文件的编码进行处理,可以通过设置编码属性指定 Spring 使用响应的编码进行处理
当构造好 EncodedResource 对象后,再次转入到 loadBeanDefinitions(new EncodedResource(resource));
public int loadBeanDefinitions(EncodedResource encodedResource) throws BeanDefinitionStoreException { Assert.notNull(encodedResource, "EncodedResource must not be null"); if (this.logger.isTraceEnabled()) { this.logger.trace("Loading XML bean definitions from " + encodedResource); } // 获取已经加载的资源 Set<EncodedResource> currentResources = (Set)this.resourcesCurrentlyBeingLoaded.get(); if (!currentResources.add(encodedResource)) { throw new BeanDefinitionStoreException("Detected cyclic loading of " + encodedResource + " - check your import definitions!"); } else { int var6; try { // 从已经封装的 Resource 对象获取 InputStream InputStream inputStream = encodedResource.getResource().getInputStream(); Throwable var4 = null;
try { InputSource inputSource = new InputSource(inputStream); if (encodedResource.getEncoding() != null) { inputSource.setEncoding(encodedResource.getEncoding()); } // 进入真正的逻辑核心部分 var6 = this.doLoadBeanDefinitions(inputSource, encodedResource.getResource()); } catch (Throwable var24) { var4 = var24; throw var24; } finally { if (inputStream != null) { if (var4 != null) { try { inputStream.close(); } catch (Throwable var23) { var4.addSuppressed(var23); } } else { inputStream.close(); } }
} } catch (IOException var26) { throw new BeanDefinitionStoreException("IOException parsing XML document from " + encodedResource.getResource(), var26); } finally { currentResources.remove(encodedResource); if (currentResources.isEmpty()) { this.resourcesCurrentlyBeingLoaded.remove(); }
}
return var6; } }
再次整理数据准备阶段的逻辑,首先对传入的 Resource 参数进行编码处理,将准备的数据传入到真正的核心处理部分 doLoadBeanDefinitions 方法
1|03. 获取 Document
doLoadBeanDefinitions 方法的代码如下:
protected int doLoadBeanDefinitions(InputSource inputSource, Resource resource) throws BeanDefinitionStoreException { try { Document doc = this.doLoadDocument(inputSource, resource); int count = this.registerBeanDefinitions(doc, resource); if (this.logger.isDebugEnabled()) { this.logger.debug("Loaded " + count + " bean definitions from " + resource); }
return count; } catch (BeanDefinitionStoreException var5) { throw var5; } catch (SAXParseException var6) { throw new XmlBeanDefinitionStoreException(resource.getDescription(), "Line " + var6.getLineNumber() + " in XML document from " + resource + " is invalid", var6); } catch (SAXException var7) { throw new XmlBeanDefinitionStoreException(resource.getDescription(), "XML document from " + resource + " is invalid", var7); } catch (ParserConfigurationException var8) { throw new BeanDefinitionStoreException(resource.getDescription(), "Parser configuration exception parsing XML from " + resource, var8); } catch (IOException var9) { throw new BeanDefinitionStoreException(resource.getDescription(), "IOException parsing XML document from " + resource, var9); } catch (Throwable var10) { throw new BeanDefinitionStoreException(resource.getDescription(), "Unexpected exception parsing XML document from " + resource, var10); } }
protected Document doLoadDocument(InputSource inputSource, Resource resource) throws Exception { return this.documentLoader.loadDocument(inputSource, this.getEntityResolver(), this.errorHandler, this.getValidationModeForResource(resource), this.isNamespaceAware()); }
不考虑处理异常的代码,其实只做了三件事:
- 获取对 XML 文件的验证模式
- 加载 XML 文件,并得到对应的 Document
- 根据返回的 Document 注册 Bean 信息
获取 XML 验证模式是为了保证 XML 文件的正确性,常用的验证模式有 DTD 和 XSD 两种。Spring 通过 getValidationModeForResource 方法获取对应资源的验证模式,这里不再赘述
XmlBeanDefinitionReader 将文档读取交由 DocumentLoader 去处理,DocumentLoader 是个接口,真正调用的是 DefaultDocumentLoader,解析代码如下:
对于这部分代码没有太多可以描述的,因为通过 SAX 解析 XML 文档的套路大都相同,解析完成返回一个 Document 对象
1|04. 解析及注册 BeanDefinitions
当程序拥有 Document 对象后,就会被引入下面这个方法:
BeanDefinitionDocumentReader 是一个接口,通过 createBeanDefinitionDocumentReader 方法完成实例化,实际类型是 DefaultBeanDefinitionDocumentReader,registerBeanDefinitions 方法代码如下:
getDocumentElement 方法的重要目的之一是提取 root,以便于再次将 root 作为参数继续 BeanDefinition 的注册
再次进入 doRegisterBeanDefinitions 方法:
protected void doRegisterBeanDefinitions(Element root) { // 专门处理解析 BeanDefinitionParserDelegate parent = this.delegate; this.delegate = this.createDelegate(this.getReaderContext(), root, parent); // 处理 profile 属性 if (this.delegate.isDefaultNamespace(root)) { String profileSpec = root.getAttribute("profile"); if (StringUtils.hasText(profileSpec)) { String[] specifiedProfiles = StringUtils.tokenizeToStringArray(profileSpec, ",; "); if (!this.getReaderContext().getEnvironment().acceptsProfiles(specifiedProfiles)) { if (this.logger.isDebugEnabled()) { this.logger.debug("Skipped XML bean definition file due to specified profiles [" + profileSpec + "] not matching: " + this.getReaderContext().getResource()); }
return; } } } // 解析前处理,留给子类实现 this.preProcessXml(root); this.parseBeanDefinitions(root, this.delegate); // 解析后处理,留给子类实现 this.postProcessXml(root); this.delegate = parent; }
这里使用了模板方法设计模式,如果继承自 DefaultBeanDefinitionDocumentReader 的子类需要在 Bean 解析前后做一些处理的话,可以重写 preProcessXml 和 postProcessXml 方法
在注册 Bean 的最开始是先对 profile 属性解析,profile 属性可用于在配置文件中部署两套配置分别适用生产环境和开发环境,做到方便的的切换环境
处理完 profile 属性以后就可以进行 XML 的读取,跟踪代码进入 parseBeanDefinitions 方法
protected void parseBeanDefinitions(Element root, BeanDefinitionParserDelegate delegate) { if (delegate.isDefaultNamespace(root)) { NodeList nl = root.getChildNodes();
for(int i = 0; i < nl.getLength(); ++i) { Node node = nl.item(i); if (node instanceof Element) { Element ele = (Element)node; if (delegate.isDefaultNamespace(ele)) { this.parseDefaultElement(ele, delegate); } else { delegate.parseCustomElement(ele); } } } } else { delegate.parseCustomElement(root); } }
根节点或者子节点是默认命名空间的话采用 parseDefaultElement 方法解析,否则使用 delegate.parseCustomElement 方法解析,而对于标签的解析,我们放到下一篇文章作讲解
Recommend
About Joyk
Aggregate valuable and interesting links.
Joyk means Joy of geeK
