

Linux性能调优之用电调优(Power Usage Tuning)
source link: https://liruilongs.github.io/2022/06/01/Linux/Linux%E6%80%A7%E8%83%BD%E8%B0%83%E4%BC%98%E4%B9%8B%E7%94%A8%E7%94%B5%E8%B0%83%E4%BC%98/
Go to the source link to view the article. You can view the picture content, updated content and better typesetting reading experience. If the link is broken, please click the button below to view the snapshot at that time.
Linux性能调优之用电调优(Power Usage Tuning)
傍晚时分,你坐在屋檐下,看着天慢慢地黑下去,心里寂寞而凄凉,感到自己的生命被剥夺了。当时我是个年轻人,但我害怕这样生活下去,衰老下去。在我看来,这是比死亡更可怕的事。——–王小波
- 整理一些Linux用电功耗调优的笔记,分享给小伙伴,关于用电调优个人觉得:
- 最好使用powertop这样的专业工具来搞
- 或者使用Linux自带的调优策略来
- 建议针对某些策略进行调优要做好评估,错误预算。
- 如果单纯为了省电,造成生产故障,最后一地鸡毛,那就得不偿失,好心办了坏事。
- 博文提到的策略个人觉得部分并不适合生产环境,部分可以尝试,有些可能内核原因已经不支持了,这里整理出来作为了解
- 博文内容涉及:
- 红帽推荐的节能策略,书有些旧,所以部分修改内核参数的模块简单记录,博文没有Demo
- 使用红帽自带调优模块tuned调优
- 使用节源工具powertop自动调优
- 食用方式
- 需了解Linux基础知识
我以为爱情可以填满人生的遗憾,然而,制造更多遗憾的却偏偏是爱情
我的Linux内核版本
┌──[[email protected]]-[~]
└─$uname -r
4.18.0-193.el8.x86_64
┌──[[email protected]]-[~]
└─$
管理与高CPU活动相关的功耗和废热是数据中心运行的主要关注点之一。对于需要最大限度延长电池寿命的移动设备来说,最大限度地减少功耗也越来越重要。
可以使用一些通用策略来降低计算机上的功耗:
- 禁用未使用的服务。
- 禁用不用的硬件设备。
- 避免对系统进行轮询操作。
- 延长延迟活动的生命周期。
- 允许不活动的设备进入省电状态。
下面我们我们看一些可以在在Linux系统上实现这些策略的一些方法。
禁用以太网局域:ethtool -s eth0 wol d
这里需要注意的是,当禁用之后,同一局域网下就不支持远程开机了
┌──[[email protected]]-[~]
└─$ ethtool -s eth0 wol d
┌──[[email protected]]-[~]
└─$ ethtool  eth0
Settings for eth0:
        Supported ports: [ TP ]
        Supported link modes:   1000baseT/Full
                                10000baseT/Full
        Supported pause frame use: No
        Supports auto-negotiation: No
        Supported FEC modes: Not reported
        Advertised link modes:  Not reported
        Advertised pause frame use: No
        Advertised auto-negotiation: No
        Advertised FEC modes: Not reported
        Speed: 10000Mb/s
        Duplex: Full
        Port: Twisted Pair
        PHYAD: 0
        Transceiver: internal
        Auto-negotiation: off
        MDI-X: Unknown
        Supports Wake-on: uag
        Wake-on: d
        Link detected: yes
┌──[[email protected]]-[~]
└─$
支持Wake-On-LAN的以太网卡必须保持供电以监控Wake-On-LAN以太网帧(可用于远程开机),即使在系统断电的情况下。
启用笔记本模式
当启用笔记本模式时,缓存中的脏页一次提交,而不是随着时间的推移分散提交,减少了硬盘休眠后重新启动的需要。
┌──[[email protected]]-[~]
└─$ echo 1 >/proc/sys/vm/laptop_mode
┌──[[email protected]]-[~]
└─$ cat /proc/sys/vm/laptop_mode
1
┌──[[email protected]]-[~]
└─$
关闭 nmi_watchdog
nmi_watchdog 内核模块用于监视内核,并在怀疑CPU陷入繁忙循环时生成一个不可屏蔽的“中断”,允许内核记录调试信息。
┌──[[email protected]]-[~]
└─$ cat /proc/sys/kernel/nmi_watchdog
1
┌──[[email protected]]-[~]
└─$ echo 0 > /proc/sys/kernel/nmi_watchdog
┌──[[email protected]]-[~]
└─$ cat /proc/sys/kernel/nmi_watchdog
0
┌──[[email protected]]-[~]
└─$
启用noatime文件系统挂载选项,不更新访问时间
Unix atime跟踪文件的访问时间,其效果是每次读都有一个相关的写操作来更新atime。atime字段很少使用,可以通过使用noatime挂载文件系统来禁用它。注意,Linux 6内核支持relative选项,该选项维护atime字段,但将更新提交推迟一天。我们当前的系统为Linux release 8.2 (Ootpa)支持relative和strictatime
man帮助文档
atime  Do  not  use  the  noatime feature, so the inode access time is controlled by kernel defaults.  See
       also the descriptions of the relatime and strictatime mount options.

noatime
       Do not update inode access times on this filesystem (e.g. for faster access on the  news  spool  to
       speed  up  news  servers).   This  works  for  all  inode  types  (directories  too), so it implies
       nodiratime.
┌──[[email protected]]-[~]
└─$ mount -o remount,noatime  /dev/mapper/rhel-home   /home
可以通过stat命令来查看文件目录的详细信息
┌──[[email protected]]-[/home]
└─$ stat /home/
  File: /home/
  Size: 23              Blocks: 0          IO Block: 4096   directory
Device: fd02h/64770d    Inode: 128         Links: 3
Access: (0755/drwxr-xr-x)  Uid: (    0/    root)   Gid: (    0/    root)
Context: system_u:object_r:home_root_t:s0
Access: 2020-11-25 05:10:33.506038318 +0800
Modify: 2022-04-11 23:36:50.446087028 +0800
Change: 2022-06-03 11:10:41.288596109 +0800
 Birth: -
禁用经常不使用的蓝牙接口
┌──[[email protected]]-[/home/liruilong]
└─$ hciconfig hci0 down
蓝牙无线电接收器耗电,并需要连接USB子系统(额,英语小白..原文:and exercises the USB subsystem.)。我们平常基本不会用的,禁用它
┌──[[email protected]]-[/home/liruilong]
└─$ hciconfig -a
hci0:   Type: Primary  Bus: USB
        BD Address: 3C:91:80:47:61:72  ACL MTU: 8192:128  SCO MTU: 64:128
        UP RUNNING
        RX bytes:1048 acl:0 sco:0 events:51 errors:0
        TX bytes:1209 acl:0 sco:0 commands:51 errors:0
        Features: 0xff 0xff 0x8f 0xfe 0x83 0xe1 0x08 0x80
        Packet type: DM1 DM3 DM5 DH1 DH3 DH5 HV1 HV2 HV3
        Link policy: RSWITCH HOLD SNIFF PARK
        Link mode: SLAVE ACCEPT
        Name: 'liruilongs.github.io'
        Class: 0x4c0000
        Service Classes: Rendering, Capturing, Telephony
        Device Class: Miscellaneous,
        HCI Version: 2.1 (0x4)  Revision: 0x100
        LMP Version: 2.1 (0x4)  Subversion: 0x100
        Manufacturer: not assigned (6502)
| 命令选择 | 描述 |
|---|---|
| -a | 显示蓝牙设备信息 |
| up | 开启蓝牙设备 |
| down | 关闭蓝牙设备 |
| reset | 重置蓝牙设备 |
| pscan | 启用页面扫描,禁用查询扫描 |
┌──[[email protected]]-[/home/liruilong]
└─$ hciconfig pscan
hci0:   Type: Primary  Bus: USB
        BD Address: 3C:91:80:47:61:72  ACL MTU: 8192:128  SCO MTU: 64:128
        UP RUNNING
        RX bytes:1840 acl:0 sco:0 events:78 errors:0
        TX bytes:1571 acl:0 sco:0 commands:78 errors:0
┌──[[email protected]]-[/home/liruilong]
└─$ hciconfig hci0 down
┌──[[email protected]]-[/home/liruilong]
└─$ hciconfig pscan
hci0:   Type: Primary  Bus: USB
        BD Address: 3C:91:80:47:61:72  ACL MTU: 8192:128  SCO MTU: 64:128
        DOWN
        RX bytes:1840 acl:0 sco:0 events:78 errors:0
        TX bytes:1571 acl:0 sco:0 commands:78 errors:0
启用按需CPU频率调控器
Linux内核允许通过可配置的策略来控制CPU速度。ondemand调控器允许cpu闲置或在使用不频繁时以较低的速度运行。
┌──[[email protected]]-[/usr/lib/modules/4.18.0-193.el8.x86_64/kernel/drivers/cpufreq]
└─$ cat /sys/devices/system/cpu/cpu0/cpufreq/scaling_governor
┌──[[email protected]]-[/usr/lib/modules/4.18.0-193.el8.x86_64/kernel/drivers/cpufreq]
└─$ modprobe cpufreq_ondemand
┌──[[email protected]]-[/usr/lib/modules/4.18.0-193.el8.x86_64/kernel/drivers/cpufreq]
└─$ echo ondemand > /sys/devices/system/cpu/cpu0/cpufreq/scaling_governor
┌──[[email protected]]-[/usr/lib/modules/4.18.0-193.el8.x86_64/kernel/drivers/cpufreq]
└─$
常见策略我们简单来看下。
ondemand:系统默认的超频模式,按需调节,内核提供的功能,不是很强大,但有效实现了动态频率调节,平时以低速方式运行,当系统负载提高时候自动提高频率。以这种模式运行不会因为降频造成性能降低,同时也能节约电能和降低温度。一般官方内核默认的方式都是ondemand。interactive:交互模式,直接上最高频率,然后看CPU负荷慢慢降低,比较耗电。Interactive 是以 CPU 排程数量而调整频率,从而实现省电。InteractiveX 是以 CPU 负载来调整 CPU 频率,不会过度把频率调低。所以比 Interactive 反应好些,但是省电的效果一般。conservative:保守模式,类似于ondemand,但调整相对较缓,想省电就用他吧。Google官方内核,kang内核默认模式。smartass:聪明模式,是I和C模式的升级,该模式在比interactive 模式不差的响应的前提下会做到了更加省电。performance:性能模式,只有最高频率,从来不考虑消耗的电量,性能没得说,但是耗电量。powersave省电模式,通常以最低频率运行。userspace:用户自定义模式,系统将变频策略的决策权交给了用户态应用程序,并提供了相应的接口供用户态应用程序调节CPU 运行频率使用。也就是长期以来都在用的那个模式。可以通过手动编辑配置文件进行配置Hotplug:类似于ondemand, 但是cpu会在关屏下尝试关掉一个cpu,并且带有deep sleep,比较省电。
临时设置,发现报错了。根据提示信息我们排查一下问题。
┌──[[email protected]]-[/sys/devices/system/cpu/cpu0]
└─$ cpupower  frequency-set  -g ondemand
Setting cpu: 0
Error setting new values. Common errors:
- Do you have proper administration rights? (super-user?)
- Is the governor you requested available and modprobed?
- Trying to set an invalid policy?
- Trying to set a specific frequency, but userspace governor is not available,
   for example because of hardware which cannot be set to a specific frequency
   or because the userspace governor isn't loaded?
查frequency-info信息,发现调频的信息都没有
┌──[[email protected]]-[/sys/devices/system/cpu/cpu0]
└─$ cpupower frequency-info
analyzing CPU 0:
  no or unknown cpufreq driver is active on this CPU
  CPUs which run at the same hardware frequency: Not Available
  CPUs which need to have their frequency coordinated by software: Not Available
  maximum transition latency:  Cannot determine or is not supported.
  hardware limits: Not Available
  available cpufreq governors: Not Available
  Unable to determine current policy
  current CPU frequency: Unable to call hardware
  current CPU frequency:  Unable to call to kernel
  boost state support:
    Supported: no
    Active: no
    Boost States: 0
    Total States: 1
    Pstate-P0:  1600MHz
可能是调频模块没有启动,我们来看下。
┌──[[email protected]]-[/sys/devices/system/cpu/cpu0]
└─$ cd /sys/devices/system/cpu/cpu0;ls
cache        crash_notes_size  firmware_node  node0  subsystem  uevent
crash_notes  driver            microcode      power  topology
确实么有名为cpufreq的文件夹,然后我们看一下我的CUP信息
┌──[[email protected]]-[/sys/devices/system/cpu/cpu0]
└─$ cat /proc/cpuinfo  | grep name
model name      : AMD Ryzen 7 2700U with Radeon Vega Mobile Gfx
model name      : AMD Ryzen 7 2700U with Radeon Vega Mobile Gfx
┌──[[email protected]]-[/sys/devices/system/cpu/cpu0]
└─$
可以用的 CPUfreq 模块
┌──[[email protected]]-[/sys/devices/system/cpu/cpu0]
└─$ ls /usr/lib/modules/$(uname -r)/kernel/drivers/cpufreq/
acpi-cpufreq.ko.xz          p4-clockmod.ko.xz  speedstep-lib.ko.xz
amd_freq_sensitivity.ko.xz  powernow-k8.ko.xz
┌──[[email protected]]-[/sys/devices/system/cpu/cpu0]
└─$
- p4-clockmod.ko.xz Intel P4的处理器
- speedstep-lib.ko.xz 迅弛,很多笔记本都是这个
- amd_freq_sensitivity.ko.xz,powernow-k*.ko AMD处理器用的
- acpi-cpufreq.ko.xz 如果所有的都不行,试试这个,(但2.6.20或以上的内核推荐优先使用该项)
加载一下AMD对应的模块试试,发现没办法加载
┌──[[email protected]]-[/lib/modules/4.18.0-193.el8.x86_64/kernel/drivers/cpufreq]
└─$ modprobe  powernow-k8
modprobe: ERROR: could not insert 'powernow_k8': No such device
尝试修改一下配置试试,我们要修改这个文件
┌──[[email protected]]-[/lib/modules/4.18.0-193.el8.x86_64/kernel/drivers/cpufreq]
└─$ cat /proc/cmdline
BOOT_IMAGE=(hd0,msdos1)/vmlinuz-4.18.0-193.el8.x86_64 root=/dev/mapper/rhel-root ro resume=/dev/mapper/rhel-swap net.ifnames=0 biosdevname=0 rd.lvm.lv=rhel/root rd.lvm.lv=rhel/swap rhgb quiet
但是cmdline 不能直接更改,而是通过更改配置文件生成的该文件
┌──[[email protected]]-[/lib/modules/4.18.0-193.el8.x86_64/kernel/drivers/cpufreq]
└─$ sed  '$a GRUB_CMDLINE_LINUX_DEFAULT="intel_pstate=disable"' /etc/default/grub
GRUB_TIMEOUT=5
GRUB_DISTRIBUTOR="$(sed 's, release .*$,,g' /etc/system-release)"
GRUB_DEFAULT=saved
GRUB_DISABLE_SUBMENU=true
GRUB_TERMINAL_OUTPUT="console"
GRUB_CMDLINE_LINUX="resume=/dev/mapper/rhel-swap net.ifnames=0 biosdevname=0 rd.lvm.lv=rhel/root rd.lvm.lv=rhel/swap rhgb quiet"
GRUB_DISABLE_RECOVERY="true"
GRUB_ENABLE_BLSCFG=true
GRUB_CMDLINE_LINUX_DEFAULT="intel_pstate=disable"
┌──[[email protected]]-[/lib/modules/4.18.0-193.el8.x86_64/kernel/drivers/cpufreq]
└─$ sed -i '$a GRUB_CMDLINE_LINUX_DEFAULT="intel_pstate=disable"' /etc/default/grub
运行grub2-mkconfig -o /boot/grub2/grub.cfg,重新生成config文件
┌──[[email protected]]-[/lib/modules/4.18.0-193.el8.x86_64/kernel/drivers/cpufreq]
└─$ grub2-mkconfig -o /boot/grub2/grub.cfg
Generating grub configuration file ...
reboot 重启检查/proc/cmdline
┌──[[email protected]]-[~]
└─$ cat /proc/cmdline | grep intel_pstate=disable
BOOT_IMAGE=(hd0,msdos1)/vmlinuz-4.18.0-193.el8.x86_64 root=/dev/mapper/rhel-root ro resume=/dev/mapper/rhel-swap net.ifnames=0 biosdevname=0 rd.lvm.lv=rhel/root rd.lvm.lv=rhel/swap rhgb quiet intel_pstate=disable
还是不行,时间关系这里做简单记录,感兴趣小伙伴在研究下,看文档需要系统 BIOS 配置为允许操作系统控制 CPU 电源管理
┌──[[email protected]]-[/usr/lib/modules/4.18.0-193.el8.x86_64/kernel/drivers/cpufreq]
└─$ modprobe powernow-k8
modprobe: ERROR: could not insert 'powernow_k8': No such device
┌──[[email protected]]-[/usr/lib/modules/4.18.0-193.el8.x86_64/kernel/drivers/cpufreq]
└─$
感兴趣小伙伴可以参考下这个:https://access.redhat.com/solutions/253803
将符合AC97的声卡设置为省电模式
┌──[[email protected]]-[~]
└─$ cat /sys/module/snd_ac97_codec/parameters/power_save
5
┌──[[email protected]]-[~]
└─$ echo 1 > /sys/module/snd_ac97_codec/parameters/power_save
┌──[[email protected]]-[~]
└─$ cat /sys/module/snd_ac97_codec/parameters/power_save
1
┌──[[email protected]]-[~]
└─$
禁用rsyslogd同步
rsyslog是一个开源的软件程序,它负责写入日志。它记录绝大部分的日志记录,和系统有关的、安全、认证ssh,su、计划任务at,cron等日志。所以这要根据实际情况选择,如果遇到木马入侵等安全相关问题,通过日志排查可以发现问题。
┌──[[email protected]]-[~]
└─$ sed -e 's#\s/var/log/#-' /etc/rsyslog.conf
默认情况下,rsyslogd在写入所有文件后同步所有文件。在文件名前面加上”-“将禁用此行为。
┌──[[email protected]]-[~]
└─$ grep /var/log /etc/rsyslog.conf
*.info;mail.none;authpriv.none;cron.none                /var/log/messages
authpriv.*                                              /var/log/secure
mail.*                                                  -/var/log/maillog
cron.*                                                  /var/log/cron
uucp,news.crit                                          /var/log/spooler
local7.*                                                /var/log/boot.log
┌──[[email protected]]-[~]
└─$
启用电源感知CPU调度器
这个我的机器没办法做Demo。感兴趣小伙伴可以研究下
echo 1 > /sys/devices/system/cpu/sched_mc_power_savings
调整任务调度,使任务在尽可能少的内核上调度,允许未使用的cpu空闲。支持以下值。
- 0:无节能负载均衡(默认值)
- 1:对于长时间运行的线程,先填充一个线程/内核/包
- 2:也将任务唤醒到半空闲的cpu包,以节省电力
增加虚拟机的脏回写时间
┌──[[email protected]]-[/sys/devices/system/cpu]
└─$ cat /proc/sys/vm/dirty_writeback_centisecs
500
┌──[[email protected]]-[/sys/devices/system/cpu]
└─$ echo 300000 > /proc/sys/vm/dirty_writeback_centisecs
┌──[[email protected]]-[/sys/devices/system/cpu]
└─$ cat /proc/sys/vm/dirty_writeback_centisecs
300000
┌──[[email protected]]-[/sys/devices/system/cpu]
└─$
vm/dirty_writeback_centisecs sysctl控制I/O缓存中的脏页提交到磁盘的时间,在Linux中默认为500。增加时间可以显著减少磁盘旋转,但在崩溃的情况下会有更多的数据丢失的风险。
开启ALPM (SATAAggressive Link Power Management)模式
现代SATA控制器可以在不工作时进入低功耗模式,从而显著节省电力。
echo min_power > /sys/class/scsihost/hoste/link_power_management_policy
这个也不行,可能是内核版本的原因,或者是需要安装TLP电源管理工具
启用USB 的autosuspend
usbcore. autosuspend=1(on the kernel command 1ine)
USB自动暂停允许不活动的USB设备进入省电模式。
开启无线设备的省电模式
iwpriv wlane set_power 5c
无线设备支持不同的功率级别,从1到5不等。O表示自动,6表示不节能。
节能调优配置文件
RHEL7/8的调优服务tuned:提供了大量预设的调优方案,旨在于简化调优的实施,充分利用系统资源与能效。管理员可以针对不同的业务选择不同的优化策略,节能的调优可以使用powersave策略
┌──[[email protected]]-[/sys/class/scsi_host/host0]
└─$ tuned-adm list | grep powersave
- powersave                   - Optimize for low power consumption
┌──[[email protected]]-[/sys/class/scsi_host/host0]
└─$ tuned-adm profile powersave
┌──[[email protected]]-[/sys/class/scsi_host/host0]
└─$ tuned-adm active
Current active profile: powersave
配置功率使用powertop
PowerTOP 是一个笔记本电脑节省电源的 Linux 工具。此工具由 Intel 公司发布。它可以帮助用户找出那些耗电量大的程序,通过修复或者关闭那些应用程序或进程,从而为用户节省电源。
PowerTOP 要求 Linux 内核开启 tickless idle 功能,具备 2.6.21 及以上版本。另外,PowerTOP 工作的最佳平台为笔记本电脑。
官网地址: http://www.linuxpowertop.org/
┌──[[email protected]]-[/sys/class/scsi_host/host0/power]
└─$ yum -y install powertop
┌──[[email protected]]-[~]
└─$ powertop --help
Usage: powertop [OPTIONS]

--auto-tune         sets all tunable options to their GOOD setting
 -c, --calibrate         runs powertop in calibration mode
 -C, --csv[=filename]    generate a csv report
     --debug             run in "debug" mode
     --extech[=devnode]  uses an Extech Power Analyzer for measurements
 -r, --html[=filename]   generate a html report
 -i, --iteration[=iterations] number of times to run each test
 -q, --quiet             suppress stderr output
 -s, --sample[=seconds]  interval for power consumption measurement
 -t, --time[=seconds]    generate a report for 'x' seconds
 -w, --workload[=workload] file to execute for workload
 -V, --version           print version information
 -h, --help              print this help menu

For more help please refer to the 'man 8 powertop'
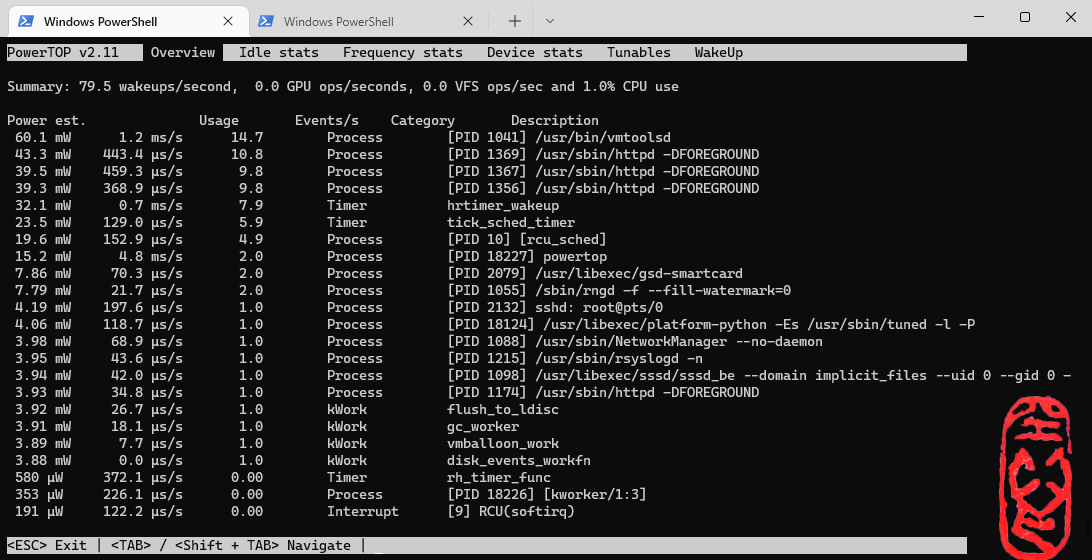

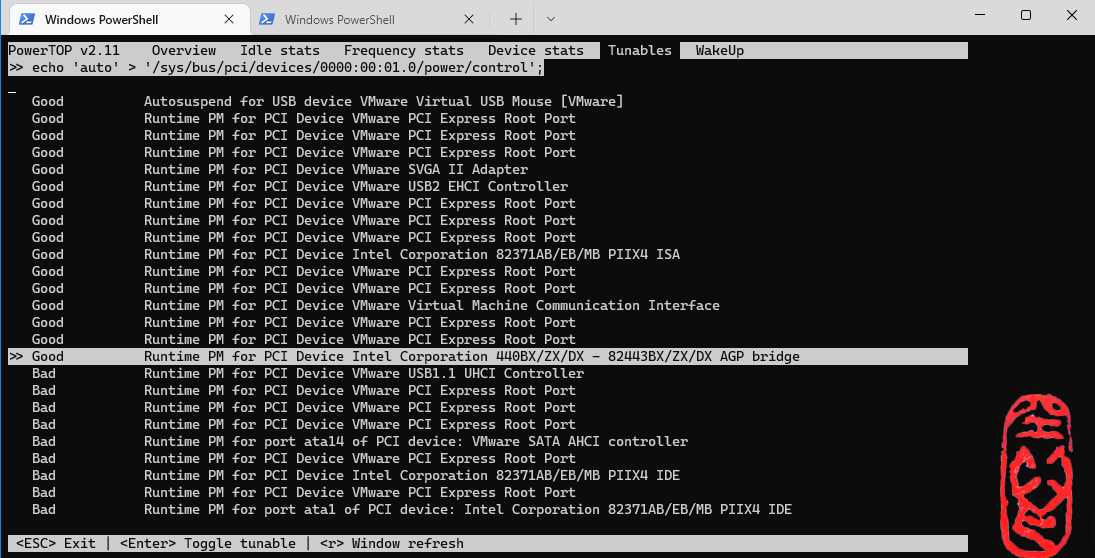
请使用 Tab, Shift + Tab 或方向键 ←, → 切换至 Tunables 分页 ↑, ↓ 上下移动,于欲调校的项目按下 Enter 进行调校,当所有状态显示为 Good 后即可按下 q 离开。
也可以通过命令来批量设置
┌──[[email protected]]-[~]
└─$ powertop --auto-tune
modprobe cpufreq_stats failedLoaded 0 prior measurements
RAPL device for cpu 0
RAPL device for cpu 0
Devfreq not enabled
glob returned GLOB_ABORTED
 the port is sda
Leaving PowerTOP
┌──[[email protected]]-[~]
└─$
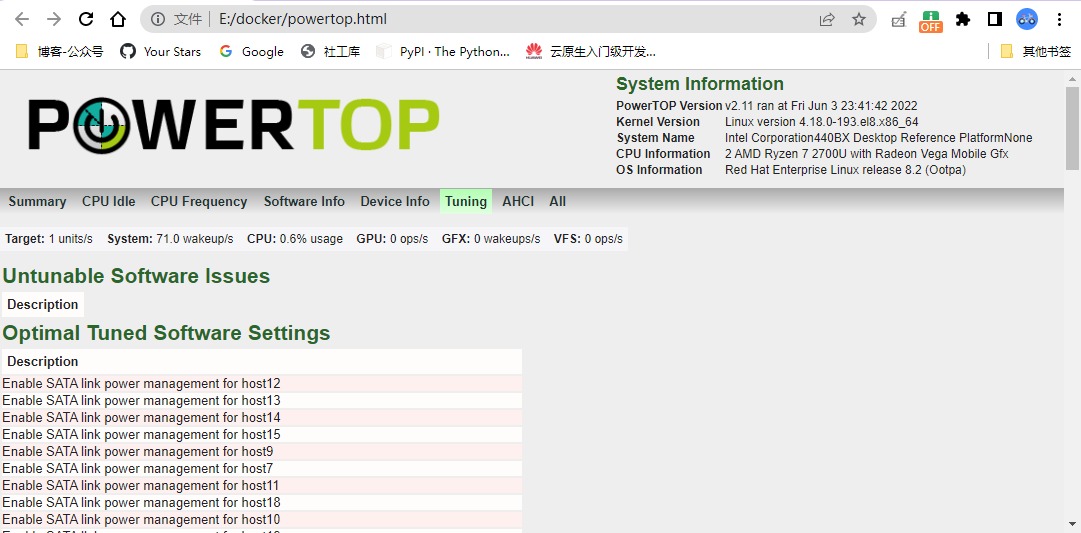
PowerTOP 本身并无储存功能,但我们可以借由 powertop --html/csv 产生的报告来调校系统,甚至于开机时载入这些设定.
┌──[[email protected]]-[~]
└─$ powertop --html
modprobe cpufreq_stats failedLoaded 0 prior measurements
RAPL device for cpu 0
RAPL device for cpu 0
Devfreq not enabled
glob returned GLOB_ABORTED
Preparing to take measurements
Taking 1 measurement(s) for a duration of 20 second(s) each.
 the port is sda
PowerTOP outputing using base filename powertop.html
PS E:\docker> scp [email protected]:/root/powertop.html  .\
[email protected]'s password:
powertop.html                                                                                      100%   71KB   9.9MB/s   00:00
PS E:\docker>
参考博文书籍
Recommend
About Joyk
Aggregate valuable and interesting links.
Joyk means Joy of geeK