

Build a URL Shortener With FastAPI and Python
source link: https://realpython.com/build-a-python-url-shortener-with-fastapi/
Go to the source link to view the article. You can view the picture content, updated content and better typesetting reading experience. If the link is broken, please click the button below to view the snapshot at that time.

Build a URL Shortener With FastAPI and Python
In this tutorial, you’ll build a URL shortener with Python and FastAPI. URLs can be extremely long and not user-friendly. This is where a URL shortener can come in handy. A URL shortener reduces the number of characters in a URL, making it easier to read, remember, and share.
By following this step-by-step project, you’ll build a URL shortener with Python and FastAPI. At the end of this tutorial, you’ll have a fully functional API-driven web app that creates shortened URLs that forward to target URLs.
In this tutorial, you’ll learn how to:
- Create a REST API with FastAPI
- Run a development web server with Uvicorn
- Model an SQLite database
- Investigate the auto-generated API documentation
- Interact with the database with CRUD actions
- Optimize your app by refactoring your code
This URL shortener project is for intermediate Python programmers who want to try out FastAPI and learn about API design, CRUD, and interaction with a database. To follow along, it’ll help if you’re familiar with the basics of handling HTTP requests. If you need a refresher on FastAPI, Using FastAPI to Build Python Web APIs is a great introduction.
Get Source Code: Click here to get access to the source code that you’ll use to build your Python URL shortener with FastAPI.
Demo: Your Python URL Shortener
In this step-by-step project, you’ll build an API to create and manage shortened URLs. The main purpose of this API is to receive a full target URL and return a shortened URL. To try out your API endpoints, you’ll leverage the documentation that FastAPI automatically creates:
When you post a target URL to the URL shortener app, you get a shortened URL and a secret key back. The shortened URL contains a random key that forwards to the target URL. You can use the secret key to see the shortened URL’s statistics or delete the forwarding.
Project Overview
Your URL shortener Python project will provide API endpoints that are capable of receiving different HTTP request types. Each endpoint will perform an action that you’ll specify. Here’s a summary of your URL shortener’s API endpoints:
| Endpoint | HTTP Verb | Request Body | Action |
|---|---|---|---|
/ |
GET |
Returns a Hello, World! string |
|
/url |
POST |
Your target URL | Shows the created url_key with additional info, including a secret_key |
/{url_key} |
GET |
Forwards to your target URL | |
/admin/{secret_key} |
GET |
Shows administrative info about your shortened URL | |
/admin/{secret_key} |
DELETE |
Your secret key | Deletes your shortened URL |
The code you’ll write in this tutorial focuses on getting the app working first. However, having a working app doesn’t always mean that the code behind it is perfect. That’s why you’ll find a step in this tutorial where you’ll refactor parts of your app.
If you want to have a look at the final source code, go ahead and download it:
Get Source Code: Click here to get access to the source code that you’ll use to build your Python URL shortener with FastAPI.
This project is a great starting point to extend your API with more functionality. At the end of this tutorial, you’ll find ideas about what to build next.
Prerequisites
To get the most out of this tutorial, you should be comfortable with the following concepts:
The linked resources will help you better understand the code that you write in this tutorial. However, in this tutorial, you’ll build your app step by step. So even if you’re not familiar with the concepts above, then you’ll be able to follow along.
Step 1: Prepare Your Environment
In this step, you’ll prepare the development environment for your FastAPI app. First, you’ll create the folder structure for your app. Then, you’ll create a virtual environment and install all project dependencies that you need for your project. Finally, you’ll learn how to store environment variables outside of your code and how to load the variables into your app.
Create the Project’s Folder Structure
In this section, you’ll create your project structure.
You can name the root folder of your project any way you like.
For example, you could name it url_shortener_project/.
The root folder will be your working directory. You’ll run the commands for your application from the root folder that you’re in right now. The files and folders that you’ll create will be located in either this folder or your app’s folder, which you’ll create in a moment.
While you can choose your project folder’s name individually, it’s important to name your app folder shortener_app/.
When you’re inside your project folder, create a subfolder called shortener_app/:
$ mkdir shortener_app
The shortener_app/ folder will be the location that your app will live in.
Later, you’ll add your app’s source code into different files in this shortener_app/ directory.
Your URL shortener Python app will be a package named shortener_app that’ll contain different modules.
To use shortener_app as a package, create an __init__.py file:
PS> ni shortener_app\__init__.py
You create a package by adding an __init__.py file to a directory.
The __init__.py file will stay empty throughout this tutorial.
Its only job is to tell Python that your shortener_app/ directory is a package.
Note: Without an __init__.py file, you’d create not a regular package but a namespace package. A namespace package comes in handy when splitting the package over multiple directories, but you’re not splitting the package in this project. Check out Python import: Advanced Techniques and Tips to learn more about packages.
With the package structure in place, move on to the next section, where you’ll create a virtual environment and add your project’s dependencies.
Add Project Dependencies
Dependencies are the Python packages that your FastAPI project needs to work.
Before installing them with pip, it’s a good idea to create a virtual environment.
That way, you’re installing the dependencies not system-wide but only in your project’s virtual environment.
Select your operating system below and use your platform-specific command to set up a virtual environment:
PS> python -m venv venv
PS> .\venv\Scripts\activate
(venv) PS> python -m pip --version
pip 21.2.3 from ...\lib\site-packages\pip (python 3.10)
With the commands shown above, you create a virtual environment named venv by using Python’s built-in venv module.
Then you activate it with the source command.
The parentheses (()) surrounding your venv name indicate that you successfully activated the virtual environment.
After you’ve created and activated your virtual environment, it’s time to install the dependencies that your URL shortener Python app requires:
(venv) $ python -m pip install fastapi==0.75.0 uvicorn==0.17.6
You’ll use the FastAPI web framework to build the API.
So it’s no big surprise that fastapi is the first requirement of your project.
To run the API, you need a web server.
That’s what uvicorn is for.
Uvicorn is a web server implementation for Python that provides an Asynchronous Server Gateway Interface (ASGI).
Web Server Gateway Interfaces (WSGI) specify how your web server communicates with your web application.
Traditional WSGI implementations like Gunicorn need to run multiple processes to handle network traffic concurrently. ASGI, in contrast, can handle an asynchronous event loop on a single thread, as long as you can avoid calling any blocking functions.
FastAPI leverages the ASGI standard, and you use the uvicorn web server, which can handle asynchronous functionality.
But as you’ll see in this tutorial, you don’t have to write asynchronous code to use FastAPI.
Note: If you want to learn more about Async IO in Python and how FastAPI handles parallelism, then you can check out the Concurrency and async / await page of the FastAPI documentation.
With your web framework and the web server installed, add sqlalchemy to the mix:
(venv) $ python -m pip install sqlalchemy==1.4.32
SQLAlchemy is a Python SQL tool kit that helps you communicate with your database. Instead of writing raw SQL statements, you can use SQLAlchemy’s Object-Relational Mapper (ORM). The ORM provides a more user-friendly way for you to declare the interactions of your application and the SQLite database that you’ll use.
Your application will also rely on environment variables.
You’ll learn more about environment variables later in the tutorial.
For now, make sure to install python-dotenv to load them from an external file:
(venv) $ python -m pip install python-dotenv==0.19.2
The python-dotenv package helps you read key-value pairs from an external file and set them as environment variables.
Finally, you’ll use a package to validate URLs:
(venv) $ python -m pip install validators==0.18.2
As the name suggests, the validators library helps you validate values like email addresses, IP addresses, or even Finnish social security numbers.
You’ll use validators to validate the URL that a user wants to shorten in your project.
Note: The pip install commands above are singled out to explain why they’re required. You can install all dependencies in one command by chaining the package names.
Now you’ve installed all the project dependencies that you need your FastAPI project to work with. Installing requirements is vital in your development process, as it prepares your working environment. In the next section, you’ll define environment variables that’ll store the settings of your app.
Define Environment Variables
You’re currently developing your Python URL shortener on your local computer. But once you want to make it available to your users, you may want to deploy it to the web.
It makes sense to use different settings for different environments. Your local development environment may use a differently named database than an online production environment.
To be flexible, you store this information in special variables that you can adjust for each environment. While you won’t take steps to host your app online in this tutorial, you’ll build your app in a way that enables you to deploy it to the cloud in the future.
Start by creating a config.py file with default settings:
 1# shortener_app/config.py
 2
 3from pydantic import BaseSettings
 4
 5class Settings(BaseSettings):
 6    env_name: str = "Local"
 7    base_url: str = "http://localhost:8000"
 8    db_url: str = "sqlite:///./shortener.db"
 9
10def get_settings() -> Settings:
11    settings = Settings()
12    print(f"Loading settings for: {settings.env_name}")
13    return settings
In line 3, you’re importing pydantic.
You installed pydantic automatically when you installed fastapi with pip.
pydantic is a library that uses type annotation to validate data and manage settings.
The Settings class that you define in line 5 is a subclass of BaseSettings.
The BaseSettings class comes in handy to define environment variables in your application.
You only have to define the variables that you want to use, and pydantic takes care of the rest.
In other words, pydantic will automatically assume those default values if it doesn’t find the corresponding environment variables.
In this case, you’re defining the default settings for env_name, base_url, and db_url in lines 6 to 8.
Later you’ll replace their values with external environment variables:
| Settings Variable | Environment Variable | Value |
|---|---|---|
env_name |
ENV_NAME |
Name of your current environment |
base_url |
BASE_URL |
Domain of your app |
db_url |
DB_URL |
Address of your database |
It’s a good start to have env_name, base_url, and db_url in place with default values.
But since the values for your current environment, the domain of your app, and the address of your database are dependent on the environment that you’re working in, you’ll load the values from external environment variables later.
To show a message once your settings are loaded, you create get_settings() in lines 10 to 13.
The get_settings() function returns an instance of your Settings class and will provide you with the option of caching your settings.
But before you investigate why you need caching, run get_settings() in the interactive Python interpreter:
>>> from shortener_app.config import get_settings
>>> get_settings().base_url
Loading settings for: Local
'http://localhost:8000'

>>> get_settings().db_url
Loading settings for: Local
'sqlite:///./shortener.db'
Your settings are loaded correctly when you call get_settings().
However, you can optimize the retrieval of your settings a bit more.
Note: If you got an error when running the commands above, then you should make sure that you’re starting the interactive Python interpreter out of your project’s root directory:
(venv) PS> ls
shortener_app/    venv/
When running the ls command in your terminal, you should see shortener_app/ as a subdirectory.
If your app direcory is listed, then you’re currently in your project’s root directory.
You don’t change your app’s settings while running the app.
Still, you’re loading your settings over and over again every time you call get_settings().
But you can take advantage of get_settings() being a function to implement a Least Recently Used (LRU) strategy.
When you start your app, it makes sense to load your settings and then cache the data. Caching is an optimization technique that you can use in your applications to keep recent or often-used data in memory. You can implement an LRU cache strategy to accomplish this behavior:
# shortener_app/config.py

from functools import lru_cache

from pydantic import BaseSettings

class Settings(BaseSettings):
    env_name: str = "Local"
    base_url: str = "http://localhost:8000"
    db_url: str = "sqlite:///./shortener.db"

@lru_cache
def get_settings() -> Settings:
    settings = Settings()
    print(f"Loading settings for: {settings.env_name}")
    return settings
You import lru_cache from Python’s functools module in line 3.
The @lru_cache decorator allows you to cache the result of get_settings() using the LRU strategy.
Run the command below to see how the caching works:
>>> from shortener_app.config import get_settings
>>> get_settings().base_url
Loading settings for: Local
'http://localhost:8000'

>>> get_settings().db_url
'sqlite:///./shortener.db'
Now, you see your message only once.
That means that your settings are successfully cached.
By adding the @lru_cache decorator, you made your app faster while decreasing the load on computing resources.
Another improvement that you’ll implement is loading external environment variables.
Start by creating an external .env file in the root directory of your project, and then add this content:
# .env

ENV_NAME="Development"
BASE_URL="http://127.0.0.1:8000"
DB_URL="sqlite:///./shortener.db"
By storing your environment variables externally, you’re following the twelve-factor app methology. The twelve-factor app methodology states twelve principles to enable developers to build portable and scalable web applications. One principle is to store the configuration of your app in the environment:
An app’s config is everything that is likely to vary between deploys (staging, production, developer environments, etc.). This includes:
- Resource handles to the database, Memcached, and other backing services
- Credentials to external services such as Amazon S3 or Twitter
- Per-deploy values such as the canonical hostname for the deploy
The twelve-factor principles require strict separation of config from code. Config varies substantially across deploys, and code does not. (Source)
It’s recommended to have different .env files for different environments.
Also, you should never add the .env file to your version control system, as your environment variables may store sensitive information.
Note: If you’re sharing your code with other developers, then you may want to show in your repository what their .env files should look like. In that case, you can add .env_sample to your version control system. In .env_sample, you can store the keys with placeholder values. To help yourself and your fellow developers, don’t forget to write instructions in your README.md file on how to rename .env_sample and store the correct values in the file.
The configuration variables that you used in your Settings class are a fallback for your external environment variables.
In the .env file, you’re declaring the same variables for your development environment.
When you deploy your application to the web, you declare environment variables for each environment.
To load your external .env file, adjust your Settings class in your config.py file:
# shortener_app/config.py

# ...

class Settings(BaseSettings):
    env_name: str = "Local"
    base_url: str = "http://localhost:8000"
    db_url: str = "sqlite:///./shortener.db"

    class Config:
        env_file = ".env"

# ...
When you add the Config class with the path to your env_file to your settings, pydantic loads your environment variables from the .env file.
Test your external environment variables by running the commands below:
>>> from shortener_app.config import get_settings
>>> get_settings().base_url
Loading settings for: Development
'http://127.0.0.1:8000'

>>> get_settings().db_url
'sqlite:///./shortener.db'
Fantastic, the values are the ones that you declared in your .env file!
Now your app works with external variables.
Compare Your Project Setup
If you followed the instructions above, then your directory tree should look like this:
url_shortener_project/
│
├── shortener_app/
│   │
│   ├── __init__.py
│   └── config.py
│
├── venv/
│
└── .env
Your url_shortener_project/ directory contains the shortener_app/ folder.
So far, there’s an empty __init__.py file and a config.py file, which holds your app’s settings.
You can load your settings from the external .env file that you created in the root of your project directory.
Besides that, you may have a venv folder that contains your virtual environment.
With your project structure in place, you’re ready to implement the main functionality of your URL shortener app.
Step 2: Set Up Your Python URL Shortener
Now that you’ve prepared your development environment, it’s time to set up your URL shortener app. With only a few lines of code, you’ll create a FastAPI app with your first API endpoint.
Once the app is running, you’ll define what your app should be able to do. You’ll model the data schema into a database. At the end of this step, you’ll be able to shorten a URL and see how your app forwards the URL to its target.
Create Your FastAPI App
Start with a Hello, World! implementation of FastAPI.
This implementation is a FastAPI app that has one endpoint.
Create a file named main.py in the shortener_app/ folder and add this code:
 1# shortener_app/main.py
 2
 3from fastapi import FastAPI
 4
 5app = FastAPI()
 6
 [email protected]("/")
 8def read_root():
 9    return "Welcome to the URL shortener API :)"
In line 3, you import FastAPI.
You define app in line 5 by instantiating the FastAPI class.
The app variable is the main point of interaction to create the API.
You’ll refer to it multiple times during this tutorial.
In line 7, you use a path operation decorator to associate your root path with read_root() by registering it in FastAPI.
Now, FastAPI listens to the root path and delegates all incoming GET requests to your read_root() function.
Finally, you return a string in line 9. This string is displayed when you send a request to the root path of your API.
The code that you just added to main.py is the start of your application.
To run your app, you need a server.
As you learned above, you already installed uvicorn to be your server.
Run the live server using uvicorn:
(venv) $ uvicorn shortener_app.main:app --reload

INFO:     Uvicorn running on http://127.0.0.1:8000
INFO:     (Press CTRL+C to quit)
INFO:     Started reloader process [28720]
INFO:     Started server process [28722]
INFO:     Waiting for application startup.
INFO:     Application startup complete.
You tell uvicorn to run app of your shortener_app package’s main.py file with the command above.
The --reload flag makes sure that your server will reload automatically when you save your application’s code.
The automatic reload will be very handy, as you don’t need to stop and restart your server repeatedly while coding.
Instead, you can keep this terminal window open in the background.
Now that your server is running, test the response of your API endpoint.
Open http://127.0.0.1:8000 in your browser:

When you navigate to http://127.0.0.1:8000 in your browser, you’re sending a GET request to the root of your FastAPI app.
The response is the welcome message that you defined.
Congratulations, your app works!
Note: Your browser may display the response as unformatted text. You can install a JSON formatter extension for your browser to render API responses nicely.
One great thing about FastAPI is that the framework automatically creates documentation of your API endpoints for you.
Go check it out in your browser at http://127.0.0.1:8000/docs:
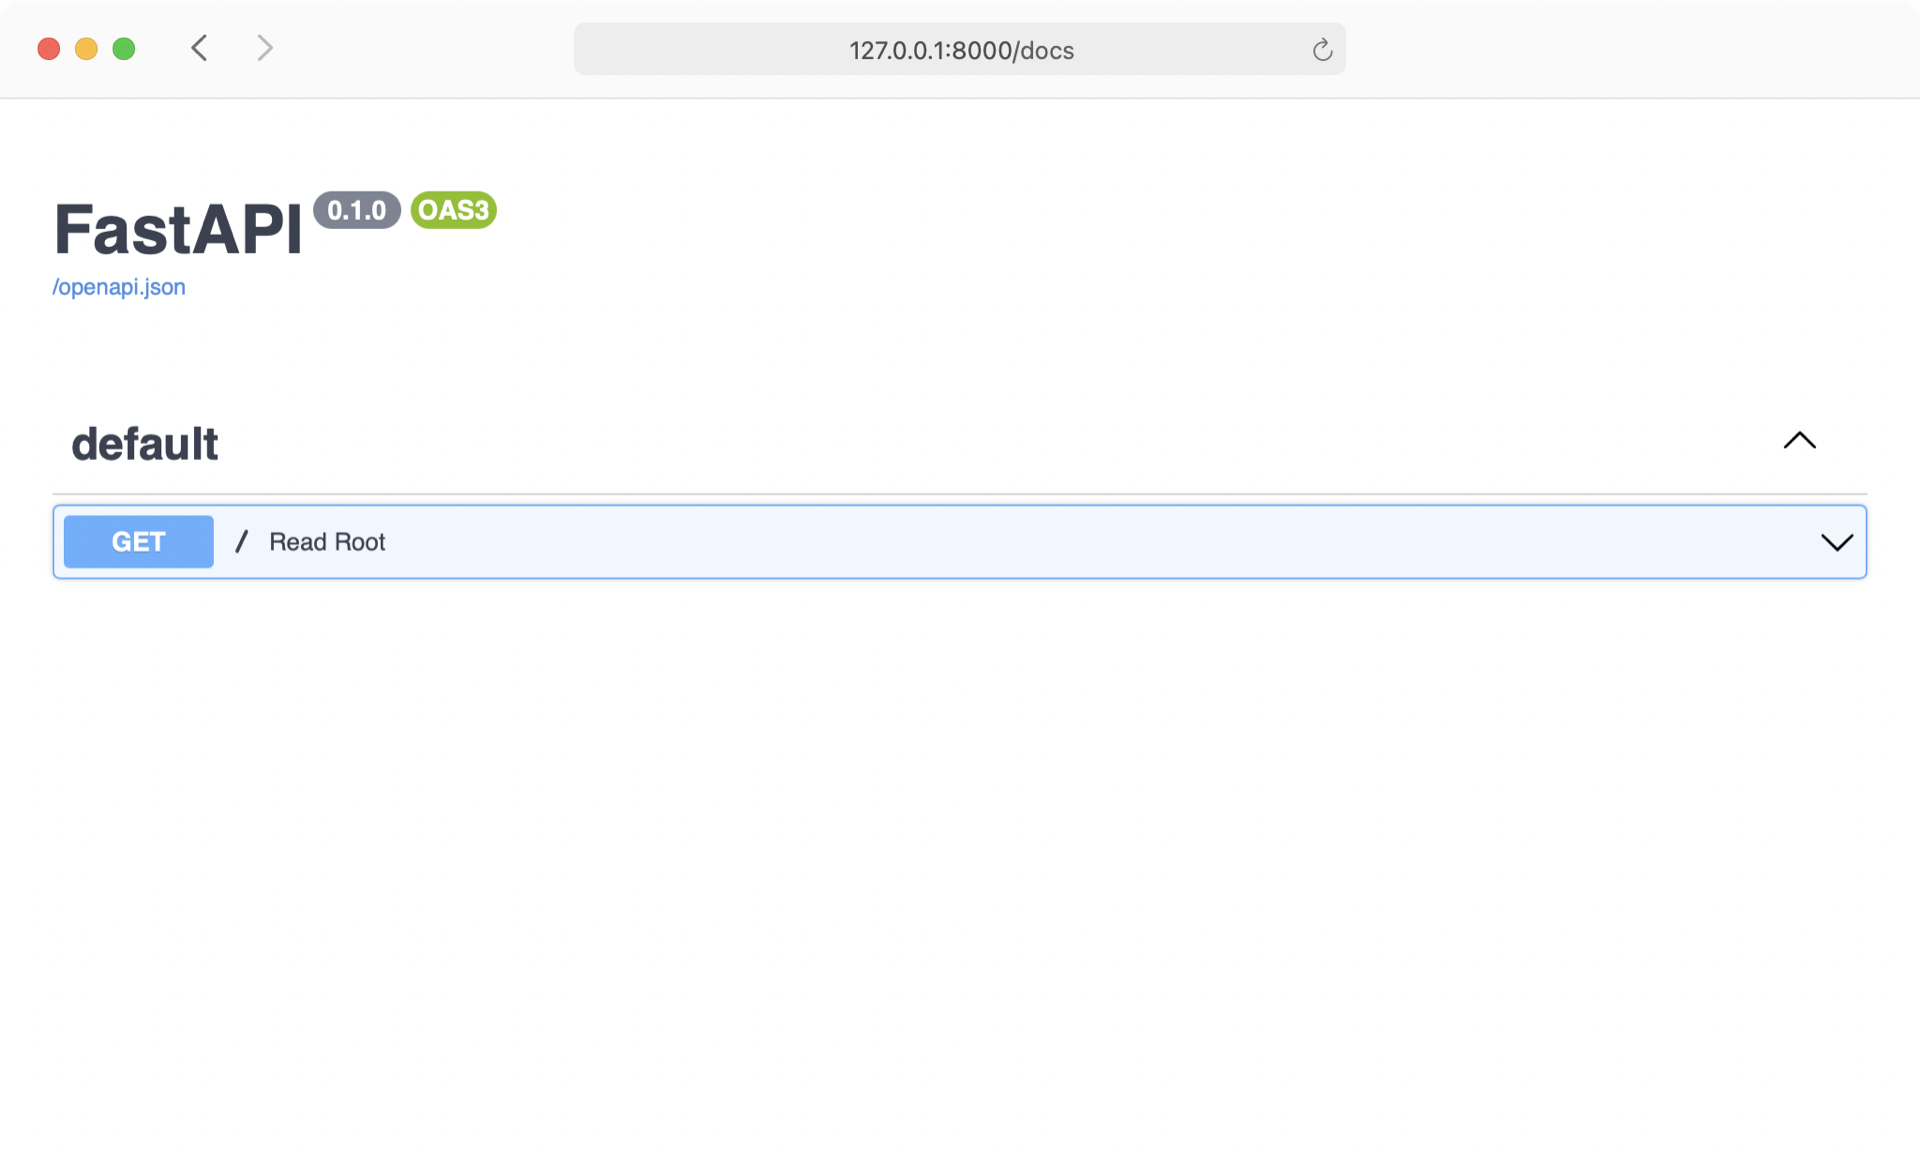
This is the Swagger UI documentation that FastAPI created for you. Not only does Swagger UI give you an overview of your API’s endpoints, but you can also use it to test your API. You’ll leverage this functionality throughout the rest of the tutorial to keep tabs on your API’s behavior.
You can also view the alternate documentation at http://127.0.0.1:8000/redoc.
But throughout this tutorial, you’ll only see screenshots of the Swagger UI documentation that you can find at the /docs endpoint.
Decide What Your App Can Do
Before you add more code to your application, remember the endpoints and actions of your URL shortener:
| Endpoint | HTTP Verb | Request Body | Action |
|---|---|---|---|
/ |
GET |
Returns a Hello, World! string |
|
/url |
POST |
Your target URL | Shows the created url_key with additional info, including a secret_key |
/{url_key} |
GET |
Forwards to your target URL | |
/admin/{secret_key} |
GET |
Shows administrative info about your shortened URL | |
/admin/{secret_key} |
DELETE |
Your secret key | Deletes your shortened URL |
When a user posts a target URL that they want to shorten, your app should send a message confirming that the action worked. To enable your user to manage the shortened URL, you’re sending along a response with some additional information to the client. Here’s an example of how a response body can look:
{
  "target_url": "https://realpython.com",
  "is_active": true,
  "clicks": 0,
  "url": "JNPGB",
  "admin_url": "MIZJZYVA"
}
Your schema states what your API expects as a request body and what the client can expect in the response body. You’ll implement type hinting to verify that the request and the response match the data types that you define.
Start by creating the base models for your API request and response bodies in a schemas.py file:
 1# shortener_app/schemas.py
 2
 3from pydantic import BaseModel
 4
 5class URLBase(BaseModel):
 6    target_url: str
 7
 8class URL(URLBase):
 9    is_active: bool
10    clicks: int
11
12    class Config:
13        orm_mode = True
14
15class URLInfo(URL):
16    url: str
17    admin_url: str
In the schemas.py file, you’re using pydantic’s BaseModel to define your URLBase class.
The URLBase class in line 5 contains the field target_url, which requires a string.
You’ll use target_url to store the URL that your shortened URL forwards to.
The URL class in line 8 inherits the target_url field from URLBase.
In lines 9 and 10, you add the Boolean field is_active and the integer field clicks to the class.
The is_active field allows you to deactivate shortened URLs.
With clicks, you’ll later count how many times a shortened URL has been visited.
Like in your settings.py file, you use the Config class in line 12 to provide configurations to pydantic.
In this case, you tell pydantic with orm_mode = True to work with a database model.
ORM stands for Object-Relational Mapping, and it provides the convenience of interacting with your database using an object-oriented approach.
In the next section, you’ll see how the ORM works and how the URL class relates to the urls database table.
In line 15, you define URLInfo.
This enhances URL by requiring two additional strings, url and admin_url.
You could also add the two strings url and admin_url to URL.
But by adding url and admin_url to the URLInfo subclass, you can use the data in your API without storing it in your database.
Head back to main.py to use the URLBase schema in a POST endpoint:
 1# shortener_app/main.py
 2
 3import validators
 4from fastapi import FastAPI, HTTPException
 5
 6from . import schemas
 7
 8# ...
 9
10def raise_bad_request(message):
11    raise HTTPException(status_code=400, detail=message)
12
13# ...
14
[email protected]("/url")
16def create_url(url: schemas.URLBase):
17    if not validators.url(url.target_url):
18        raise_bad_request(message="Your provided URL is not valid")
19    return f"TODO: Create database entry for: {url.target_url}"
In lines 3 to 6, you import HTTPException from fastapi, along with validators and the schemas module that you just created.
The raise_bad_request() function in line 10 takes message as an argument and raises an HTTPException with a status code 400.
You’ll raise it in line 18 when the provided URL isn’t valid.
Later in the tutorial, you’ll reuse raise_bad_request(), which is why you put HTTPException into its own function.
In line 16, you define the create_url endpoint, which expects a URL string as a POST request body.
You define this endpoint as a POST request endpoint with the @app.post decorator in line 15.
The URL for the create_url endpoint is /url.
While pydantic makes sure the URL is a string, it doesn’t check if the string is a valid URL.
That’s the job of the validators package that you installed at the beginning of this tutorial.
In line 17, you check if url.target_url is a valid URL.
If the provided target_url isn’t valid, then you call raise_bad_request().
For now, you’re only returning a message to yourself in line 19.
Later you’ll create a database entry if target_url is valid.
Now, you have functions in main.py in place that work with the schema you defined in schemas.py.
You can send requests to your API endpoints and get responses in return, but nothing happends under the hood so far.
In the next section, you’ll breathe some life into your project by connecting your app with a database.
Prepare Your SQLite Database
Although you can reach your API endpoint to shorten a URL, nothing has happened in the backend yet. In this section, you’ll create and connect your database to your codebase.
First, store the code that you need for the database connection in a file named database.py:
 1# shortener_app/database.py
 2
 3from sqlalchemy import create_engine
 4from sqlalchemy.ext.declarative import declarative_base
 5from sqlalchemy.orm import sessionmaker
 6
 7from .config import get_settings
 8
 9engine = create_engine(
10    get_settings().db_url, connect_args={"check_same_thread": False}
11)
12SessionLocal = sessionmaker(
13    autocommit=False, autoflush=False, bind=engine
14)
15Base = declarative_base()
In one of the previous sections, you learned that you’d use SQLAlchemy to communicate with your database.
In particular, you’ll use create_engine(), which you import in line 3, to define your engine in line 9.
You can think of engine as the entry point to your database.
The first argument is the database URL, which you receive from db_url of the settings that you import in line 7.
You set check_same_thread to False because you’re working with an SQLite database.
With this connection argument, SQLite allows more than one request at a time to communicate with the database.
You use sessionmaker, which you import in line 5, to create the SessionLocal class in line 12.
You’ll create a working database session when you instantiate SessionLocal later.
The declarative_base function that you import in line 4 returns a class that connects the database engine to the SQLAlchemy functionality of the models.
You assign declarative_base() to Base in line 15.
Base will be the class that the database model inherits from in your models.py file.
While database.py contains information about your database connection, the models.py file will describe the content of your database.
To continue, create models.py:
 1# shortener_app/models.py
 2
 3from sqlalchemy import Boolean, Column, Integer, String
 4
 5from .database import Base
 6
 7class URL(Base):
 8    __tablename__ = "urls"
 9
10    id = Column(Integer, primary_key=True)
11    key = Column(String, unique=True, index=True)
12    secret_key = Column(String, unique=True, index=True)
13    target_url = Column(String, index=True)
14    is_active = Column(Boolean, default=True)
15    clicks = Column(Integer, default=0)
The code that you add to models.py looks similar to the code that you wrote in schemas.py.
In schemas.py, you defined what data your API expected from the client and the server.
In models.py, you declare how your data should be stored in the database.
You’re creating a database model named URL in line 7.
The URL model is a subclass of Base, which you import in line 5.
It’s common to give your model a singular name and your database tables plural names.
That’s why you name your model in line 7 URL and provide the special variable __tablename__ in line 8.
In line 10, you define id as your database’s primary key.
By setting the primary_key argument to True, you don’t need to provide a unique argument, as it defaults to True for primary keys anyway.
The key and secret_key columns that you define in lines 11 and 12 will also contain unique entries.
The key field will contain the random string that’ll be part of the shortened URL.
With secret_key, you can provide a secret key to the user to manage their shortened URL and see statistics.
In line 13, you define the column target_url to store the URL strings for which your app provides shortened URLs.
It’s important that you don’t set your target_url column to unique=True.
If you only accepted unique values for this database field, then you’d prevent different users from forwarding to the same URL.
Your app’s expected behavior is that any user can create a shortened URL for any target URL without knowing if such a forward already exists. So while you’ll provide a unique shortened URL, multiple shortened URLs may forward to the same website.
As you’ll see later, the is_active Boolean column in line 14 will come in handy when users want to delete a shortened URL.
Instead of giving the user the power to delete a database entry directly, you’ll make the entry inactive instead.
That way, you have a safety net for critical actions and may undo the deletion if it was triggered by a user accidentally.
In line 15, you define the clicks column, which starts with zero.
Later, this field will increase the integer each time someone clicks the shortened link.
Connect Your Database
With the database model in place, you can now link your app to the database.
For now, you’ll add most of the code to communicate with your database to main.py:
 1# shortener_app/main.py
 2
 3import secrets
 4
 5import validators
 6from fastapi import Depends, FastAPI, HTTPException
 7from sqlalchemy.orm import Session
 8
 9from . import models, schemas
10from .database import SessionLocal, engine
11
12app = FastAPI()
13models.Base.metadata.create_all(bind=engine)
14
15def get_db():
16    db = SessionLocal()
17    try:
18        yield db
19    finally:
20        db.close()
21
22# ...
23
[email protected]("/url", response_model=schemas.URLInfo)
25def create_url(url: schemas.URLBase, db: Session = Depends(get_db)):
26    if not validators.url(url.target_url):
27        raise_bad_request(message="Your provided URL is not valid")
28
29    chars = "ABCDEFGHIJKLMNOPQRSTUVWXYZ"
30    key = "".join(secrets.choice(chars) for _ in range(5))
31    secret_key = "".join(secrets.choice(chars) for _ in range(8))
32    db_url = models.URL(
33        target_url=url.target_url, key=key, secret_key=secret_key
34    )
35    db.add(db_url)
36    db.commit()
37    db.refresh(db_url)
38    db_url.url = key
39    db_url.admin_url = secret_key
40
41    return db_url
There’s a lot going on in main.py now.
Here’s what’s happening line by line:
- Lines 3 to 7 import the functions and classes from external modules.
- Line 9 imports your internal modules
modelsandschemas. - Line 10 imports
SessionLocalandenginefrom yourdatabasemodule. - Line 12 stays the same. Here you define your FastAPI app.
- Line 13 binds your database engine with
models.Base.metadata.create_all(). If the database that you defined inenginedoesn’t exist yet, then it’ll be created with all modeled tables once you run your app the first time. - Line 15 to 20 define the
get_db()function, which will create andyieldnew database sessions with each request. Once the request is finished, you close the session withdb.close(). You use thetry…finallyblock to close the database connection in any case, even when an error occurs during the request. - Line 24 is the path operation decorator that makes sure that the
create_url()function below responds to any POST requests at the/urlpath. - Line 25 defines
create_url(), which requires aURLBaseschema as an argument and depends on the database session. By passingget_dbintoDepends(), you establish a database session for the request and close the session when the request is finished. - Lines 26 and 27 make sure that the provided
target_urldata is a valid URL. If the URL isn’t valid, then you callraise_bad_request(). - Lines 29 to 31 provide random strings for
keyandsecret_key. - Lines 32 to 37 create a database entry for your
target_url. - Lines 38 and 39 add
keyandsecret_keytodb_urlto match the requiredURLInfoschema that you need to return at the end of the function.
You may feel that the code you just added overwhelms the scope of the create_url() function.
Your intuition is correct.
Indeed, you may find better places to create random strings and perform database actions.
But it’s okay not to be perfect right away.
First, check if your app works as expected before tackling the shortcomings.
Restart your live server if it didn’t restart itself already:
(venv) $ uvicorn shortener_app.main:app --reload
When the server restarted, sqlalchemy automatically created your database in the location that you defined in your DB_URL environment variable.
If you used sqlite:///./shortener.db as the value of DB_URL, then there should be a file named shortener.db in the root directory of your project now.
That’s your SQLite database!
So far, the database contains the table that you defined in models.py, but it doesn’t contain any data.
To have a look, fire up your Python interpreter and follow the commands shown below:
 1>>> from shortener_app.database import SessionLocal
 2Loading settings for: Development
 3>>> db = SessionLocal()
 4
 5>>> from shortener_app.models import URL
 6>>> db.query(URL).all()
 7[]
First, you import SessionLocal in line 1 to instantiate a database connection in line 3.
In line 5, you import your URL model.
You use URL as the argument of your database query in line 6 to request all database entries for URL.
The returned list in line 7 is empty because your urls table doesn’t contain any data yet.
Keep this session open for now and hop over to your browser.
Open http://127.0.0.1:8000/docs and use your POST endpoint to create some URLs:
This works, as your API responds with the data that you defined in schemas.py:
{
  "target_url": "https://realpython.com",
  "is_active": true,
  "clicks": 0,
  "url": "JNPGB",
  "admin_url": "MIZJZYVA"
}
Once you’ve used the POST endpoint of your app, verify that the request created the database entries accordingly:
>>> db.query(URL).all()
[<shortener_app.models.URL object at 0x104c65cc0>, ...]
With db.query(URL).all() you’re querying all entries of your URL table.
In return, you get a list of all database entries that you created with the POST requests that you sent over to your API.
You can now store data in your database, and it persists across multiple users’ sessions. That’s a significant milestone for your URL shortener!
This might make you, as the backend developer, happy. But to make your users happy, you need to add the vital feature of actually forwarding to the targeted URL. In the next section, you’ll enhance your app to forward a shortened URL to its URL target.
Forward a Shortened URL
Your Python URL shortener app aims to provide shortened URLs that forward to a target URL. For example, if you want to share a picture, then you won’t have to rely on an awkwardly long link. Instead, you can use the URL shortener app to create a short link.
This means that your app needs to have a route that forwards to the target URL.
In more technical terms, the forwarding behavior means that you need to redirect HTTP requests with URL.key to the URL.target_url address.
Update main.py to implement a RedirectResponse:
 1# shortener_app/main.py
 2
 3# ...
 4
 5from fastapi import Depends, FastAPI, HTTPException, Request
 6from fastapi.responses import RedirectResponse
 7
 8# ...
 9
10def raise_not_found(request):
11    message = f"URL '{request.url}' doesn't exist"
12    raise HTTPException(status_code=404, detail=message)
13
14# ...
15
[email protected]("/{url_key}")
17def forward_to_target_url(
18        url_key: str,
19        request: Request,
20        db: Session = Depends(get_db)
21    ):
22    db_url = (
23        db.query(models.URL)
24        .filter(models.URL.key == url_key, models.URL.is_active)
25        .first()
26    )
27    if db_url:
28        return RedirectResponse(db_url.target_url)
29    else:
30        raise_not_found(request)
For the redirecting behavior that your app needs, you use the Request and RedirectResponse classes, which you import in lines 5 and 6.
RedirectResponse returns an HTTP redirect that forwards the request of the client.
Remember the raise_bad_request() function that you created before? You add a similar function named raise_not_found() in line 10.
You’ll use raise_not_found() in line 30 if the provided URL.key doesn’t match any URLs in your database.
Unlike raise_bad_request(), where you passed in a message, raise_not_found() always returns the same message that you define in line 11.
Canonically, you send back the 404 HTTP status code in the HTTPException.
In line 17, you create the forward_to_target_url() function with an @app.get() decorator function from line 16.
When you use the @app.get() decorator, you allow GET requests for the URL that you provide as an argument.
With the "/{url_key}" argument, the forward_to_target_url() function will be called any time a client requests a URL that matches the host and key pattern.
In lines 22 to 26, you look for an active URL entry with the provided url_key in your database.
If a database entry is found, then you return the RedirectResponse with target_url in line 28.
If no matching database entry is found, then you raise the HTTPException.
In your browser, try out the behavior that you just implemented:
First, go to your documentation at http://127.0.0.1:8000/docs and create a POST request to your create_url endpoint.
As a target URL, you use https://realpython.com.
Copy the key that you receive in the response and try out the forwarding.
In the example shown above, http://127.0.0.1:8000/JNPGB forwards successfully to https://realpython.com.
That’s almost perfect!
Why only almost?
Although the code works, both create_url() and forward_to_target_url() have shortcomings.
In the next section, you’ll clean up your code before creating more functionality and endpoints for your Python URL shortener app.
Step 3: Tidy Up Your Code
In the last step, you connected your URL shortener API with the database. The code that you wrote worked, but it had a few shortcomings. If you spend some time tidying up your code now, then you’ll make implementing new features more convenient in the long run.
At the end of this step, not only will you have a codebase that you can build upon properly. But you’ll also have cleaner code that may even spark some joy.
Spot Flaws in Your Code
Refactoring your code contains the risk that it’s a never-ending endeavor. Like in a drawing where you keep erasing to perfect your line, you could spend unlimited time looking for improvements in your codebase.
It’s a good idea to limit the scope of your refactoring process. You’ll do this by glancing over your code and listing the flaws that you want to erase.
Don’t be intimidated!
In general, your code is viable, and it works.
However, as you discovered in the last step, the create_url() and forward_to_target_url() functions in your main.py file aren’t ideal yet.
Note: Feel free to revisit your code for a moment and write down any shortcomings that you find. Then you can compare your list items with the ones that you’ll find below.
Start by having a look at the current state of create_url():
 1# shortener_app/main.py
 2
 [email protected]("/url", response_model=schemas.URLInfo)
 4def create_url(url: schemas.URLBase, db: Session = Depends(get_db)):
 5    if not validators.url(url.target_url):
 6        raise_bad_request(message="Your provided URL is not valid")
 7
 8    chars = "ABCDEFGHIJKLMNOPQRSTUVWXYZ"
 9    key = "".join(secrets.choice(chars) for _ in range(5))
10    secret_key = "".join(secrets.choice(chars) for _ in range(8))
11    db_url = models.URL(
12        target_url=url.target_url, key=key, secret_key=secret_key
13    )
14    db.add(db_url)
15    db.commit()
16    db.refresh(db_url)
17    db_url.url = key
18    db_url.admin_url = secret_key
19
20    return db_url
In line 8, you’re hard-coding the alphabet as a value of chars.
If you also want to add digits to the string, then typing them out can be cumbersome.
You may have heard of the Don’t Repeat Yourself (DRY) principle for keeping your code clean.
Lines 9 and 10 look nearly identical.
The way you’re constructing the key and secret_key variables is a perfect example of non-DRY code.
In lines 11 to 16, you’re interacting with the database.
This action should not be a direct concern of create_url().
In create_url(), you want to define what data your endpoint expects and what the endpoint should return.
Ideally, you should outsource any computation of your data to other functions.
At the end of the function in lines 17 and 18, you’re mingling with the database object to create the schemas.URLInfo response.
You’re not trying to save this part to the database, so there’s no harm.
But there should be a more apparent separation of the database interactions in the lines above.
In summary, the create_url() function is too loaded with different actions.
When you’re reading the code, it’s hard to understand the function’s purpose.
Next, look at forward_to_target_url().
Again, take a moment to find the problems on your own first. Then read on to learn what the problems are:
 1# shortener_app/main.py
 2
 [email protected]("/{url_key}")
 4def forward_to_target_url(
 5        url_key: str,
 6        request: Request,
 7        db: Session = Depends(get_db)
 8    ):
 9    db_url = (
10        db.query(models.URL)
11        .filter(models.URL.key == url_key, models.URL.is_active)
12        .first()
13    )
14    if db_url:
15        return RedirectResponse(db_url.target_url)
16    else:
17        raise_not_found(request)
In lines 9 to 13, you perform a database action.
Just like in create_url(), it doesn’t feel right that you interact with the database in the function that defines an API endpoint.
Next, you’ll take the flaws that you found in create_url() and forward_to_target_url() and fix them one by one.
Refactor Your Code
In this section, you’ll create two new files to separate the concerns of your app.
Along the way, you’ll define functions to single out responsibilities.
You’ll end up with a cleaner create_url() that’s way more readable.
Start by creating a new file named keygen.py.
This file will contain all helper functions to generate keys for your project.
It’s the perfect location to create the random string that you need for your .url and .admin_url attributes:
# shortener_app/keygen.py

import secrets
import string

def create_random_key(length: int = 5) -> str:
    chars = string.ascii_uppercase + string.digits
    return "".join(secrets.choice(chars) for _ in range(length))
Instead of hard-coding the letters A to Z, you use the string module and combine all ASCII uppercase characters and digits into chars.
Then you use the secrets module to randomly choose five characters from chars and return the selection.
You could accomplish a similar result by using the random module, like before.
However, the secrets module is recommended when creating random strings that you use as secret keys.
PEP 506 introduced secrets as the standard Python module for generating cryptographically secure random bytes and strings.
Check out the Guide to Generating Random Data in Python to learn more about generating random data.
By modularizing the random string creation into its own function, you can test it conveniently in the Python interpreter:
>>> from shortener_app.keygen import create_random_key
>>> create_random_key()
'81I5B'
>>> create_random_key(length=8)
'WAT3K9VQ'
When you call create_random_key() without any arguments, then you receive a string with five characters.
In your case, the string is probably different from the string in the example above.
But it should contain uppercase letters, numbers, or both.
Next, create a crud.py file.
Your crud.py file will contain functions that perform actions to Create, Read, Update, and Delete (CRUD) items in your database.
Go ahead and add create_db_url():
# shortener_app/crud.py

from sqlalchemy.orm import Session

from . import keygen, models, schemas

def create_db_url(db: Session, url: schemas.URLBase) -> models.URL:
    key = keygen.create_random_key()
    secret_key = keygen.create_random_key(length=8)
    db_url = models.URL(
        target_url=url.target_url, key=key, secret_key=secret_key
    )
    db.add(db_url)
    db.commit()
    db.refresh(db_url)
    return db_url
Before going into detail about this code, take note of one issue in this code implementation.
Remember that your database entry’s key value must be unique.
Although the chances are minor, it’s possible for keygen.create_random_key() to return a key that already exists.
So you need to make sure that there’s no entry with the same key.
First, define a function that tells you if a key already exists in your database:
# shortener_app/crud.py

# ...

def get_db_url_by_key(db: Session, url_key: str) -> models.URL:
    return (
        db.query(models.URL)
        .filter(models.URL.key == url_key, models.URL.is_active)
        .first()
    )
This function returns either None or a database entry with a provided key.
Now you can create a function that makes sure you generate a unique key.
Move back to keygen.py and add create_unique_random_key():
# shortener_app/keygen.py

# ...

from sqlalchemy.orm import Session

from . import crud

# ...

def create_unique_random_key(db: Session) -> str:
    key = create_random_key()
    while crud.get_db_url_by_key(db, key):
        key = create_random_key()
    return key
The while loop is the most crucial part of create_unique_random_key().
You’re calling create_random_key() again if key already exists in your database.
Using this logic makes sure that every shortened URL exists only once.
With this function in place, update your create_db_url() function in crud.py:
 1# shortener_app/crud.py
 2
 3# ...
 4
 5def create_db_url(db: Session, url: schemas.URLBase) -> models.URL:
 6    key = keygen.create_unique_random_key(db)
 7    secret_key = f"{key}_{keygen.create_random_key(length=8)}"
 8    db_url = models.URL(
 9        target_url=url.target_url, key=key, secret_key=secret_key
10    )
11    db.add(db_url)
12    db.commit()
13    db.refresh(db_url)
14    return db_url
In line 6, you’re calling keygen.create_unique_random_key() to get a unique string for your shortened URL’s key.
By calling keygen.create_unique_random_key(), you ensure that there are no two duplicate keys in the database.
Note that you’re calling keygen.create_random_key() in line 7 to construct the secret_key string.
As you learned before, keygen.create_random_key() only creates a random string, but you don’t check if it exists in the database.
Still, you can be sure that secret_key is unique because you’re prefixing the string with the value of key.
So even if keygen.create_random_key() returns a string created already at some point before, then putting the unique key upfront makes the whole string unique.
There are two advantages to creating secret_key like this:
- The
keyprefix indicates which shortened URLsecret_keybelongs to. - You’re not hitting the database again when creating another random string.
Head back to main.py and update create_url() to use crud.create_db_url():
 1# shortener_app/main.py
 2
 3# ...
 4
 5from . import crud, models, schemas
 6
 7# ...
 8
 [email protected]("/url", response_model=schemas.URLInfo)
10def create_url(url: schemas.URLBase, db: Session = Depends(get_db)):
11    if not validators.url(url.target_url):
12        raise_bad_request(message="Your provided URL is not valid")
13
14    db_url = crud.create_db_url(db=db, url=url)
15    db_url.url = db_url.key
16    db_url.admin_url = db_url.secret_key
17
18    return db_url
First, remove the import of the secrets module.
Because you don’t use secrets directly in main.py, you don’t need to import the module in main.py.
In line 14, you call crud.create_db_url().
You get the db_url database object back, and you can use its fields db_url.key and db_url.secret_key in lines 15 and 16.
Next, leverage the creation of get_db_url_by_key() and update forward_to_target_url():
 1# shortener_app/main.py
 2
 3# ...
 4
 [email protected]("/{url_key}")
 6def forward_to_target_url(
 7        url_key: str,
 8        request: Request,
 9        db: Session = Depends(get_db)
10    ):
11    if db_url := crud.get_db_url_by_key(db=db, url_key=url_key):
12        return RedirectResponse(db_url.target_url)
13    else:
14        raise_not_found(request)
In line 11, you’re updating forward_to_target_url() to use crud.get_db_url_by_key().
This is a great chance to use an assignment expression (:=) and streamline the if statement.
The := operator is colloquially known as the walrus operator and gives you a new syntax for assigning variables in the middle of expressions.
If db_url is a database entry, then you return your RedirectResponse to target_url in line 12.
Otherwise, you call raise_not_found() in line 14.
With all these updates in place, it’s time to check if your Python URL shortener still works as expected.
Go to http://127.0.0.1:8000/docs and try out your API endpoints in the browser:
Your API functions the same way as at the end of the last step. But your code is much cleaner now.
Still, you’re not returning URLs, as the attributes .url and .admin_url would suggest. Instead, you’re only returning the keys.
You’ll create proper URLs in the next section, where you’ll also add some functionality to let your users manage their shortened URLs.
Step 4: Manage Your URLs
You cleaned up your code in the last section by creating new files and functions. Now, you’ll build upon your improvements. At the end of this step, you’ll be able to manage your URLs by accessing secured endpoints of your API.
Get Information About Your URL
When you create a shortened URL, you receive information in the response body that looks like this:
{
  "target_url": "https://realpython.com",
  "is_active": true,
  "clicks": 0,
  "url": "81I5B",
  "admin_url": "81I5B_WAT3K9VQ"
}
In this section, you’ll create an admin endpoint so that you can also see this information about your URL later.
This endpoint will only be accessible to users who know the secret_key.
Start by creating get_db_url_by_secret_key() in your crud.py file:
# shortener_app/crud.py

# ...

def get_db_url_by_secret_key(db: Session, secret_key: str) -> models.URL:
    return (
        db.query(models.URL)
        .filter(models.URL.secret_key == secret_key, models.URL.is_active)
        .first()
    )
Your get_db_url_by_secret_key() function checks your database for an active database entry with the provided secret_key.
If a database entry is found, then you return the entry.
Otherwise, you return None.
You work with the returned data in get_url_info() in main.py:
 1# shortener_app/main.py
 2
 3# ...
 4
 [email protected](
 6    "/admin/{secret_key}",
 7    name="administration info",
 8    response_model=schemas.URLInfo,
 9)
10def get_url_info(
11    secret_key: str, request: Request, db: Session = Depends(get_db)
12):
13    if db_url := crud.get_db_url_by_secret_key(db, secret_key=secret_key):
14        db_url.url = db_url.key
15        db_url.admin_url = db_url.secret_key
16        return db_url
17    else:
18        raise_not_found(request)
In line 5, you’re defining a new API endpoint at the /admin/{secret_key} URL.
You also give this endpoint the name "administration info", making it easier to refer to it later.
As response_model, you expect a URLInfo schema in line 8.
After you get the database entry of crud.get_db_url_by_secret_key() in line 13, you assign it to db_url and check it right away.
You’re using an assignment expression for the if statement of this line.
But hold on a second!
Do you also have the feeling that lines 14 and 15 look familiar?
Those are exactly the lines of code that you wrote in create_url(), so you have a chance for a refactoring session in the same file:
 1# shortener_app/main.py
 2
 3# ...
 4
 5from starlette.datastructures import URL
 6
 7# ...
 8
 9from .config import get_settings
10
11# ...
12
13def get_admin_info(db_url: models.URL) -> schemas.URLInfo:
14    base_url = URL(get_settings().base_url)
15    admin_endpoint = app.url_path_for(
16        "administration info", secret_key=db_url.secret_key
17    )
18    db_url.url = str(base_url.replace(path=db_url.key))
19    db_url.admin_url = str(base_url.replace(path=admin_endpoint))
20    return db_url
21
22# ...
In get_admin_info(), you go even one step further than just receiving the .url and .admin_url attributes.
You also leverage the URL class from the starlette package that comes with FastAPI.
To create base_url in line 14, you pass in base_url from your settings to initialize the URL class.
After that, you can use the .replace() method to construct a full URL.
Before, you only returned key and secret_key on their own.
If you wanted to visit one of the endpoints, then you had to add it to your base URL yourself.
Your app is now much more user-friendly, as URLInfo returns the complete URLs for both the forwarding url and the admin_url.
With this function in place, you can update both create_url() and get_url_info():
 1# shortener_app/main.py
 2
 3# ...
 4
 [email protected]("/url", response_model=schemas.URLInfo)
 6def create_url(url: schemas.URLBase, db: Session = Depends(get_db)):
 7    if not validators.url(url.target_url):
 8        raise_bad_request(message="Your provided URL is not valid")
 9    db_url = crud.create_db_url(db=db, url=url)
10    return get_admin_info(db_url)
11
12
13# ...
14
[email protected](
16    "/admin/{secret_key}",
17    name="administration info",
18    response_model=schemas.URLInfo,
19)
20def get_url_info(
21    secret_key: str, request: Request, db: Session = Depends(get_db)
22):
23    if db_url := crud.get_db_url_by_secret_key(db, secret_key=secret_key):
24        return get_admin_info(db_url)
25    else:
26        raise_not_found(request)
Remove the lines where you set the .url and .admin_url attributes. Instead of returning db_url, you now return the URLInfo schema from get_admin_info() in lines 10 and 24.
You cleaned up create_url() and have an endpoint to see information about your URL.
Try it out in the browser.
In the response, you now receive the complete URLs of your forwarding URL and the administration URL:
{
  "target_url": "https://realpython.com",
  "is_active": true,
  "clicks": 0,
  "url": "http://127.0.0.1:8000/81I5B",
  "admin_url": "http://127.0.0.1:8000/81I5B_WAT3K9VQ"
}
This looks good so far.
You may have shared the shortened URL in your network.
But although the URL has been clicked multiple times, the clicks value is still 0.
In the next section, you’ll implement the functionality to see how often your URL has been visited.
Update Your Visitor Count
When you visit the "administration info" endpoint, the response body contains data about your shortened URL.
One data point of the response body is how often your shortened URL was clicked.
So far, the count has remained zero.
To count the clicks when your shortened URL is visited, add a new function to your crud.py file:
 1# shortener_app/crud.py
 2
 3# ...
 4
 5def update_db_clicks(db: Session, db_url: schemas.URL) -> models.URL:
 6    db_url.clicks += 1
 7    db.commit()
 8    db.refresh(db_url)
 9    return db_url
The update_db_clicks() function takes db_url as an argument in line 5.
This means that you can expect an existing database entry inside the function.
In line 6, you increase the clicks value by one.
With the .commit() and .refresh() methods in lines 7 and 8, you save your update in the database.
Note: The methods .commit() and .refresh() are from db, not db_url.
When you forward to a target URL, you call the update_db_clicks() function that you just created.
Therefore, you need to adjust the forward_to_target_url() function in main.py:
 1# shortener_app/main.py
 2
 3# ...
 4
 [email protected]("/{url_key}")
 6def forward_to_target_url(
 7        url_key: str,
 8        request: Request,
 9        db: Session = Depends(get_db)
10    ):
11    if db_url := crud.get_db_url_by_key(db=db, url_key=url_key):
12        crud.update_db_clicks(db=db, db_url=db_url)
13        return RedirectResponse(db_url.target_url)
14    else:
15        raise_not_found(request)
16
17# ...
Insert the crud.update_db_clicks() function call in line 12.
Every time a friend uses your shortened URL, the click count increases.
You can use the number of clicks to see how often a link was visited.
At some point, you may decide to delete the forwarding URL. Read on to implement a deactivation endpoint in your app.
Delete a URL
Your Python URL shortener app is great for sharing a link with friends. Once your friends have visited the link, you may want to delete the shortened URL again.
Just like with the update_db_clicks() function, you start by creating a new function in crud.py:
 1# shortener_app/crud.py
 2
 3# ...
 4
 5def deactivate_db_url_by_secret_key(db: Session, secret_key: str) -> models.URL:
 6    db_url = get_db_url_by_secret_key(db, secret_key)
 7    if db_url:
 8        db_url.is_active = False
 9        db.commit()
10        db.refresh(db_url)
11    return db_url
First, note that you call the function deactivate_db_url_by_secret_key() and not delete_db_url_by_secret_key().
Consequently, you set the .is_active attribute in line 8 to False instead of deleting the database entry completely.
Remember that your database queries where you requested a URL object contained the filter that the URL must be active. This means that any deactivated URLs won’t get returned in your database calls. To the user, it’ll look like the URL was deleted, but only you as a super admin can actually complete the deletion action. This has the major advantage that you can recover a deactivated URL if a user changes their mind about disabling their URL.
The deactivate_db_url_by_secret_key() function in line 5 takes secret_key as an argument.
Only the creator of a shortened URL knows this secret_key.
It’s an excellent security measure when only the creator can deactivate a URL.
Now, the only function that’s missing is the endpoint to call deactivate_db_url_by_secret_key().
Open main.py one last time and add a delete_url() function:
 1# shortener_app/main.py
 2
 3# ...
 4
 [email protected]("/admin/{secret_key}")
 6def delete_url(
 7    secret_key: str, request: Request, db: Session = Depends(get_db)
 8):
 9    if db_url := crud.deactivate_db_url_by_secret_key(db, secret_key=secret_key):
10        message = f"Successfully deleted shortened URL for '{db_url.target_url}'"
11        return {"detail": message}
12    else:
13        raise_not_found(request)
You use the @app.delete() decorator in line 5 to indicate that delete_url() accepts DELETE requests.
However, this deletion action is only allowed if the request body contains the appropriate secret_key.
This secret_key must be part of the URL as shown in line 5, and it’s an argument of the delete_url() function that you define in line 6.
The body of delete_url() probably looks familiar by now.
You’re using an assignment expression (:=) in line 9 to assign db_url the return of crud.deactivate_db_url_by_secret_key() in line 10.
If a database entry with the provided secret_key exists and was deactivated, then you return the success message in line 11.
Otherwise, you trigger raise_not_found() in line 13.
Now you’re also able to deactivate URLs that aren’t needed anymore. Go ahead and use your URL shortener to create a short URL:
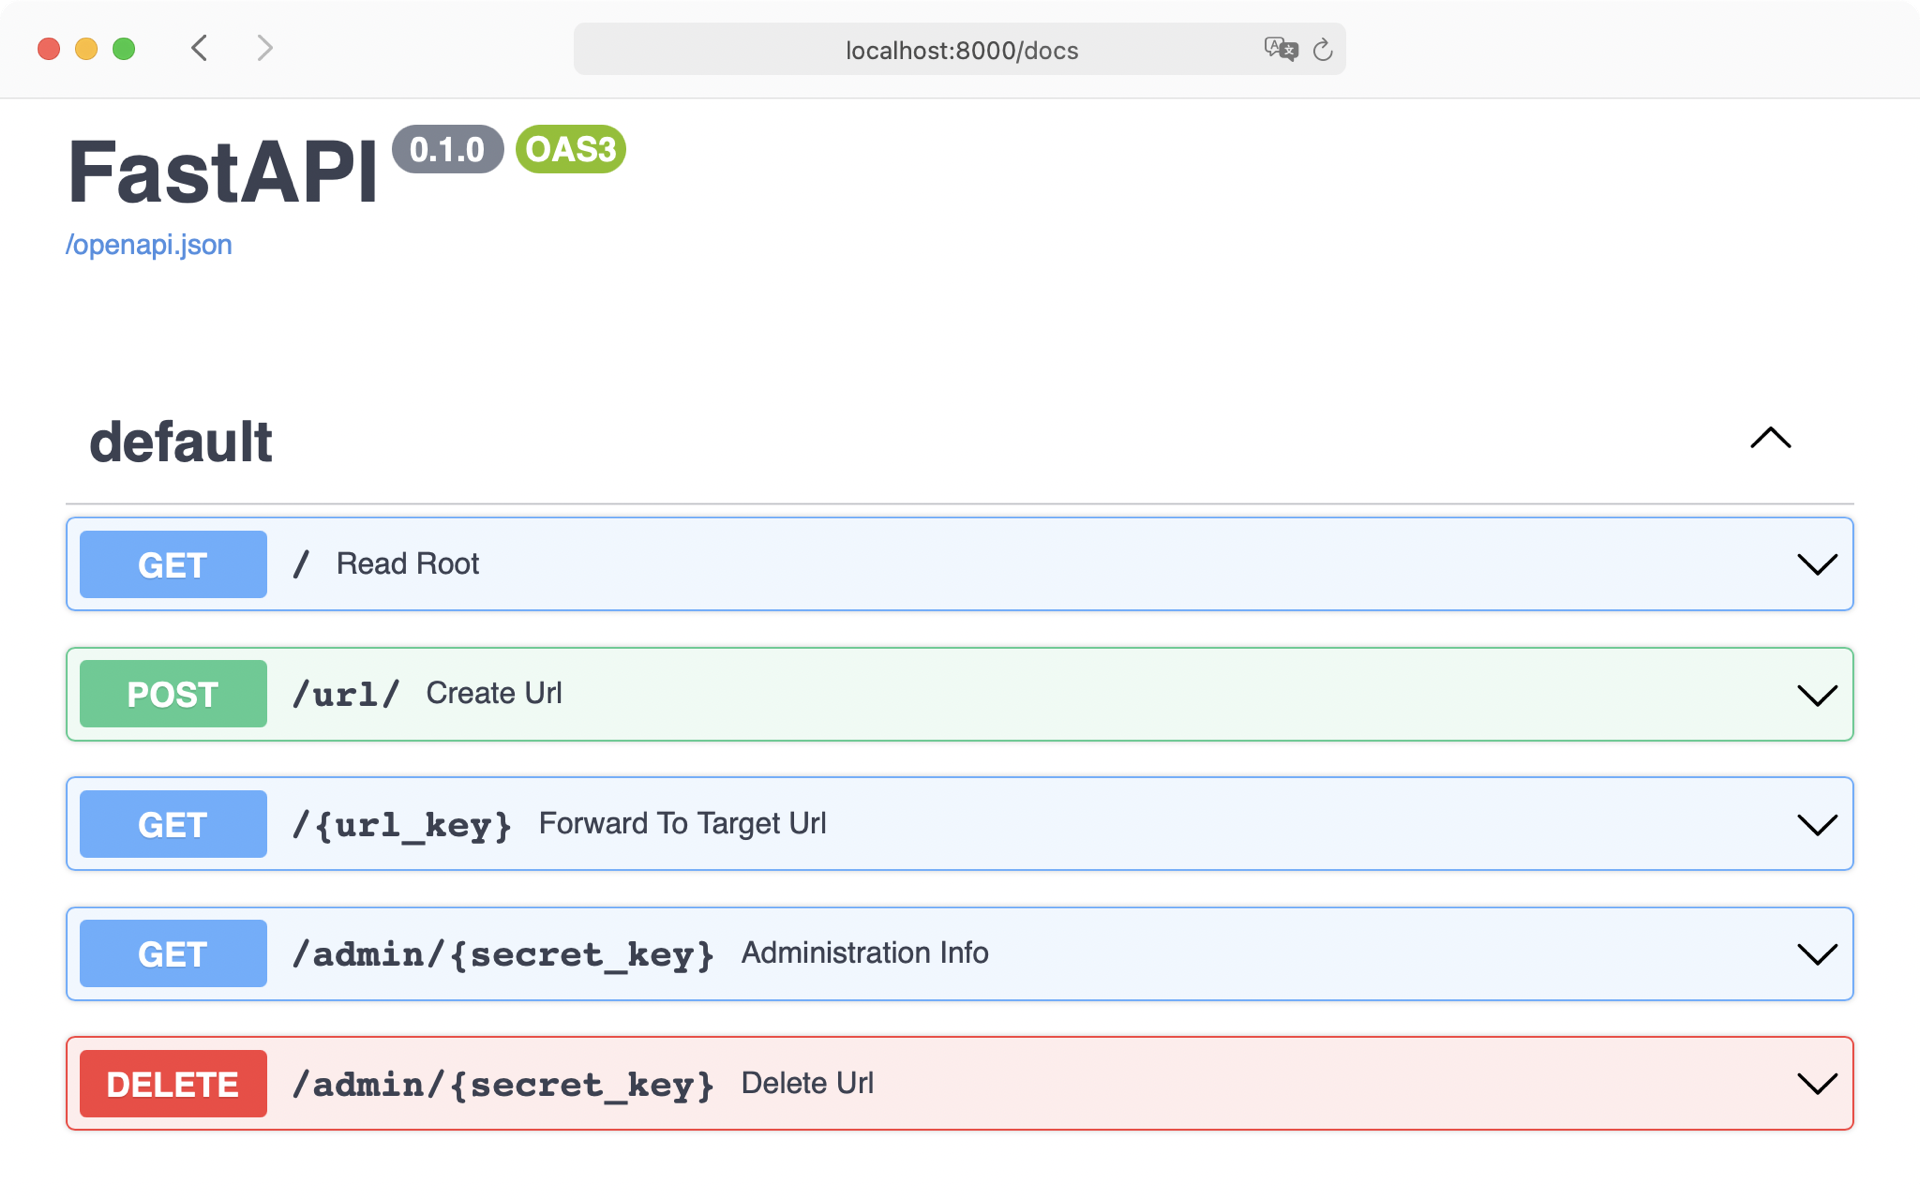
When a shortened URL is active, it’ll forward you to the target URL. But once you deactivate your shortened URL, the forward to the target URL won’t work anymore. Perfect, this means you’ve created a fully functional URL shortener!
Conclusion
You’ve built a web app with FastAPI to create and manage shortened URLs. With your URL shortener, you can now convert long URLs into tiny, shareable links. When someone clicks your shortened URL, then your URL shortener app will forward them to the targeted URL.
In this tutorial, you learned how to:
- Create a REST API with FastAPI
- Run a development web server with Uvicorn
- Model an SQLite database
- Investigate the auto-generated API documentation
- Interact with the database with CRUD actions
The code that you wrote focused on getting the app working first. But you didn’t stop there. You took your time to inspect your codebase and spotted opportunities to refactor your code. You’re now in a great position to think about extending your Python URL shortener.
To review what you’ve already created, check out the full source code:
Get Source Code: Click here to get access to the source code that you’ll use to build your Python URL shortener with FastAPI.
Next Steps
You now can call a fully functional Python URL shortener your own. You added plenty of features to your app by following this step-by-step tutorial. Although you’ve reached the end of this tutorial, there are still features left that you can build into your app.
Here are some ideas for additional features:
- Custom URL key: Let your users create custom URL keys instead of a random string.
- Peek URL: Create an endpoint for your users to check which target URL is behind a shortened URL.
- Graceful Forward: Check if the website exists before forwarding.
When you feel ready, then hosting your project on Heroku is a great next step. If you want to make your URL shortener Python project even more user-friendly, then you can consider adding a front end. With a front end, you can provide a nice-looking interface for your users, so they don’t need to know about any API endpoints themselves.
No matter in which direction you take the development of your URL shortener, make sure to promote it in the comments below. Bonus points if you post a shortened link that forwards to your hosted project!
🐍 Python Tricks 💌
Get a short & sweet Python Trick delivered to your inbox every couple of days. No spam ever. Unsubscribe any time. Curated by the Real Python team.

About Philipp Acsany
Philipp is a Berlin-based technical writer with a graphic design background and a passion for full-stack web development.
» More about PhilippEach tutorial at Real Python is created by a team of developers so that it meets our high quality standards. The team members who worked on this tutorial are:
Master Real-World Python Skills
With Unlimited Access to Real Python

Join us and get access to hundreds of tutorials, hands-on video courses, and a community of expert Pythonistas:
What Do You Think?
Real Python Comment Policy: The most useful comments are those written with the goal of learning from or helping out other readers—after reading the whole article and all the earlier comments. Complaints and insults generally won’t make the cut here.
What’s your #1 takeaway or favorite thing you learned? How are you going to put your newfound skills to use? Leave a comment below and let us know.
Recommend
About Joyk
Aggregate valuable and interesting links.
Joyk means Joy of geeK