

安装 Ubuntu 22.04 (LTS), Webmin, Nginx, MariaDB, PHP8.1-FPM,Perl-Fastcgi 到...
source link: https://seo.g2soft.net/2022/05/15/ubuntu-2204-lts-webmin-nginx-part4.html
Go to the source link to view the article. You can view the picture content, updated content and better typesetting reading experience. If the link is broken, please click the button below to view the snapshot at that time.
安装 Ubuntu 22.04 LTS, Webmin, Nginx, MariaDB, PHP8.1-FPM,Perl-Fastcgi 到 DigitalOcean 的 VPS上。
DavidYin 介绍了如何在 DigitalOcean 创建新 VPS。并且完成基本的 Ubuntu 22.04 LTS的系统。然后介绍如何安装 Webmin 主机控制面板,时区设置和 SSH 的安全设置。再之后说明一下如何用之前的新添加的用户来安装 Nginx Web 服务器和 MairaDB 数据库服务器。
现在就是很重要的语言支持部分了。因为我用的最多的就是 php 以及 perl 语言。所以这两部分就是重点了。
安装 php8.1-fpm
Ubuntu 22.04 LTS 仓库所包含的是 php8.1.2,目前 php 官方支持的版本是 8.1,8.0,7.4 这三个系列。所以直接使用 Ubuntu 的就已经是很新的版本了。
sudo apt install php8.1 php8.1-fpm php8.1-cli php8.1-common php8.1-mbstring php8.1-gd php8.1-intl php8.1-xml php8.1-mysql php8.1-zip php8.1-curl安装完成后,执行 php -v 命令,可以看到版本信息。
davidyin@fig:~$ php -v
PHP 8.1.2 (cli) (built: Apr  7 2022 17:46:26) (NTS)
Copyright (c) The PHP Group
Zend Engine v4.1.2, Copyright (c) Zend Technologies
    with Zend OPcache v8.1.2, Copyright (c), by Zend Technologies
再看一下 php8.1-fpm 是否已经运行。
sudo service php8.1-fpm status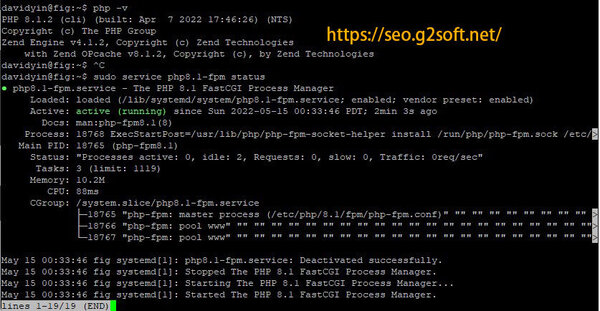
设置虚拟主机
说明:下面这些都是用来举例说明所用的,在实际使用中请用真实的数据。
IP: 147.182.232.40
Domain: u22.webexample.win
username: davidyin
接下来我要设置一个 vhost,就是一个虚拟主机,我用的域名是 u22.webexample.win,此为举例而已。 到域名服务商的网站,专门设置域名记录的地方,把 u22.webexample.win 的 A 记录指向此 VPS 的 IP 地址,生效可能需要十分钟或更久,为快捷,可以在所操作的Windows hosts 文件添加纪录使之在本地立即可用。 新建一个主机配置文件,webexample.conf,如下。
sudo nano /etc/nginx/conf.d/webexample.conf新建这个配置文件,并把下面的内容复制其中。
log_format   main '$remote_addr - $remote_user [$time_local]  $status '
    '"$request" $body_bytes_sent "$http_referer" '
    '"$http_user_agent" "$http_x_forwarded_for"';

server {
    listen       80;
    server_name  u22.webexample.win;
    access_log  /var/log/nginx/host.access.log  main;

    root   /home/davidyin/u22.webexample.win;
    index  index.php index.html index.htm;

    location / {
        try_files $uri $uri/ = 404;
    }

    # redirect server error pages to the static page /50x.html
    #
    error_page   500 502 503 504  /50x.html;
    location = /50x.html {
        root   /usr/share/nginx/html;
    }

    location ~ \.php$ {
        fastcgi_split_path_info ^(.+\.php)(/.+)$;
        fastcgi_pass unix:/var/run/php/php8.1-fpm.sock;
        fastcgi_index index.php;
        fastcgi_param SCRIPT_FILENAME $document_root$fastcgi_script_name;
        include fastcgi_params;
    }

    # deny access to .htaccess files, if Apache's document root
    # concurs with nginx's one
    #
    location ~ /\.ht {
        deny  all;
    }
}
保存退出,然后执行 sudo nginx -t 命令看看,是否配置文件正确。若正确,就重启 Nginx 服务,使配置生效。
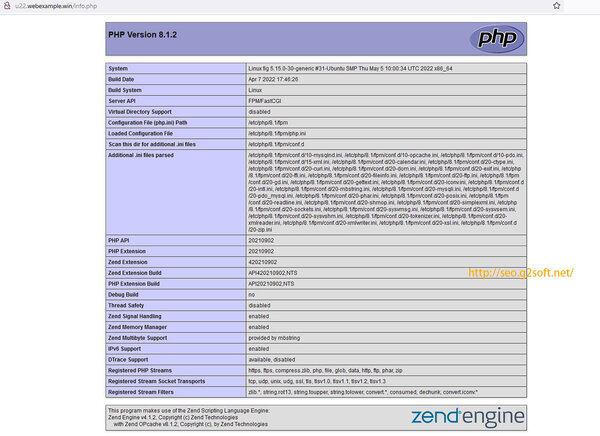
sudo service nginx restart在/home/davidyin/u22.webexample.win/下新建一个文件 info.php
输入如下内容:
<?php
phpinfo();
回到桌面浏览器中,输入网址 http://u22.webexample.win/info.php,如果看到下面这些内容,就表示 php 安装正确, nginx 也运行正确。
如果出现问题,或者是页面错误,可以查看这两个日志文件。
- /var/log/nginx/host.access.log
- /var/log/nginx/error.log
至此,php8.1 已经安装完毕,并且虚拟主机也可以使用 php 的语言了。
SSL 证书的签发
如果是商用,或者愿意购买一年期的证书,DavidYin建议到 Gogetssl 购买,这里价格最优,无限重签,不限服务器。目前的证书可以购买多年的,但是实际签发的证书都是一年的,每年重新签发一次,直到购买的年份用完为止。买多年的会便宜一点。
- Sectigo Essential SSL 一年的证书,$10.00;两年证书,$17.50;三年证书 $25.00。
- Sectigo PositiveSSL 一年的证书,$4.50;两年证书,$7.88;三年证书 $11.25。
- GoGetSSL Domain SSL 一年的证书,$4.00;两年证书,$7.00;三年证书 $7.00。
- 还有 Thawte, DigiCert,GeoTrust,RepidSSL 的证书可以选择。
Gogetssl 证书的好处是你买了一个证书给域名 A 用,如果这个域名不用了,还可以签发给域名 B 使用剩下的时间。
免费证书这里我采用 Zerossl 的 SSL 证书。使用了 Neilpang 的 ACME.SH 来安装。每月自动续签。
先安装工具。
davidyin@fig:~$ curl  https://get.acme.sh | sh -s [email protected]
  % Total    % Received % Xferd  Average Speed   Time    Time     Time  Current
                                 Dload  Upload   Total   Spent    Left  Speed
100   937    0   937    0     0   2674      0 --:--:-- --:--:-- --:--:--  2669
  % Total    % Received % Xferd  Average Speed   Time    Time     Time  Current
                                 Dload  Upload   Total   Spent    Left  Speed
100  211k  100  211k    0     0   384k      0 --:--:-- --:--:-- --:--:--  384k
[Sun May 15 00:57:30 PDT 2022] Installing from online archive.
[Sun May 15 00:57:30 PDT 2022] Downloading https://github.com/acmesh-official/acme.sh/archive/master.tar.gz
[Sun May 15 00:57:31 PDT 2022] Extracting master.tar.gz
[Sun May 15 00:57:31 PDT 2022] Installing to /home/davidyin/.acme.sh
[Sun May 15 00:57:31 PDT 2022] Installed to /home/davidyin/.acme.sh/acme.sh
[Sun May 15 00:57:31 PDT 2022] Installing alias to '/home/davidyin/.bashrc'
[Sun May 15 00:57:31 PDT 2022] OK, Close and reopen your terminal to start using acme.sh
[Sun May 15 00:57:31 PDT 2022] Installing cron job
no crontab for davidyin
no crontab for davidyin
[Sun May 15 00:57:31 PDT 2022] Good, bash is found, so change the shebang to use bash as preferred.
[Sun May 15 00:57:32 PDT 2022] OK
[Sun May 15 00:57:32 PDT 2022] Install success!
安装完成后,它会把 acme.sh 安装到我的 home 目录之下:比如 /home/davidyin/.acme.sh/
并且自动创建了一个 bash 的别名,方便使用,直接输入 acme.sh 命令就可以了。另外还自动创建了一个 cronjob,每天零点自动检测所有的证书,如果快过期,就会自动更新。如果安装完,不能直接运行 acme.sh 命令,重启系统就可以。
验证域名的方式有两种,DNS 和 http,我采用了 DNS api 方式,比如域名管理商 namesilo 是被支持的,还有很多域名注册商也支持,我这里用的是 he.net 的 DNS 服务。
执行下面的命令,可以看到 acme.sh 用的证书签发是 zerossl.com 的 90 天免费证书。
acme.sh --issue --dns dns_he -d u22.webexample.win -k ec-384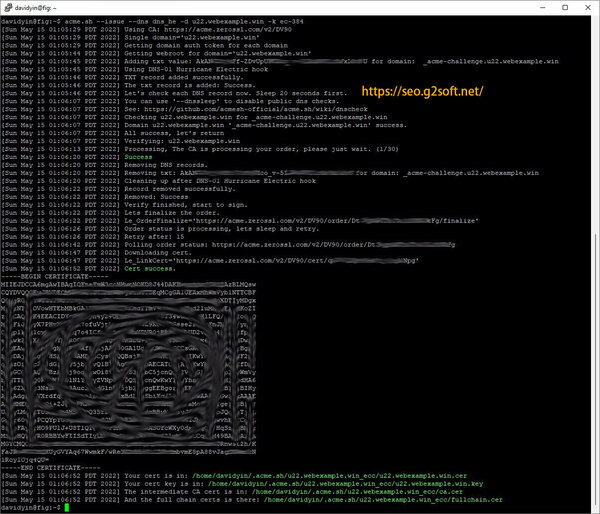
验证正确,就会自动签发证书,证书会临时先存放在一个工作目录,现在我要指定一个目录存放: /home/davidyin/ssl/。
mkdir ~/ssl
acme.sh --install-cert -d u22.webexample.win \
--key-file       /home/davidyin/ssl/key  \
--fullchain-file /home/davidyin/ssl/cert \
--reloadcmd     "service nginx force-reload" \
--ecc
就这样,证书也签发好了,也安装到指定位置,接下来会介绍如何在 nginx 的配置文件中,设置证书路径,设置 https,设置重定向,还有 perl-fastcgi等等。
Recommend
About Joyk
Aggregate valuable and interesting links.
Joyk means Joy of geeK