

React Editor or Text Area—How To Choose
source link: https://www.telerik.com/blogs/react-editor-text-area-how-choose
Go to the source link to view the article. You can view the picture content, updated content and better typesetting reading experience. If the link is broken, please click the button below to view the snapshot at that time.
React Editor or Text Area—How To Choose
Would your React app work best with a rich-text editor or a text area where users can input information? This post can help you decide and learn how to implement the best choice.
Many websites on the internet require users to provide some kind of information. A blog website might have a comments section with post a message functionality or an admin area where a user can create new articles.
These features could use different form fields to allow users to insert text, such as a text area or a rich-text editor. However, the question is, which one should be used when and how can we use them?
In this article, we will cover:
- How to implement a form using a React text area
- How to implement a React text editor
- Security concerns related to rich-text editors and how to deal with them
To demonstrate how we can use text area and rich-text editor components, we will use KendoReact, which is a UI kit that offers a lot of ready-build and production-ready components.
First, let’s start by creating a project and installing the necessary libraries.
You can find the full code example for this project in this GitHub repo. Below you can also find an interactive StackBlitz example.
Project Setup
We are going to use Vite to quickly scaffold a new React project. If you haven’t heard about Vite before, you might want to check out my article about it—What Is Vite: The Guide to Modern and Super-Fast Project Tooling.
Run the command below in your terminal to create a new React project.
$ npm init vite kendo-react-editor-vs-textarea -- --template react
After the project creation is complete, run the following commands to get into the project directory and install all dependencies.
$ cd kendo-react-editor-vs-textarea && npm install
Finally, you can start the development server by running the npm run dev command.
You should see the project running upon visiting localhost:3000 in your browser. Next, let’s install all KendoReact libraries we will need for this project.
$ npm install --save @progress/kendo-react-editor @progress/kendo-react-intl @progress/kendo-react-buttons @progress/kendo-react-dropdowns @progress/kendo-react-dialogs @progress/kendo-react-inputs @progress/kendo-react-layout @progress/kendo-react-popup @progress/kendo-react-pdf @progress/kendo-react-progressbars @progress/kendo-drawing @progress/kendo-react-form @progress/kendo-react-treeview @progress/kendo-licensing @progress/kendo-theme-default
Note: KendoReact is a commercial UI component library, and as a part of this you will need to provide a license key when you use the components in your React projects. You can snag a license key through a free trial or by owning a commercial license. For more information, you can head over to the KendoReact Licensing page.
After the installation is complete, let’s clean up the App component and its styles file. We can start by renaming the App.css file to App.module.css and replacing its content with the code below.
src/App.module.css
.appContainer {
  max-width: 1180px;
  margin: 2rem auto;
  padding: 0 2rem;
}
We also need to update the App.jsx file.
src/App.jsx
import styles from "./App.module.css";
import RichTextEditor from "./components/RichTextEditor";
import TextareaMessage from "./components/TextareaMessage";

function App() {
  return (
    <div className={styles.appContainer}>
      <h1 className="k-mb-6">React Editor vs React Text Area</h1>
      <div className="k-mb-4">
        <TextareaMessage />
      </div>
      <div>
        <RichTextEditor />
      </div>
    </div>
  );
}

export default App;
In the App component, we’re importing TextareaMessage and RichTextEditor components. Let’s create them next.
src/components/TextareaMessage.jsx
const TextareaMessage = props => {
  return <div>TextareaMessage</div>;
};

export default TextareaMessage;
src/components/RichTextEditor.jsx
const RichTextEditor = props => {
  return <div>RichTextEditor</div>;
};

export default RichTextEditor;
Last but not least, we need to include the KendoReact Default theme.
src/main.jsx
import React from "react";
import ReactDOM from "react-dom";
import "@progress/kendo-theme-default/dist/all.css";
import "./index.css";
import App from "./App";

ReactDOM.render(
  <React.StrictMode>
    <App />
  </React.StrictMode>,
  document.getElementById("root")
);
That’s enough for the initial setup.
Using React Text Area Component To Implement a Message Form
A React Text Area is a simple component that allows users to enter text into a box that can have multiple rows and expand if needed. KendoReact provides a TextArea component via @progress/kendo-react-inputs package.
React Calendar vs. React Scheduler
Explore the differences between a React calendar and a React scheduler component so you know when to choose one over the other.
Below we have a simple create comment form. This form contains the TextArea component that allows a user to enter a comment and a submit button. When a comment is submitted, it is added to the comments array, which is displayed
next to the form.
src/components/TextareaComments.jsx
import { useState } from "react";
import { TextArea } from "@progress/kendo-react-inputs";
import { Button } from "@progress/kendo-react-buttons";

const TextareaComments = props => {
  const [comments, setComments] = useState([
    "hello world",
    "how are you doing?",
  ]);
  const [commentText, setCommentText] = useState("");

  const handleSubmit = e => {
    e.preventDefault();
    setComments(prevState => [...prevState, commentText]);
    setCommentText("");
  };

  const onChangeText = e => {
    setCommentText(e.value);
  };

  return (
    <div className="k-d-flex k-gap-8">
      <div className="k-flex-grow">
        <h2>Create Comment Form</h2>
        <form onSubmit={handleSubmit}>
          <TextArea value={commentText} onChange={onChangeText} rows={5} />
          <div className="k-form-buttons k-justify-content-end">
            <Button
              themeColor={"primary"}
              type={"submit"}
              disabled={!commentText}
              >
              Add comment
            </Button>
          </div>
        </form>
      </div>
      <div className="k-flex-grow">
        <h2>Comments</h2>
        <ul className="k-list k-list-ul">
          {comments.map((comment, idx) => {
            return (
              <li className="k-list-item" key={idx}>
                {idx + 1} - {comment}
              </li>
            );
          })}
        </ul>
      </div>
    </div>
  );
};

export default TextareaComments;
Below you can see how the create comment form looks.
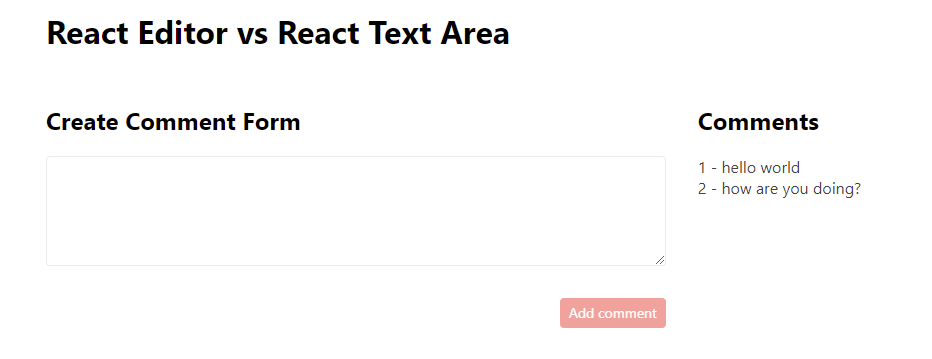
The form is very simple, but the text area is a good choice for such a feature since users are supposed to provide just a simple text input. But what if we would want to allow users to create richer content? That’s where the React Editor comes into play.
Using React Editor Component To Implement a Rich-Text Editor
KendoReact provides a great Editor component that can be enhanced with many useful tools. These can be used to add styles and transform text. For instance, we can change
the font weight, style, size, alignment, color; add lists and links; and much more. Here’s an example code for the create content form that utilizes the Editor component provided via @progress/kendo-react-editor package.
src/components/RichTextEditor.jsx
import { useState } from "react";
import { Editor, EditorTools } from "@progress/kendo-react-editor";
const {
  Bold,
  Italic,
  Underline,
  Strikethrough,
  Subscript,
  Superscript,
  ForeColor,
  BackColor,
  CleanFormatting,
  AlignLeft,
  AlignCenter,
  AlignRight,
  AlignJustify,
  Indent,
  Outdent,
  OrderedList,
  UnorderedList,
  NumberedList,
  BulletedList,
  Undo,
  Redo,
  FontSize,
  FontName,
  FormatBlock,
  Link,
  Unlink,
  InsertImage,
  ViewHtml,
  InsertTable,
  InsertFile,
  SelectAll,
  Print,
  Pdf,
  AddRowBefore,
  AddRowAfter,
  AddColumnBefore,
  AddColumnAfter,
  DeleteRow,
  DeleteColumn,
  DeleteTable,
  MergeCells,
  SplitCell,
} = EditorTools;

const tools = [
  [Bold, Italic, Underline, Strikethrough],
  [Subscript, Superscript],
  ForeColor,
  BackColor,
  [CleanFormatting],
  [AlignLeft, AlignCenter, AlignRight, AlignJustify],
  [Indent, Outdent],
  [OrderedList, UnorderedList],
  [NumberedList, BulletedList],
  FontSize,
  FontName,
  FormatBlock,
  [SelectAll],
  [Undo, Redo],
  [Link, Unlink, InsertImage, ViewHtml],
  [InsertTable, InsertFile],
  [Pdf, Print],
  [AddRowBefore, AddRowAfter, AddColumnBefore, AddColumnAfter],
  [DeleteRow, DeleteColumn, DeleteTable],
  [MergeCells, SplitCell],
];

const initialRichText = `<h1>Hello world</h1>
  <p>How are you doing?</p>
`;

const RichTextEditor = props => {
  const [richText, setRichText] = useState(initialRichText);

  const onChangeText = e => {
    setRichText(e.html);
  };

  const handleSubmit = e => {
    e.preventDefault();
    console.log(richText);
  };

  return (
    <div>
      <div className="k-d-flex k-gap-8">
        <div className="k-flex-grow" style={{ maxWidth: "50%" }}>
          <h2>Create Content Form</h2>
          <form onSubmit={handleSubmit}>
            <Editor
              defaultContent={richText}
              tools={tools}
              onChange={onChangeText}
              contentStyle={{ height: 200 }}
            />
          </form>
        </div>
        <div className="k-flex-grow">
          <h2>Parsed Editor Text</h2>
          <div dangerouslySetInnerHTML={{ __html: richText }} />
        </div>
      </div>
    </div>
  );
};

export default RichTextEditor;
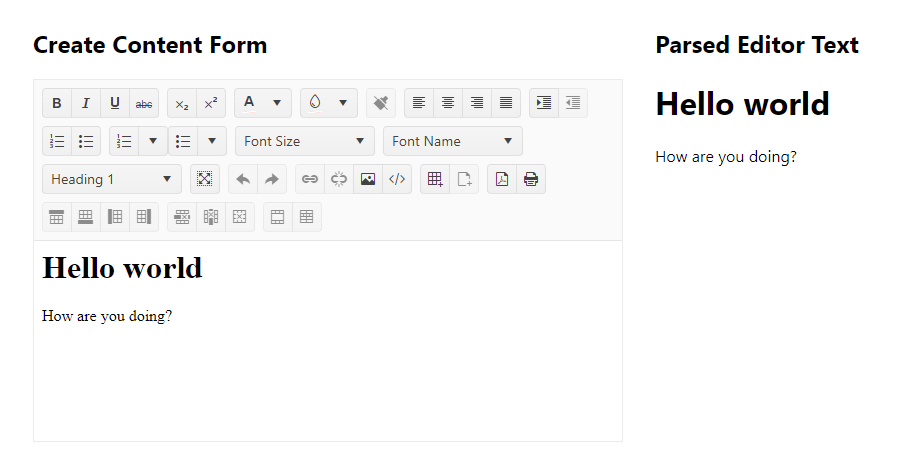
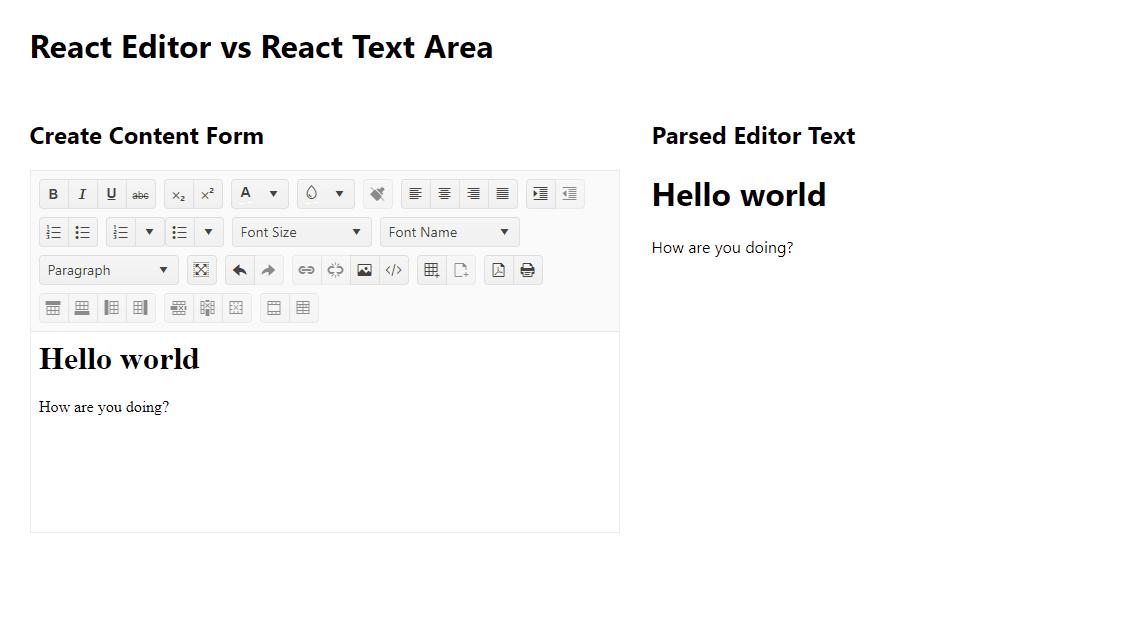
The image below shows how the create content form looks. The editor has a lot of different tools for creating rich-text content. However, there is no need to use all of them, and we can choose to use only some of them based on project requirements. When we type in the editor, the HTML text is immediately rendered next to the form.
A React Editor can be used to create fancier content than a text area, but there is a very important security implication to consider.
React Editor Security Considerations
The content produced by the React Editor is an HTML string. Therefore, it can be inserted into the DOM using innerHTML or insertAdjacentHTML method. However, this opens our application for XSS attacks. Just look at the GIF below.

A user can add a link that utilizes javascript: protocol instead of a valid URL. This way, a user can insert malicious JavaScript code. In this example, the link only triggers an alert, but someone could add a script that would download other
scripts, steal the user’s data and act on behalf of the user.
This attack vector is known as Cross-Side Scripting (XSS). It’s crucial to be careful when dealing with HTML strings provided by users. An additional step we can take to decrease the chances of an XSS attack is to sanitize the content provided by users. We can do it by using libraries, such as dompurify or isomorphic-dompurify. Let’s install and use the former.
npm install --save dompurify
Now we need to update the RichTextEditor component, import the dompurify library and use it to sanitize the HTML string provided by the React Editor.
src/components/RichTextEditor.jsx
First, we need to import DOMPurify at the top of the file.
import DOMPurify from "dompurify";
Next, we have to update the onChangeText method to sanitize the HTML string before it’s passed to setRichText.
const onChangeText = e => {
  setRichText(DOMPurify.sanitize(e.html));
};
That’s it. With the help of dompurify, a user shouldn’t be able to inject malicious JavaScript.
Wrap-up
We have covered how to implement Text Area and Editor components using KendoReact. Both components have their use cases, but you are probably only going to need the text area most of the time.
It’s best not to allow users to enter HTML that will then be rendered on a website. However, if you find yourself in need of a rich-text editor, make sure that the HTML content is correctly sanitized to avoid XSS attacks.
Recommend
About Joyk
Aggregate valuable and interesting links.
Joyk means Joy of geeK