

Creating social sharing images in Rust
source link: https://hashrust.com/blog/creating-social-sharing-images-in-rust/
Go to the source link to view the article. You can view the picture content, updated content and better typesetting reading experience. If the link is broken, please click the button below to view the snapshot at that time.
Creating social sharing images in Rust
2022-01-19
Introduction
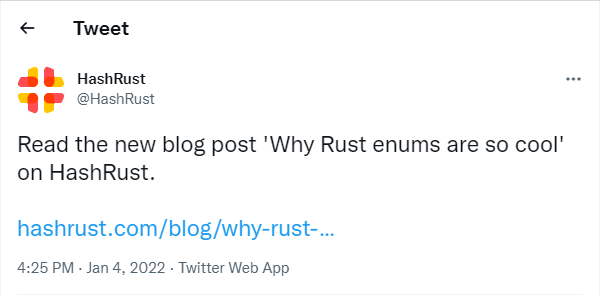
This blog had languished without a new post for about a year. In the new year I decided to write more often. So I wrote my last post about Rust enums and then shared it on Twitter. This is what it looked like:
I tweeted and forgot about it. Then sometime later, in reply to someone else, I tweeted about the IntelliJ Rust plugin and it looked like this:

This made me wonder. Why was a cool image shown for the IntelliJ Rust plugin but a tweet about my blog post was just plain, boring text? This is a story about how I configured my blog to show such images when someone tweets a link about one of my blog posts.
Open Graph and Twitter cards
Many websites automatically convert links into images when people share it. This is true for Twitter, Facebook, LinkedIn and many others. When a link is shared, the sharing platform fetches the link's HTML and looks for an og:image meta tag similar to this:
<meta property="og:image" content="https://hashrust.com/blog/why-rust-enums-are-so-cool/index.png" />
If og:image meta tag is found, its content attribute is treated as a link to the image to be rendered in the shared post. The og:image tag is part of the Open Graph Protocol. Open Graph is accepted by many social platforms. There is another Twitter specific protocol called Twitter cards. Its image tag looks like this:
<meta name="twitter:image" content="https://hashrust.com/blog/why-rust-enums-are-so-cool/index.png" />
You should probably implement both for you website. I will not go into too much depth about these protocols as you can read about them on their respective pages. What I will talk about though is how I implemented these protocols for this blog.
Social sharing images for HashRust
Adding a bunch of meta tags for HashRust was easy. The difficult bit was creating the actual images for each of my blog posts. I could have used images from something like Unsplash but I decided against that for a couple of reasons. First, I didn't think generic photographs went really well with HashRust's aesthetics. And second, I didn't want to spend hours searching for that perfect image for each post.
I wanted to create images automatically with a repeatable and consistent process. I looked around to see if others had already solved this problem. Indeed, GitHub and IndieHackers do generate social sharing images automatically. I decided to do something similar for this blog. While my solution was inspired by GitHub and IndieHackers, it differed from them in a few ways.
First, GitHub and IndieHackers both have most of their content generated by their users. This forces them to have a service that can generate images on the fly. Think what happens when someone creates a new repo on GitHub or a new post on IndieHackers? That new repo or post should have an accompanying image created automatically when someone shares it. This is not true for HashRust because I write all the content on this website. I don't need to generate the images dynamically. I can create them when I build my static website.
Second, both GitHub and IndieHackers use Puppeteer. Although Puppeteer is a very mature library and would have worked fine, I wanted something written in Rust. After all HashRust is a blog about Rust. With a bit of googling I found the headless_chrome crate. This crate, while not even close in features to Puppeteer, was good enough for me.
Template design
Having made all the tech choices, I needed to decide on the look of the images. After two gruelling days my programmer artist brain came up with this in Inkscape:
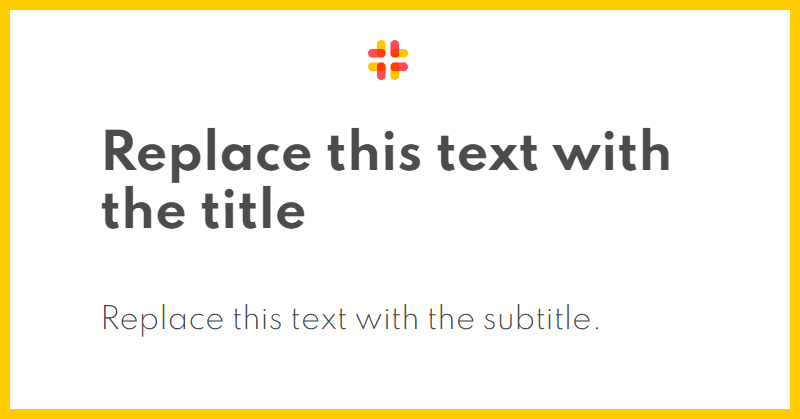
This design needed to be converted into a webpage template. The HTML was straightforward:
<div id="container">
    <img id="logo" src="/logo.png"></img>
    <div id="title"><span>Replace this text with the title</span></div>
    <div id="subtitle"><span>Replace this text with the subtitle.</span></div>
</div>
And CSS looked like the following:
* {
    margin: 0;
    padding: 0;
    box-sizing: border-box;
}

#container {
    width: 800px;
    height: 419px;
    border: 10px solid #ffcc00;
}

#logo {
    position: absolute;
    width: 40px;
    height: 40px;
    left: 368px;
    top: 40px;
}

#title {
    position: absolute;
    width: 600px;
    height: 150px;
    left: 100px;
    top: 110px;
    display: flex;
    flex-direction: column;
    justify-content: center;
    color: #4c4c4c;

    font-family: 'Spartan';
    font-weight: 700;
    font-size: 50px;
}

#title span {
    vertical-align: middle;
}

#subtitle {
    position: absolute;
    width: 600px;
    height: 80px;
    left: 100px;
    top: 280px;
    display: flex;
    flex-direction: column;
    justify-content: center;
    color: #4c4c4c;

    font-family: 'Spartan';
    font-weight: 300;
    font-size: 30px;
}

#subtitle span {
    vertical-align: middle;
}
You might have noticed in the CSS that I have put the elements at absolute positions. This is fine because unlike a responsive website the size of the images I wanted was constant at 800×419 pixels.
The parts that varied — #title and #subtitle text — needed a bit of JavaScript to keep them within their bounding boxes. For example, a longer title might overflow #title's dimensions because it has a fixed size of 600×150 pixels. Similarly, a shorter title might leave too much whitespace around it. The solution was to adjust the font-size property until the #title (and #subtitle) had a snug fit.
The resizeText JavaScript function computed the font-size for such a fit:
const resizeText = ({ element, parent, minSize, maxSize}) => {
    const hasOverflown = (element, parent) => element.offsetWidth > parent.clientWidth ||
          element.offsetHeight > parent.clientHeight;

    let i = minSize;
    let overflown = false;

    while (!overflown && i < maxSize) {
        element.style.fontSize = `${i}px`;
        overflown = hasOverflown(element, parent);
        if (!overflown) {
            i++;
        }
    }

    if (overflown) {
        element.style.fontSize = `${i - 1}px`
    }
}
The resizeText function took an element containing the text, its parent element and a minSize and maxSize for a range of possible values for font-size. It tries out all the values of font-size from minSize to maxSize until the text overflows the parent. This technique was inspired by this post by Jan Küster on Dev.to. If you look at the above code and are itching to use binary search, remember a wise man's words about premature optimization.
Next I needed a function that called resizeText for both #title and #subtitle:
const fitText = () => {
    resizeText({
        element: document.querySelector('#title span'),
        parent: document.querySelector('#title'),
        minSize: 30,
        maxSize: 50
    })

    resizeText({
        element: document.querySelector('#subtitle span'),
        parent: document.querySelector('#subtitle'),
        minSize: 24,
        maxSize: 30
    })
}
And finally, I needed a function that could replace the placeholder text in the template with actual title and subtitle text:
const setText = (titleText, subtitleText) => {
    let titleSpan = document.querySelector('#title span');
    let subtitleSpan = document.querySelector('#subtitle span');
    titleSpan.innerText = titleText;
    subtitleSpan.innerText = subtitleText;
}
This completed the HTML/CSS/JS template. Now I had to write the Rust code to open this template in chrome. The setText and fitText functions will be called by the Rust code before capturing an image as you will see later.
Static file server
All that was left now was to open the template in a headless_chrome controlled browser, update title and subtitle, fit the texts inside their bounding boxes and capture the image.
Using tokio, hyper and hyper_staticfile crates, I started a static file HTTP server in the folder where the HTML template was saved. This is the complete function:
pub(crate) async fn start_server(root_path: &Path, port: u16) {
    let address = SocketAddr::from(([127, 0, 0, 1], port));

    let make_service = make_service_fn(move |_| {
        let root = Static::new(root_path);
        async { Ok::<_, Infallible>(service_fn(move |req| handle_request(req, root.clone()))) }
    });

    let server = Server::bind(&address).serve(make_service);
    if let Err(e) = server.await {
        eprintln!("Error while starting server: {}", e);
    }
}
Let's breakdown the start_server function. It takes two arguments — root_path and port:
pub(crate) async fn start_server(root_path: &Path, port: u16) {
root_path is the folder that should be served by the static server. port is where the static file server listens for HTTP connections. Next we create a localhost SocketAddr for port:
let address = SocketAddr::from(([127, 0, 0, 1], port));
And a service using the make_service_fn:
let make_service = make_service_fn(move |_| {
    let root = Static::new(root_path);
    async { Ok::<_, Infallible>(service_fn(move |req| handle_request(req, root.clone()))) }
});
As per hyper's docs, a service is an asynchronous function from a Request to a Response. In make_service_fn we create a Static instance from the hyper-staticfile crate and pass it to the handle_request function which simply serves the files at root:
async fn handle_request<B>(req: Request<B>, root: Static) -> Result<Response<Body>, Error> {
    root.serve(req).await
}
Next we bind to the address created earlier and start serving requests using the service that was just created:
let server = Server::bind(&address).serve(make_service);
And finally we wait forever for the server to exit, printing any error if the server fails to start:
if let Err(e) = server.await {
    eprintln!("Error while starting server: {}", e);
}
With the server serving the HTML template, capturing the image was all that was left now.
Capturing the image
Next, I used headless_chrome to open a chrome browser to the static server's URL, updated #title and #subtitle, adjusted their font-size and captured the PNG image:
pub(crate) fn save_image(chrome_path: &Path, static_server_url: &str, title: &str, subtitle: &str, image_path: &Path) {
    let options = LaunchOptionsBuilder::default()
        .path(Some(chrome_path.to_path_buf()))
        .build().expect("Failed to build LaunchOptions");

    let browser = match Browser::new(options) {
        Ok(browser) => browser,
        Err(e) => {
            eprintln!("Failed to create browser: {}", e);
            return;
        }
    };

    let tab = match browser.wait_for_initial_tab() {
        Ok(tab) => tab,
        Err(e) => {
            eprintln!("Failed to wait for initial tab: {}", e);
            return;
        }
    };

    if let Err(e) = tab.navigate_to(static_server_url) {
        eprintln!("Error while navigating to url: {}", e);
        return;
    }

    if let Err(e) = tab.wait_until_navigated() {
        eprintln!("Error while waiting for navigation: {}", e);
        return;
    }

    let title = title.replace("'", "\\'");
    let subtitle = subtitle.replace("'", "\\'");

    let js_expr = format!(r"
            setText('{}', '{}');
            fitText();
        ", title, subtitle);

    if let Err(e) = tab.evaluate(&js_expr, true){
        eprintln!("Error while evaluating js: {}", e);
        return;
    }

    let container = match tab.find_element("#container") {
        Ok(container) => container,
        Err(e) => {
            eprintln!("Error while finding #container element: {}", e);
            return;
        }
    };

    let viewport = match container.get_box_model() {
        Ok(box_model) => box_model.border_viewport(),
        Err(e) => {
            eprintln!("Error while getting #container box model: {}", e);
            return;
        }
    };

    let png_data = match tab.capture_screenshot(ScreenshotFormat::PNG, Some(viewport), true) {
        Ok(png_data) => png_data,
        Err(e) => {
            eprintln!("Error while capturing screenshot: {}", e);
            return;
        }
    };

    if let Err(e) = fs::write(image_path, &png_data) {
        eprintln!("Error while capturing screenshot: {}", e);
    }
}
Again, the save_image function is very long and needs to be discussed bit by bit. save_image accepts five arguments:
pub(crate) fn save_image(chrome_path: &Path, static_server_url: &str, title: &str, subtitle: &str, image_path: &Path) {
chrome_path is the path of the chrome browser's executable. This doesn't have to be strictly Chrome; any browser from its lineage should work. I tested with Brave, for example, and it worked. static_server_url is the URL on which the static file server is listening. title and subtitle contain the text to be updated in the template. image_path is the path where the PNG image has to be saved.
Next we create the launch options using LaunchOptionsBuilder:
let options = LaunchOptionsBuilder::default()
    .path(Some(chrome_path.to_path_buf()))
    .build().expect("Failed to build LaunchOptions");
Here I set the path of the Chrome executable by calling the path method on the builder. If path is not called, headless_chrome will try to automatically detect a suitable Chrome binary. headless is another useful method for debugging. It is on by default, but you can disable it if you want to see the browser UI.
Then we launch the browser and wait for an empty tab to open:
let browser = match Browser::new(options) {
    Ok(browser) => browser,
    Err(e) => {
        eprintln!("Failed to create browser: {}", e);
        return;
    }
};

let tab = match browser.wait_for_initial_tab() {
    Ok(tab) => tab,
    Err(e) => {
        eprintln!("Failed to wait for initial tab: {}", e);
        return;
    }
};
Nothing much to explain here. Then we navigate to the static server URL and wait until it opens in the new tab:
if let Err(e) = tab.navigate_to(static_server_url) {
    eprintln!("Error while navigating to url: {}", e);
    return;
}

if let Err(e) = tab.wait_until_navigated() {
    eprintln!("Error while waiting for navigation: {}", e);
    return;
}
After that we call the setText and fitText JavaScript functions from the template defined earlier:
let title = title.replace("'", "\\'");
let subtitle = subtitle.replace("'", "\\'");

let js_expr = format!(r"
    setText('{}', '{}');
    fitText();
    ", title, subtitle);

if let Err(e) = tab.evaluate(&js_expr, true){
    eprintln!("Error while evaluating js: {}", e);
    return;
}
Notice that single quotes in title and subtitle are escaped so that they don't interfere with the arguments to setText in the js_expr JavaScript expression. The evaluate method on tab will wait for the js_expr to complete if the second argument is true. Now I was ready to capture the image. So I got the #container element and its viewport:
let container = match tab.find_element("#container") {
    Ok(container) => container,
    Err(e) => {
        eprintln!("Error while finding #container element: {}", e);
        return;
    }
};

let viewport = match container.get_box_model() {
    Ok(box_model) => box_model.border_viewport(),
    Err(e) => {
        eprintln!("Error while getting #container box model: {}", e);
        return;
    }
};
And finally, captured the image and saved it to the disc at image_path location:
let png_data = match tab.capture_screenshot(ScreenshotFormat::PNG, Some(viewport), true) {
    Ok(png_data) => png_data,
    Err(e) => {
        eprintln!("Error while capturing screenshot: {}", e);
        return;
    }
};

if let Err(e) = fs::write(image_path, &png_data) {
    eprintln!("Error while capturing screenshot: {}", e);
}
Phew.
And that is how I captured an image for one blog post. There was still work to do to parse the frontmatter from each blog post to extract the title and the subtitle. I also had to handle synchronization between code that started static file server and the code that captured the image. While what you see above covers the essence of the code, I omitted some detail for the sake of clarity. If you are curious, you can take a look at the full code in its repository.
Conclusion
Twitter cards and Open Graph images are a great tool to facelift your posts on social media. While these protocols themselves are quite simple, I still needed to create the images that are shown in the shared posts. In this blog I showed you how I wrote a tool to automate creation of images for sharing on social media. Feel free to view source on this page and see the metadata tags yourself. Now when you share a link to this post on social media you will see a beautiful image rendered in the post. Go ahead, try it now 👇.
Recommend
About Joyk
Aggregate valuable and interesting links.
Joyk means Joy of geeK