

WWDC 2021 新 Formatter API:新老比较及如何自定义
source link: https://www.fatbobman.com/posts/newFormatter/
Go to the source link to view the article. You can view the picture content, updated content and better typesetting reading experience. If the link is broken, please click the button below to view the snapshot at that time.
在 WWDC 2021 的 What's in Foundation 专题中,苹果隆重介绍了适用于 Swift 的新 Formatter API。网上已经有不少文章对新 API 的用法进行了说明。本文将通过介绍如何创建符合新 API 的 Formatter,让读者从另一个角度了解新 Formatter API 的设计机制;并对新旧两款 API 进行比较。
本文的演示代码可以在 Github 上下载

健康笔记是我开发的一个iOS app,主要服务于有长期健康管理需求的人士。健康笔记提供了强大的自定义数据类型功能,可以满足记录生活中绝大多数的健康项目数据的需要。你可以为每个家庭成员创建各自的健康数据记录笔记,或者针对某个特定项目、特定时期创建对应的笔记。
新旧交替或风格转换
新 Formatter API 可以做什么
新 Formatter 提供了一个便捷的接口,让 Swift 程序员以更熟悉方式在应用程序中呈现本地化的格式字符串。
新 API 比旧 API 好吗
好和坏都是相对的,对于以 Swift 开发为主或者只会 Swift 的程序员(比如我本人),新 Formatter 不仅学习和使用起来更容易,同时也更适合日益流行的声明式编程风格。不过从整体功能和效率上讲,新 Formatter 并不具备优势。
新旧 API 比较
调用方便度
如果说新 API 相较旧 API 的最大优势,便是在调用上更符合直觉、更方便了。
旧 API:
      let number = 3.147
      let numberFormat = NumberFormatter()
      numberFormat.numberStyle = .decimal
      numberFormat.maximumFractionDigits = 2
      numberFormat.roundingMode = .halfUp
      let numString = numberFormat.string(from: NSNumber(3.147))!
      // 3.15
新 API:
      let number = 3.147
      let numString = number.formatted(.number.precision(.fractionLength(2)).rounded(rule: .up))
      // 3.15
旧 API:
      let numberlist = [3.345,534.3412,4546.4254]
      let numberFormat = NumberFormatter()
              numberFormat.numberStyle = .decimal
              numberFormat.maximumFractionDigits = 2
              numberFormat.roundingMode = .halfUp
      let listFormat = ListFormatter()
      let listString = listFormat
                  .string(from:
                              numberlist
                              .compactMap{numberFormat.string(from:NSNumber(value: $0))}
                  ) ?? ""
      // 3.35, 534.35, and 4,546.43
新 API:
        let numString1 = numberlist.formatted(
            .list(
                memberStyle: .number.precision(.fractionLength(2)).rounded(rule: .up),
                type: .and
            )
        )
    // 3.35, 534.35, and 4,546.43
即使你对新 API 并不很了解,仅凭代码的自动提示你就可以快速组合出想要的格式化结果。
在 WWDC 视频中,苹果几次提及新 API 对性能的提升。不过苹果并没有告诉你全部的真相。
从我个人的测试数据来看,新 API 的效率相较于仅使用一次的 Formatter 实例来说,提升还是比较明显的(30% —— 300%),不过同可复用的 Formatter 实例比较,仍有数量级上的差距。
旧 API,每次都重新创建实例
    func testDateFormatterLong() throws {
        measure {
            for _ in 0..<count {
                let date = Date()
                let formatter = DateFormatter()
                formatter.dateStyle = .full
                formatter.timeStyle = .full
                _ = formatter.string(from: date)
            }
        }
    }
// 0.121
旧 API,只创建一次实例
    func testDateFormatterLongCreateOnce() throws {
        let formatter = DateFormatter()
        measure {
            for _ in 0..<count {
                let date = Date()
                formatter.dateStyle = .full
                formatter.timeStyle = .full
                _ = formatter.string(from: date)
            }
        }
    }
// 0.005
    func testDateFormatStyleLong() throws {
        measure {
            for _ in 0..<count {
                _ = Date().formatted(.dateTime.year().month(.wide).day().weekday(.wide).hour(.conversationalTwoDigits(amPM: .wide)).minute(.defaultDigits).second(.twoDigits).timeZone(.genericName(.long)))
            }
        }
    }
// 0.085
使用新 API,配置的内容越多,执行所需时间也会相应增长。不过除非是对性能有非常高要求的场景,否则新 API 的执行效率还是有可以令人满意的。
本文的 Demo 中,附带了部分 Unit Test 代码,大家可以自行测试。
旧 API 中,针对不同的格式化类型,我们需要创建不同的 Formatter 实例。比如使用 NumberFormatter 格式化数字、DateFormatter 格式化日期。
新 API 针对每个支持的类型都提供了统一的调用接口,尽量减少代码层面的复杂度
Date.now.formatted()
// 9/30/2021, 2:12 PM
345.formatted(.number.precision(.integerLength(5)))
// 00,345
Date.now.addingTimeInterval(100000).formatted(.relative(presentation: .named))
// tomorrow
自定义难度
新 API 的调用便利性是建立在大量繁杂工作的基础之上的。相较于旧 API 通过属性直接设置,新 API 采用函数式编程方式,针对每个属性单独编写设置方法。虽然并不复杂,但工作量明显提高。
AttributedString
新 API 为每个可转换类型都提供 AttributedString 格式支持。通过 AttribtedString 中的 Field,可以方便的生成想要的显示样式。
    var dateString: AttributedString {
        var attributedString = Date.now.formatted(.dateTime
            .hour()
            .minute()
            .weekday()
            .attributed
        )
        let weekContainer = AttributeContainer()
            .dateField(.weekday)
        let colorContainer = AttributeContainer()
            .foregroundColor(.red)
        attributedString.replaceAttributes(weekContainer, with: colorContainer)
        return attributedString
    }

Text(dateString)

代码出错率
在新 API 中,一切都是类型安全的,开发者无需反复的查阅文档,你的代码可以享受编译时检查的好处。
比如下面的代码
let dateFormatter:DateFormatter = {
    let formatter = DateFormatter()
    formatter.dateFormat = "yyyy-MM-dd HH:mm:ss"
    return formatter
}()

let dateString = dateFormatter.string(from: Date.now)
let dateString = Date.now.formatted(.iso8601.year().month().day().dateSeparator(.dash).dateTimeSeparator(.space).time(includingFractionalSeconds: false) .timeSeparator(.colon))
如果单从代码量上来看,在本例中,新 API 不占据任何优势。不过你无需在 yyyy 和 YYYY 或者 MM 还是 mm 中犹豫,也不用反复查看 令人头痛的文档,减少了在代码中犯错的可能性。
风格转换?
旧 API 是 Objectiv-C 的产物,它十分高效且好用,但在 Swift 中使用难免有不协调感。
新 API 是完全为 Swift 开发的,它采用了当前流行的声明式的风格。开发者只需要声明需要显示的字段,系统将以合适的格式进行呈现。
两种风格将在苹果的开发生态中长期共存,开发者可以选择适合自己的方式来实现同一个目标。
因此不存在风格转换的问题,苹果只是补交了 Swift 开发环境上缺失的一部分而已。
新旧 API 将长期共存。
新 API 并非用来替换旧的 Formatter API,应该算是旧 Formatter 的 Swift 实现版本。新 API 基本涵盖了旧 API 绝大多数的功能,着重改善了开发者的使用体验。
类似的情况在最近几年中将不断上演,苹果在 Swift 语言层面基本完善的情况下,将逐步提供其核心框架的 Swift 版本。本届 WWDC 上推出的 AttributedString 也可以佐证这一点。
如何自定义新的 Formatter
新老 API 在自定义方面的不同
旧 API 是用类实现的,在创建自定义格式化器时,我们需要创建一个 Formatter 的子类,并至少实现以下两个方法:
class MyFormatter:Formatter {
   // 将被格式化类型转换成格式类型(字符串)
    override func string(for obj: Any?) -> String?{
        guard let value = obj as? Double else {return nil}
        return String(value)
    }

   // 将格式化类型(字符串)转换回被格式化类型
    override func getObjectValue(_ obj: AutoreleasingUnsafeMutablePointer<AnyObject?>?, for string: String, errorDescription error: AutoreleasingUnsafeMutablePointer<NSString?>?) -> Bool{
        guard let value = Double(string) else {return false}
        obj?.pointee = value as AnyObject
        return true
    }
}
需要的情况下,我们也可以提供NSAttributedString的格式化实现
    override func attributedString(for obj: Any, withDefaultAttributes attrs: [NSAttributedString.Key : Any]? = nil) -> NSAttributedString? {
        nil
    }
数据的格式转换都是在一个类定义中完成的。
新 API 充分体现了 Swift 作为面向协议语言的特点,使用两个协议(FormatStyle、ParseStrategy),分别定义了格式化数据和从格式化转换两个方向的实现。
FormatStyle
将被格式化类型转换成格式化类型。
public protocol FormatStyle : Decodable, Encodable, Hashable {

    /// The type of data to format.
    associatedtype FormatInput

    /// The type of the formatted data.
    associatedtype FormatOutput

    /// Creates a `FormatOutput` instance from `value`.
    func format(_ value: Self.FormatInput) -> Self.FormatOutput

    /// If the format allows selecting a locale, returns a copy of this format with the new locale set. Default implementation returns an unmodified self.
    func locale(_ locale: Locale) -> Self
}
尽管在导出类型上使用了泛型,不过由于新 API 着重于格式化(而不是类型转换),因此通常 FormatOutpu 为String或者AttributedString。
func format(_ value: Self.FormatInput) -> Self.FormatOutput是必须实现的方法,locale用来为 Formatter 设置区域信息,其返回值中的format方法的输出类型同原结构一致。因此,尽管 Formatter 会针对不同区域提供不同语言的返回结果,但为了兼容性,返回结果仍为String。
FormatStyle 协议同时约定了必须满足 Codable 和 Hashable。
ParseStrategy
将格式化后的数据转换成被格式化类型
public protocol ParseStrategy : Decodable, Encodable, Hashable {

    /// The type of the representation describing the data.
    associatedtype ParseInput

    /// The type of the data type.
    associatedtype ParseOutput

    /// Creates an instance of the `ParseOutput` type from `value`.
    func parse(_ value: Self.ParseInput) throws -> Self.ParseOutput
}
parse的定义可比旧 API 的getObjectValue容易理解多了。
ParseableFromatStyle
由于FormatStyle和ParseStrategy是两个独立的协议,因此苹果又提供了ParseableFromatStyle协议,方便我们在一个结构体中实现两个协议的方法。
public protocol ParseableFormatStyle : FormatStyle {

    associatedtype Strategy : ParseStrategy where Self.FormatInput == Self.Strategy.ParseOutput, Self.FormatOutput == Self.Strategy.ParseInput

    /// A `ParseStrategy` that can be used to parse this `FormatStyle`'s output
    var parseStrategy: Self.Strategy { get }
}
尽管理论上也可以通过
FormatStyle&ParseStrategy在一个结构体中实现双向转换,不过官方框架只支持通过ParseableFromatStyle协议实现的 Formatter。
尽管ParseableFromatStyle协议并没有要求一定要输出 AttributedString,不过在官方的新 Formatter API 中还是为每个类型都提供了 AttributedString 的输出。
为了方便 Formatter 的调用,所有的官方 Formatter 都使用了 Swift 5.5 的新功能——在泛型上下文中扩展静态成员查找
extension FormatStyle where Self == IntegerFormatStyle<Int> {
    public static var number: IntegerFormatStyle<Int> { get }
}
我们最好也为自定义的 Formatter 提供类似的定义
健康笔记是我开发的一个iOS app,主要服务于有长期健康管理需求的人士。健康笔记提供了强大的自定义数据类型功能,可以满足记录生活中绝大多数的健康项目数据的需要。你可以为每个家庭成员创建各自的健康数据记录笔记,或者针对某个特定项目、特定时期创建对应的笔记。
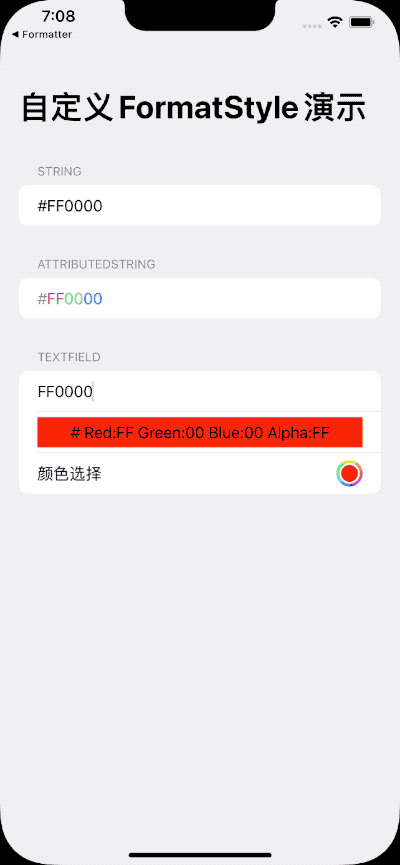
本节中,我们将用新的协议来实现针对 UIColor 的 Formatter,它将实现如下功能:
- 转换成 String
UIColor.red.formatted()
// #FFFFFF
- 转换成 AttributedString
UIColor.red.formatted(.uiColor.attributed)

- 从 String 转换成 UIColor
let color = try! UIColor("#FFFFFFCC")
// UIExtendedSRGBColorSpace 1 1 1 0.8
- 支持链式配置(前缀、标记符号、是否显示透明度)
Text(color, format: .uiColor.alpah().mark().prefix)

- localized

实现 ParseStrategy
将字符串转换成 UIColor。
struct UIColorParseStrategy: ParseStrategy {
    func parse(_ value: String) throws -> UIColor {
        var hexColor = value
        if value.hasPrefix("#") {
            let start = value.index(value.startIndex, offsetBy: 1)
            hexColor = String(value[start...])
        }

        if hexColor.count == 6 {
            hexColor += "FF"
        }

        if hexColor.count == 8 {
            let scanner = Scanner(string: hexColor)
            var hexNumber: UInt64 = 0

            if scanner.scanHexInt64(&hexNumber) {
                return UIColor(red: CGFloat((hexNumber & 0xff000000) >> 24) / 255,
                               green: CGFloat((hexNumber & 0x00ff0000) >> 16) / 255,
                               blue: CGFloat((hexNumber & 0x0000ff00) >> 8) / 255,
                               alpha: CGFloat(hexNumber & 0x000000ff) / 255)
            }
        }

        throw Err.wrongColor
    }

    enum Err: Error {
        case wrongColor
    }
}
在 Demo 中,我们并没有实现一个要求非常严格的 ParseStrategy。任何长度为 6 或 8 的十六进制字符串都将被转换成 UIColor。
实现 ParseableFromatStyle
struct UIColorFormatStyle: ParseableFormatStyle {
    var parseStrategy: UIColorParseStrategy {
        UIColorParseStrategy()
    }

    private var alpha: Alpha = .none
    private var prefix: Prefix = .hashtag
    private var mark: Mark = .none
    private var locale: Locale = .current

    enum Prefix: Codable {
        case hashtag
        case none
    }

    enum Alpha: Codable {
        case show
        case none
    }

    enum Mark: Codable {
        case show
        case none
    }

    init(prefix: Prefix = .hashtag, alpha: Alpha = .none, mark: Mark = .none, locale: Locale = .current) {
        self.prefix = prefix
        self.alpha = alpha
        self.mark = mark
        self.locale = locale
    }

    func format(_ value: UIColor) -> String {
        let (prefix, red, green, blue, alpha, redMark, greenMark, blueMark, alphaMark) = Self.getField(value, prefix: prefix, alpha: alpha, mark: mark, locale: locale)
        return prefix + redMark + red + greenMark + green + blueMark + blue + alphaMark + alpha
    }
}

extension UIColorFormatStyle {
    static func getField(_ color: UIColor, prefix: Prefix, alpha: Alpha, mark: Mark, locale: Locale) -> (prefix: String, red: String, green: String, blue: String, alpha: String, redMask: String, greenMark: String, blueMark: String, alphaMark: String) {
        var r: CGFloat = 0
        var g: CGFloat = 0
        var b: CGFloat = 0
        var a: CGFloat = 0
        color.getRed(&r, green: &g, blue: &b, alpha: &a)
        let formatString = "%02X"
        let prefix = prefix == .hashtag ? "#" : ""
        let red = String(format: formatString, Int(r * 0xff))
        let green = String(format: formatString, Int(g * 0xff))
        let blue = String(format: formatString, Int(b * 0xff))
        let alphaString = alpha == .show ? String(format: formatString, Int(a * 0xff)) : ""

        var redMark = ""
        var greenMark = ""
        var blueMark = ""
        var alphaMark = ""

        if mark == .show {
            redMark = "Red: "
            greenMark = "Green: "
            blueMark = "Blue: "
            alphaMark = alpha == .show ? "Alpha: " : ""
        }

        return (prefix, red, green, blue, alphaString, redMark, greenMark, blueMark, alphaMark)
    }
}
在 ParseableFromatStyle 中,除了实现format方法外,我们为不同的配置声明了属性。
将
getField方法声明为结构方法,便于之后的Attributed调用
在完成了上述代码后,我们已经可以使用代码在 UIColor 和 String 之间进行转换:
let colorString = UIColorFormatStyle().format(UIColor.blue)
// #0000FF

let colorString = UIColorFormatStyle(prefix: .none, alpha: .show, mark: .show).format(UIColor.blue)
// Red:00 Green:00 Blue:FF Alpha:FF

let color = try! UIColorFormatStyle().parseStrategy.parse("#FF3322")
// UIExtendedSRGBColorSpace 1 0.2 0.133333 1
extension UIColorFormatStyle {
    func prefix(_ value: Prefix = .hashtag) -> Self {
        guard prefix != value else { return self }
        var result = self
        result.prefix = value
        return result
    }

    func alpah(_ value: Alpha = .show) -> Self {
        guard alpha != value else { return self }
        var result = self
        result.alpha = value
        return result
    }

    func mark(_ value: Mark = .show) -> Self {
        guard mark != value else { return self }
        var result = self
        result.mark = value
        return result
    }

    func locale(_ locale: Locale) -> UIColorFormatStyle {
        guard self.locale != locale else { return self }
        var result = self
        result.locale = locale
        return result
    }
}
现在我们获得了链式配置的能力。
let colorString = UIColorFormatStyle().alpah(.show).prefix(.none).format(UIColor.blue)
// 0000FFFF
localized 支持
由于format的输出类型为 String,因此,我们需要在getField中将Mark转换成对应区域的文字。在getField中做如下修改:
        if mark == .show {
            redMark = getLocalizedString(.red, locale: locale)
            greenMark = getLocalizedString(.green, locale: locale)
            blueMark = getLocalizedString(.blue, locale: locale)
            alphaMark = alpha == .show ? getLocalizedString(.alpha, locale: locale) : ""
        }
在 UIColorFormatStyle 添加如下代码:
enum MarkTag:String{
        case red
        case green
        case blue
        case alpha
    }

    static let localeString:[String:String] = [
        "EN-red":" Red:",
        "EN-green":" Green:",
        "EN-blue" : " Blue:",
        "EN-alpha" : " Alpha:",
        "ZH-red" : " 红:",
        "ZH-green" : " 绿:",
        "ZH-blue" : " 蓝",
        "ZH-alpha" : " 透明度:"
    ]
至此,当系统切换到拥有对应语言包的地区时,Mark 将显示对应的内容
# Red:00 Green:00 Blue:FF Alpha:FF
# 红:00 绿:00 蓝:FF 透明度:FF
截至本文完成时,
String(localized:String,locale:Locale)仍有 Bug,无法获取到对应的 Locale 文字。系统的 Formatter 也有这个问题。正常的情况下,我们可以使用如下代码,在非中文区域获得中文的 mark 显示 之前对 String 新的构造方法理解有误,经过官方的邮件解释,String(localized:String, locale:Locale)中的locale是用来设置字符串差值中 formatter 的 locale。因此对原有代码进行了修改。
let colorString = UIColorFormatStyle().mark().locale(Locale(identifier: "zh-cn")).format(UIColor.blue)
在 SwiftUI 中设置
// Text 将自动调用 Formatter 的 locale 方法
Text(color, format: .uiColor.mark())
    .environment(\.locale, Locale(identifier: "zh-cn"))
AttributedString 支持
创建自定义 Field,便于使用者修改 AttributedString 不同区域的 Style
enum UIColorAttirbute: CodableAttributedStringKey, MarkdownDecodableAttributedStringKey {
    enum Value: String, Codable {
        case red
        case green
        case blue
        case alpha
        case prefix
        case mark
    }

    static var name: String = "colorPart"
}

extension AttributeScopes {
    public struct UIColorAttributes: AttributeScope {
        let colorPart: UIColorAttirbute
    }

    var myApp: UIColorAttributes.Type { UIColorAttributes.self }
}

extension AttributeDynamicLookup {
    subscript<T>(dynamicMember keyPath: KeyPath<AttributeScopes.UIColorAttributes, T>) -> T where T: AttributedStringKey { self[T.self] }
}
过些日子我会写篇博文介绍 AttributedString 的用法,以及如何自定义 AttributedKey
由于将 UIColor 格式化成 AttributedString 是单向的(无需从 AttribuedString 转换回 UIColor),因此 Attributed 只需遵循 FormatStyle 协议
extension UIColorFormatStyle {
    var attributed: Attributed {
        Attributed(prefix: prefix, alpha: alpha,mark: mark,locale: locale)
    }

    struct Attributed: Codable, Hashable, FormatStyle {
        private var alpha: Alpha = .none
        private var prefix: Prefix = .hashtag
        private var mark: Mark = .none
        private var locale: Locale = .current

        init(prefix: Prefix = .hashtag, alpha: Alpha = .none, mark: Mark = .none, locale: Locale = .current) {
            self.prefix = prefix
            self.alpha = alpha
            self.mark = mark
            self.locale = locale
        }

        func format(_ value: UIColor) -> AttributedString {
            let (prefix, red, green, blue, alpha, redMark, greenMark, blueMark, alphaMark) = UIColorFormatStyle.getField(value, prefix: prefix, alpha: alpha, mark: mark, locale: locale)
            let prefixString = AttributedString(localized: "^[\(prefix)](colorPart:'prefix')", including: \.myApp)
            let redString = AttributedString(localized: "^[\(red)](colorPart:'red')", including: \.myApp)
            let greenString = AttributedString(localized: "^[\(green)](colorPart:'green')", including: \.myApp)
            let blueString = AttributedString(localized: "^[\(blue)](colorPart:'blue')", including: \.myApp)
            let alphaString = AttributedString(localized: "^[\(alpha)](colorPart:'alpha')", including: \.myApp)

            let redMarkString = AttributedString(localized: "^[\(redMark)](colorPart:'mark')",  including: \.myApp)
            let greenMarkString = AttributedString(localized: "^[\(greenMark)](colorPart:'mark')" ,including: \.myApp)
            let blueMarkString = AttributedString(localized: "^[\(blueMark)](colorPart:'mark')" ,including: \.myApp)
            let alphaMarkString = AttributedString(localized: "^[\(alphaMark)](colorPart:'mark')" ,including: \.myApp)

            let result = prefixString + redMarkString + redString + greenMarkString + greenString + blueMarkString + blueString + alphaMarkString + alphaString
            return result
        }

        func prefix(_ value: Prefix = .hashtag) -> Self {
            guard prefix != value else { return self }
            var result = self
            result.prefix = value
            return result
        }

        func alpah(_ value: Alpha = .show) -> Self {
            guard alpha != value else { return self }
            var result = self
            result.alpha = value
            return result
        }

        func mark(_ value: Mark = .show) -> Self {
            guard mark != value else { return self }
            var result = self
            result.mark = value
            return result
        }

        func locale<T:FormatStyle>(_ locale: Locale) -> T {
            guard self.locale != locale else { return self as! T }
            var result = self
            result.locale = locale
            return result as! T
        }
    }
}
统一性支持
为 UIColorFormatStyle 添加 FormatStyle 扩展,方便在 Xcode 中使用
extension FormatStyle where Self == UIColorFormatStyle.Attributed {
    static var uiColor: UIColorFormatStyle.Attributed {
        UIColorFormatStyle().attributed
    }
}

extension FormatStyle where Self == UIColorFormatStyle {
    static var uiColor: UIColorFormatStyle {
        UIColorFormatStyle()
    }
}
为 UIColor 添加便捷构造方法和formatted方法,保持同官方 Formatter 一致的使用体验。
extension UIColor {
    func formatted<F>(_ format: F) -> F.FormatOutput where F: FormatStyle, F.FormatInput == UIColor, F.FormatOutput == String {
        format.format(self)
    }

    func formatted<F>(_ format: F) -> F.FormatOutput where F: FormatStyle, F.FormatInput == UIColor, F.FormatOutput == AttributedString {
        format.format(self)
    }

    func formatted() -> String {
        UIColorFormatStyle().format(self)
    }

    convenience init<T:ParseStrategy>(_ value: String, strategy: T = UIColorParseStrategy() as! T  ) throws where T.ParseOutput == UIColor {
        try self.init(cgColor: strategy.parse(value as! T.ParseInput).cgColor)
    }

    convenience init(_ value: String) throws  {
        try self.init(cgColor: UIColorParseStrategy().parse(value).cgColor)
    }
}
可以在 Github 上下载全部代码。
鉴于官方已经提供了大量种类齐全、功能丰富的 Formatter,大多数的开发者可能都不会碰到需要自定义 Formatter 的场景。不过通过对自定义 Formatter 协议的了解,可以加强我们对原生 Formatter 的认识,在代码中更好地使用它们。
希望本文能对你有所帮助。
Recommend
About Joyk
Aggregate valuable and interesting links.
Joyk means Joy of geeK