

Continuous Integration, Continuous Deployment (CI-CD) with Azure DevOps
source link: https://milan.milanovic.org/post/cd-cd-with-azure-devops-yaml/
Go to the source link to view the article. You can view the picture content, updated content and better typesetting reading experience. If the link is broken, please click the button below to view the snapshot at that time.
Continuous Integration, Continuous Deployment (CI-CD) with Azure DevOps
Continuous Integration, Continuous Deployment (CI-CD) with Azure DevOps and YAML
Continuous integration and Continuous deployment are an important part of modern software development practices and DevOps. It brings to software development teams a focus on fulfilling business requirements, code quality, and security as deployment steps are automated.
Continuous integration (CI) represents a set of practices that drive development teams to implement small changes and check-in code to the version control repository frequently. The developer’s changes are validated by creating a build and running automated tests against the build. It put emphasis on test automation to check that the application is not broken whenever new commits are integrated into the main branch.
Continuous deployment (CD) continues on Continuous integration, it automates the delivery of applications to selected infrastructure environments. Most teams use different environments (such as development, testing, etc.) and CD ensures there is an automated way to push code changes into them.
In this article, we will investigate how to implement these two DevOps principles by using one ASP.NET Core application and Azure DevOps. We will use Azure YAML Pipelines to continuously build and deploy our app on every push. Pipelines consist of stages, which consist of jobs, which consist of steps. Each step could be a script or task.
Create an Azure DevOps project
We will start from the same (simple) ASP.NET application shown in the previous blog post. The first step is to set up the Azure DevOps environment on the https://dev.azure.com/ location.
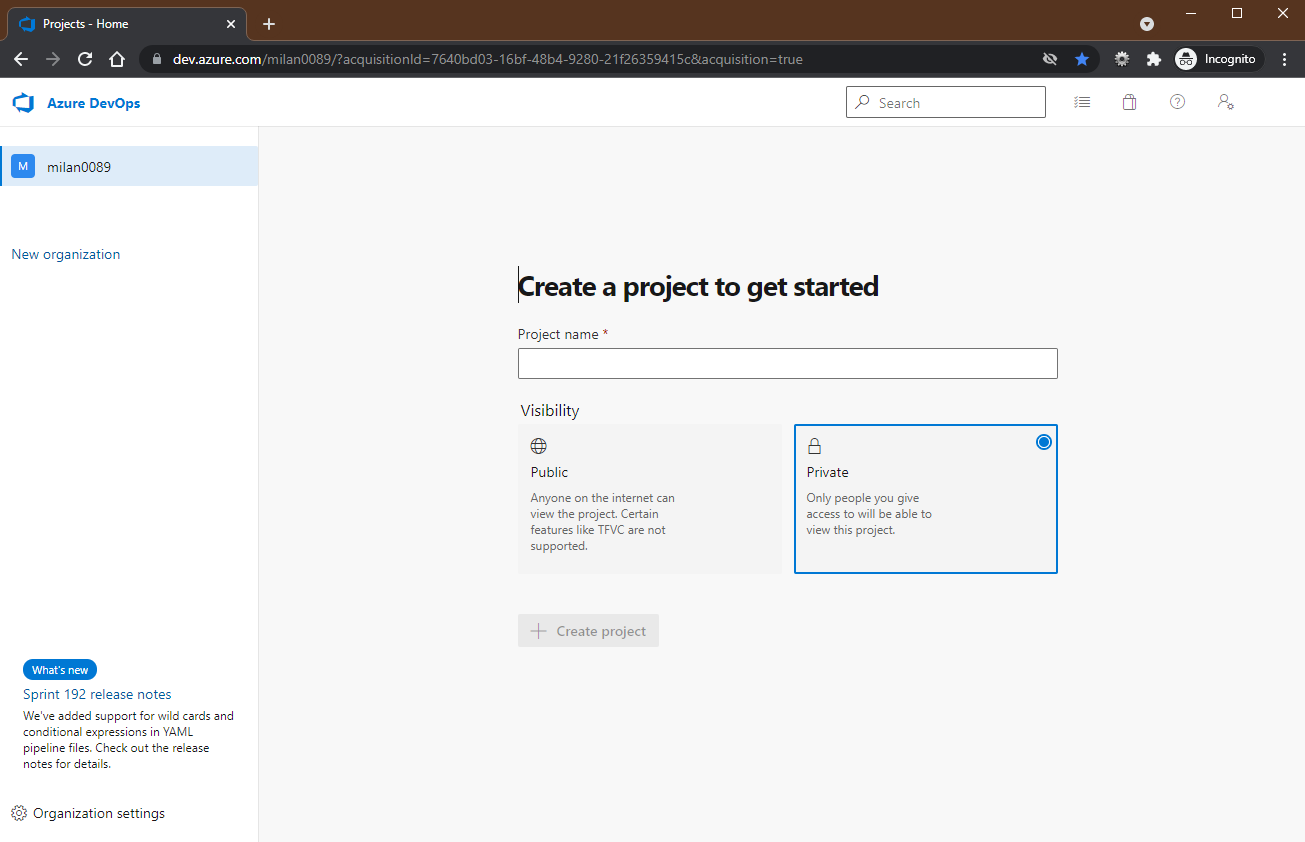
When we enter the name for the project and click Create a new project will be created in the Azure DevOps.
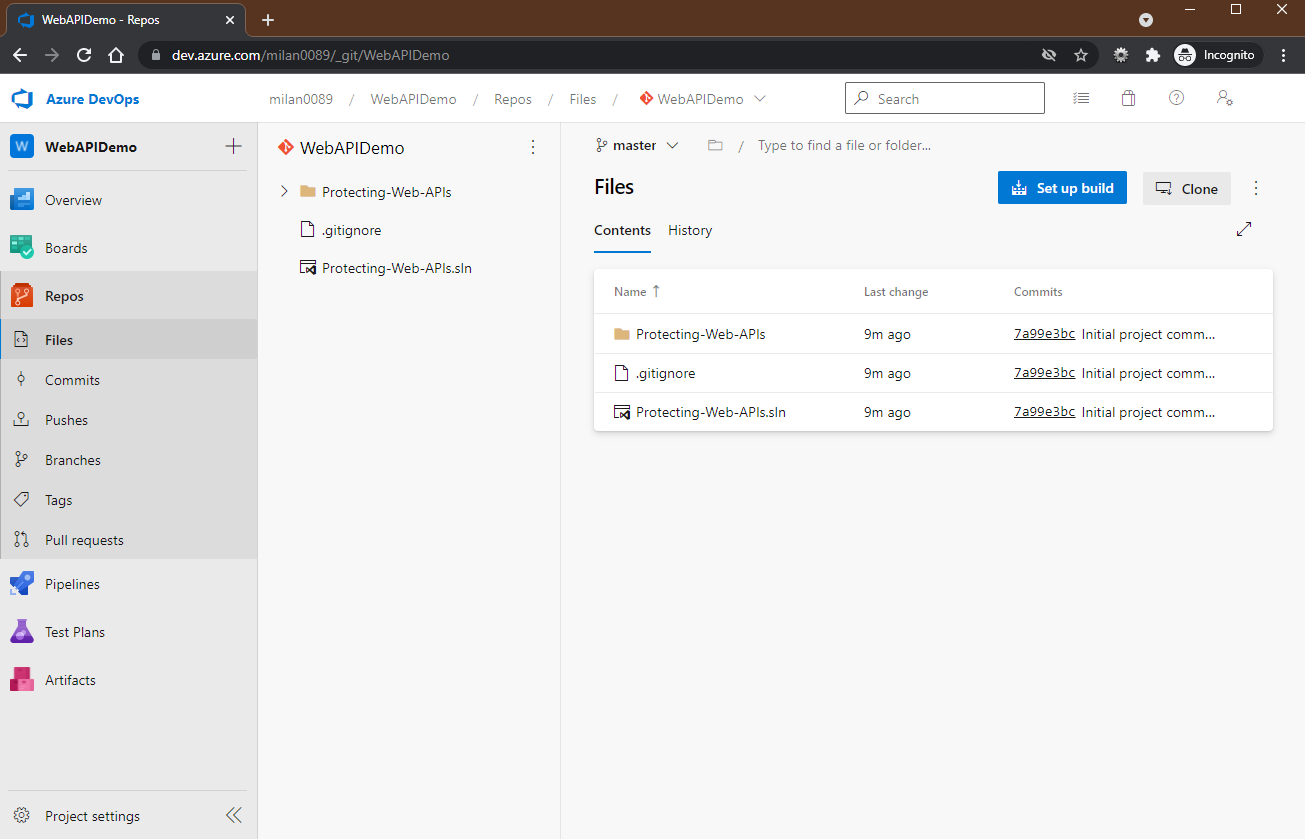
Pushing the code to the repository
The next step is to push our local code to the Azure DevOps repository. We can push it either via Visual Studio menus or GIT. We will use the GIT approach here. In the directory where solution is located first create a GIT repository:
git init
and in the next step do the initial commit for all project files:
git add . and then git commit -m "Initial project"
When we created the repository and the first commit, the next step is to create a remote for our project (can be read from Azure DevOps page):
git remote add origin https://[email protected]/your_organization/WebAPIDemo/_git/WebAPIDemo
and then to push our changes to the remote repository:
git push -u origin --all
after this, our code will be in the repository:
Creating Build Pipeline
Now we need to create a build pipeline. To create a new build pipeline for our project, we go to Pipelines -> Create Pipeline.
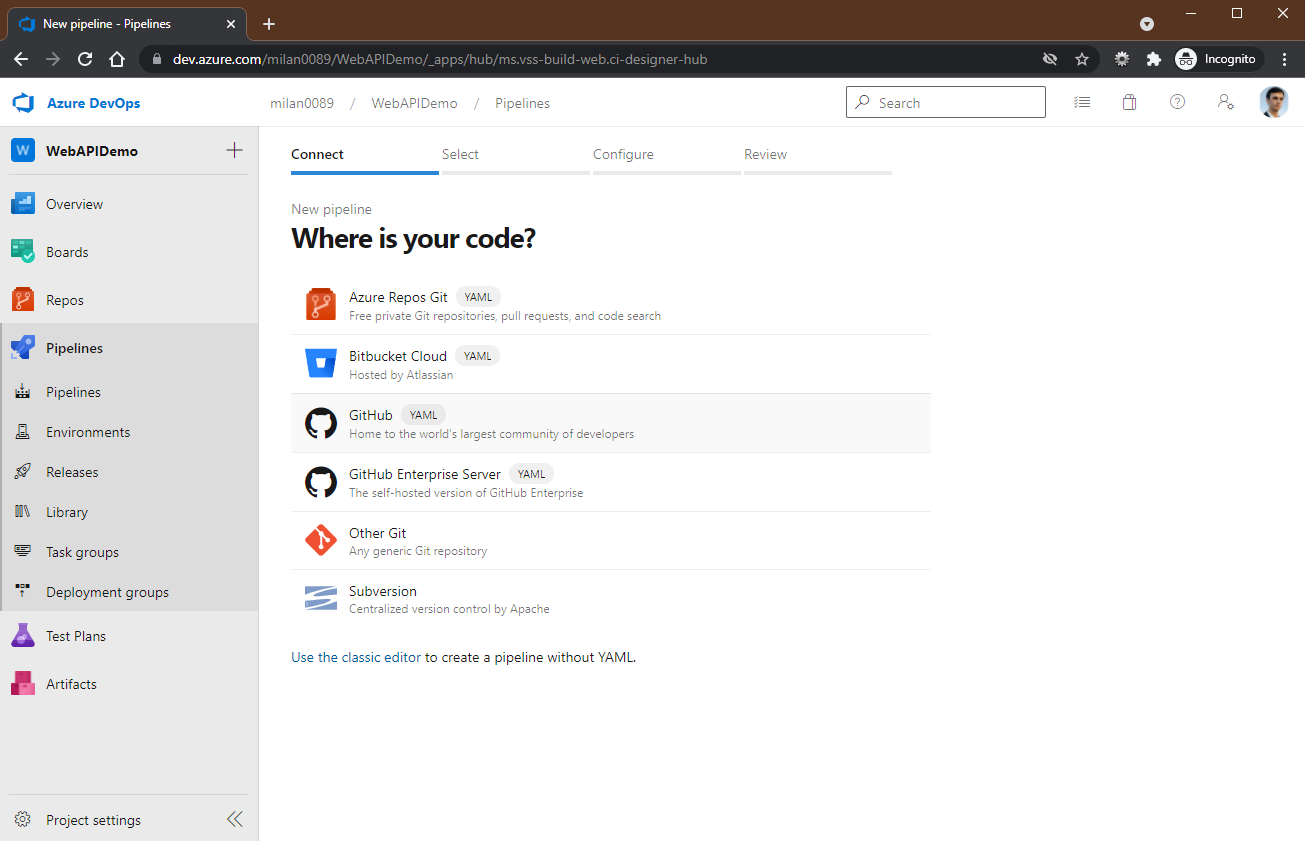
In this step, we have a few options to choose from. The first option is to choose a source where the code is stored and in this case, it is Azure Repos Git (Yaml - is a human-friendly data serialization language, where is important to keep identitation in a file). In the next step, we choose our repository (WebAPIDemo), and then in the third step, we need to choose a template for our build pipeline (we can choose here from ASP.NET, over Android to Node.js-based projects). Here we choose the ASP.NET Core template as this is our type of application and we will get the following generated azure-pipelines.yaml file.
# ASP.NET Core
# Build and test ASP.NET Core projects targeting .NET Core.
# Add steps that run tests, create a NuGet package, deploy, and more:
# https://docs.microsoft.com/azure/devops/pipelines/languages/dotnet-core

trigger:
- master

pool:
  vmImage: ubuntu-latest

variables:
  buildConfiguration: 'Release'

steps:
- script: dotnet build --configuration $(buildConfiguration)
  displayName: 'dotnet build $(buildConfiguration)'
The first definition of a trigger (master) means that this pipeline will be triggered on any change of master branch (merge). The second one (pool) defines a build machine, in this example it’s ubuntu-latest, but it can be also Windows Server 2019 (windows-2019), macOSX Mojave 10.14 (macOs-10.14), etc. On every build, Azure Pipelines spins up an Azure VM with such configuration to run a pipeline and a build. If such configuration is not enough you can always create your custom (private) VMs for builds or even scale sets.
Variables part represents some variables we want to define and in this case its build configuration.
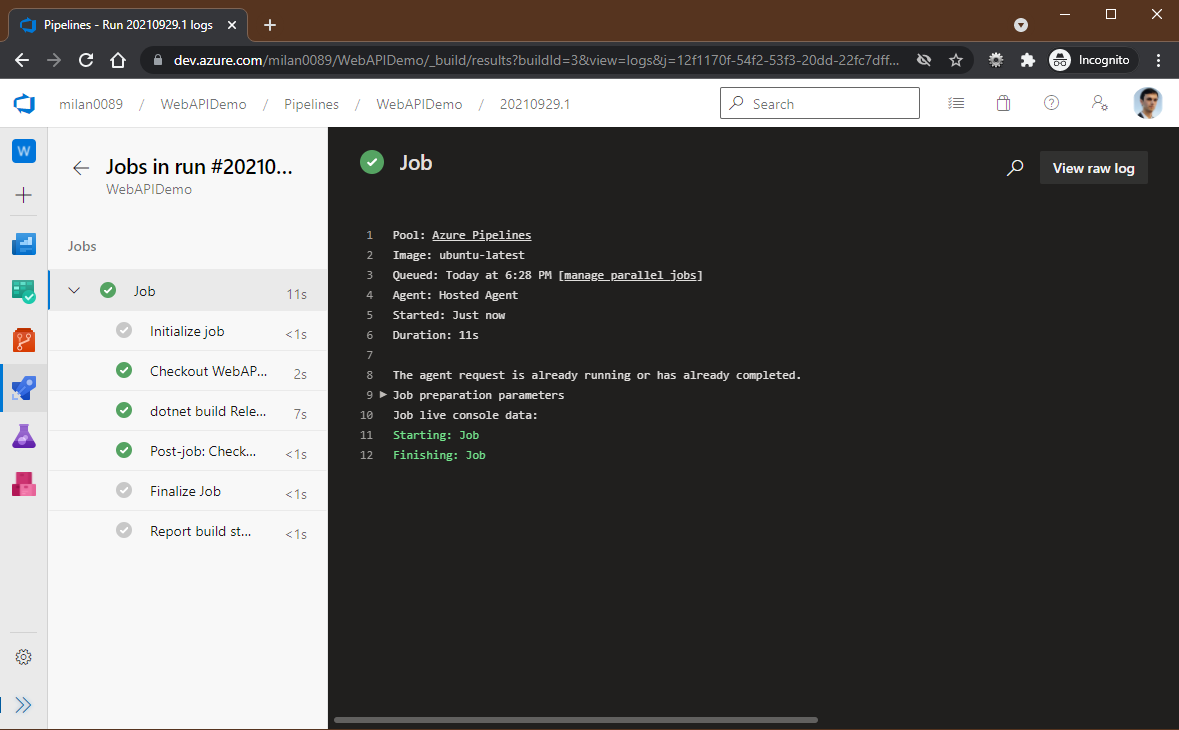
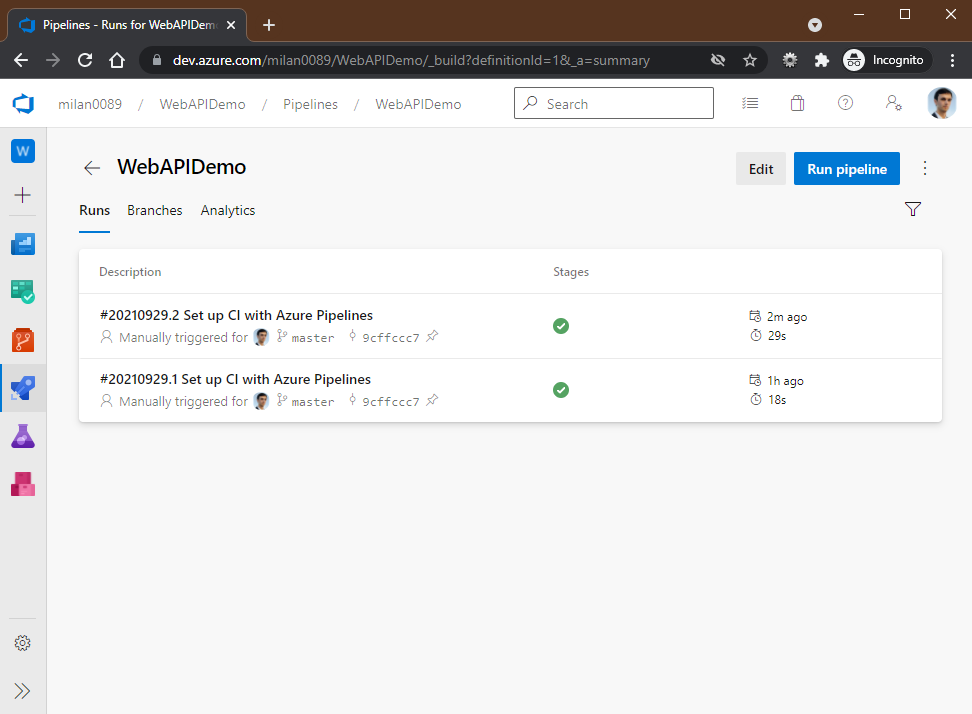
When we create and commit the file, the build will be triggered and run. After running it we will see every step and how the build succeeded.
And if we go back to the list of builds for our project, we can see all previous builds.
Create Azure Infrastructure
When we have built the application in the previous step, in the next step we need to create a release pipeline to deploy the application and we want to be automatic, on every build we will do an automatic deployment. To do this we need to have Azure account and create an empty App Service (we will use Azure CLI for this, but can be done via Azure UI or PowerShell too).
First, we will create a resource group (called resourcegroup):
az group create --name resourcegroup --location centralus
Then, we will create a service plan in a previously created resource group with a free tier:
az appservice plan create --name serviceplan --resource-group resourcegroup --sku FREE
And in the last step we will create an app service (called webapidemo224 - must be unique in the whole Azure space) that will be using the previously created app plan and be located in the previously created resource group:
az webapp create --name webapidemo224 --resource-group resourcegroup --plan serviceplan
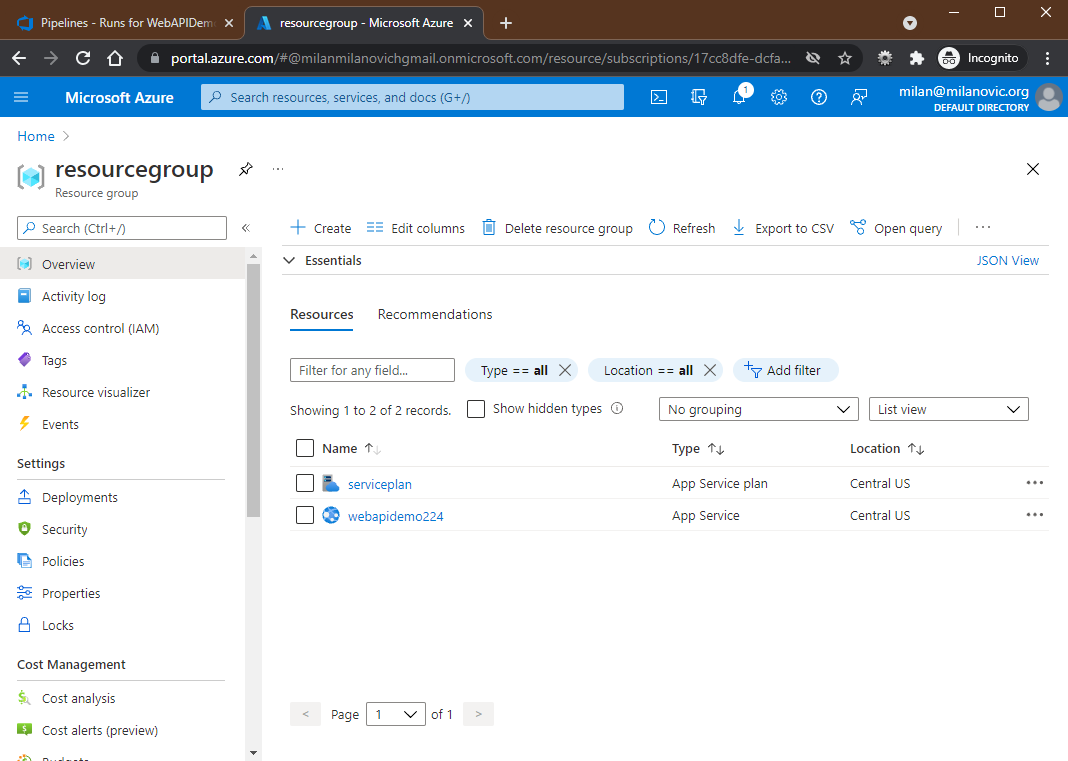
Now, if we go to the Azure portal, in created resource group we can see created app plan and app service:
When we have all this, we need to adjust our Azure pipeline for our app to publish and pack the app for deployment and move it to the build artifacts folder. After the build step in the azure-pipelines.yaml file we will add the following two tasks:
- task: DotNetCoreCLI@2
  displayName: 'dotnet publish $(buildConfiguration)'
  inputs:
    command: 'publish'
    publishWebProjects: true
    arguments: '--configuration $(buildConfiguration) --output $(Build.ArtifactStagingDirectory)'
    zipAfterPublish: true

- task: PublishBuildArtifacts@1
  displayName: 'publish artifacts'
and push the file to our repository with git commit and git push.
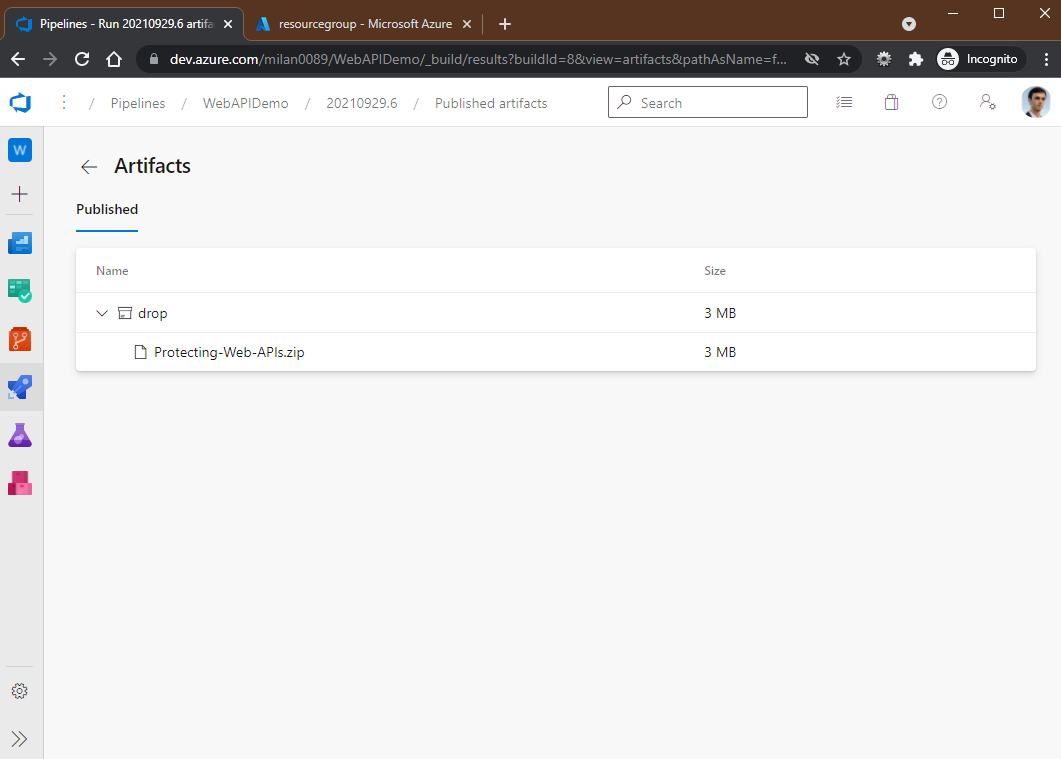
Now when we run the new build we can see that it produced one build artifact and that is our application in the .zip format:
On top of such generated YAML build pipeline we can add more steps, e.g., dotnet restore to restore NuGet packages or dotnet test to run tests in the test project in the solution as shown in the full example:
# ASP.NET Core
# Build and test ASP.NET Core projects targeting .NET Core.
# Add steps that run tests, create a NuGet package, deploy, and more:
# https://docs.microsoft.com/azure/devops/pipelines/languages/dotnet-core

trigger:
- master

pool:
  vmImage: ubuntu-latest

variables:
  buildConfiguration: 'Release'

steps:
- script: dotnet restore
  displayName: 'dotnet restore'

- script: dotnet build --configuration $(buildConfiguration)
  displayName: 'dotnet build $(buildConfiguration)'

- script: dotnet test $(Parameters.TestProjects) --configuration $(buildConfiguration)
  displayName: 'dotnet test'

- task: DotNetCoreCLI@2
  displayName: 'dotnet publish $(buildConfiguration)'
  inputs:
    command: 'publish'
    publishWebProjects: true
    arguments: '--configuration $(buildConfiguration) --output $(Build.ArtifactStagingDirectory)'
    zipAfterPublish: true

- task: PublishBuildArtifacts@1
  displayName: 'publish artifacts'
In this pipeline example, we can see that we can use simple command-line scripts but also specialized dot net core CLI scripts with predefined attributes.
Except steps, in the build pipeline, we can also have stages, which are major divisions in a pipeline, like “run tests” or “deploy to staging” and jobs, which are items that are assigned to a single agent machine in the agent pool.
Create Release Pipeline
The next step is the creation of the Release pipeline. We go to Pipelines -> Releases -> New Pipeline. Here we can select from many templates:
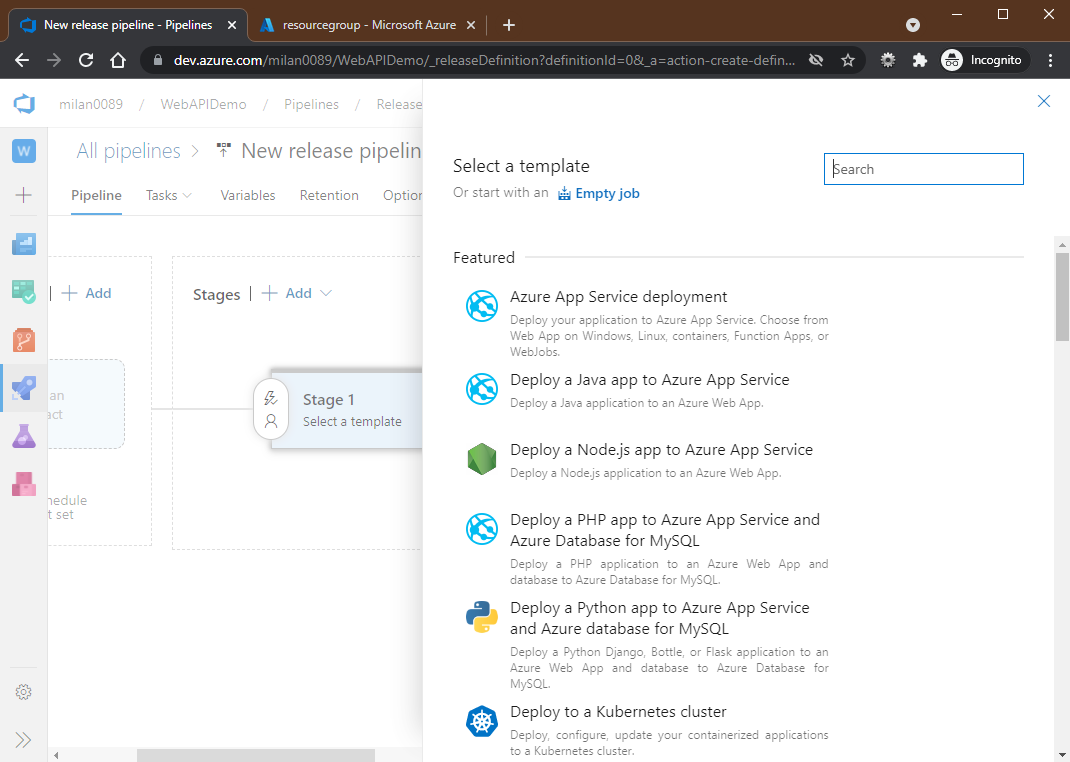
Here we choose Azure App Service deployment option and give some name to this stage (e.g., Dev). Now to deploy we need an artifact, which we will choose from Add an artifact object:

inside we choose our build pipeline (in this case WebAPIDemo) and click the Add button.
Now we want that our release pipeline triggers every time I got a new artifact (build pipeline run and produces it), so we need to click on the round thunderbolt button and click Enabled:
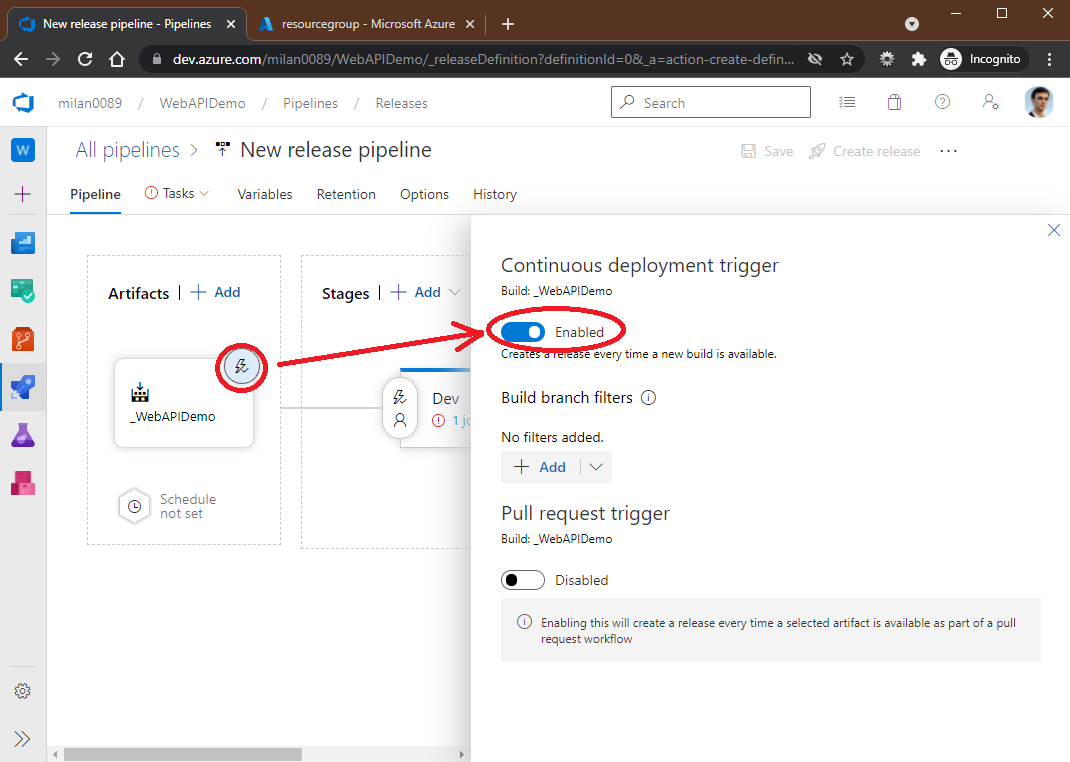
and in the filter, we will choose default branch (as we have only one - master).
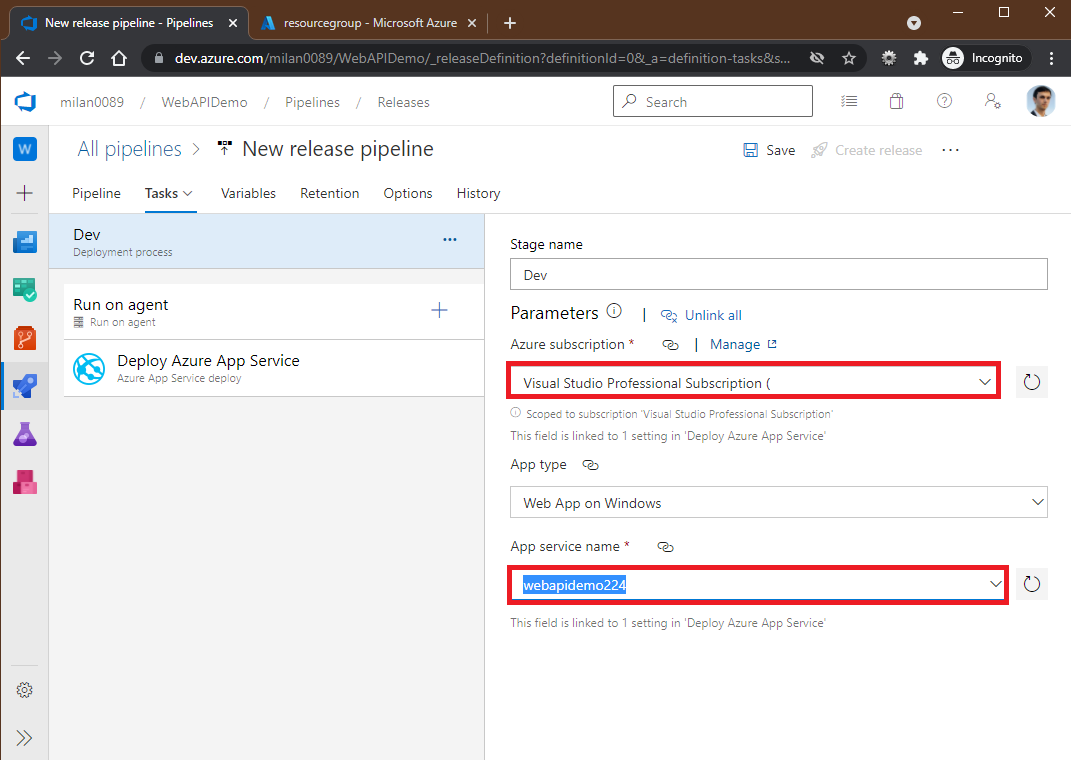
The next step is to click on the Dev environment box where we need to choose some options, such as Azure subscription and app service name:
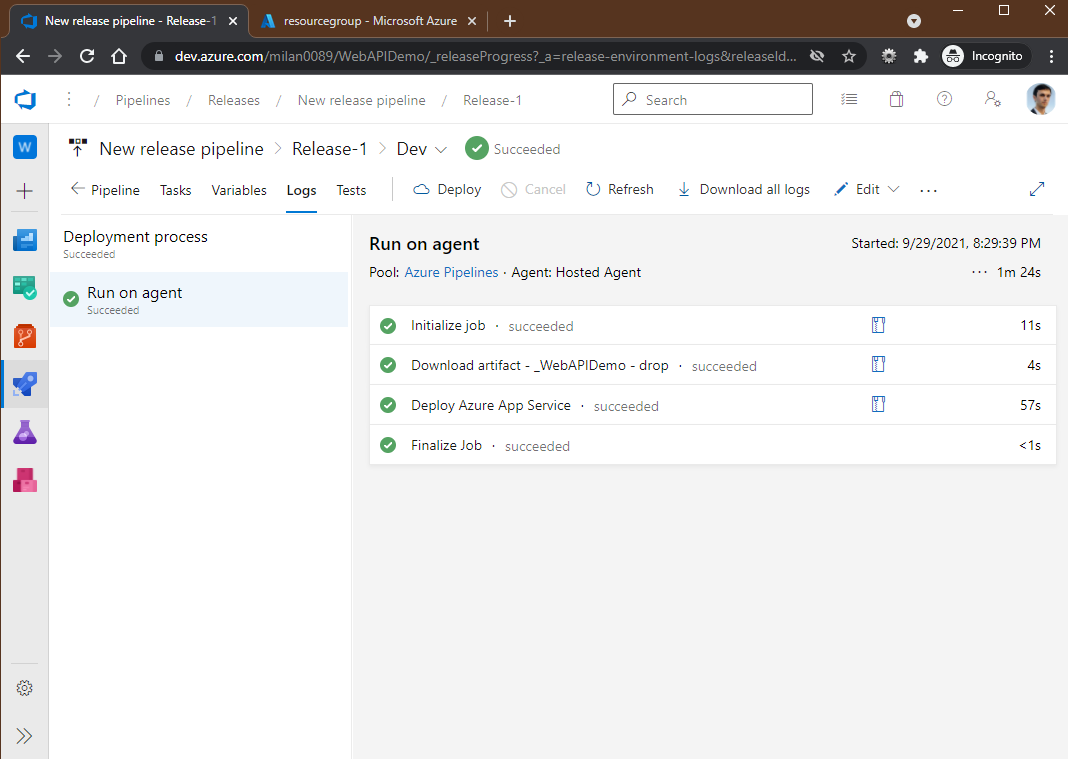
Then we just need to click on the Save button. After our release pipeline is saved we can just click on the Create release button next to it. This will create a Release-1 and on the next page, we just need to click on the Deploy button. This will start our deployment.
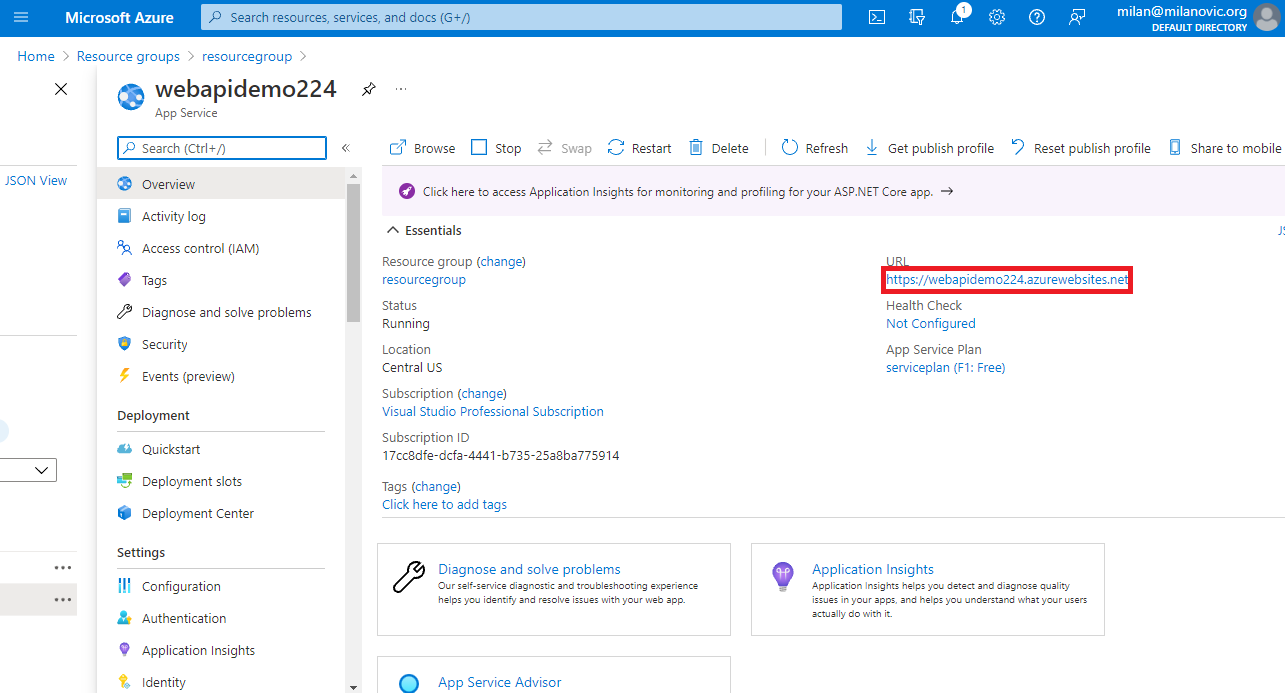
When the deployment finishes we can go to the Azure portal and check that our app service is deployed.
Now if we change any file in our solution and push it to our repository in Azure DevOps, the first build pipeline will be triggered to build and pack the application and then afterward automatically release pipeline will be triggered to deploy our application on the Azure App service.
Recommend
About Joyk
Aggregate valuable and interesting links.
Joyk means Joy of geeK