

clean-state: 一个轻巧又灵活的React状态管理器
source link: https://segmentfault.com/a/1190000040653733
Go to the source link to view the article. You can view the picture content, updated content and better typesetting reading experience. If the link is broken, please click the button below to view the snapshot at that time.
clean-state: 一个轻巧又灵活的React状态管理器
TNTWeb - 全称腾讯新闻中台前端团队,组内小伙伴在Web前端、NodeJS开发、UI设计、移动APP等大前端领域都有所实践和积累。
目前团队主要支持腾讯新闻各业务的前端开发,业务开发之余也积累沉淀了一些前端基础设施,赋能业务提效和产品创新。
团队倡导开源共建,拥有各种技术大牛,团队Github地址:https://github.com/tnfe
本文作者冷叶 项目地址: https://github.com/tnfe/clean-state

React从设计之初到最新的v17版本,已经经历了近百次迭代。围绕着单向数据流的设计哲学出现了以Flux思想为主的Redux状态管理和以响应式监听为主的Mobx,一个强调理念上的统一而另一个强调性能体验上的极致。但是通过唯物辩证法我们知道,对立和统一才是所有事物发展的最终形态。于是自[email protected]后推出了Hooks函数,在不改变其心智模型的基础上补齐了对逻辑抽象的短板,借助这一能力我们就可以打开全新的状态管理视野。
在目前以MVVM为核心的软件开发模式下,我们知道视图的本质就是对数据的表达,任何数据的突变都会带来视图上的反馈。当面临一个大型项目开发时,为了提高后续的维护迭代效率,我们首先要做的就是模块拆解,让每一个部分尽可能碎片化可复用,这也是微组件的初级概念。

而在整个拆解的过程中,我们碎片化的其实是UI层。比如一个弹窗,在特定的业务上有会统一的设计标准,变化的只是文案;亦或是一个大列表,每次更新的是元数据,卡片的轮廓保持了统一。那么数据该如何处理,试想如果跟随组件走,那当一个项目越来越大时,散落在各个地方的数据和逻辑会急剧增大该软件的熵,造成后面的需求迭代、错误排查、调试维护等难度指数级增大。所以,对数据一定程度上的中心化成为了前端正确的开发理念。
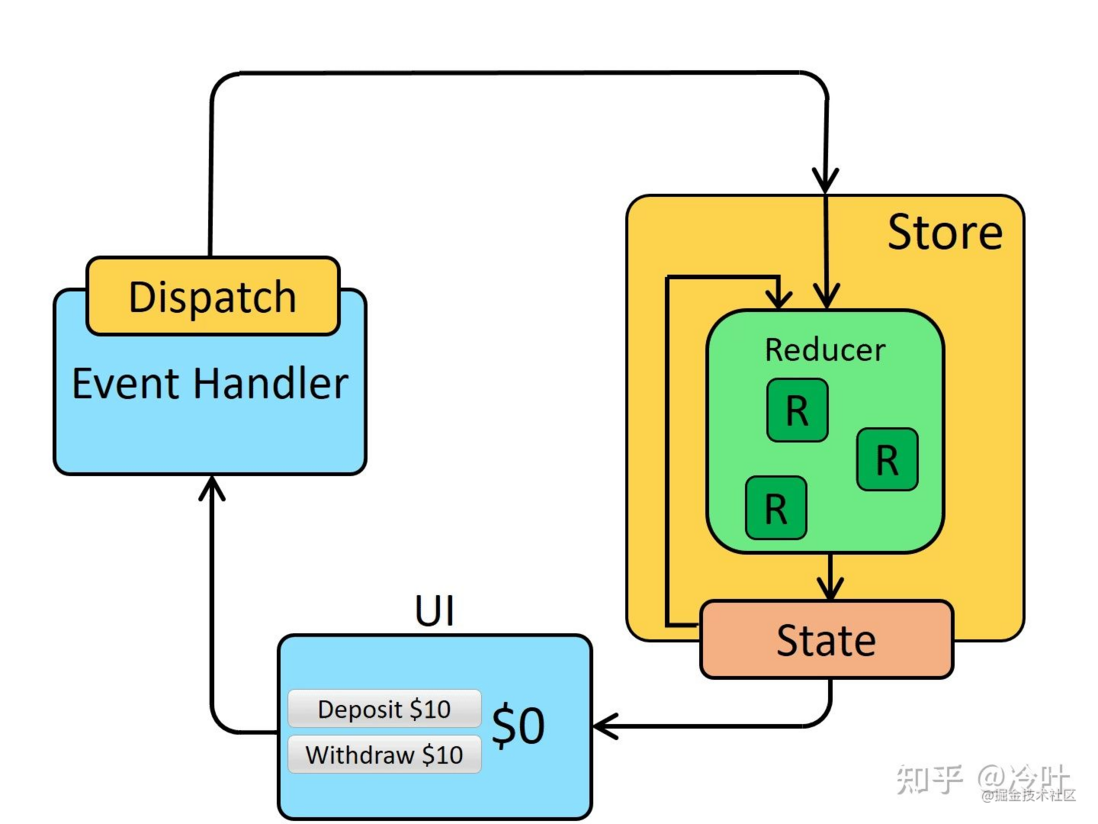
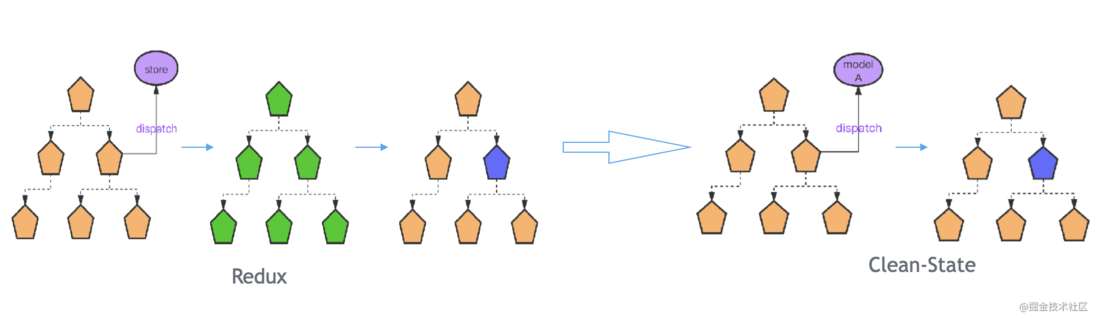
在React里我们把与视图相对应的数据称之为状态,关乎状态管理的方案也经历了一个刀耕火种的时代。最出名的是Redux,它虽然在性能上被人诟病但是奈何思想正确被最大程度的使用。它将数据中心化为State存储在store中,通过dispatch来发布一个action触发reducer来更新。
设计理念是很好,但是当真正用到项目中时我们就会发现几个问题:
- 架构层面如何组织?这里我们不得不引入很多第三方开发库,比如react-redux、redux-thunk、redux-saga等等,这无疑增加了很大的学习成本,同时在寸土寸金的移动端会引入过大的包。
- 性能上如何避免无效渲染?我们通过react-redux做桥接后,关注过源码的同学会发现redux在react里更新的本质是变量提升,通过将state提升每次dispatch后都会触发顶层的setState。根据React的更新机制,这会触发所有子节点的Render函数执行。
// Provider 注入
import React from 'react'
import ReactDOM from 'react-dom'
import { Provider } from 'react-redux'
import store from './store'
import App from './App'
const rootElement = document.getElementById('root')
ReactDOM.render(
<Provider store={store}>
<App />
</Provider>,
rootElement
)
// connect 使用
import { connect } from 'react-redux'
import { increment, decrement, reset } from './actionCreators'
// const Counter = ...
const mapStateToProps = (state /*, ownProps*/) => {
return {
counter: state.counter,
}
}
const mapDispatchToProps = { increment, decrement, reset }
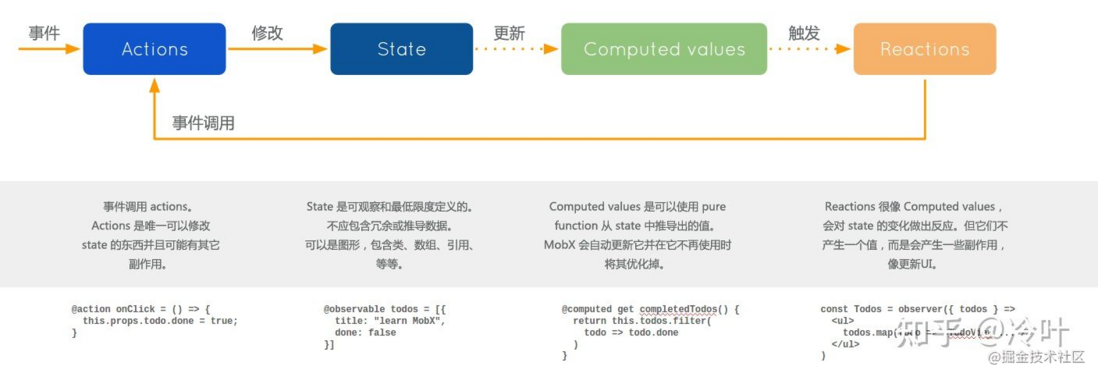
export default connect(mapStateToProps, mapDispatchToProps)(Counter)第二个方案是Mobx,它虽然能做到目标组件的精确更新,但是它走的是另一个流派, 当然也拥有一大帮拥簇但是不喜欢它的也大有人在。他的核心理念是:任何源自应用状态的东西都应该自动地获得。这句话就是说组件要不要更新不由父亲说了算,而是应该由绑定的数据通知,这种响应式监听方法终归与React的单项数据流理念相悖。
// 声明可观察状态
import { decorate, observable } from "mobx";

class TodoList {
    @observable todos = [];
    @computed get unfinishedTodoCount() {
        return this.todos.filter(todo => !todo.finished).length;
    }
}

// 声明观察组件
import React, {Component} from 'react';
import ReactDOM from 'react-dom';
import {observer} from 'mobx-react';

@observer
class TodoListView extends Component {
    render() {
        return <div>
            <ul>
                {this.props.todoList.todos.map(todo =>
                    <TodoView todo={todo} key={todo.id} />
                )}
            </ul>
            Tasks left: {this.props.todoList.unfinishedTodoCount}
        </div>
    }
}

const TodoView = observer(({todo}) =>
    <li>
        <input
            type="checkbox"
            checked={todo.finished}
            onClick={() => todo.finished = !todo.finished}
        />{todo.title}
    </li>
)

const store = new TodoList();
ReactDOM.render(<TodoListView todoList={store} />, document.getElementById('mount'));
四、轻巧又灵活的方案:Clean-State
也许你还可以有不一样的选择, 首先我们来看一下Hooks的设计动机是什么:
- 解决组件之间复用逻辑状态困难问题。
- 过多的生命周期导致组件难以理解。
- 消除class组件和函数组件分歧,简化模块定义。
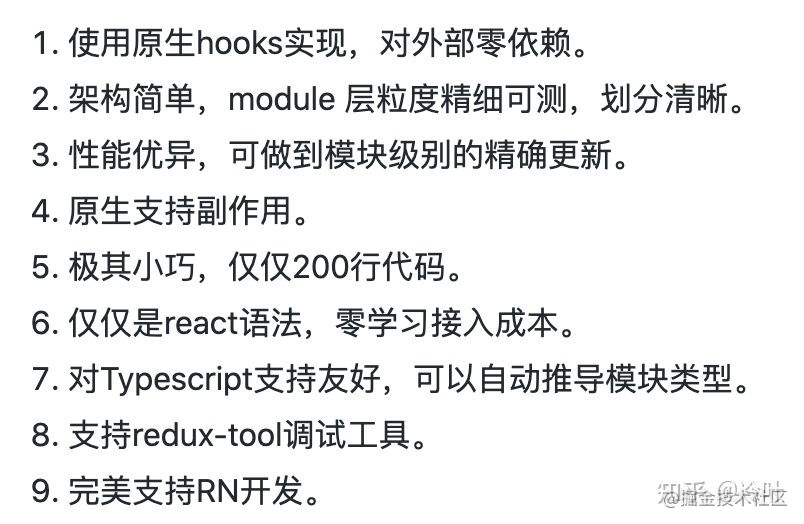
从这几点我们就能发现,hooks本质上就是要简化React学习使用的心智曲线,并在逻辑抽象方面再往前走一步。而Clean-State就是站在这一思想的肩膀上产生的,它告别了ReactContext的概念用极其精简的方法提出了状态管理的新方式。通过CS我们没有了更多的学习负担,也不需要人为的的组织架构,它提供了统一的解决方案,在性能上我们不再去做变量提升,也抛弃了Provider注入的方式因此可以做到模块级别的精确更新,下图罗列出来了他的一些特点。
在CS中,我们最大程度的尊崇极简主义原则,让开发用最简单的方式来构建产品大厦。
1、模块如何划分
在模块划分上,推荐以路由入口或者数据模型来区分,这符合自然的思维方式。
每个状态管理的模块我们称之为module,统一管理在单个目录下,最后由index文件导出。
|--modules
|   |-- user.js
|   |-- project.js
|   |-- index.js
2、模块如何定义
在定义上,我们没有做更多的概念,沿袭了日常开发中最合理的方式。
state 作为模块状态;effect处理副作用;reducer返回更新后的状态。
// modules/user.js
const state = {
  name: 'test'
}

const user = {
  state,
  reducers: {
    setName({payload, state}) {
      return {...state, ...payload}
    }
  },
  effects: {
    async fetchNameAndSet({dispatch}) {
      const name = await Promise.resolve('fetch_name')
      dispatch.user.setName({name})
    }
  }
}

export default user;
3、模块如何注册
你只需要在模块入口文件调用bootstrap即可,他会自动串联多个模块,并返回useModule和dispatch方法。
// modules/index.js
import user from './user'
import bootstrap from 'clean-state'

const modules = { user }
export const {useModule, dispatch}  = bootstrap(modules);
4、如何使用模块
我们通过modules入口文件导出的useModule和dispatch来使用模块状态或者触发执行方法。
// page.js
import {useCallback} from 'react'
import { useModule, dispatch } from './modules'

function App() {
  /**
   * 这里你也能够传入数组同时返回多个模块状态
   * const {user, project} = useModule(['user', 'project'])
   */
  const { user } = useModule('user')
  const onChange = useCallback((e)=> {
    const { target } = e
    dispatch.user.setName({name: target.value})
  }, [])

  const onClick = useCallback(()=> {
    dispatch.user.fetchNameAndSet()
  }, [])

  return (
    <div className="App">
      <div>
        <div>
          name: {user.name}
        </div>
        <div>
          修改用户名: <input onChange={onChange}></input>
        </div>
        <button onClick={onClick}>获取用户名</button>
      </div>
    </div>
  );
}

export default App;
5、如何跨模块访问
每个reducer和effect我们都注入了rootState参数,可以访问其他模块属性;effect中同时注入了dispatch方法可以跨模块调用。
 async fetchNameAndSet({dispatch, rootState, state, payload}) {
      const name = await Promise.resolve('fetch_name')
      dispatch.user.setName({name})
 }
6、混入机制
在很多情况下,多个模块之间会存在公共的state、reducer或者effect,这里我们为了防止用户在每个模块里做重复声明,对外暴露了混入的方法。
// common.js
const common = {
  reducers: {
    setValue<State>({payload, state}: {payload: Record<string, any>, state: State}): State {
      return {...state, ...payload}
    }
  }
}
export default common;

// modules/index.js
import commont from './common'
import user from './user'
import { mixin } from 'clean-state';

// Mix Common's setValue method into the User module
const modules = mixin(common, { user })

// You can now call the dispatch.user.setValue method on other pages
export const {useModule, dispatch}  = bootstrap(modules);
7、如何调试
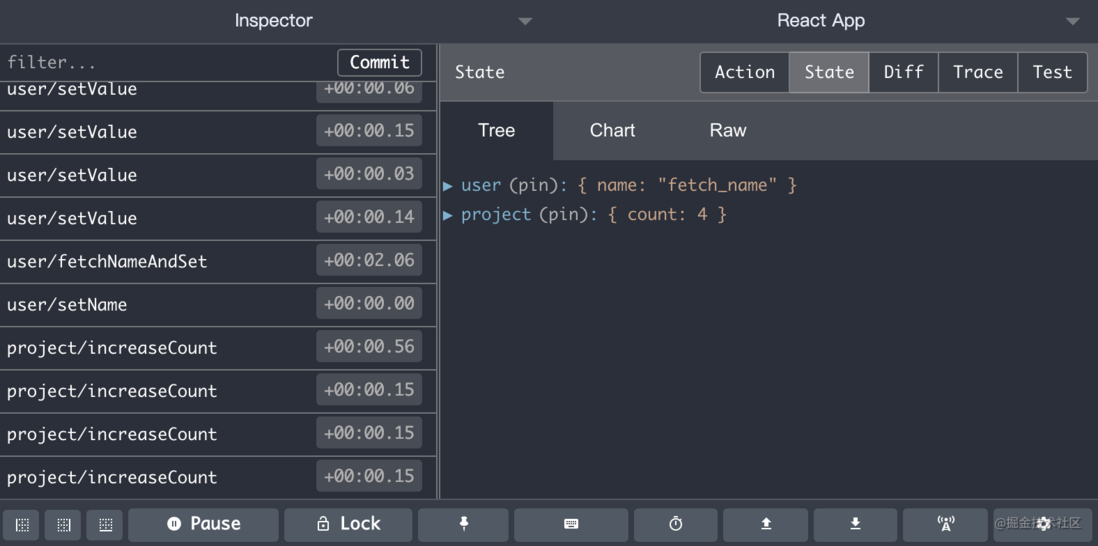
在开发过程中如何进行调试呢,CS提供了插件机制来友好的支持redux-devtool的调试。
/**
 * 安装: npm install cs-redux-devtool
 */

// modules/index.js
import user from './user'
import bootstrap from 'clean-state'
import devTool from 'cs-redux-devtool'

bootstrapfrom.addPlugin(devTool)

...
经过以上简短的配置,我们就能通过Redux DevTool来追踪状态的变化了!
五、技术实现
话不多说,首先我们来看下CS的整体架构图:
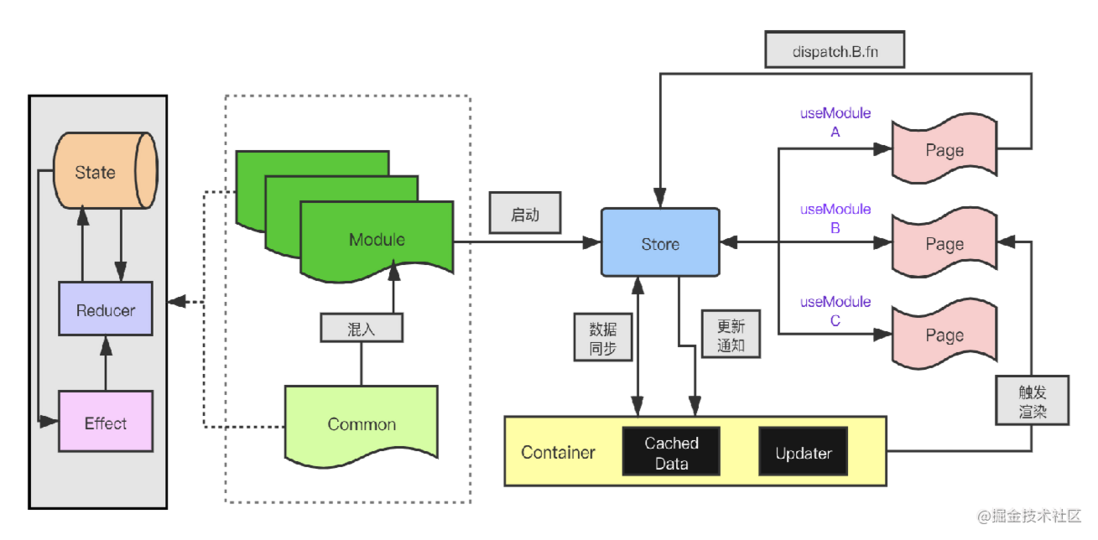
Module层划分为State、Reducer、Effect三部分,我们对公共的部分提供了混入机制。项目启动后会生成Store,同时会初始化Container与Store做数据同步。
当我们在page、component或者hooks中调用useModule时便会将对应的模块状态和对象方法做关联,更新函数加入到Container中。那么当A页面触发B模块方法时,我们就能精确的只执行B的依赖render函数。
下面我们给出在不做任何优化逻辑情况下redux和cs的代码执行情况,可以看到我们减少了所有的无用组件渲染。
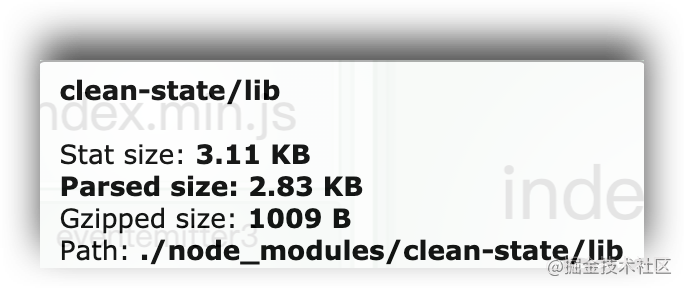
下面这张图是我在实际落地项目中的打包依赖图,可以看到经过Gzip压缩后,CS整体的大小还不足1KB,希望能助力C端项目开发的用户体验和性能极致~
那么所有的这一切是如何实现呢?接下来我会循序渐进的详细讲解。
1、entry
// index.js
import bootstrap from './bootstrap';

export { default as mixin } from './mixin';
export default bootstrap;
首先来看下入口文件代码,我们仅仅导出了两个api,第一个是 mixin 用来处理对公共属性的模块混入,第二个是bootstrap用来启动状态管理器,我们看看启动的主流程实现。
2、bootstrap
// bootstrap.js
const bootstrap: Bootstrap = <Modules>(modules: Modules) => {
  const container = new Container(modules);
  const pluginEmitter = new EventEmitter();
  ...
  return { useModule: useModule as any, dispatch };
};
bootstrap入参是modules的集合,紧接着我们会初始化一个container容器,做数据状态的缓存和更新器存储。pluginEmitter是cs插件机制的一部分,会对所有函数的执行会进行跟踪。最终我们导出了两个方法,一个是useModule用来读取模块状态,另外一个是dispatch用来分发事件。
这两个方法本质上是可以在index中统一导出,这样去做的原因是这里我们对多数据中心提供了支持。接下来我们围绕这两个api来详细看下具体实现。
3、useModule
// bootstrap.js
const bootstrap: Bootstrap = <Modules>(modules: Modules) => {
  const container = new Container(modules);
  const pluginEmitter = new EventEmitter();
  ...
  return { useModule: useModule as any, dispatch };
};
首先是useModule的实现。我们看到入参namespace是一个字符串类型或者字符串数组类型的参数,紧接着我们声明了一个空状态,并提供setState代理来进行新对象的赋值,也是这一步操作触发了关联组件的更新。
最后我们将该方法和状态绑定到container对象中,以观察者模式来实现更新。最后返回的数据实际上也来自于container的缓存对象。这一段逻辑就非常的简单清晰,那接下来我们看下dispatch的实现。
4、dispatch
// bootstrap
const bootstrap: Bootstrap = <Modules>(modules: Modules) => {
  ...
  // The only module method call that is exposed to the outside world
  const dispatch: any = (
    nameAndMethod: string,
    payload: Record<string, any>,
  ) => {
    const [namespace, methodName] = nameAndMethod.split('/');
    const combineModule = container.getModule(namespace);

    const { state, reducers, effects } = combineModule[namespace];
    const rootState = container.getRootState();

    // The side effects take precedence over the reducer execution
    if (effects[methodName]) {
      return effects[methodName]({ state, payload, rootState, dispatch });
    } else if (reducers[methodName]) {
      const newState = reducers[methodName]({
        state,
        rootState,
        payload,
      });
      container.setState(namespace, newState);
    }
  };
  return { useModule: useModule as any, dispatch };
};
dispatch方法接受两个参数,第一个是调用的模块和方法名字符串具体格式类似moduleName/function,第二个是负载对象,我们会根据nameAndMethod在container中取出对应的模块和方法来调用执行。
在执行过程中effect优先于reducer,并传入各自需要的参数。在实际的项目开发中,考虑到开发效率和使用习惯,我们对dispatch进行了一层封装,支持dispatch.module.fun的形式。
5、dispatch 链式调用
// bootstrap
const bootstrap: Bootstrap = <Modules>(modules: Modules) => {

  const injectFns = (reducersOrEffects) => {
    Object.keys(reducersOrEffects).forEach((key) => {
      if (!dispatch[key]) dispatch[key] = {};
      const originFns = reducersOrEffects[key];
      const fns = {};
      Object.keys(originFns).forEach((fnKey) => {
        fns[fnKey] = (payload: Record<string, any>) =>
          dispatch(`${key}/${fnKey}`, payload);
      });
      Object.assign(dispatch[key], fns);
    });
  };

  // Inject each module's reducer and effect method into the Dispatch
  const rootReducers = container.getRootReducers();
  const rootEffects = container.getRootEffects();

  injectFns(rootReducers);
  injectFns(rootEffects);
  ...
};
在方法的最后我们从container中取出rootReducers和rootEffects集合,通过injectFns方法对其按照模块进行二次封装,并将包裹后的方法代理到dispatch自身,实现了级联的调用。包装后的方法入参只有payload负载,极大的提升了用户的开发效率,并且在TS语法上提供了完整的代码提示。
6、结合redux-devtool
在PC端使用Redux调试工具的核心点是,建立一个虚拟的Redux-Store来和我们的状态管理库做数据同步。这里我单独开发了 cs-redux-devtool 这样的一个库,我们看下实现原理。
首先在install方法里实例化一个redux store,它根据我们传入的modules自动生成了相应的reducer。紧接着调用window.__REDUX_DEVTOOLS_EXTENSION__方法来开启Chrome插件,这个方法是当我们的浏览器安装Redux-Devtools后,自动注入到当前页面上下文。最后,我们用传入的PluginEmitter来监听状态更新事件,同步到虚拟的redux-store上。
import { createStore, combineReducers } from 'redux'

var reduxStore = null;
var actionLen = 0

function createReducer(moduleName, initState) {
  return function (state, action) {
    if (state === undefined) state = initState;

    const {newState, type = ''} = action
    const [disPatchModule] = type.split('/')
    if (moduleName === disPatchModule && newState) {
      return newState
    } else {
      return state;
    }
  };
}

function createReducers(modules) {
  var moduleKeys = Object.keys(modules);
  var reducers = {};
  moduleKeys.forEach(function (key) {
    const {state} = modules[key]
    reducers[key] = createReducer(key, state);
  });
  return reducers;
}

function injectReduxDevTool(reducers) {
  reduxStore = createStore(
    combineReducers(reducers),
    window.__REDUX_DEVTOOLS_EXTENSION__ && window.__REDUX_DEVTOOLS_EXTENSION__()
  );
}

function dispatchAction(actionForRedux) {
  if (reduxStore) {
    actionLen++;
    reduxStore.dispatch(actionForRedux);
  }
}

function install(modules, pluginEmitter) {
  const reducers = createReducers(modules)

  injectReduxDevTool(reducers)
  pluginEmitter.on('CS_DISPATCH_TYPE', (action)=> {
    dispatchAction(action)
  })
}

export default install
那么,在Clean-State里我们就会将注册的插件加入到plugins数组里,当对应模块的effect或者reducer被触发时,我们会将处理后的结果发射到公共的发布器里面来实现监听同步。
const bootstrap: Bootstrap = <Modules>(modules: Modules) => {
  const container = new Container(modules);
  const pluginEmitter = new EventEmitter();

  // The only module method call that is exposed to the outside world
  const dispatch: any = (
    nameAndMethod: string,
    payload: Record<string, any>,
  ) => {
    ...

    // The side effects take precedence over the reducer execution
    if (effects[methodName]) {
      pluginEmitter.emit(DISPATCH_TYPE, {
        type: nameAndMethod,
        payload,
      });
      return effects[methodName]({ state, payload, rootState, dispatch });
    } else if (reducers[methodName]) {
      const newState = reducers[methodName]({
        state,
        rootState,
        payload,
      });
      container.setState(namespace, newState);

      // Sync state to plugin
      pluginEmitter.emit(DISPATCH_TYPE, {
        type: nameAndMethod,
        payload,
        newState,
      });
    }
  };

  ...

  plugins.forEach((plugin) => plugin(modules, pluginEmitter));

  ...
};
Clean-State拥抱了React正确的设计模式和思想,通过精简的代码完成了架构层面的设计和视图层面的优化。如果你是新起的React项目,强烈推荐使用hooks纯函数的方式来编写构建你的应用,你会体验到更快的React开发姿势。无论是toB端逻辑复杂的项目还是toC端追求高性能都可以来了解使用CS。
Recommend
About Joyk
Aggregate valuable and interesting links.
Joyk means Joy of geeK