

Amazon ES - Secure your cluster from anonymous users! #2 - Knoldus Blogs
source link: https://blog.knoldus.com/amazon-es-secure-cluster-anonymous-users-2/
Go to the source link to view the article. You can view the picture content, updated content and better typesetting reading experience. If the link is broken, please click the button below to view the snapshot at that time.
Amazon ES – Secure your cluster from anonymous users! #2
Reading Time: 5 minutes
In the previous blog, we have learned how to create a domain on Amazon ES and also how to create an index using Curl on the cluster. Now, let’s just look how we can control access to Amazon ES Domain.
One of the key benefits of using Amazon ES is that you can utilize AWS Identity and Access Management (IAM) to control access to your search domains. However, if you were to run an unmanaged Elasticsearch cluster on AWS, utilizing IAM to authorize access to your domains would require more effort.
Amazon ES help us to add an authorization layer by integrating with IAM. You can configure your domains so that only trusted users and applications can access them. You write an IAM policy to control access to the cluster’s endpoint and attach that policy to specific IAM entities.
Types of IAM Policy
- Resource-based Policy – A resource-based policy is attached to the Amazon ES domain (accessible through the domain’s console) and enables you to specify which AWS account and which AWS users or roles can access your Amazon ES endpoint. In addition, a resource-based policy lets you specify an IP condition for restricting access based on source IP addresses. This type of policy is attached to an AWS resource, such as an Amazon S3 bucket.
- Identity-based Policy – You can specify which actions an IAM identity can perform against one or more AWS resources, such as an Amazon ES domain or an S3 bucket. This type of policy is attached to an identity, such as an IAM user, group, or role.
Strategies to authenticate Amazon ES requests
- On the basis of originating IP address – You can specify an IP Condition. Any call from that IP address will either be allowed access or be denied access to the resource.
- On the basis of originating Principal – You are required to include information in every request to your Amazon ES endpoint that AWS can use to authenticate the requesting user or application. This you can accomplish by signing the request using Signature Version 4.
Note: These authentication strategies apply to both types of policies.
The second approach is what we are going to discuss with the example that we have described in this blog. We will be using Resource-based policy to write our IAM policy.
Steps to configure resource-based policy
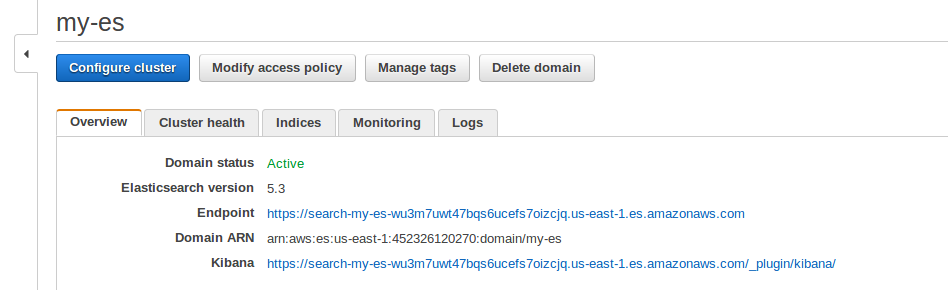
Step 1: Modify the access policy
Click on the ‘Modify Access Policy‘ button as shown in the image, to change access to your Amazon ES domain.
Step 2: Select a policy template
To allow or block access to the domain, select a policy template from the template selector or add one or more Identity and Access Management (IAM) policy statements.
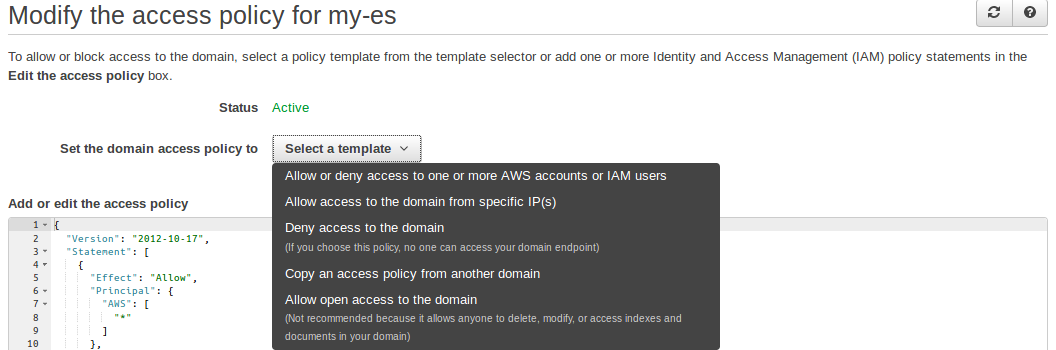
Since we are focussing on Resource-based policy, so we need to specify which AWS account and which AWS users or roles can access our Amazon ES endpoint, so we will be selecting ‘Allow or deny access to one or more AWS accounts or IAM users’ template.

Step 3: Enter the AWS account details
A pop-up box will appear, asking you to enter a comma-separated list of valid AWS account IDs, AWS account ARNs, or IAM user ARNs to allow or deny access to your Amazon ES endpoint, setting the Effect to ALLOW or DENY.
Else, you can directly edit the access policy in the section below.
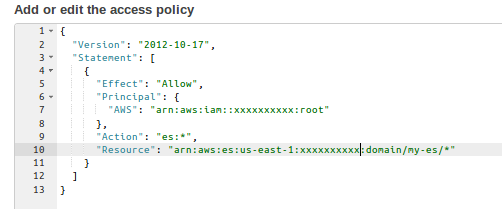
In the preceding screenshot, you can see that the policy is attached to an Amazon ES domain called my-es, which is defined in the Resource section of the policy. In the Principal section, you can specify the AWS account you want to allow or deny access to, setting the ‘allow’ or ‘deny’ option in Effect.
At last, Click on the Submit button below to activate the policy.
Now, if you try to hit your cluster endpoint or Kibana endpoint from your browser, you will get the following error –

Signing Request to Amazon ES endpoint
Now, since you are done with setting up the IAM policy for your Amazon ES domain. The question comes, How are we going to connect with the Amazon ES cluster from our application? How can we send the request to our cluster endpoint to perform actions like create an index, update an index, etc?
The answer is pretty simple. All you need to do is issue a Signature Version signed request to your Amazon ES endpoint.
We have built our application using Scala-sbt. So, first add the following library dependencies in build.sbt –
"com.amazonaws" % "aws-java-sdk-core" % "1.11.256"
"vc.inreach.aws" % "aws-signing-request-interceptor" % "0.0.20"
These are added to use classes such as AWSSigner to perform signing of request to the Amazon ES endpoint.
Following piece of code is all that you have to write to create a signed request –
private def performSigningSteps: HttpRequestInterceptor = {

  val awsCredentialsProvider: AWSCredentialsProvider = new AWSStaticCredentialsProvider(
    new BasicAWSCredentials(AWS_ACCESS_ID, AWS_ACCESS_KEY))

  val awsSigner = new AWSSigner(awsCredentialsProvider, REGION, SERVICE_NAME, clock)

  new AWSSigningRequestInterceptor(awsSigner)

}

final val clock = new Supplier[LocalDateTime] {
  override def get(): LocalDateTime = LocalDateTime.now(ZoneOffset.UTC)
}
where AWS_ACCESS_ID and AWS_ACCESS_KEY are the credentials of your AWS account on which you have set up the Amazon ES cluster.
SERVICE_NAME and REGION are set to the ‘es’ and the region where your cluster is being set up like us-east-1.
To be able to add the AWSSigningRequestInterceptor to Java High-Level Rest Client (you can find the complete detail about it here) , and thus be able to sign requests to the Amazon Elasticsearch Service, you need to configure the same using setHttpClientConfigCallback method of the client.
lazy val client: RestHighLevelClient = new RestHighLevelClient(
  RestClient.builder(
    new HttpHost(AWS_HOST, 80))
    .setHttpClientConfigCallback(
      (httpClientBuilder: HttpAsyncClientBuilder) =>
        httpClientBuilder.addInterceptorLast(performSigningSteps))
    .build())
Here, AWS_HOST is the endpoint of your Amazon ES cluster, which looks like “search-my-es-xxxxxxxxxx.us-east-1.es.amazonaws.com”. Amazon ES service runs on port 80.
It’s done. You are good to go. You can create an index, perform operations like update, delete, search and many more very easily.
For viewing data which is inserted in Elasticsearch, either you can check the count of documents at AWS ES cluster ‘indices’ option or you can use proxy aws-es-Kibana. For running proxy AWS Kibana, use the following commands:
Install the npm module
sudo apt install npm
sudo npm install -g aws-es-kibana
Set AWS credentials – Use the AWS Access ID and Key.
export AWS_ACCESS_KEY_ID=XXXXXXXXXXXXXX
export AWS_SECRET_ACCESS_KEY=XXXXXXXXXXXXXX
Run the proxy
aws-es-kibana Search-my-es-xxxxxxxxxxxxxxx.us-east-1.es.amazonaws.com
You can find the complete demo code here.
References :
Hope you enjoyed reading the blog! 
Recommend
About Joyk
Aggregate valuable and interesting links.
Joyk means Joy of geeK