

给 wireshark 写一个 RocketMQ 协议解析的 lua 插件
source link: https://club.perfma.com/article/2333807
Go to the source link to view the article. You can view the picture content, updated content and better typesetting reading experience. If the link is broken, please click the button below to view the snapshot at that time.
学习 RocketMQ,需要搞懂两个东西:通信和存储。这里花了一点时间写了一个 RocketMQ 的 wireshark lua 插件,过程挺有意思,写出来记录一下。
通过阅读这篇文章,你会了解到下面这些知识。
wireshark lua 插件的骨架代码如何编写
插件版 Hello World 如何实现
RocketMQ 的基本通信协议格式
RocketMQ 在 PULL 有消息时的 Body 格式是什么样的
初探 Hello World 插件
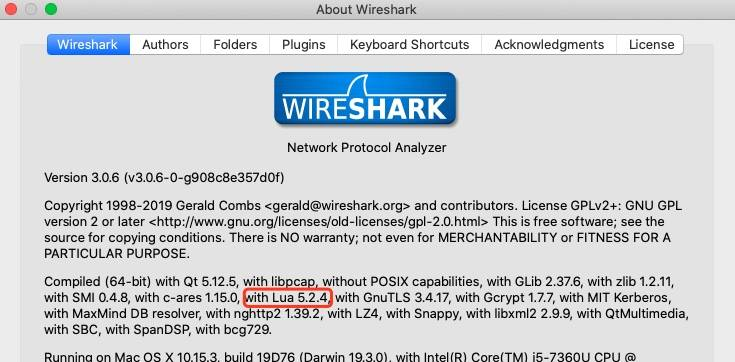
从 wireshark 的 about 页面可以看到现在它支持的 Lua 版本,下面是我 v3.0.6 版本的 wireshark 对应的页面。
可以看到,目前支持的 Lua 版本是 5.2.4。下面我们来看一段骨架代码。
-- 声明协议
local NAME = "RocketMQ"
local PORTS = { 9876, 10911 }
local proto = Proto.new(NAME, "RocketMQ Protocol")

-- 声明 dissector 函数,处理包
function proto.dissector(tvb, pinfo, tree)
    print("load plugin...demo")
    pinfo.cols.protocol = proto.name;
    pinfo.cols.info = "Hello, World"
end

-- 注册 dissector 到 wireshark
for _, port in ipairs(PORTS) do
    DissectorTable.get("tcp.port"):add(port, proto)
end
找到 wireshark 插件目录,在我的电脑上这个路径是 /Applications/Wireshark.app/Contents/Resources/share/wireshark/,修改其中的 init.lua 文件
vim /Applications/Wireshark.app/Contents/Resources/share/wireshark/init.lua
增加一行加载上面 lua 文件的 dofile 调用。
...
dofile("/path/to/demo.lua")
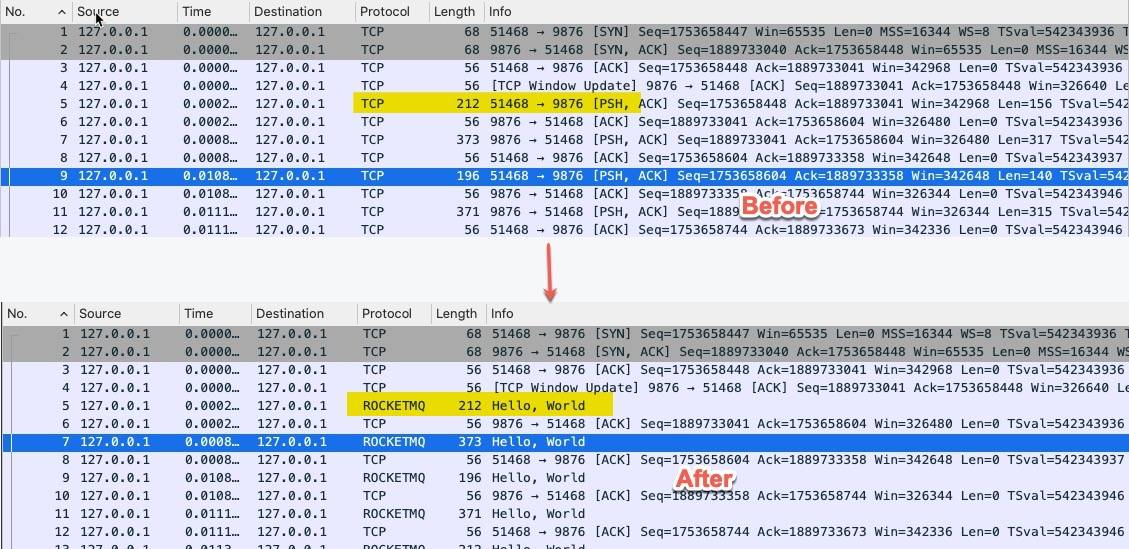
执行前后效果如下
解析 RocketMQ 协议
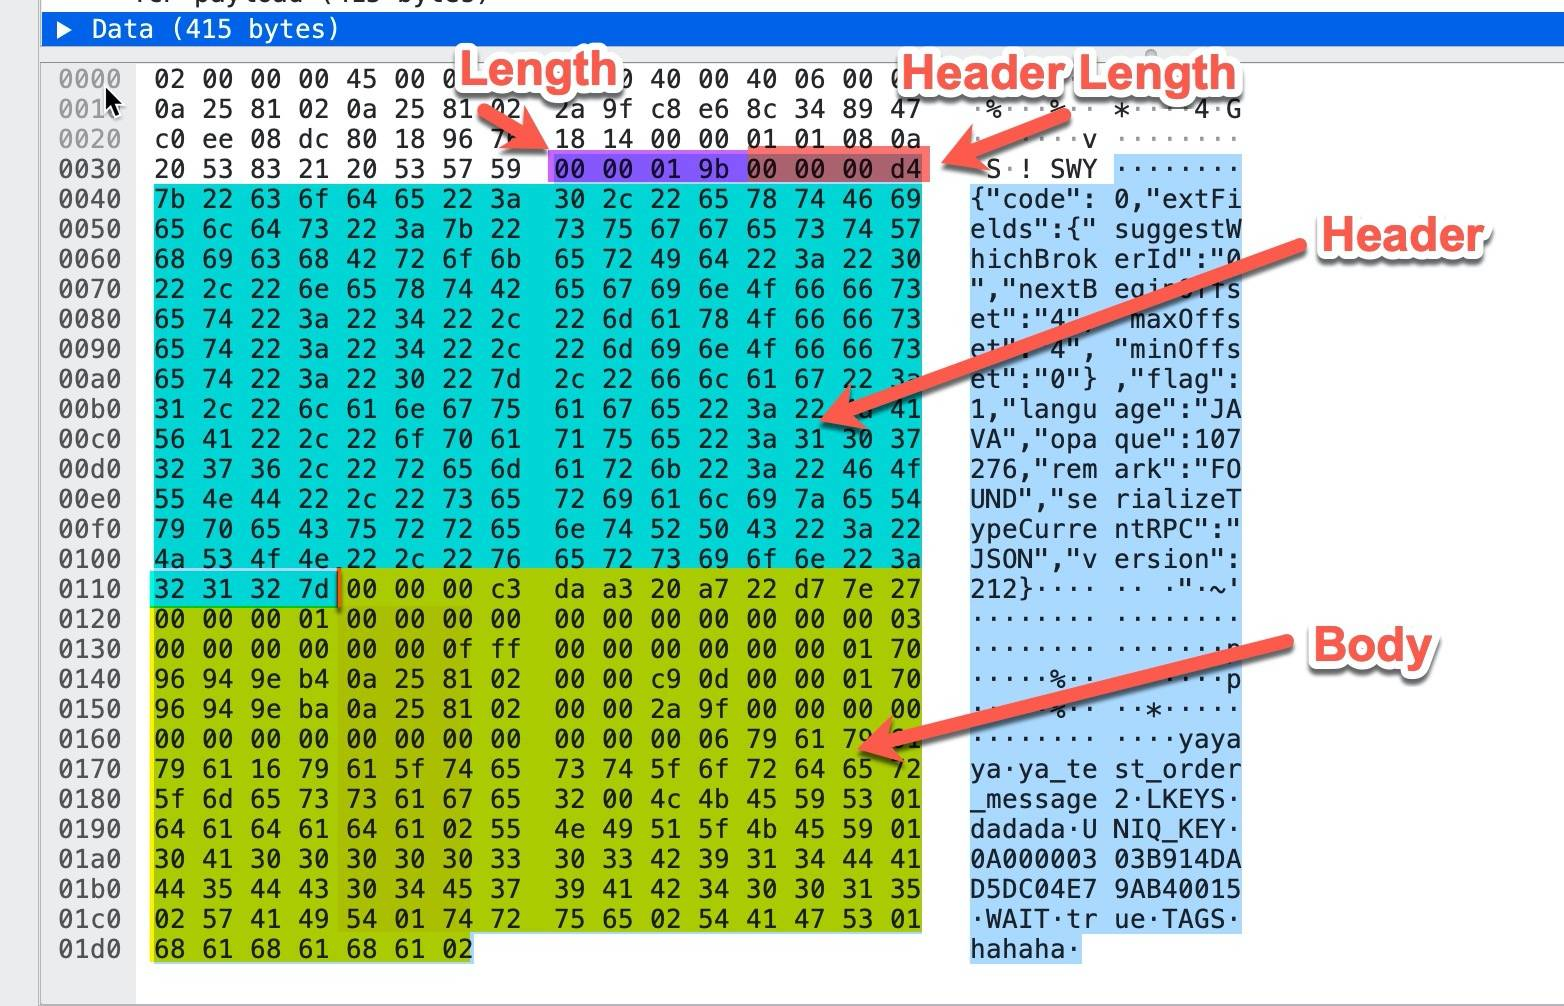
RocketMQ 的通信协议是比较简单的,整体的协议格式如下所示
RocketMQ 的通信协议由四部分组成:

第一部分:头 4 个字节表示剩下三部分的总长度(不包括自己这 4 个字节)
第二部分:接下来的 4 个字节表示 Header 部分的长度
第三部分:接下来的 Header Length 长度的内容为协议头,是用 json 序列化后存储,主要用来表示不同的请求响应类型
第四部分:body 内容
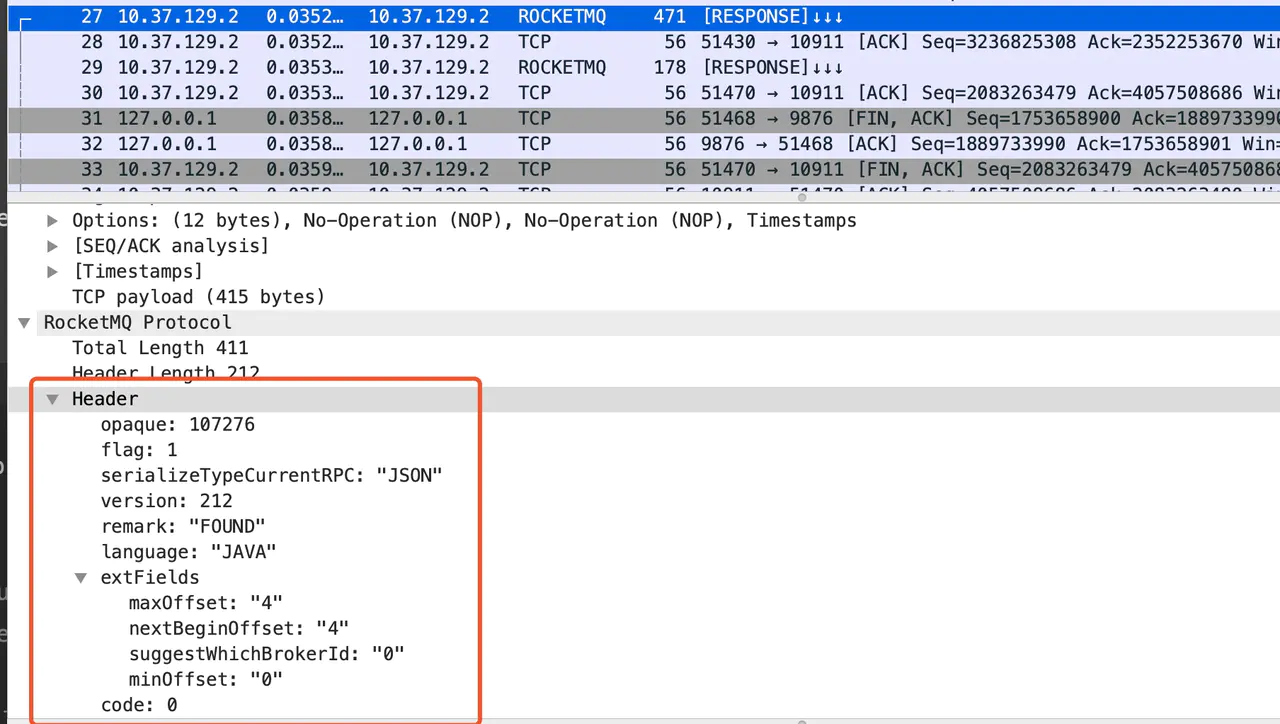
以一个实际的包为例:
头四个字节 00 00 01 9b 表示整个包的长度 411(0x019b),接下来的四个字节 00 00 00 d4 表示 Header Length,这里为 212(0xD4),接下来的 212 个字节表示Header 的内容,可以看到这是一段 json 的字符串,最后的 195(411-4-212) 个字节表示 Body 的真正内容,具体的消息格式下面会再讲到。
接下来我们来写解析的程序。
解析的逻辑在 proto.dissector 方法中进行,它的签名如下所示
function proto.dissector(tvb, pinfo, tree)
end
这些参数的释义如下:
tvb 是 “Testy Virtual Buffer” 的缩写,是包含数据包的 buffer 内容
pinfo 是 Packet Information 的缩写,表示 Packet 包相关的信息,可以获取包的源端口、目标端口等信息。
tree 表示 wireshark UI 界面的展示树,解析包得到的信息都会添加到这个有层级关系的树中。
接下来我们把 RocketMQ 通信的四个部分展示到 wireshark 中。修改 proto.dissector 函数的代码如下所示
function proto.dissector(tvb, pinfo, tree)
    print("load plugin...demo")

    local subtree = tree:add(proto, tvb())
    pinfo.cols.protocol = proto.name;
    pinfo.cols.info = ""

    local length = tvb(0, 4):uint()
    subtree:add("Total Length", length)
    local headerLength = tvb(4, 4):uint()
    subtree:add("Header Length", headerLength)
    local headerData = tvb(8, headerLength):string()
    subtree:add("Header", headerData)
    local bodyDataLen = length - 4 - headerLength
    local bodyData = tvb(8 + headerLength, bodyDataLen):string()
    subtree:add("Body", bodyData)
end
重新加载 lua 脚本,可以看到 Wireshark 中 RocketMQ 协议的几个部分已经显示出来了。
为了能区分是通信 Request 还是 Response,我们可以通过目标端口号来区分,新增一个方法。
function isRequest(pinfo)
    local dstPort = pinfo.dst_port;
    for _, port in ipairs(PORTS) do
        if (dstPort == port) then
            return true
        end
    end
    return false
end
在 proto.dissector 中新增对请求和响应的区分,增加更可读的描述
if (isRequest(pinfo)) then
    pinfo.cols.info:append("[REQUEST]" .. "↑↑↑")
else
    pinfo.cols.info:append("[RESPONSE]" .. "↓↓↓")
end
效果如下所示
接下来我们要做的就是把 json 做解析,展示的更好看一点,先来看 header 和 body 为 json 格式时请求和响应。增加一个递归的方法,统一处理 json 格式的数据

-- k,v 分别表示 json 的 key 和 value,tree 表示 UI 树
function parseAndAddTree(k, v, tree)
    if (type(v) == 'table') then
        local sizeStr = ""
        if (#v > 0) then
            sizeStr = "size: " .. #v
        end;
        local childTree = tree:add(k, sizeStr, tree)
        for key, value in pairs(v) do
            parseAndAddTree(key, value, childTree)
        end
    else
        tree:add(k .. ":", json.stringify(v))
    end
end
在 proto.dissector 方法中增加 Header 的解析,如下所示
local subtree = tree:add(protoMQ, tvb())
local headerTree = subtree:add("Header", "")

-- 解析 json
local header = json.parse(headerData, 1, "}")

for k, v in pairs(header) do
    parseAndAddTree(k, v, headerTree)
end
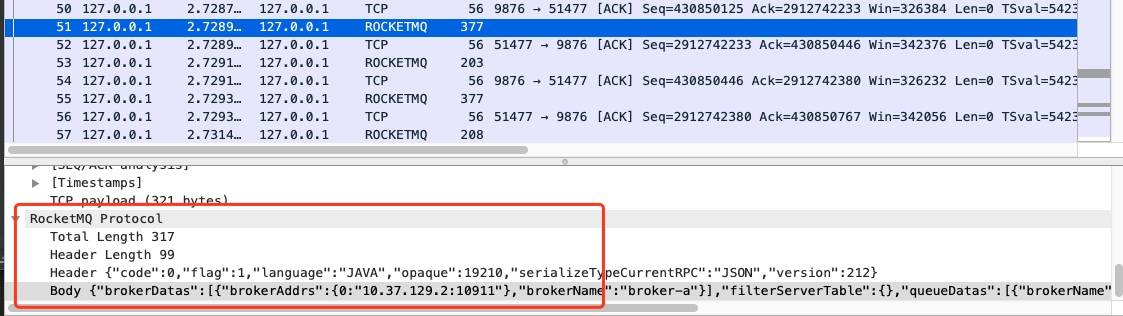
重新加载运行上面的代码,效果如下所示
同时我们也可以在 RocketMQ 的源码中找到请求和响应 code 对应的更可读的字符串表示,
local requestCodeMap = {
    [10] = "SEND_MESSAGE",
    [11] = "PULL_MESSAGE",
    [12] = "QUERY_MESSAGE",
    ...
}

local responseCode = {
    [0] = "SUCCESS",
    [1] = "SYSTEM_ERROR",
    [2] = "SYSTEM_BUSY",
}
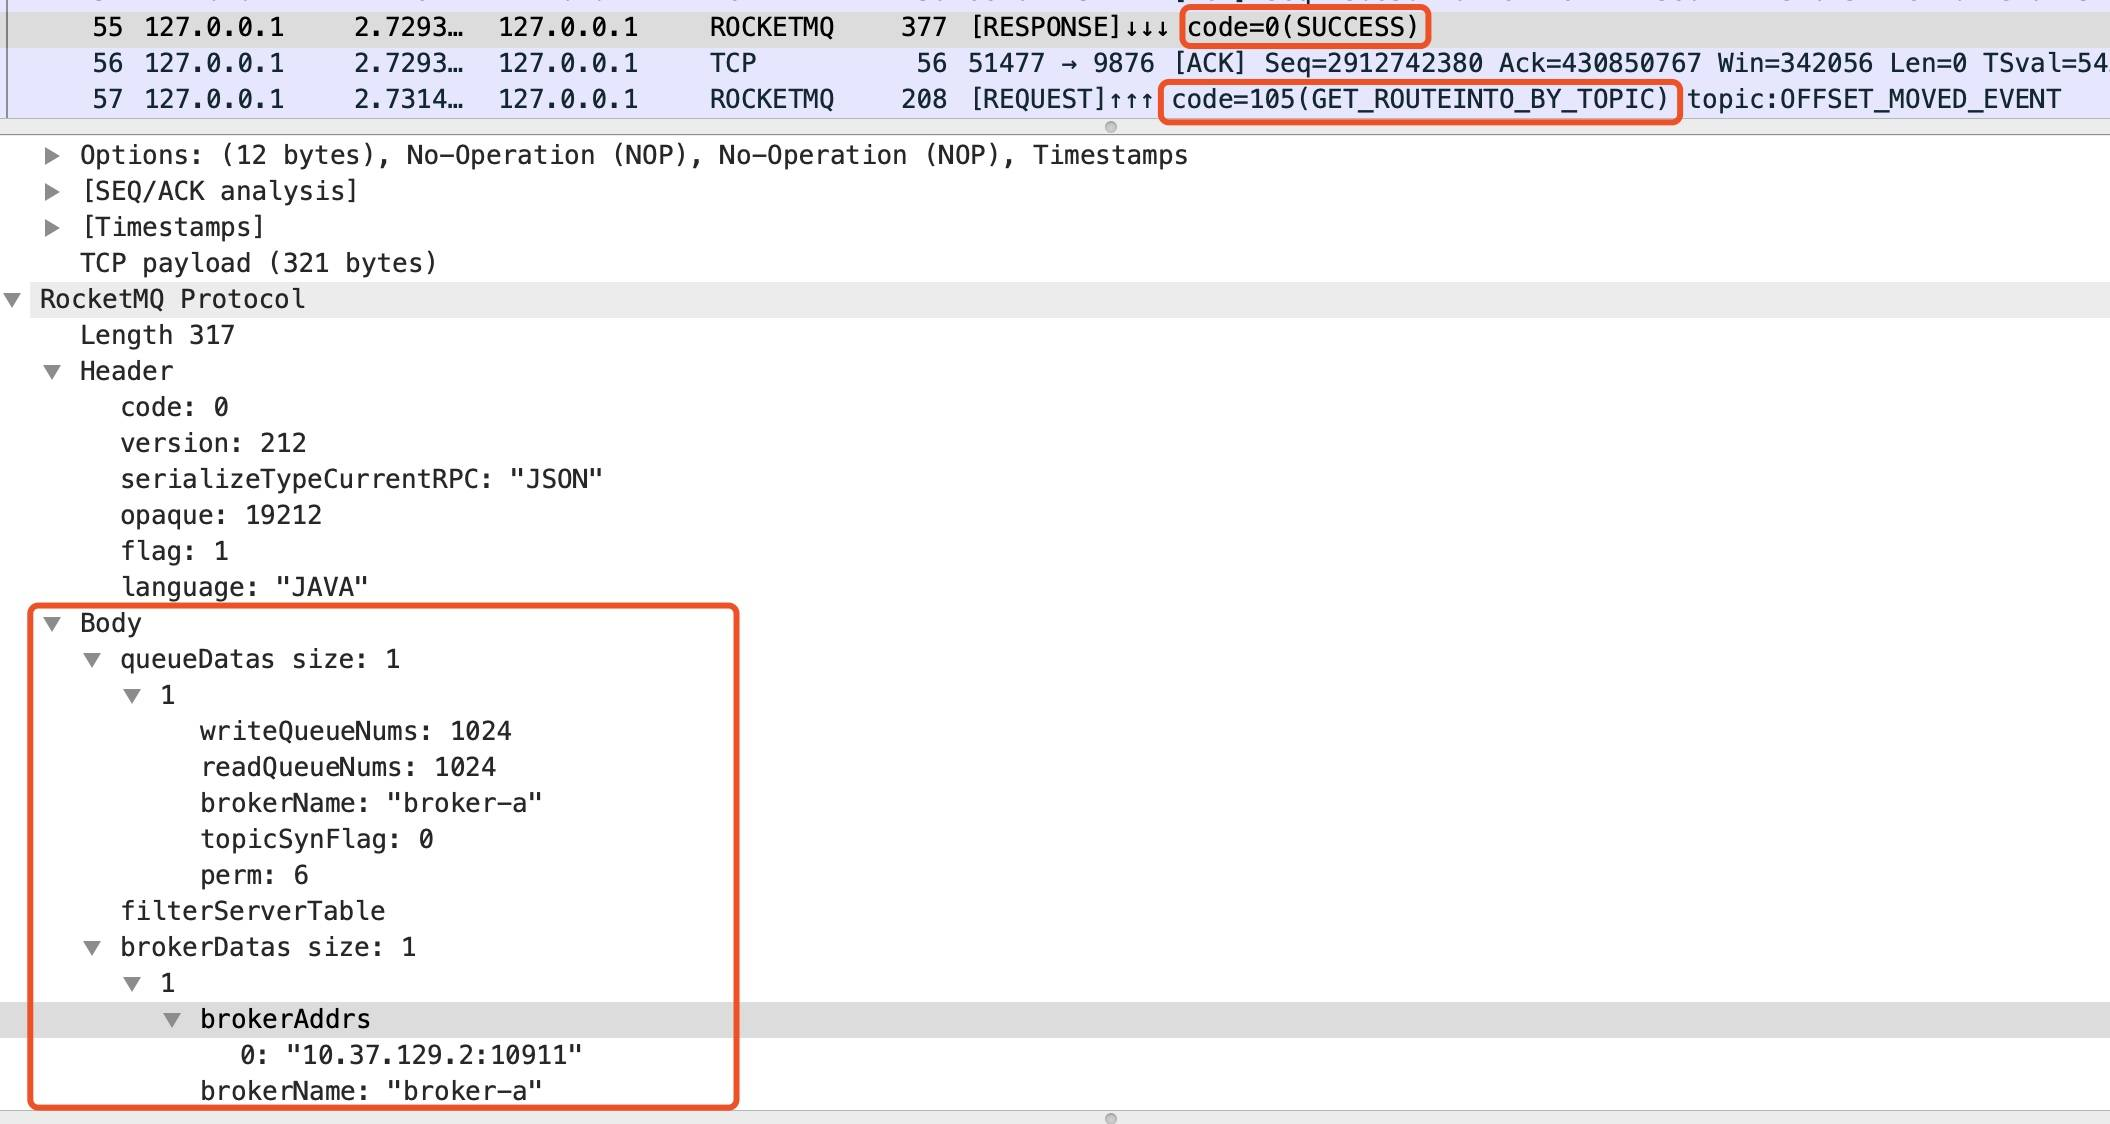
如果 Body 是 json 字符串的话也可以用这种方式来处理,如下所示
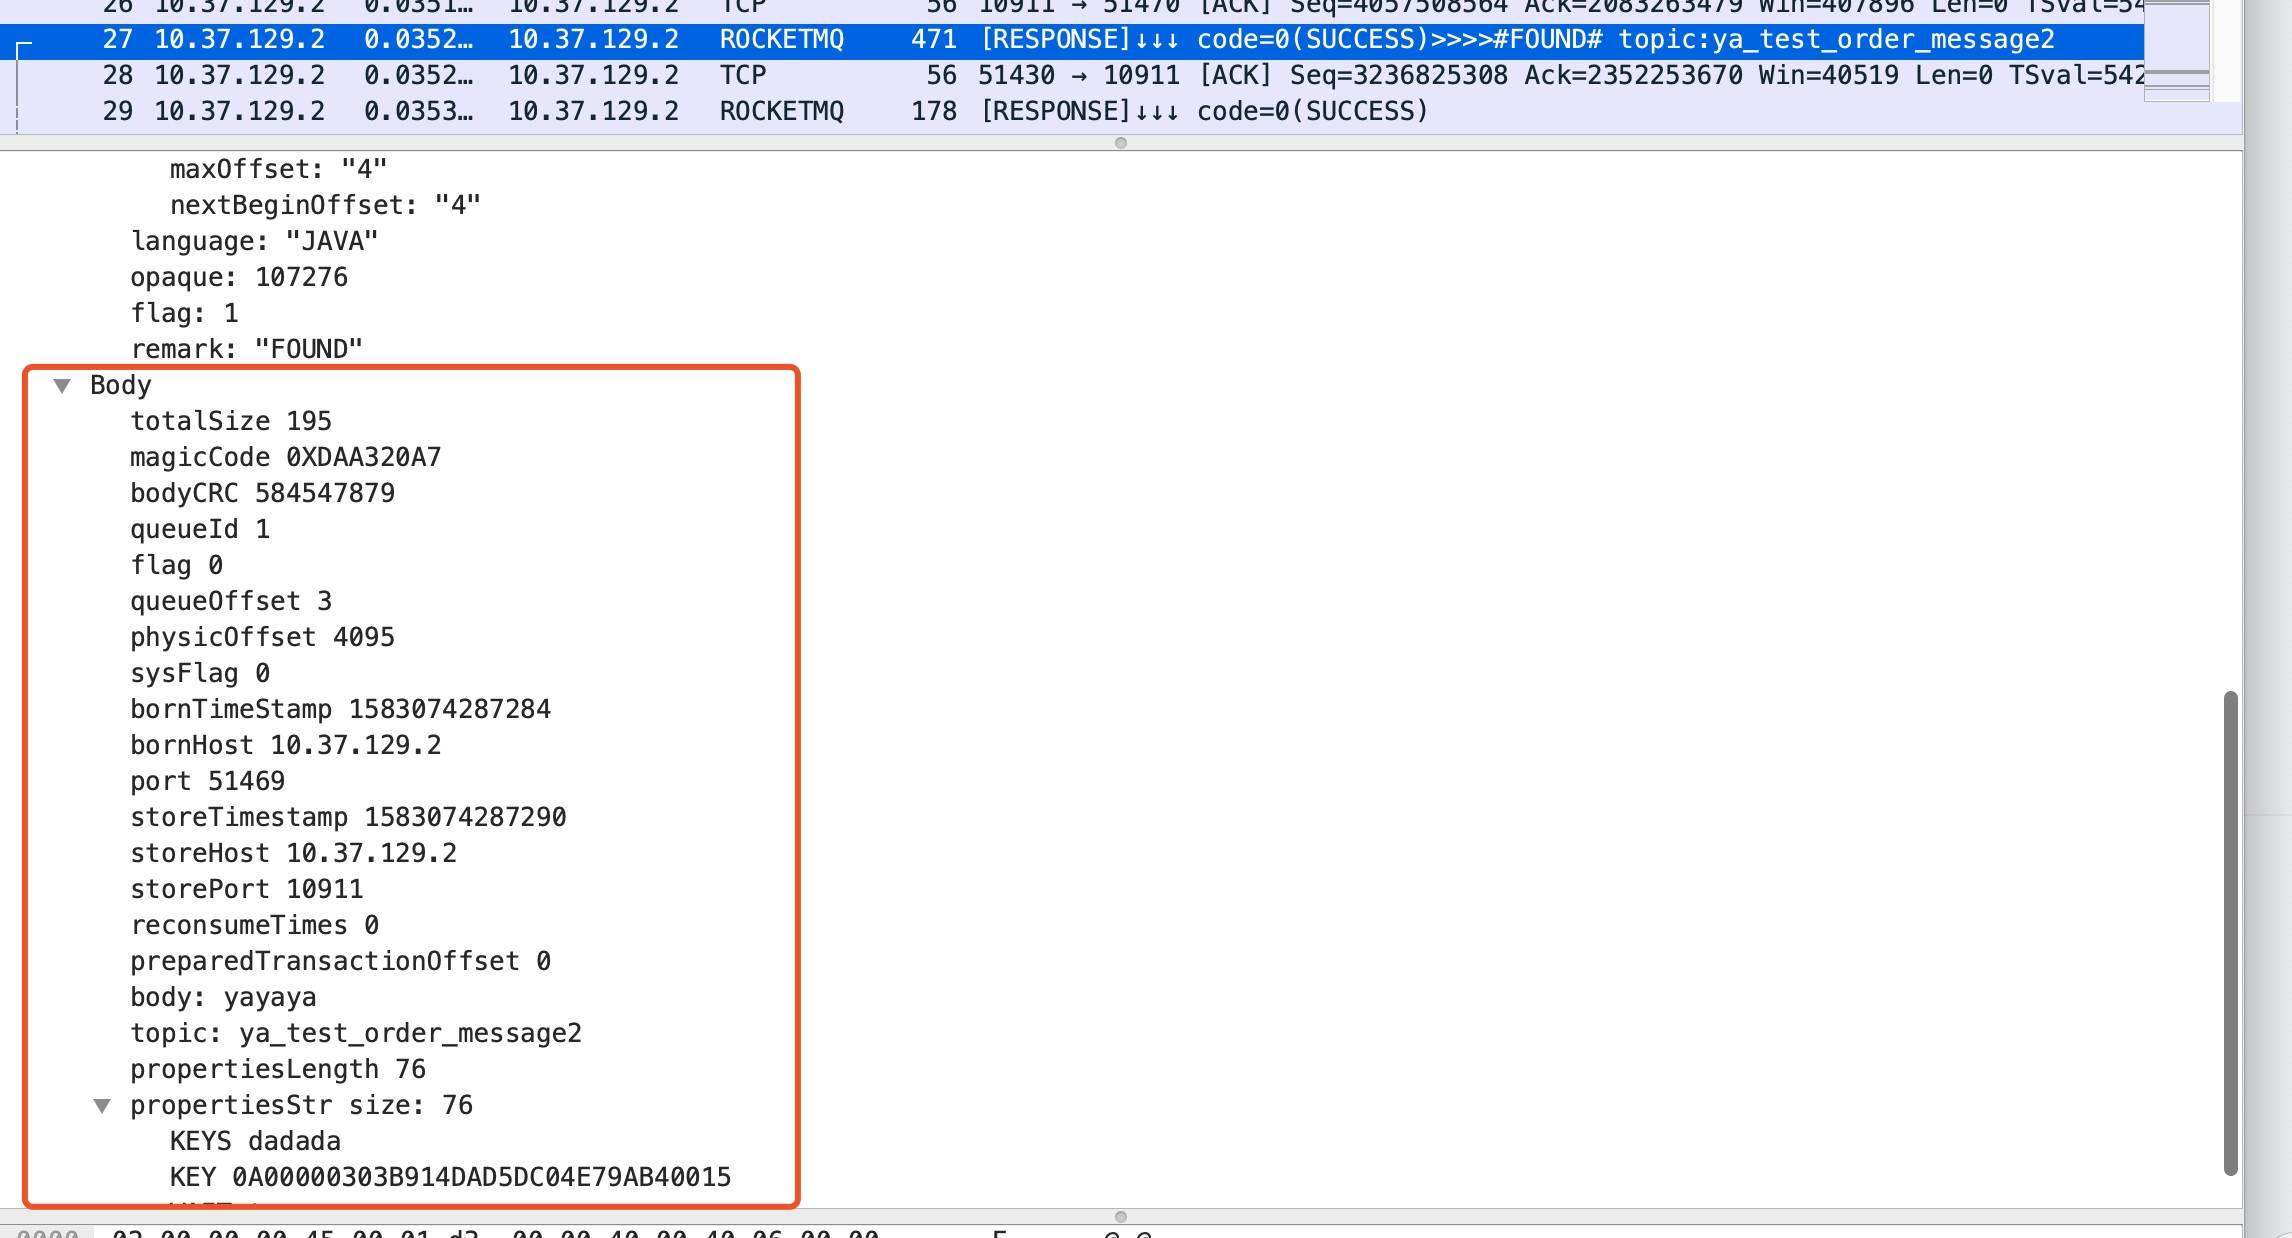
但是在一些情况下,Body 并不是用 json 字符串来表示的,比如在 PULL 消息的时候,如果服务器有返回可消费的消息,这时 Body 中存储的并不是字符串,而是 RocketMQ 自定义的消息格式,如下所示
写这段解析是个体力活,我参照 RocketMQ 的 Java 源码实现了一个 lua 版本,完整的代码如下所示,

function decodeMessageExt(bodyTree, pinfo, bodyData)
    local bodyTree = bodyTree:add("Body", "")

    pinfo.cols.info:append(">>>>#FOUND#")

    local offset = 0;

    bodyTree:add("totalSize", bodyData(offset, 4):int())
    offset = offset + 4;

    local magicCode = string.format("0X%8.8X", bodyData(offset, 4):uint())
    bodyTree:add("magicCode", magicCode)
    offset = offset + 4;

    bodyTree:add("bodyCRC", bodyData(offset, 4):int())
    offset = offset + 4;

    bodyTree:add("queueId", bodyData(offset, 4):int())
    offset = offset + 4;

    bodyTree:add("flag", bodyData(offset, 4):int())
    offset = offset + 4;

    bodyTree:add("queueOffset", bodyData(offset, 8):int64():tonumber())
    offset = offset + 8;

    bodyTree:add("physicOffset", bodyData(offset, 8):int64():tonumber())
    offset = offset + 8;

    bodyTree:add("sysFlag", bodyData(offset, 4):int())
    offset = offset + 4;


    bodyTree:add("bornTimeStamp", bodyData(offset, 8):int64():tonumber())
    offset = offset + 8;

    local bornHost = bodyData(offset, 1):uint()
            .. "." .. bodyData(offset + 1, 1):uint()
            .. "." .. bodyData(offset + 2, 1):uint()
            .. "." .. bodyData(offset + 3, 1):uint()

    bodyTree:add("bornHost", bornHost)
    offset = offset + 4;

    bodyTree:add("port", bodyData(offset, 4):int())
    offset = offset + 4;
    bodyTree:add("storeTimestamp", bodyData(offset, 8):int64():tonumber())
    offset = offset + 8;

    local storeHost = bodyData(offset, 1):uint()
            .. "." .. bodyData(offset + 1, 1):uint()
            .. "." .. bodyData(offset + 2, 1):uint()
            .. "." .. bodyData(offset + 3, 1):uint()
    bodyTree:add("storeHost", storeHost)
    offset = offset + 4;

    bodyTree:add("storePort", bodyData(offset, 4):int())
    offset = offset + 4;

    --13 RECONSUMETIMES
    bodyTree:add("reconsumeTimes", bodyData(offset, 4):int())
    offset = offset + 4;
    --14 Prepared Transaction Offset
    bodyTree:add("preparedTransactionOffset", bodyData(offset, 8):int64():tonumber())
    offset = offset + 8;
    --15 BODY
    local bodyLen = bodyData(offset, 4):int()
    --            bodyTree:add("bodyLen", bodyLen)
    offset = offset + 4;

    bodyTree:add("body:", bodyData(offset, bodyLen):string())
    offset = offset + bodyLen;

    --16 TOPIC
    local topicLen = bodyData(offset, 1):int()
    offset = offset + 1;
    --            bodyTree:add("topicLen", topicLen)
    local topic = bodyData(offset, topicLen):string()
    bodyTree:add("topic:", topic)
    pinfo.cols.info:append(" topic:" .. topic)

    offset = offset + topicLen;

    --17 properties
    local propertiesLength = bodyData(offset, 2):int()
    offset = offset + 2;
    bodyTree:add("propertiesLength", propertiesLength)

    if (propertiesLength > 0) then
        local propertiesStr = bodyData(offset, propertiesLength):string()
        offset = offset + propertiesLength
        local propertiesTree = bodyTree:add("propertiesStr", "size: " .. propertiesLength)
        for k, v in string.gmatch(propertiesStr, "(%w+)\1(%w+)") do
            propertiesTree:add(k, v)
        end
    end
end
运行的效果如下所示
完整的代码我放在了 github 上: github.com/arthur-zhan… , 有兴趣的同学可以看看。除了前面文章中的那些功能,还有实现将 topic 等有用的信息提取到 Info 那一栏,方便查看通信的过程~
没事折腾折腾还挺有意思的,在后台开发中 Lua 这门胶水语言除了在 OpenResty、Redis 中有不少用处之外,还有不少有趣的用途等待我们去发掘。
通过写这个插件,我自己对 RocketMQ 通信的细节更加清楚~
Recommend
About Joyk
Aggregate valuable and interesting links.
Joyk means Joy of geeK