

How to deploy Blazor WebAssembly to Firebase Hosting
source link: https://swimburger.net/blog/dotnet/how-to-deploy-blazor-webassembly-to-firebase-hosting
Go to the source link to view the article. You can view the picture content, updated content and better typesetting reading experience. If the link is broken, please click the button below to view the snapshot at that time.
How to deploy Blazor WebAssembly to Firebase Hosting
Niels Swimberghe - 12/27/2020 - .NET
Follow me on Twitter, buy me a coffee
With ASP.NET Blazor WebAssembly (WASM) you can create .NET web applications that run completely inside of the browser sandbox. The publish output of a Blazor WASM project are all static files. Now that you can run .NET web applications without server side code, you can deploy these application to various static site hosts, such as Google's Firebase Hosting.
Here's some other tutorials if you're interested in hosting Blazor WASM on other static site hosts:
This walkthrough will show you how to deploy Blazor WASM to Firebase Hosting manually and using GitHub Actions. Make sure to review the restrictions of Firebase's free plan called "Spark".
This how-to will walk you through these high-level steps:
- Create Blazor WebAssembly project
- Commit the project to a Git repository
- Create a new GitHub project and push the Git repository to GitHub
- Initialize Firebase in your project
- Deploy to Firebase Hosting manually
- Deploy using GitHub Actions workflow
Prerequisites:
- .NET Core 3.1 or above
- GitHub account
- Firebase CLI (installation instructions)
You can refer to the code used throughout this walkthrough in this GitHub repository.
Create Blazor WebAssembly project
Run the following commands to create a new Blazor WASM project:
mkdir FirebaseHostingBlazorWasm
cd FirebaseHostingBlazorWasm
dotnet new blazorwasm -n BlazorWasmSample -o src
In this tutorial the Blazor WASM project is purposely put into the src subfolder to keep source code separate from other assets.
To give your application a try, execute dotnet run and browse to the URL in the output (probably https://localhost:5001):
dotnet run -p src/BlazorWasmSample.csproj
# Building...
# info: Microsoft.Hosting.Lifetime[0]
#       Now listening on: https://localhost:5001
# info: Microsoft.Hosting.Lifetime[0]
#       Now listening on: http://localhost:5000
# info: Microsoft.Hosting.Lifetime[0]
#       Application started. Press Ctrl+C to shut down.
# info: Microsoft.Hosting.Lifetime[0]
#       Hosting environment: Development
# info: Microsoft.Hosting.Lifetime[0]
#       Content root path: C:\Users\niels\source\repos\FirebaseHostingBlazorWasm\src
# info: Microsoft.Hosting.Lifetime[0]
#       Application is shutting down...
Optional: You can use the dotnet publish command to publish the project and verify the output:
dotnet publish src/BlazorWasmSample.csproj
# Microsoft (R) Build Engine version 16.8.0+126527ff1 for .NET
# Copyright (C) Microsoft Corporation. All rights reserved.
#
#   Determining projects to restore...
#   All projects are up-to-date for restore.
#   BlazorWasmSample -> C:\Users\niels\source\repos\FirebaseHostingBlazorWasm\src\bin\Debug\net5.0\BlazorWasmSample.dll
#   BlazorWasmSample (Blazor output) -> C:\Users\niels\source\repos\FirebaseHostingBlazorWasm\src\bin\Debug\net5.0\wwwroot  Optimizing assemblies for size, which may change the behavior of the app. Be sure to test after publishing. See: https://aka.ms/dotnet-illink
#   Compressing Blazor WebAssembly publish artifacts. This may take a while...
#   BlazorWasmSample -> C:\Users\niels\source\repos\FirebaseHostingBlazorWasm\src\bin\Debug\net5.0\publish\
In the publish directory, you will find a web.config file and a wwwroot folder. The config file helps you host your application in IIS, but you don't need that file for static site hosts. Everything you need will be inside of the wwwroot folder. The wwwroot folder contains the index.html, CSS, JS, and DLL files necessary to run the Blazor application.
Push Blazor project to GitHub
For this walkthrough, your application source code must be inside of a GitHub repository.
First, you need to create a local Git repository and commit your source code to the repository using these commands:
# add the gitignore file tailored for dotnet applications, this will ignore bin/obj and many other non-source code files
dotnet new gitignore -o src
# create the git repository
git init
# track all files that are not ignore by .gitignore
git add --all
# commit all changes to the repository
git commit -m "Initial commit"
Create a new GitHub repository (instructions) and copy the commands to "push an existing repository from the command line" from the empty GitHub repository page, here's what it should looks like but with a different URL:
git remote add origin https://github.com/Swimburger/FirebaseHostingBlazorWasm.git
git push -u origin main
Initialize Firebase in your project
Make sure you have installed the Firebase CLI and that you are logged in. Then run firebase init:
firebase init
# output with prompts below:
<#
     ######## #### ########  ######## ########     ###     ######  ########
     ##        ##  ##     ## ##       ##     ##  ##   ##  ##       ##
     ######    ##  ########  ######   ########  #########  ######  ######
     ##        ##  ##    ##  ##       ##     ## ##     ##       ## ##
     ##       #### ##     ## ######## ########  ##     ##  ######  ########

You're about to initialize a Firebase project in this directory:

  C:\Users\niels\source\repos\FirebaseHostingBlazorWasm

? Are you ready to proceed? Yes
? Which Firebase CLI features do you want to set up for this folder? Press Space to select features, then Enter to confirm your choices. Hosting: Configure and deploy Firebase Hosting sites

=== Project Setup

First, let's associate this project directory with a Firebase project.
You can create multiple project aliases by running firebase use --add,
but for now we'll just set up a default project.

? Please select an option: Create a new project
i  If you want to create a project in a Google Cloud organization or folder, please use "firebase projects:create" instead, and return to this command when you've created the project.
? Please specify a unique project id (warning: cannot be modified afterward) [6-30 characters]: blazor-wasm-sample2
? What would you like to call your project? (defaults to your project ID)
√ Creating Google Cloud Platform project
√ Adding Firebase resources to Google Cloud Platform project

=== Your Firebase project is ready! ===

Project information:
   - Project ID: blazor-wasm-sample2
   - Project Name: blazor-wasm-sample2

Firebase console is available at
https://console.firebase.google.com/project/blazor-wasm-sample2/overview
i  Using project blazor-wasm-sample2 (blazor-wasm-sample2)

=== Hosting Setup

Your public directory is the folder (relative to your project directory) that
will contain Hosting assets to be uploaded with firebase deploy. If you
have a build process for your assets, use your build's output directory.

? What do you want to use as your public directory? release/wwwroot
? Configure as a single-page app (rewrite all urls to /index.html)? Yes
? Set up automatic builds and deploys with GitHub? Yes
+  Wrote release/wwwroot/index.html

i  Didn't detect a .git folder. Assuming C:\Users\niels\source\repos\FirebaseHostingBlazorWasm is the project root.
i  Authorizing with GitHub to upload your service account to a GitHub repository's secrets store.

Visit this URL on this device to log in:
[REDACTED]

Waiting for authentication...

+  Success! Logged into GitHub as Swimburger

? For which GitHub repository would you like to set up a GitHub workflow? (format: user/repository) Swimburger/FirebaseHostingBlazorWasm

+  Created service account github-action-322735214 with Firebase Hosting admin permissions.
+  Uploaded service account JSON to GitHub as secret FIREBASE_SERVICE_ACCOUNT_BLAZOR_WASM_SAMPLE2.
i  You can manage your secrets at https://github.com/Swimburger/FirebaseHostingBlazorWasm/settings/secrets.

? Set up the workflow to run a build script before every deploy? Yes
? What script should be run before every deploy? dotnet publish -c Release -o release

+  Created workflow file C:\Users\niels\source\repos\FirebaseHostingBlazorWasm\.github/workflows/firebase-hosting-pull-request.yml
? Set up automatic deployment to your site's live channel when a PR is merged? Yes
? What is the name of the GitHub branch associated with your site's live channel? main

+  Created workflow file C:\Users\niels\source\repos\FirebaseHostingBlazorWasm\.github/workflows/firebase-hosting-merge.yml

i  Action required: Visit this URL to revoke authorization for the Firebase CLI GitHub OAuth App:
https://github.com/settings/connections/applications/89cf50f02ac6aaed3484
i  Action required: Push any new workflow file(s) to your repo

i  Writing configuration info to firebase.json...
i  Writing project information to .firebaserc...
i  Writing gitignore file to .gitignore...

+  Firebase initialization complete!
#>
The CLI will take you through initializing Firebase locally step by step. You can see the output above. Provide the following responses to the prompt:
- Are you ready to proceed? Yes
- Which Firebase CLI features do you want to set up for this folder? Press Space to select features, then Enter to confirm your choices.
Select hosting and then press enter. - First, let's associate this project directory with a Firebase project. You can create multiple project aliases by running firebase use --add, but for now we'll just set up a default project.
Create a new project- Please specify a unique project id (warning: cannot be modified afterward) [6-30 characters]:
[your-username]-blazor-wasm-sample
The project id has to be globally unique. - What would you like to call your project? (defaults to your project ID)
Accept default or provide a project name.
- Please specify a unique project id (warning: cannot be modified afterward) [6-30 characters]:
- What do you want to use as your public directory?
release/wwwroot
You'll publish the Blazor WASM project to the release folder later. - Configure as a single-page app (rewrite all urls to /index.html)?
Yes - Set up automatic builds and deploys with GitHub?
Yes - Give Firebase permissions to access your GitHub repositories
- For which GitHub repository would you like to set up a GitHub workflow? (format: user/repository)
[your_github_username]/[your_github_repository_name] - Set up the workflow to run a build script before every deploy?
Yes - What script should be run before every deploy?
dotnet publish -c Release -o release src/BlazorWasmSample.csproj - Set up automatic deployment to your site's live channel when a PR is merged?
Yes
This GitHub Actions workflow will run for every pull request made on your GitHub repository. The Firebase actions will create a new preview channel where the static app will be hosted at a subdomain unique for the PR. - What is the name of the GitHub branch associated with your site's live channel?
main
Or master if you still use the old default branch name.
If you provided all of these answers to the prompts to firebase init, you will have
- created a Firebase project
- enabled Firebase Hosting for the project
- generated Firebase files like .firebaserc and firebase.json which holds some of the Firebase configuration necessary to deploy and host your application
- generated a .gitignore file to ignore common files that need no tracking in Firebase projects
- generated GitHub Actions workflows at the folder: .github\workflows
- Firebase added a secret to your GitHub repository secrets. This secret is used to authenticate to Firebase so the Firebase GitHub Actions can deploy and create preview channels.
Let's give the generated files a closer look.
.firebaserc:
{
  "projects": {
    "default": "[your-project-id]"
  }
}
This file holds the Firebase project id which it uses to deploy to the correct project when using firebase deploy.
firebase.json:
{
  "hosting": {
    "public": "release/wwwroot",
    "ignore": [
      "firebase.json",
      "**/.*",
      "**/node_modules/**"
    ],
    "rewrites": [
      {
        "source": "**",
        "destination": "/index.html"
      }
    ]
  }
}
This file is used to hold some parameters which influence how the project will be deployed using firebase deploy.
The file is also deployed to Firebase to configure things like routing. Here's what the different properties do:
- hosting
- public: specifies the folder that will be uploaded to Firebase Hosting. This folder should hold all the static assets you want to host.
- ignore: this array holds patterns of files to explicitly not upload to Firebase Hosting.
- rewrites: this array configures different rewrites and redirects. For single page applications (SPA) like Blazor WASM, you need to rewrite HTTP request to all paths to /index.html. That is exactly what the pre-configured rewrite above does.
Let's review the GitHub Actions workflow files later.
Deploy to Firebase Hosting manually
Now that you initialized the folder with Firebase, you can manually deploy the Blazor WASM application to Firebase Hosting. First you need to publish the Blazor WASM application to the release folder:
dotnet publish -c Release -o release src/BlazorWasmSample.csproj
You can test out the hosting locally using firebase's hosting simulator with the firebase serve command:
firebase serve --only hosting
# Output:
# i  hosting: Serving hosting files from: release/wwwroot
# +  hosting: Local server: http://localhost:5000
The files you need to upload to Firebase Hosting will be at release/wwwroot. This has already been specified in firebase.json, so all you need to do is run the firebase deploy command:
firebase deploy
# Output:
#  === Deploying to 'blazor-wasm-sample2'...
#
#  i  deploying hosting
#  i  hosting[blazor-wasm-sample2]: beginning deploy...
#  i  hosting[blazor-wasm-sample2]: found 177 files in release/wwwroot
#  +  hosting[blazor-wasm-sample2]: file upload complete
#  i  hosting[blazor-wasm-sample2]: finalizing version...
#  +  hosting[blazor-wasm-sample2]: version finalized
#  i  hosting[blazor-wasm-sample2]: releasing new version...
#  +  hosting[blazor-wasm-sample2]: release complete
#
#  +  Deploy complete!
#
#  Project Console: https://console.firebase.google.com/project/blazor-wasm-sample2/overview
#  Hosting URL: https://blazor-wasm-sample2.web.app
Your Blazor WASM application will now be hosted on Firebase Hosting and you can find the URL in the output of the command.
Since you publish the Blazor application to the release folder, you should also ignore that folder in git. Add the release folder to .gitignore manually or use this PowerShell command:
Add-Content -Path ./.gitignore -NoNewline -Value "$([Environment]::NewLine)release";
Deploy using GitHub Actions Workflow
Two GitHub Actions workflow files were created during the Firebase initialization. Let's look look at what they do:
firebase-hosting-merge.yml:
# This file was auto-generated by the Firebase CLI
# https://github.com/firebase/firebase-tools

name: Deploy to Firebase Hosting on merge
'on':
  push:
    branches:
      - main
jobs:
  build_and_deploy:
    runs-on: ubuntu-latest
    steps:
      - uses: actions/checkout@v2
      - run: dotnet publish -c Release -o release src/BlazorWasmSample.csproj
      - uses: FirebaseExtended/action-hosting-deploy@v0
        with:
          repoToken: '${{ secrets.GITHUB_TOKEN }}'
          firebaseServiceAccount: '${{ secrets.FIREBASE_SERVICE_ACCOUNT_BLAZOR_WASM_SAMPLE2 }}'
          channelId: live
          projectId: blazor-wasm-sample2
        env:
          FIREBASE_CLI_PREVIEWS: hostingchannels
This workflow is executed whenever a commit is pushed to the 'main' branch. The single job called 'build_and_deploy' is run on an Ubuntu machine. This machine has some software pre-installed. Today the 'ubuntu-latest' image comes with the .NET 5 SDK pre-configured, but at the time you are reading this, the SDK version could be a newer version. You can use the 'setup-dotnet' GitHub Action to setup a different version of .NET, or to ensure the version of the SDK will be the version specified even when the 'ubuntu-latest' image is updated to use newer versions of .NET.
The job performs the following steps:
- Get all the code from the main branch of your GitHub repository
- Run the
dotnet publishcommand - Use Firebase's GitHub Action to deploy to Firebase Hosting
firebase-hosting-pull-request.yml:
# This file was auto-generated by the Firebase CLI
# https://github.com/firebase/firebase-tools

name: Deploy to Firebase Hosting on PR
'on': pull_request
jobs:
  build_and_preview:
    runs-on: ubuntu-latest
    steps:
      - uses: actions/checkout@v2
      - run: dotnet publish -c Release -o release src/BlazorWasmSample.csproj
      - uses: FirebaseExtended/action-hosting-deploy@v0
        with:
          repoToken: '${{ secrets.GITHUB_TOKEN }}'
          firebaseServiceAccount: '${{ secrets.FIREBASE_SERVICE_ACCOUNT_BLAZOR_WASM_SAMPLE2 }}'
          projectId: blazor-wasm-sample2
        env:
          FIREBASE_CLI_PREVIEWS: hostingchannels
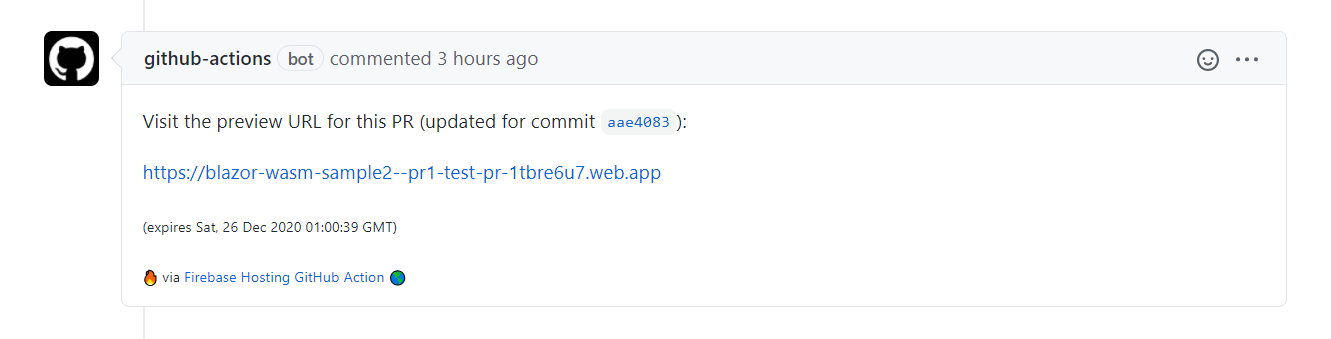
This workflow is executed whenever a pull request is created on your GitHub repository. The workflow does mostly the same. The only difference is that there's no channelid specified in the Firebase deploy action. By not specifying the channelid, Firebase's GitHub action will create a unique preview channel for the PR and comment the details of the deploy in the PR conversation. The comment will look like the screenshot below:
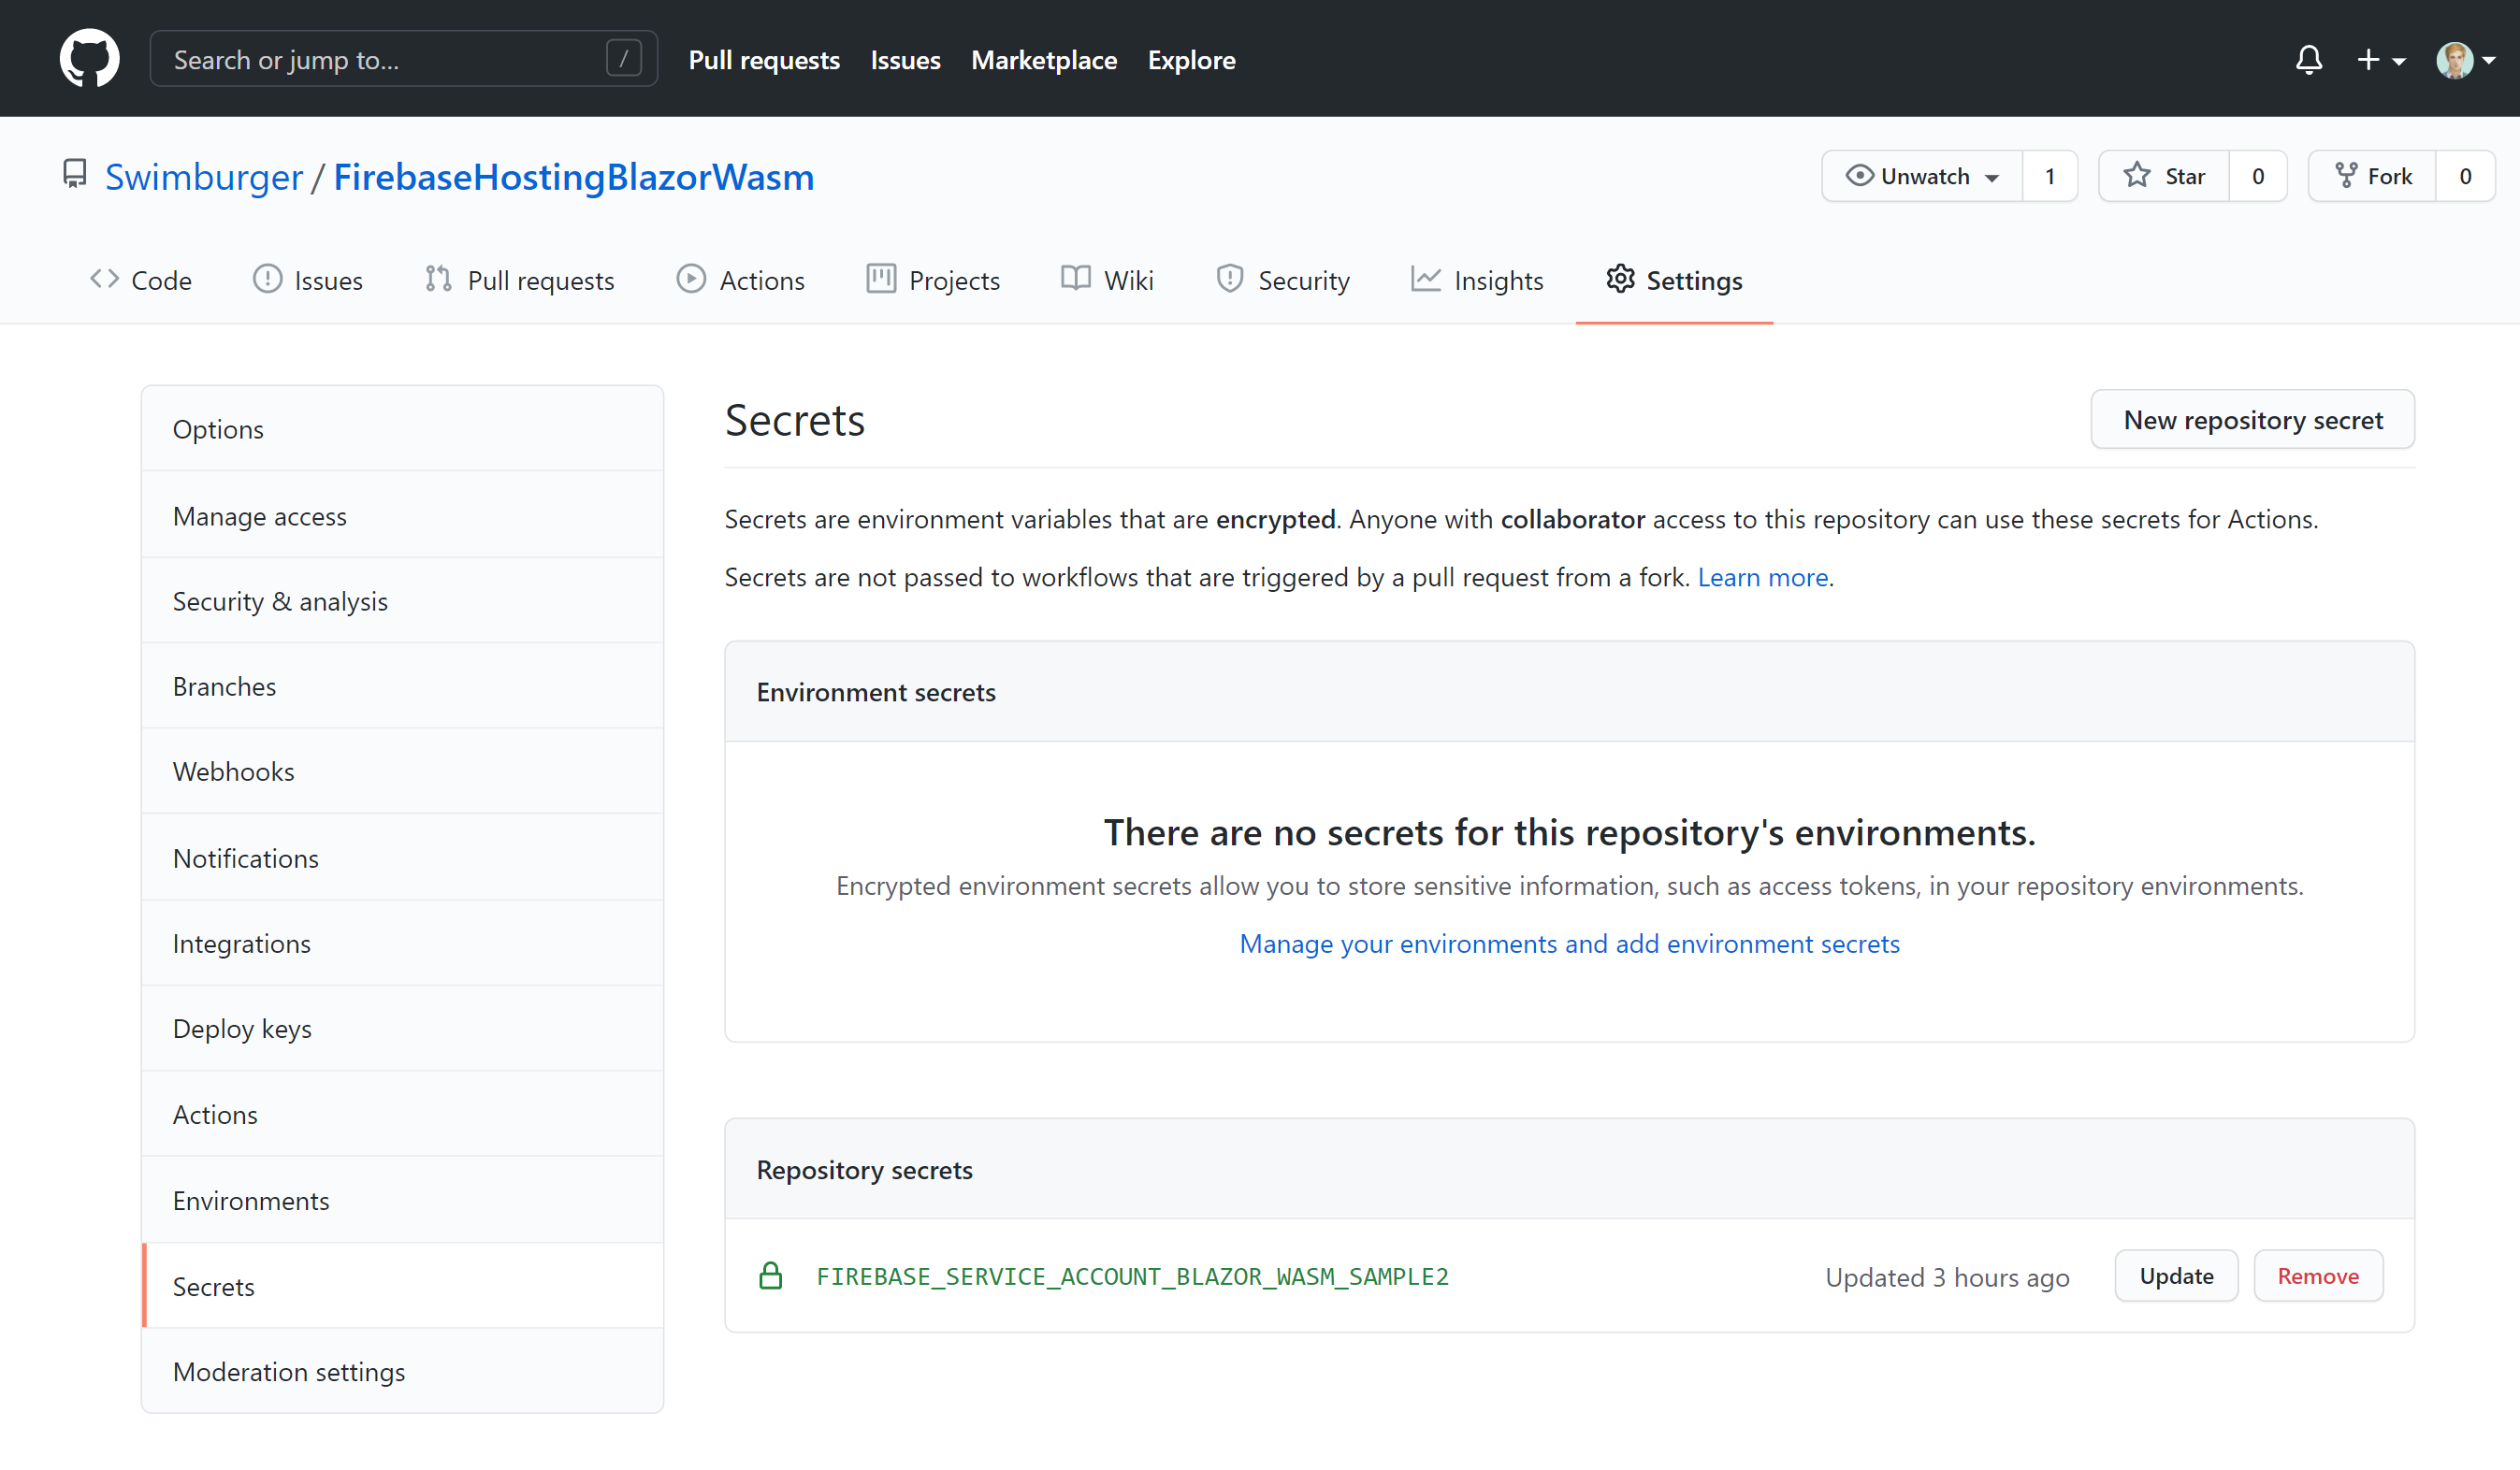
Both workflow files use a secret containing the auth token to perform operations against Firebase. The name of the secret starts with 'FIREBASE_SERVICE_ACCOUNT_'. This secret was created during the Firebase initialization and can be found under the GitHub repository settings like you can see in the screenshot below:
These files are only on your machine. You need to push them up to GitHub. Run the following commands to add the new files to git, commit them, and push them to GitHub:
# track all files that are not ignore by .gitignore
git add --all
# commit all changes to the repository
git commit -m "Add Firebase files"
# push the commits to GitHub
git push
Now the GitHub Action workflows will take effect. You can try out the automated build and deploys by modifying your Blazor project and pushing the changes to GitHub. Make sure to also try out the PR functionality!
Summary
Blazor WebAssembly can be served as static files. These files can be hosted in static hosting services such as Firebase Hosting. Using the Firebase CLI, you can create new Firebase projects and initialize the project on your local machine for deployment to Firebase Hosting. The initialization also can generate GitHub Actions workflow files to automate the build and deployment.
Recommend
About Joyk
Aggregate valuable and interesting links.
Joyk means Joy of geeK