

Getting Started With Microsoft Open Service Mesh
source link: https://thorsten-hans.com/getting-started-with-microsoft-open-service-mesh
Go to the source link to view the article. You can view the picture content, updated content and better typesetting reading experience. If the link is broken, please click the button below to view the snapshot at that time.
A couple of weeks ago, Microsoft announced the first public release of Open Service Mesh (OSM) an open-source, lightweight, and extensible service mesh implementation, based on the Service Mesh Interface (SMI) specification. This article explains the core concepts of a service mesh, provides an Open Service Mesh introduction, and demonstrates some common service mesh use-cases.
Table of contents
Update 2020-10-08
In the meantime, Microsoft has released version 0.0.4 of Open Service Mesh. The updates reflect the upstream changes.
What is a Service Mesh
A service mesh helps to manage service-to-service network communication in Kubernetes environments. Several features related to communication between individual application components are offloaded from the application code to the service mesh. Typically, service mesh implementations add those capabilities to an application by using Kubernetes’ sidecar-container pattern.
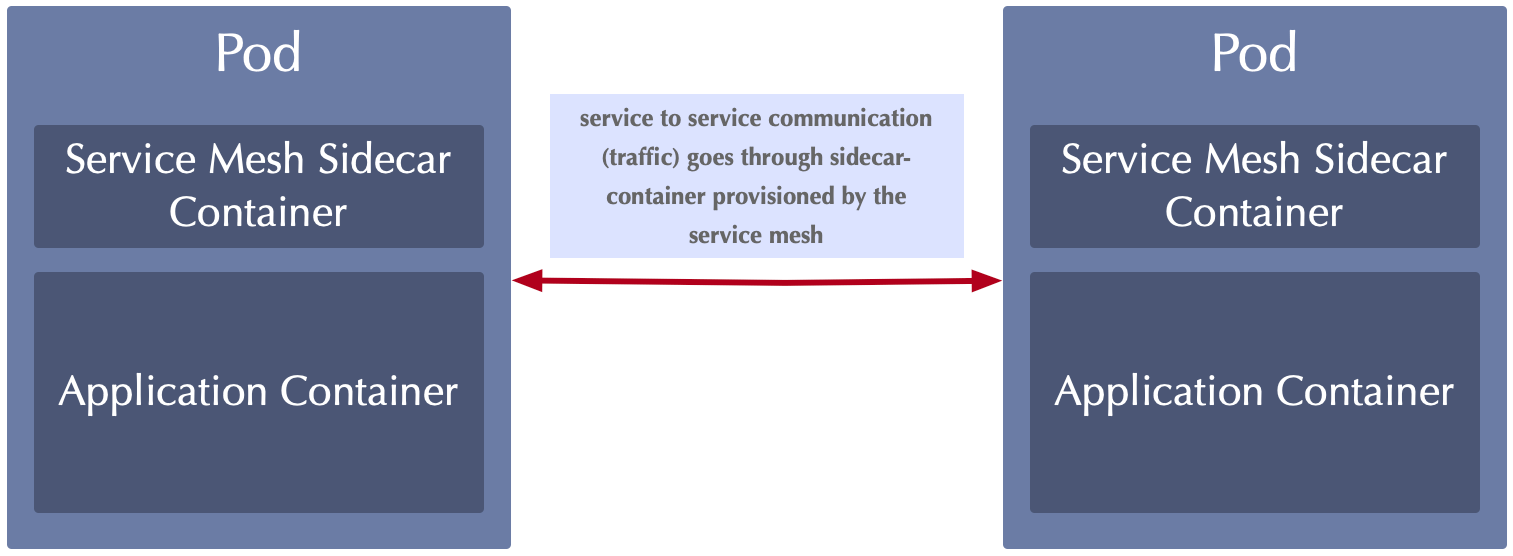
When using a service mesh, communication between two artifacts (containers in independent Kubernetes pods) is routed through a service mesh proxy running in each Pod next to the application container itself. That said, every service mesh comes with a certain proxy, which is responsible for controlling network traffic. Istio - currently the most popular service mesh - and Microsoft’s Open Service Mesh use Envoy as proxy in the sidecar-container. Other service meshes use their own proxies like Linkerd for example, again others use nginx or HAProxy to provide service mesh features.
Service meshes offer great features to control service-to-service communication, like, for example:
- Traffic Access Control
- Traffic Metrics
- Traffic Routing
- Mutual TLS (mTLS)
Besides those, many services meshes offer unique features in areas like security and resilience. As an example, I want to explain the service mesh concept by looking at traffic splitting. Traffic splitting allows you to route requests between different versions of a particular service. Traffic splitting is typically used to implement features like canary deployments. Instead of backing those routing capabilities into application code, you specify the traffic split by using Kubernetes resources. It is the proxy’s responsibility to determine where each request should be routed to match the desired split configuration.
Although service meshes are around for some years, they are still very new, compared to technologies like Kubernetes. Every service mesh implementation comes with a unique feature-set and has its advantages and disadvantages. Every service mesh had individual patterns and configuration practices, especially in the early days of service meshes. Luckily, Microsoft started the Service Mesh Interface (SMI) specification project to streamline the service mesh configuration experience.
What is the Service Mesh Interface specification
 Service Mesh Interface (SMI) specification
The Service Mesh Interface (SMI) specification provides a set of contracts for most common service mesh features like traffic access control, traffic metrics and traffic split. SMI compliant service meshes implement corresponding features based on those SMI contracts.
Users benefit from using SMI spec-compliant service meshes because they are configured using the same set of configuration objects. Those configuration objects exist in Kubernetes as Custom Resource Definitions (CRDs). That said, all features specified in the SMI spec are configured in the same way, if the service mesh is SMI spec-compliant.
The SMI specification was initially created by Microsoft back in May 2019 and donated to the Cloud Native Computing Foundation (CNCF) in April 2020. The project is currently in the sandbox tier of CNCF. As of today, several service meshes implement the SMI spec including:
Do I need a Service Mesh in Kubernetes
Adding a service mesh to your Kubernetes clusters makes overall application architecture and orchestration requirements more complex. On the flip side, you get a great set of features that are especially important when running complex applications at scale. Running a service mesh in a Kubernetes cluster will, of course, consume resources like CPU and memory. Additionally, you need someone who maintains the service mesh and ensures that all service mesh components operate correctly.
You should consider adding a service mesh only if you require - at least - one of the features specified in the SMI specification. I would not recommend using a service mesh by default or without requiring any of the features provided by the service mesh.
Introducing Microsoft Open Service Mesh (OSM)

In August 2020, Microsoft announced the availability of Open Service Mesh (OSM). A lightweight yet extensible service mesh implementation based on the SMI specification. The currently available version provides a great feature-set, as the official website promotes the following:
- Support for implementing mutual TLS (mTLS) which means that communication between components can be encrypted using certificates on both sides (source and destination)
- Simplified application onboarding by injecting side-car containers automatically
- Configure and apply fine granular access control policies for onboarded services
- Integration with different external certificate management services and solutions
- Increase observability and provide insights using application metrics to simplify debugging and monitoring
- Provide an easy and transparent way to implement traffic shifting between several deployments
- Suitable for simple and complex scenarios through SMI and Envoy XDS APIs
OSM is implemented and managed in the public, using the OSM repository on GitHub. To simplify OSM management, Open Service Mesh comes with a small command-line interface (CLI), which operators use to:
- Install OSM in the context of a Kubernetes cluster
- Onboard Kubernetes namespaces
- Quickly access the Open Service Mesh dashboard (Grafana)
- Remove Kubernetes namespaces from OSM
- Uninstall Open Service Mesh from a certain Kubernetes cluster
Having some fundamental understanding of Open Service Mesh and service meshes in general, we can move on and give OSM a try.
Install Open Service Mesh CLI
Open Service Mesh can be installed by downloading the pre-compiled OSM binary from the release page on GitHub. However, a couple of days ago, I recognized that OSM can also be installed using Homebrew - the popular package manager for macOS.
brew install osm
You can verify the OSM CLI installation on your local machine, by invoking:
osm version
# Version: dev; Commit: ; Date: 2020-10-03-21:22
Install Open Service Mesh on Kubernetes
The osm CLI reuses the context of kubectl. That said, verify that kubectl points to the desired Kubernetes cluster.
# list contexts
kubectl config get-contexts
# prints a list of all installed kubernetes contexts...

# pick desired one
kubectl config use-context <CONTEXT_NAME>
Now that kubectl points to the correct Kubernetes cluster, you can install it. By default, OSM is deployed to the osm-system namespace using the OSM Helm chart. The default OSM instance will be called osm. You can customize both, the targeting namespace and the OSM instance name by specifying corresponding arguments when invoking osm install
# install OSM with the default configuration
osm install --enable-grafana

# Alternatively!
# install OSM with custom instance name and into a custom namespace
osm install --enable-grafana --namespace my-osm-namespace --mesh-name my-osm
Traffic Access Control for simple applications
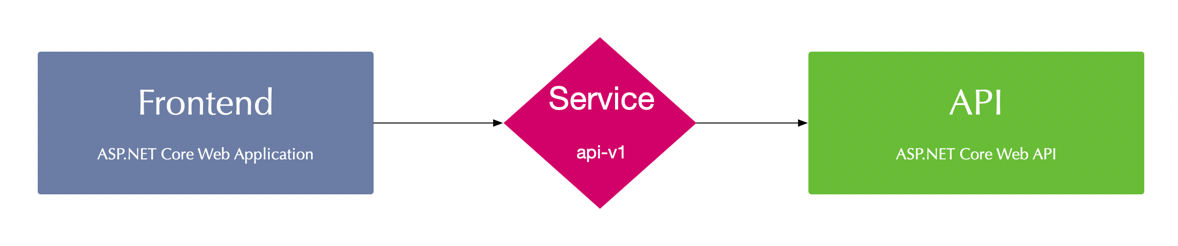
The first sample application we will use in this article is a two-tier application. It consists of an API and a fronted. The API exposes data via HTTP, that will be presented to the end-user by the frontend.
Create and Onboard the Kubernetes Namespace
First, let us create a new Kubernetes namespace and onboard it using the osm CLI:
# create a namespace
kubectl create namespace osm-simple-app

# onboard new namespace
osm namespace add osm-simple-app --enable-sidecar-injection
Deploy the Sample Application
You can deploy all application artifacts using the following kubectl command:
# deploy application components
kubectl apply -f https://github.com/ThorstenHans/osm-sample-application/tree/master/kubernetes/simple/app
This command will deploy all necessary components to the osm-simple-app namespace. You can inspect all of them with kubectl:
# list all application resources
kubectl get cm,deploy,sa,svc -n osm-simple-app
We can test the application by accessing the frontend. However, the backend communication will not work due to OSM default behavior, which does not allow service-to-service communication. Let’s test this, by using kubectl port-forward:
# setup port-forwarding to the frontend
# actual name of the frontend Pod will differ
kubectl port-forward -n osm-simple-app frontend-6bc66b65b8-hwfx5 8080:80

# Forwarding from 127.0.0.1:8080 -> 80
# Forwarding from [::1]:8080 -> 80
Browse http://localhost:8080, and you will see the following site, indicating that there was an issue while fetching data from the API.

Deploy Traffic Access Control
Now that OSM prevents service-to-service communication, we have to whitelist network traffic to go from the frontend service to the api service. According to the SMI specification, we can achieve this by defining a TrafficTarget and allow traffic for specific routes and HTTP methods using an HTTPRouteGroup.
kind: TrafficTarget
apiVersion: access.smi-spec.io/v1alpha2
metadata:
  name: api
  namespace: osm-simple-app
spec:
  destination:
    kind: ServiceAccount
    name: api-service-account
    namespace: osm-simple-app
  rules:
    - kind: HTTPRouteGroup
      name: api-service-routes
      matches:
        - api
  sources:
    - kind: ServiceAccount
      name: frontend-service-account
      namespace: osm-simple-app
---
apiVersion: specs.smi-spec.io/v1alpha3
kind: HTTPRouteGroup
metadata:
  name: api-service-routes
  namespace: osm-simple-app
spec:
  matches:
    - name: api
      pathRegex: "/api/values"
      methods: ["*"]
The TrafficTarget uses selectors to link a sources (the frontend in our case) with a destination (here, the api). You can deploy the TrafficTarget using kubectl as shown here:
# deploy TrafficTarget to the sample application
kubectl apply -f https://github.com/ThorstenHans/osm-sample-application/tree/master/kubernetes/simple/smi
Having the TrafficTarget deployed, we can use kubectl port-forward again, to test our application and verify that API requests are successful.
# enable port forwarding to the frontend
# actual name of the frontend Pod will differ
kubectl port-forward -n osm-simple-app frontend-6bc66b65b8-hwfx5 8080:80

# Forwarding from 127.0.0.1:8080 -> 80
# Forwarding from [::1]:8080 -> 80
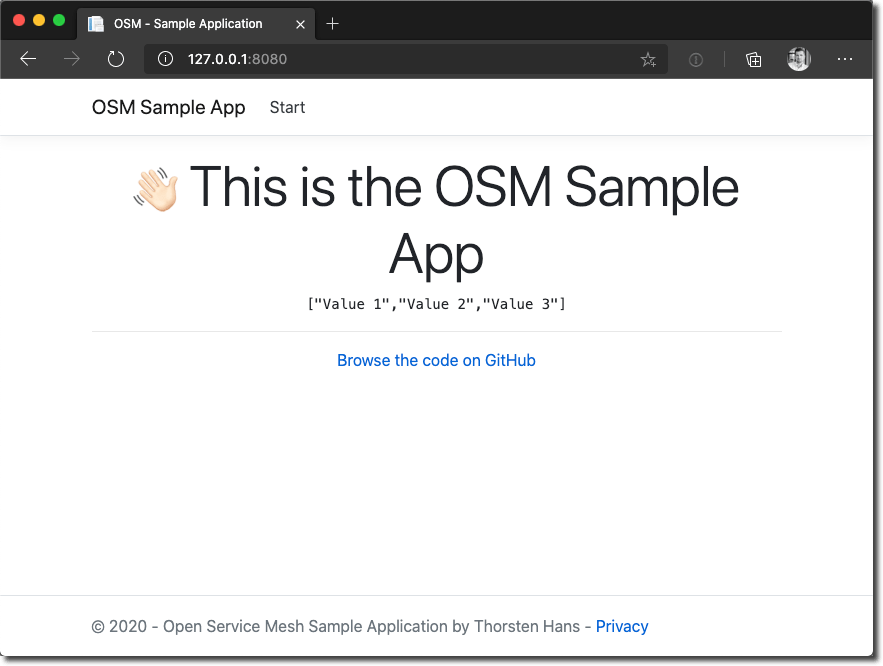
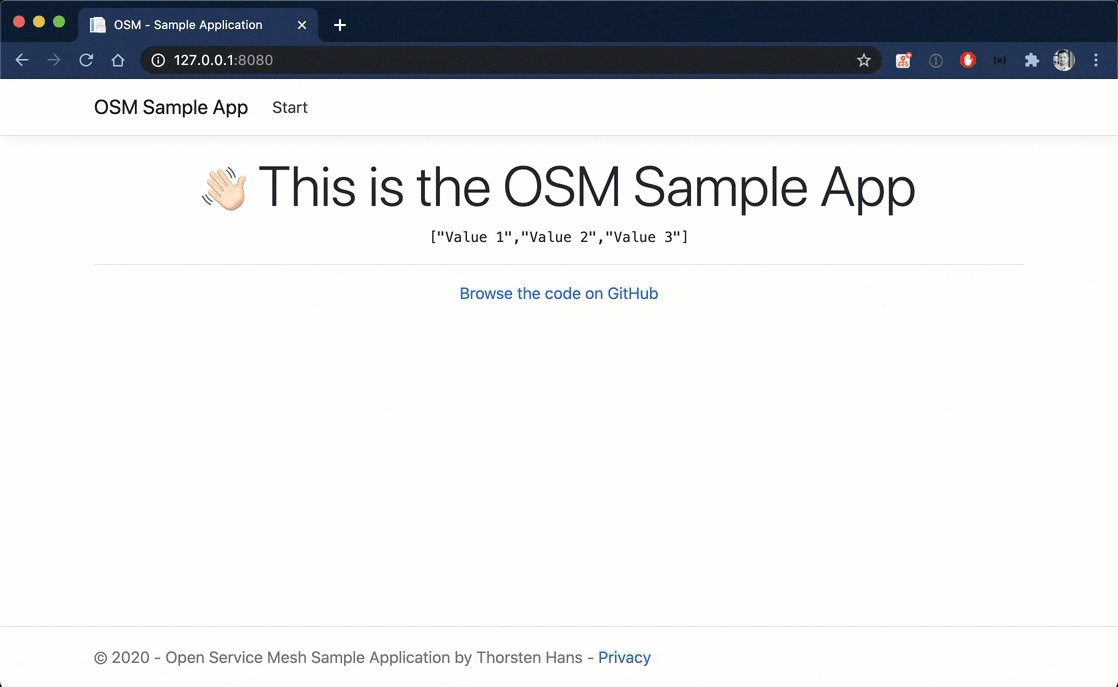
Open http://localhost:8080 in the browser. You will now see the values retrieved from the API in the frontend, as shown in the following figure:
Now that regular network traffic finds its way to the API; we can move on and take a closer look at canary deployments.
Canary Deployments with Open Service Mesh
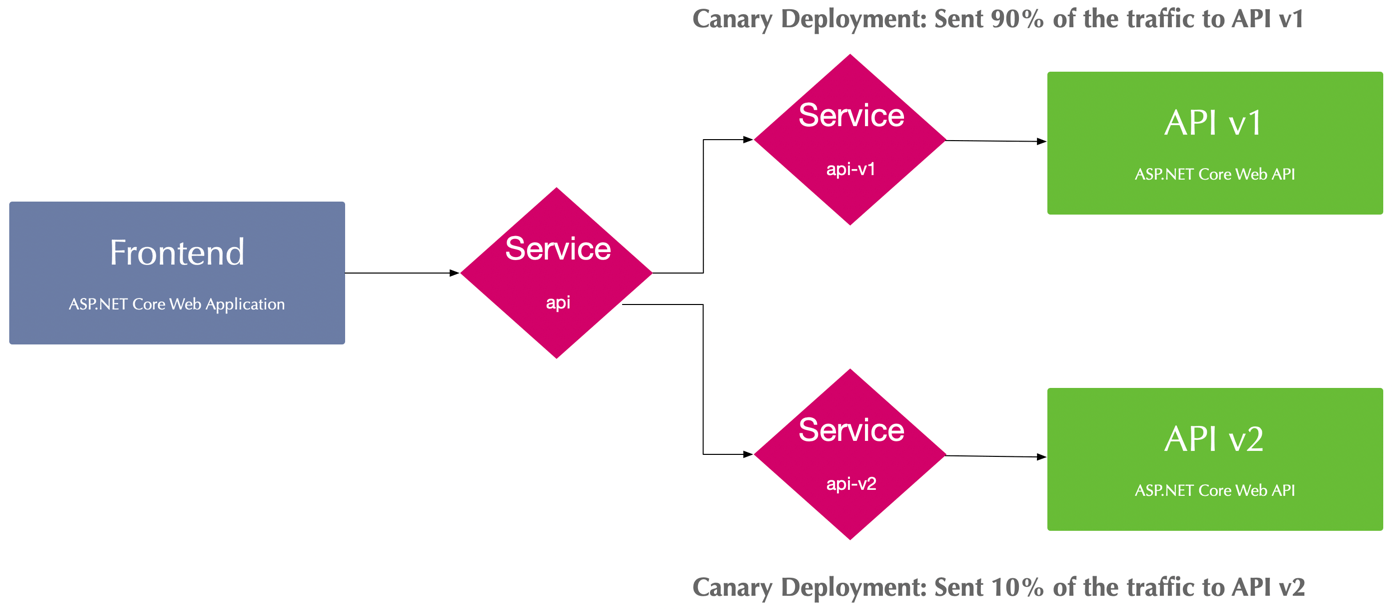
Canary deployments are mission-critical when shipping new features to a vast user-basis. With canary deployments, you can route a subset of requests to a more recent service version. Whereas the maturity of requests still hits the default service.
According to SMI, we configure canary deployments using a TrafficSplit. The TrafficSplit specification requires a root service acting as a proxy in front of actual Kubernetes services tied to Pods.
Create and Onboard the Canary Deployment Namespace
Again, let us start with creating a dedicated namespace for the canary deployment sample:
# create a kubernetes namespace
kubectl create namespace osm-canary-deployment-sample-app

# onboard the namespace to OSM
osm namespace add osm-canary-deployment-sample-app --enable-sidecar-injection
Deploy the Canary Deployment Sample Application
You can deploy all application artifacts for the canary deployment sample using kubectl:
# deploy application components
kubectl apply -f https://github.com/ThorstenHans/osm-sample-application/tree/master/kubernetes/canary-deployment/app
This command will deploy all necessary components to the osm-canary-deployment-sample-app namespace. Again, you can take a look at all the resources using kubectl get:
# list all application resources
kubectl get cm,deploy,sa,svc -n osm-simple-app
Once all Pods are in state Running, we can move on and take care about OSM related artifacts.
Deploy Traffic Access Control and Traffic Split
We have to define how traffic split should behave on top of allowing network traffic to flow from the front end to api-v1 and api-v2. Because you’ve seen a sample of TrafficTarget already in the first sample, let’s focus on TrafficSplit for now.
The TrafficSplit spec supports multiple backends. Each backend receives a relative weight as an integer value. The service mesh is responsible for routing traffic to the corresponding backends with respecting their weight. The spec.service property is also quite interesting. It points to the previously mentioned root service, which is also specified in the frontend as the origin for the API request (see this line in the ConfigMap).
apiVersion: split.smi-spec.io/v1alpha2
kind: TrafficSplit
metadata:
  name: canary-deployment
  namespace: osm-canary-deployment-sample-app
spec:
  service: api.osm-canary-deployment-sample-app
  backends:
    - service: api-v1
      weight: 90
    - service: api-v2
      weight: 10
You can deploy both the TrafficTarget and the TrafficSplit to the osm-canary-deployment-sample-app namespace using:
kubectl apply -f https://github.com/ThorstenHans/osm-sample-application/tree/master/kubernetes/canary-deployment/smi
The Canary Deployment
To verify the canary deployment, we will again activate port-forwarding to the desired frontend:
# enable port forwarding to the frontend
# actual name of the frontend Pod will differ
kubectl port-forward -n osm-canary-deployment-sample-app frontend-6bdfcfd878-42x8v 8080:80

# Forwarding from 127.0.0.1:8080 -> 80
# Forwarding from [::1]:8080 -> 80
Open http://localhost:8080 in the browser. Refresh the site a couple of times, and you will recognize ["Value 4", "Value 5", "Value 6"] being returned in between all the responses from api-v1 as shown in the following animation
Access the Open Service Mesh (OSM) Dashboard
Open Service Mesh also comes with a dashboard (powered by Grafana, Prometheus, and Zipkin) which you can use to analyze applications managed by OSM. You can access the dashboard via osm dashboard (default credentials are admin/admin).

This image shows the OSM dashboard visualizing the previously created canary deployment. See the success count to other services chart showing the 90/10 ratio between api-v1 and api-v2.
Although the pre-provisioned dashboards show a vast amount of insights, such as request latency, active connections, and connection errors, you can configure custom dashboards according to your requirements.
Sample Code
The sample applications are published on GitHub at https://github.com/thorstenhans/osm-sample-application/ including:
- a terraform project to provision an Azure Kubernetes Service instance
- the source-code for all parts of the application
- Dockerfiles and Kubernetes manifests used throughout this article-series
Feel free to file a new issue if you stuck while following this article series. I would love to assist.
Conclusion
I like the simplicity and frictionless of Microsoft Open Service Mesh. Installing and onboarding applications is straight forward, and by relying on the SMI specification, fundamental tasks can be implemented quickly. However, Open Service Mesh has to catch up with the average feature-set of its competitors. Especially when it comes to overall SMI compliance, resilience features like a circuit breaker, fault injection, etc.
Luckily, the team at Microsoft is aware of this. I recognized some interesting features while looking at the public roadmap. So it is worth checking the latest OSM releases regularly.
Recommend
About Joyk
Aggregate valuable and interesting links.
Joyk means Joy of geeK