

Provision your Azure environment with Terraform and Octopus Deploy
source link: https://asizikov.github.io/2020/03/21/azure-terraform-octopus/
Go to the source link to view the article. You can view the picture content, updated content and better typesetting reading experience. If the link is broken, please click the button below to view the snapshot at that time.
Provision your Azure environment with Terraform and Octopus Deploy
21 Mar 2020My current project has reached the point where we have to manage our infrastructure in a more organized way rather than ad-hoc manual configurations.
Current landscape
We use a pretty standard setup for a .NET web application.
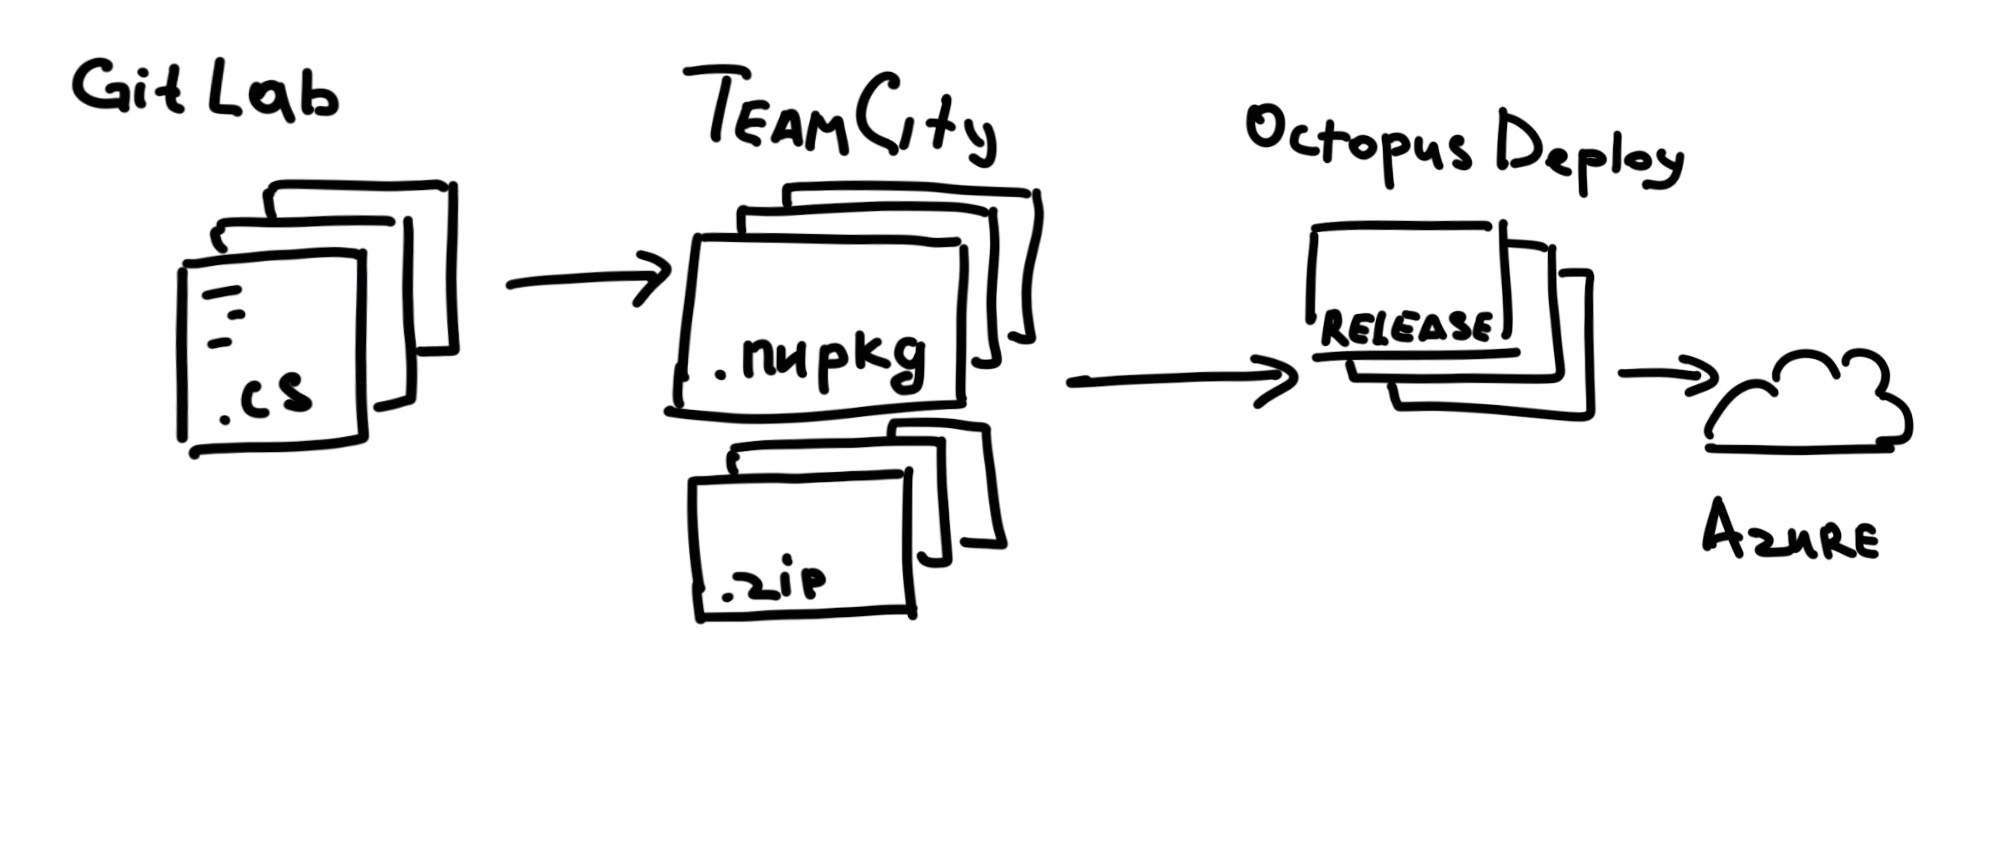
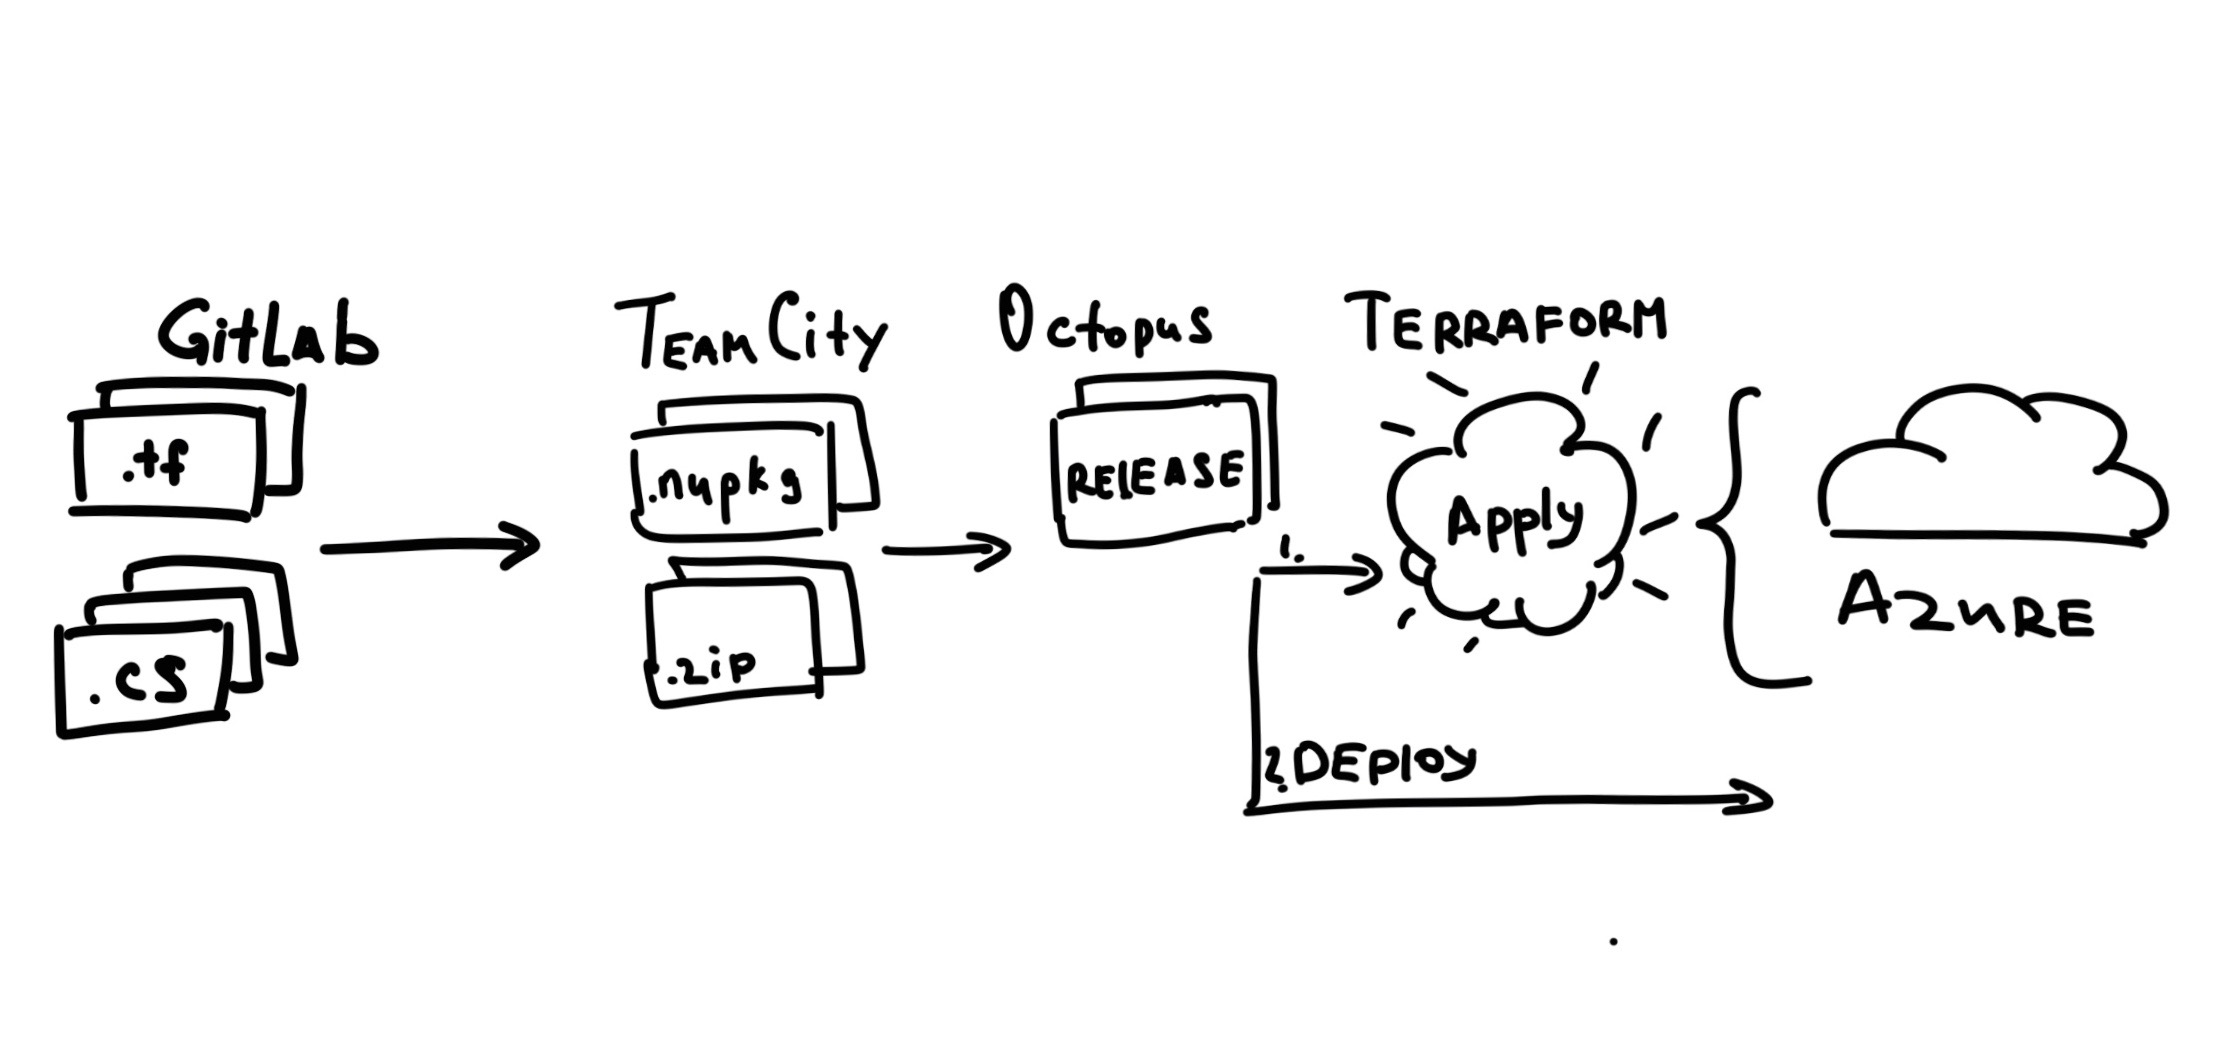
We keep our code in one monorepo hosted in internal GitLab. We use TeamCity to build our code and we use Octopus Deploy to run our deployments to Azure.
We have several environments (let’s call them feature, test, and prod) and they all are different. Each one has a different configuration, different accounts, different topology, different numbers of replicas and shards, you name it.
Things like connection strings, account and passwords are managed by Octopus.
At this point, we would like to utilize the configuration management feature provider by Octopus, and that’s why we would have to jump through several hoops to marry terraform configs and Octopus variable substitution mechanism.
Scope of the problem
We’d like to move to an Infrastructure-as-a-Code approach and provisioning our system automatically as a part of our CI/CD pipeline.
To do that we’re going to add Terraform to the game.
At the time I’m writing this post the versions for the software are the following:
- TeamCity 2019.2.2
- Octopus Deploy v2019.12.0 LTS
- Terraform v0.12.24
azurermprovider 2.2.0
Repository Setup
This part is not very important, but to provide you with the full picture I’ll put it here.
We keep our Terraform files in the same repository alongside the application code and database schemas. Basically, it’s just an \infrastructure directory in the root of the repo.
Terraform Setup
We run our application in Azure, hence the choice of Terraform backend and a provider: we keep Terraform state in Azure.
Please refer to the official documentation for a detailed step by step guide on setting up storage for Terraform State.
In short, you’d need to run the following:
#!/bin/bash

RESOURCE_GROUP_NAME=terraformstate-rg
STORAGE_ACCOUNT_NAME=terraformstateci
CONTAINER_NAME=terraformstate

# Create resource group
az group create --name $RESOURCE_GROUP_NAME --location eastus

# Create storage account
az storage account create --resource-group $RESOURCE_GROUP_NAME --name $STORAGE_ACCOUNT_NAME --sku Standard_LRS --encryption-services blob

# Get storage account key
ACCOUNT_KEY=$(az storage account keys list --resource-group $RESOURCE_GROUP_NAME --account-name $STORAGE_ACCOUNT_NAME --query [0].value -o tsv)

# Create blob container
az storage container create --name $CONTAINER_NAME --account-name $STORAGE_ACCOUNT_NAME --account-key $ACCOUNT_KEY

echo "storage_account_name: $STORAGE_ACCOUNT_NAME"
echo "container_name: $CONTAINER_NAME"
echo "access_key: $ACCOUNT_KEY"
Once you’ve successfully created a storage for your state you can update your main.tf file with the backend configuration:
# configure backend to keep terraform state terraform { backend "azurerm" { resource_group_name = "terraformstate-rg" storage_account_name = "terraformstateci" container_name = "terraformstate" key = "terraform.tfstate" } }
# Azure as a provider provider "azurerm" { version = "~>2.0" features {} }
For the purpose of this blog post I’ll be creating just a new resource group with one SQL server.
Let’s declare our setup in a new sql.tf file:
# resource group to hold the environment resource "azurerm_resource_group" "rg" { name = var.resource_group_name #note that the resource group name location = var.location #and location are variables }
resource "azurerm_sql_server" "sql_server" { name = var.sql_server_name resource_group_name = azurerm_resource_group.rg.name location = azurerm_resource_group.rg.location version = "12.0" administrator_login = var.sql_server_admin_name administrator_login_password = var.sql_server_admin_pwd }
note that I’m using variables in a gist above.
Variables are defined in a variables.tf file:
variable "sql_server_admin_pwd" {
  type    = string
}
This works fine, but for the local testing I keep the terraform.tfvars files with the values:
resource_group_name  = "test_rg"
sql_server_admin_name = "admin_name"
sql_server_admin_pwd = "P@$$w0rd1!" # dummy pwd used for local tests
values are not encrypted, but they are just for the local tests and experiments. They will be replaced with the environment-specific vars by Octopus later.
TeamCity Setup
Octopus has a specific syntax for variable substitution. Usually, it looks for #{Variable} markers in your config files. As you can imagine they are not always valid as resource names.
As I mentioned before our terraform.tfvars has realistic values for local tests. It helps our infrastructure engineers verifying their work by running terraform plan commands.
However, when we build our packages we want to convert tfvars file to replace variable’s values with the syntax suitable for Octopus.
I had to invent a convention here.
Every variable declaration var_name = "abc123" will be converted to a var_name = "#{var_name}" line.
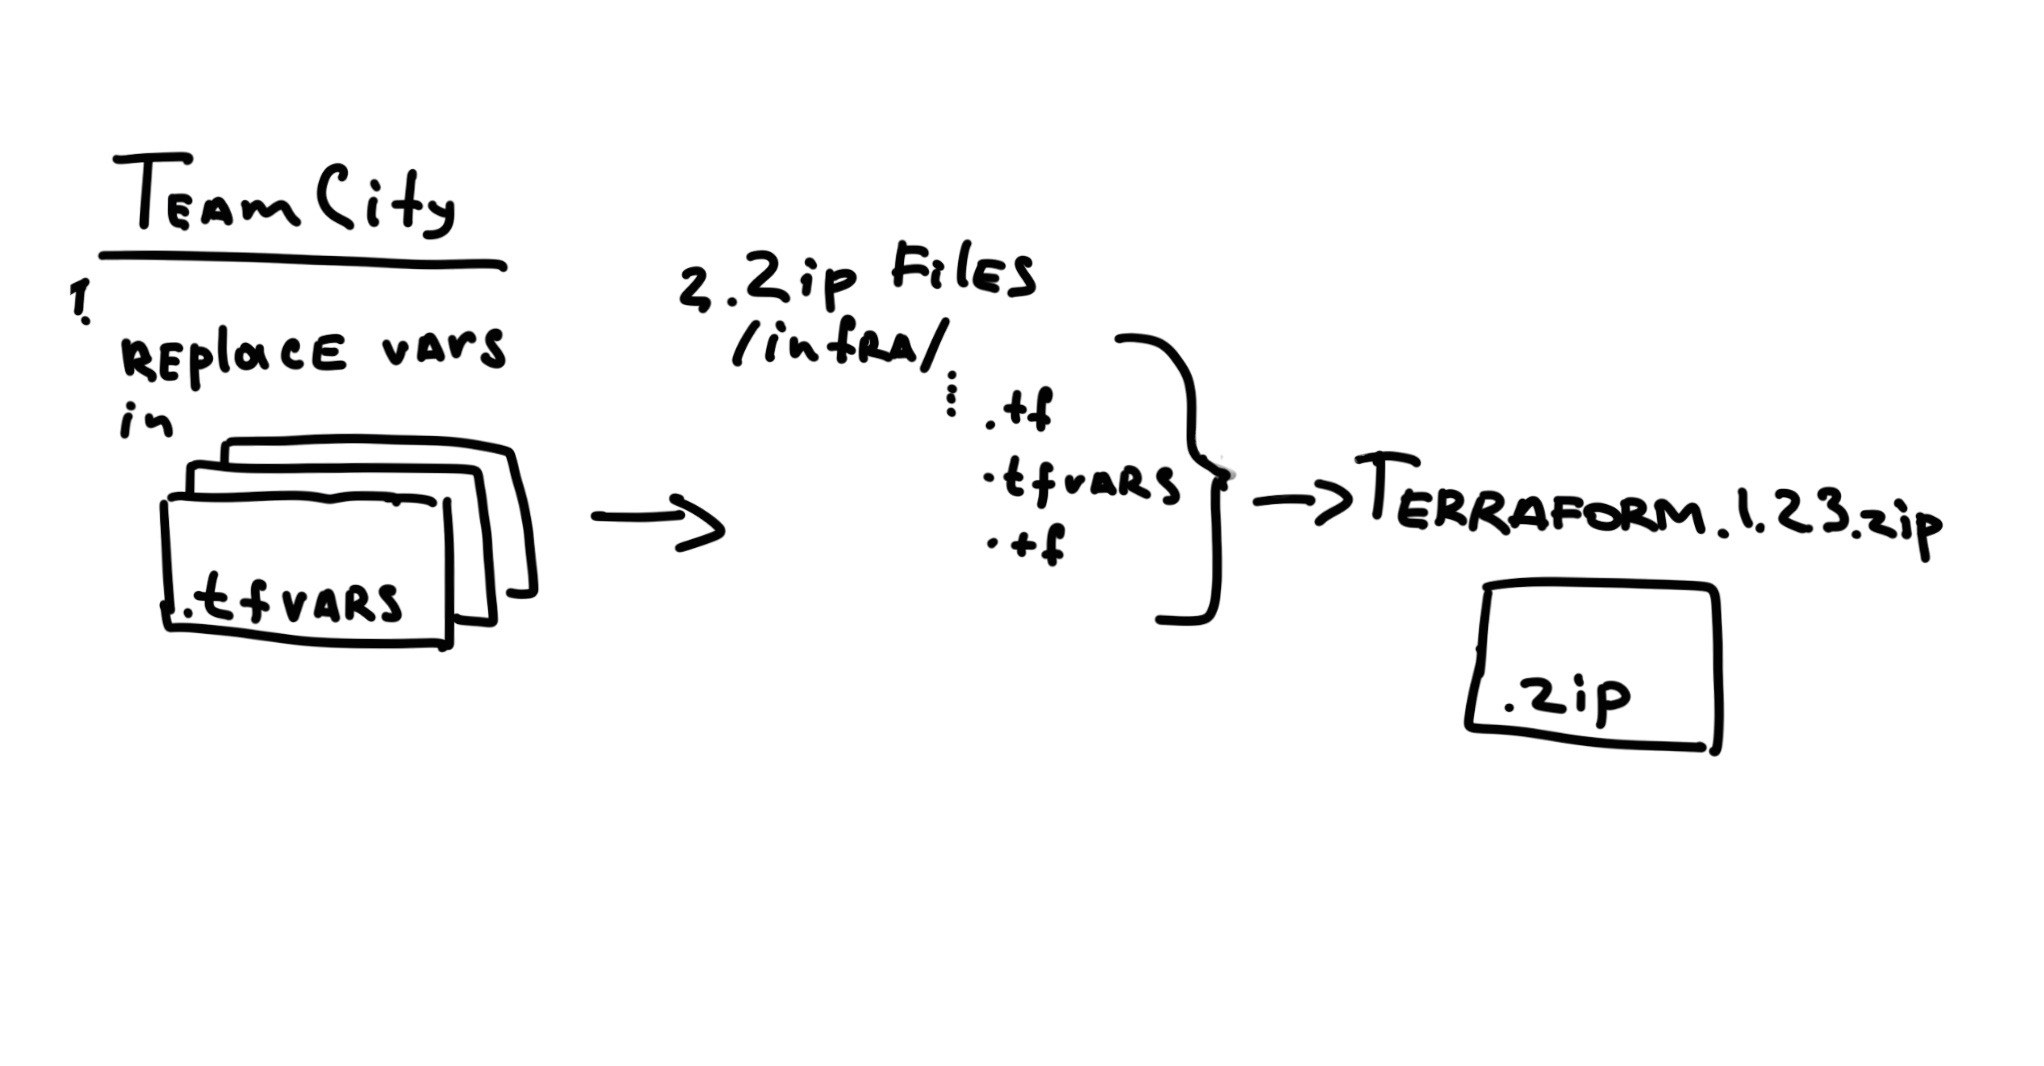
To do that we’ve set up a build step with the following PowerShell script:
Get-ChildItem -Path %teamcity.build.checkoutDir%\infra\ -Filter terraform.tfvars | Foreach-Object -Begin { Write-Host 'Processing tfvars files in directory'} { $file_name = $_.FullName Write-Host "Going to substitute variables in $file_name" $content = Get-Content $file_name for ($i = 0; $i -lt $content.Count; $i++) { $line = $content[$i].Split("#") #allow comments in a line if(![string]::IsNullOrEmpty($line[0])) { #do not process empty strings $var_definition = $line[0].Split("=") $var_name = $var_definition[0].Trim() $new_line ="$var_name = `"#{$var_name}`"" #format the updated line $content[$i] = $new_line } } $content | Set-Content -Path "$file_name" #write the result back to the same file }
After that we can build our code and then create a release package with our Terraform config.
A TeamCity build configuration has a custom %octopus.package.suffix% variable declared. This is a suffix that is composed of the branch name. It’s empty for the master branch build and has something like feature-AB-123 for a feature branch with an AB-123 name. Yes, this is a JIRA ticket name :)
With this variable we can prepare a zipped artifacts file:
+:infrastructure/** => Terraform.%build.number%%octopus.package.suffix%.zip
that would produce a file Terraform.1.123.9-feature-AB-123 which will later be uploaded to Octopus.
Octopus Setup
Let’s create a new Step in Octopus project:

We currently use an official Apply a Terraform template.
However, there are few things which we had to configure in order to make it work for us.
First of all, Octopus cannot keep up with Terraform development, so you may need to update a terraform.exe version yourself. Just grab the latest version from Terraform Downloads page and put it in a folder on your Octopus server. Something like C:\Program Files\Terraform would do.
Then you need to provide a path to your custom terraform.exe executable. To do that you need to set up a variable: Octopus.Action.Terraform.CustomTerraformExecutable. Give it a C:\Program Files\Terraform\terraform.exe value.
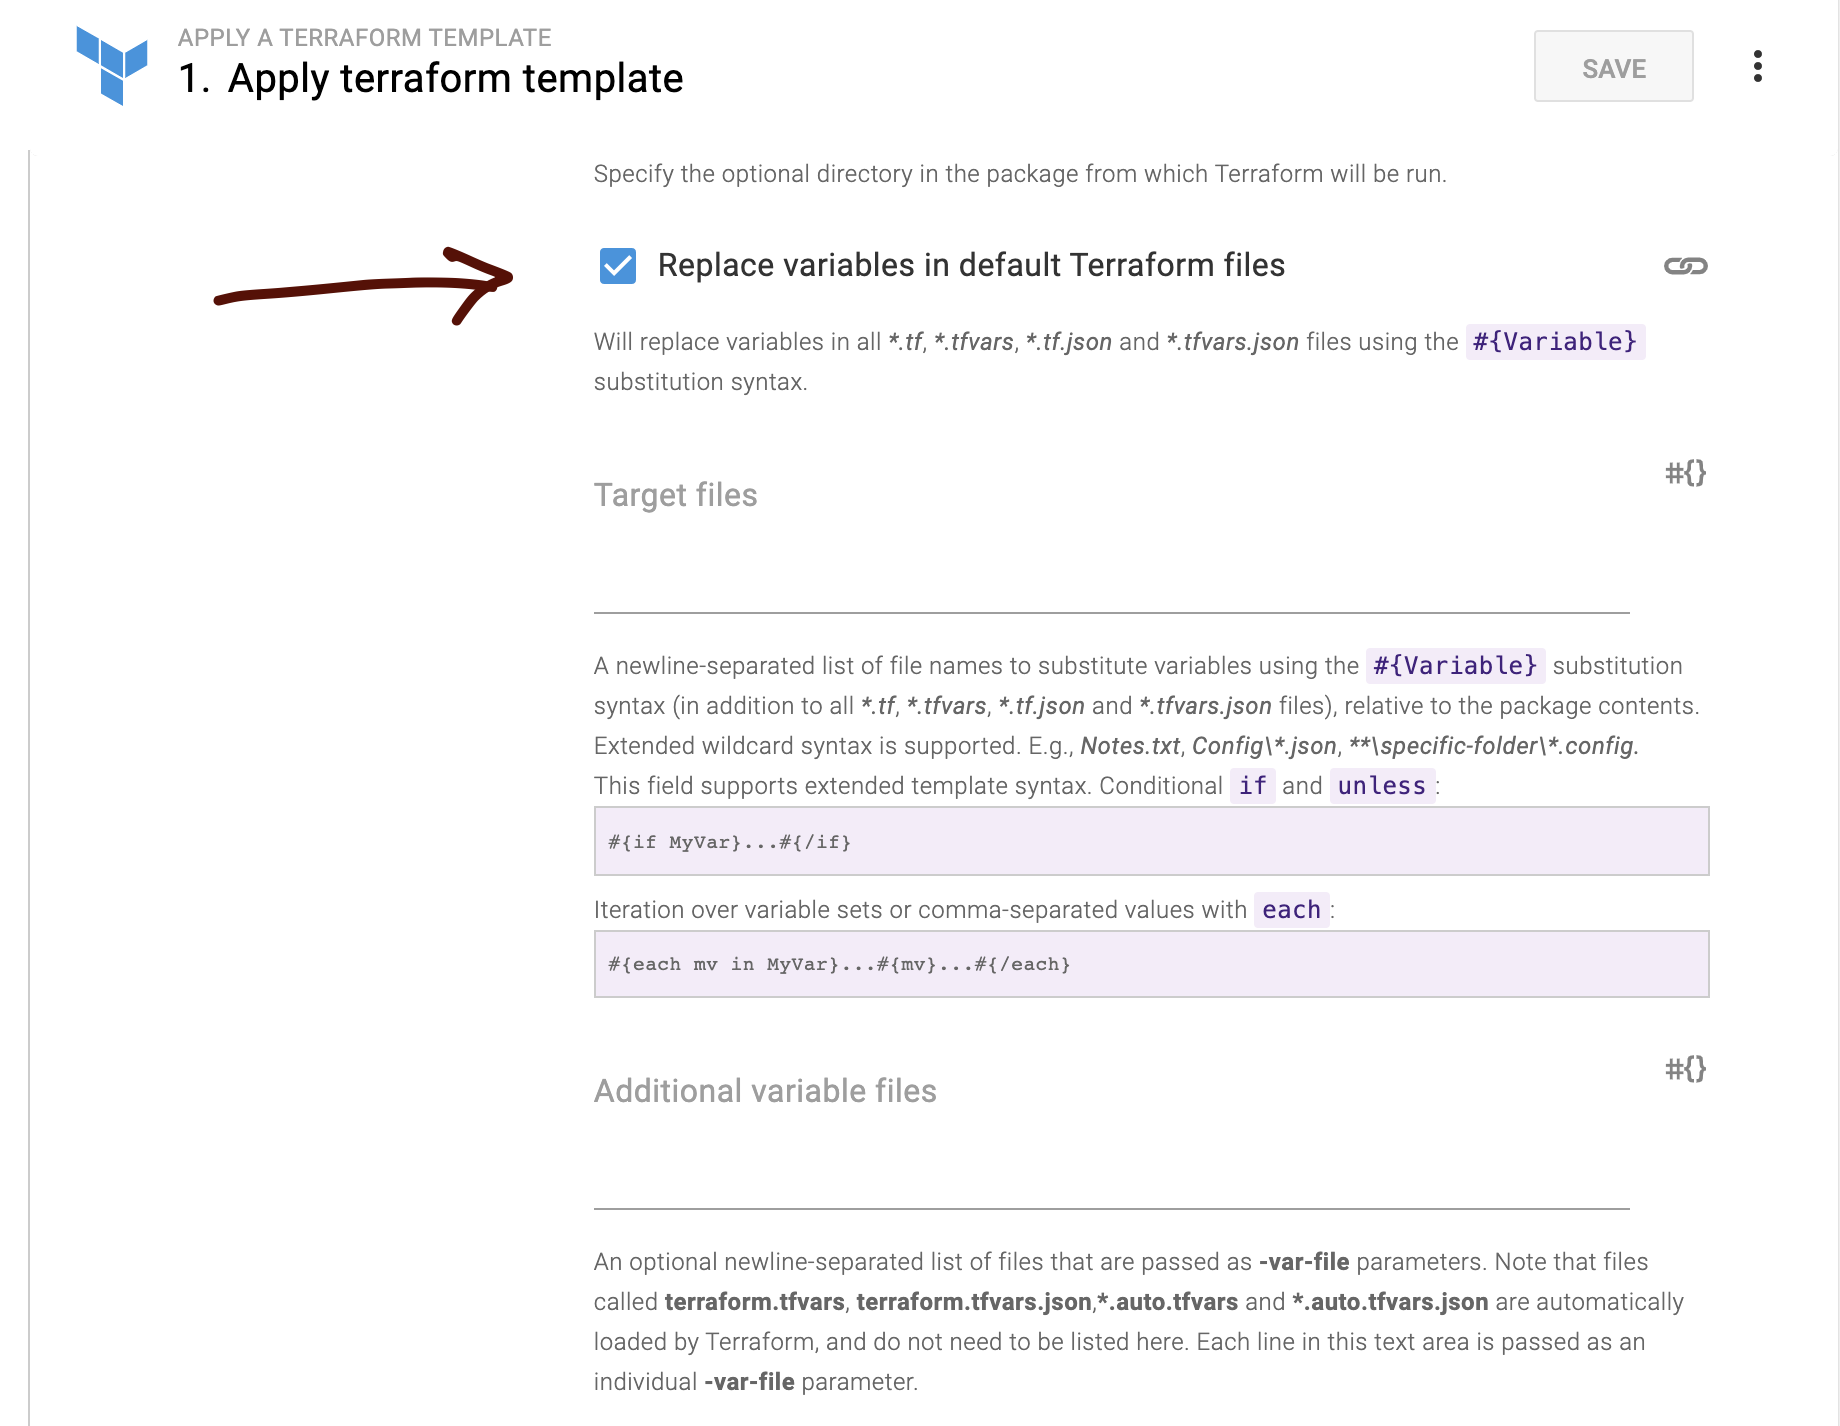
As you remember the release package contains a terraform.tfvars file with templates in it. So don’t forget to tick this box:
And of course, you will have to define your variables for each environment:
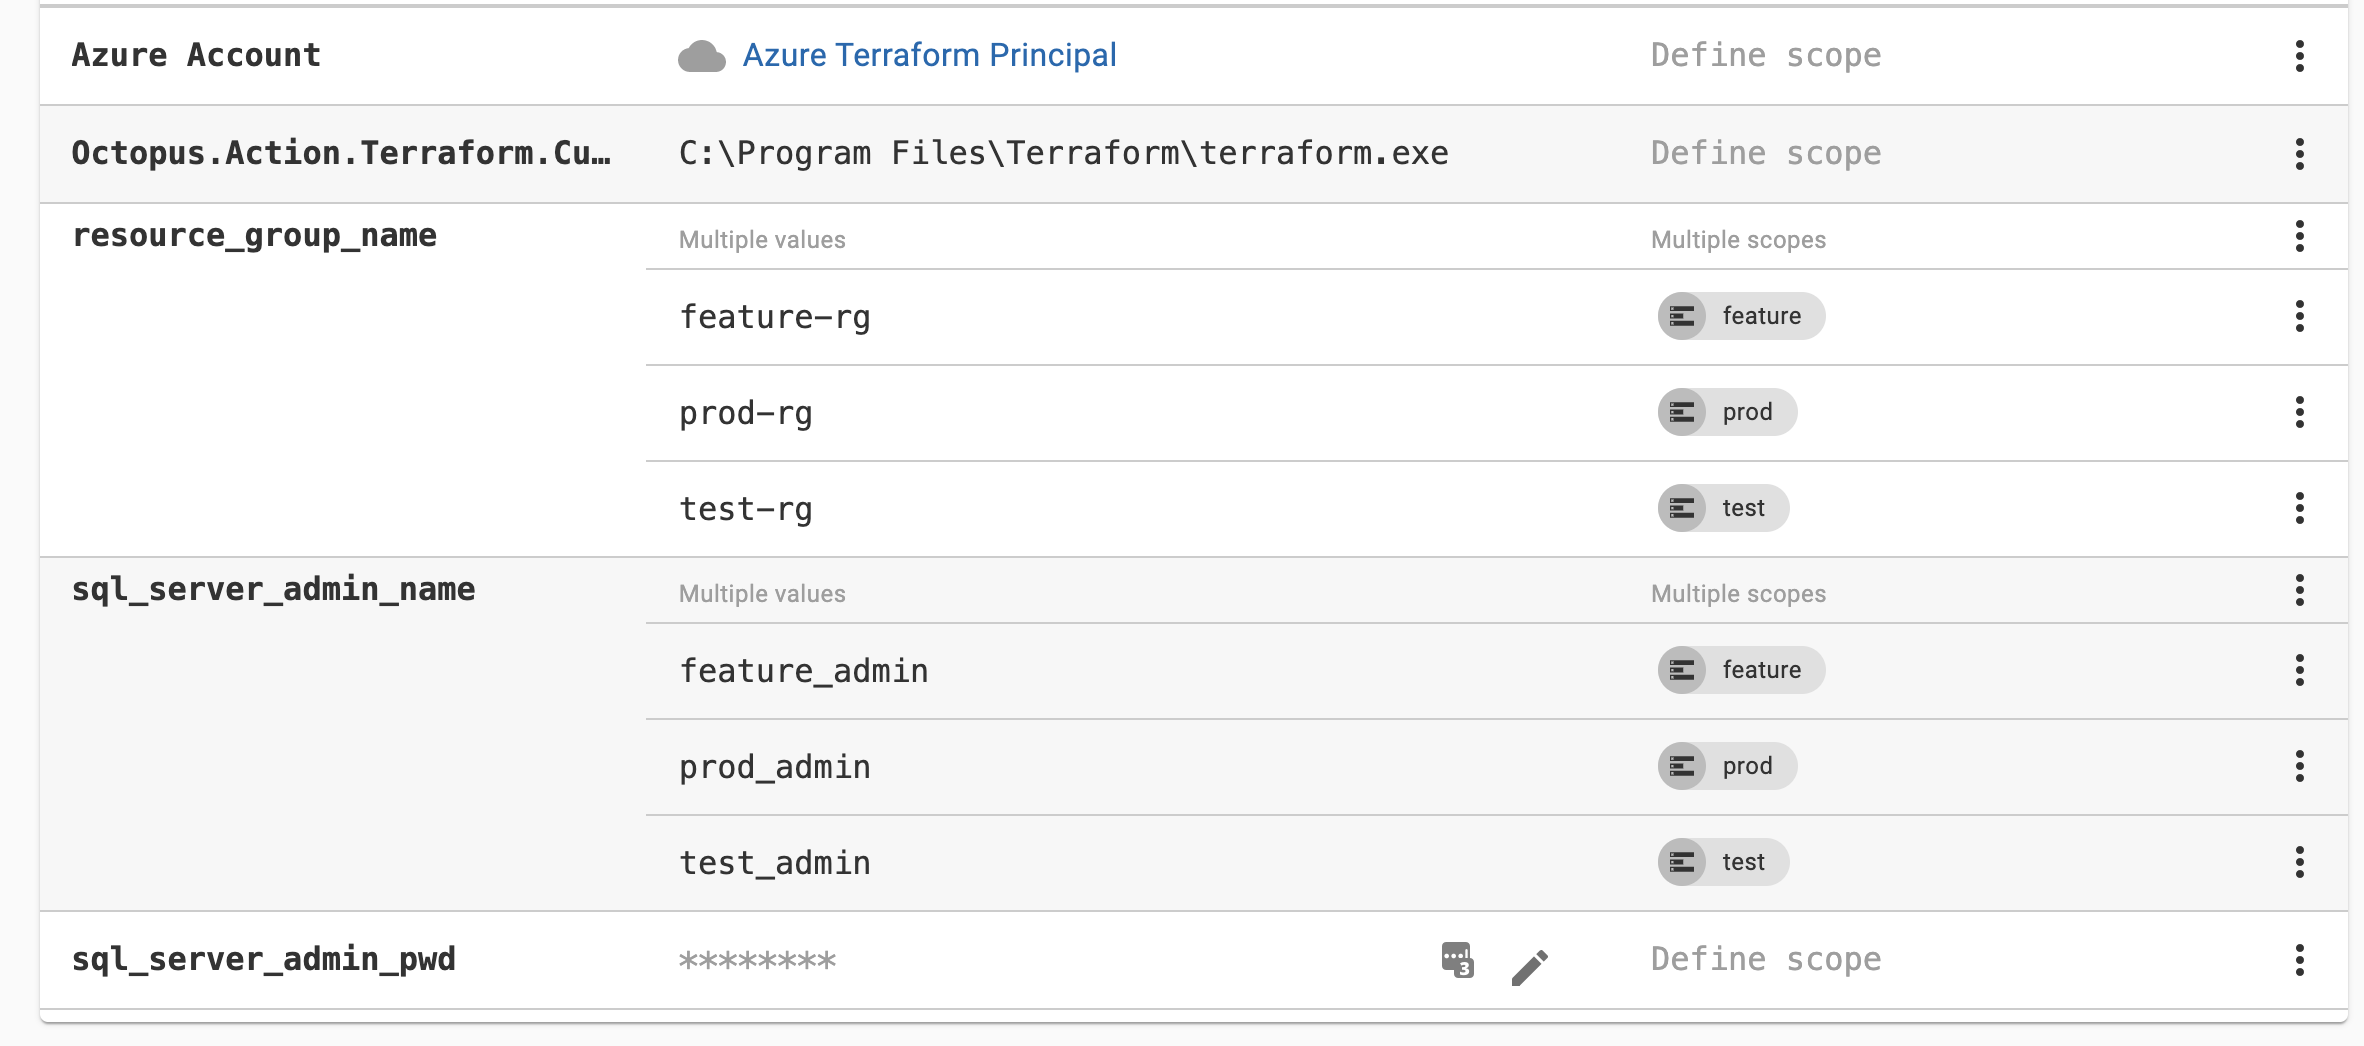
note the variable name format. It should be the same as the variable names in your terraform.tfvars file. Here we can have different values for each environment. Also, we store passwords encrypted.
And now we have a new player in our CI/CD pipeline:
Recommend
About Joyk
Aggregate valuable and interesting links.
Joyk means Joy of geeK