

Instance Segmentation with PyTorch and Mask R-CNN
source link: https://debuggercafe.com/instance-segmentation-with-pytorch-and-mask-r-cnn/
Go to the source link to view the article. You can view the picture content, updated content and better typesetting reading experience. If the link is broken, please click the button below to view the snapshot at that time.
Instance Segmentation with PyTorch and Mask R-CNN
In this article, you will get full hands-on experience with instance segmentation using PyTorch and Mask R-CNN. Image segmentation is one of the major application areas of deep learning and neural networks. One of the best known image segmentation techniques where we apply deep learning is semantic segmentation. In semantic segmentation, we mask one class in an image with a single color mask. So, different classes will have a different colored mask. You can know more about semantic segmentation from one of my previous articles. But in this article, we will focus on the topic of instance segmentation in deep learning using PyTorch and Mask R-CNN.
Take a look at the following image to get a better idea of instance segmentation.
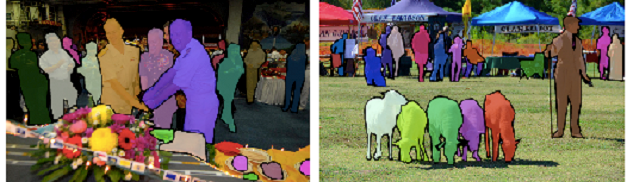
Figure 1 shows how every person has a different color mask on the left image, although each of them belongs to the person class. Similarly, all the sheep are also masked with different colors.
In this article, we will try to apply instance segmentation and achieve similar results as the above.
So, what we will be learning in this article?
- We will not train our instance segmentation model in this tutorial. Instead, we will use the PyTorch Mask R-CNN model which has been trained on the COCO dataset.
- We will start by learning a bit more about the Mask R-CNN model. Specifically, we will get to know about the input and output format of the model.
- Then we will dive into the coding part with a very detailed explanation.
- Finally, we will test the Mask R-CNN deep learning model by applying it to images.
PyTorch Mask R-CNN Deep Learning Model
Before moving into the input and output format of the Mask R-CNN model, let’s see what it actually does and how does it do it.
The Working of Mask R-CNN Model
Let’s go over the working of Mask R-CNN and deep learning instance segmentation very briefly here.
We know that in semantic segmentation each class in an image has a single color mask. But in instance segmentation each instance of a class will have different color.
How do we achieve this then? In simple terms, we can say that we can detect each object present in an image, get its bounding boxes, classify the object inside the bounding box, and mask it with a unique color. So, instance segmentation is a combination of object detection and image segmentation. It sounds simple, but in practice and training, it can become complicated really easily. This same method is also employed by the Mask R-CNN model.
What you see in figure 2 is an example of instance segmentation. You can see that each object is being detected and then a color mask is applied on it.
In fact, Mask-RCNN is a combination of the very famous Faster-RCNN deep learning object detector and image segmentation. We will not go into any technical details of the model here. But I highly recommend that you read the original Mask R-CNN paper here. And if you want to know more about image segmentation in general, then I recommend that you read one of my previous articles on image segmentation. It covers a lot of general things like evaluation metrics, some major papers, and application areas of deep learning based image segmentation
We need not worry much about all the technical details of training such a model here. We will be using a pre-trained model that is provided by PyTorch. So, it is much more beneficial, if we can know more about the input and output format of a pre-trained model that will help us in inference and coding.
The Input and Output Format of PyTorch Mask R-CNN Model
The Mask R-CNN pre-trained model that PyTorch provides has a ResNet-50-FPN backbone.
The model expects images in batches for inference and all the pixels should be within the range
[0, 1]. So, the input format to the model will be [N, C, H, W]. Here N is the number of images or batch-size, C is the color channel dimension, and H & W are the height and width of the image respectively. It is quite simple and in the typical PyTorch format as well.
The model outputs a lot of content though. Remember, that is a combination of object detection and image segmentation. During inference, the model outputs a list of dictionary containing the resulting tensors. Formally, it is a
List[Dict[Tensor]]. And the following are the contents, which I have taken from the PyTorch models website.
- boxes
boxes(FloatTensor[N, 4])(FloatTensor[N, 4]): the predicted boxes in[x1, y1, x2, y2][x1, y1, x2, y2]format, with values ofxbetween0andWand values ofybetween0andH. - labels
labels(Int64Tensor[N]Int64Tensor[N]): the predicted labels for each image - scores
scores(Tensor[N]Tensor[N]): the scores or each prediction. - masks
masks(UInt8Tensor[N, 1, H, W]UInt8Tensor[N, 1, H, W]): the predicted masks for each instance, in0-1range. In order to obtain the final segmentation masks, the soft masks can be thresholded, generally with a value of 0.5 (mask >= 0.5mask >= 0.5).
So, the dictionary contains four keys,
boxes, labels, scores, and masks. These keys contain the resulting tensors as values. And notice that, we should consider the mask values which are greater than or equal to 0.5.
I hope that the above details make some of the technicalities clearer. If not, it will be much clearer when we actually code our way through. Coding and applying Mask R-CNN model to images will help us understand the working even better than it is now. So, let’s move further.
Project Directory Structure
Here, we will get to know about the project’s directory structure. I hope that you follow the same structure as in this tutorial, so that you can move on without any difficulty. The following is the directory structure that we will follow.
├───input
│       image1.jpg
│       image2.jpg
│       image3.jpg
│
├───outputs
│
└───src
    │   coco_names.py
    │   mask_rcnn_images.py
    │   utils.py
So, we have three folders.
- The input
inputfolder contains the images that we will test the Mask R-CNN model on. - The outputs
outputsfolder will contain all the segmented images after they have passed through the Mask R-CNN model. - And finally, we have the
srcfolder which will contain the Python scripts.
You are free to use any image of your choice to run inference using the Mask R-CNN model. However, if you want to use the same images as in this tutorial, then you can download the zipped input file below. The images have been taken from Pixabay.
After downloading, extract the files inside the parent project directory.
Libraries That We Need
PyTorch is the only major library that we need for this tutorial. I have used PyTorch 1.6 for this project. So, you can go ahead and download PyTorch if you have not done so.
All the other libraries are common deep learning and computer vision libraries which probably you already have. If not, feel free to install them along the way.
Instance Segmentation using PyTorch and Mask R-CNN
From this section onward, we will start to write the code for instance segmentation on images using PyTorch and Mask R-CNN.
Let’s begin with defining all the COCO dataset’s class names in a Python script.
The COCO Dataset Class Names
We will keep all the class names separate from the other Python code so that our code remains clean.
Create a
coco_names.py script inside the src folder and put the following list into it.
COCO_INSTANCE_CATEGORY_NAMES = [
    '__background__', 'person', 'bicycle', 'car', 'motorcycle', 'airplane', 'bus',
    'train', 'truck', 'boat', 'traffic light', 'fire hydrant', 'N/A', 'stop sign',
    'parking meter', 'bench', 'bird', 'cat', 'dog', 'horse', 'sheep', 'cow',
    'elephant', 'bear', 'zebra', 'giraffe', 'N/A', 'backpack', 'umbrella', 'N/A', 'N/A',
    'handbag', 'tie', 'suitcase', 'frisbee', 'skis', 'snowboard', 'sports ball',
    'kite', 'baseball bat', 'baseball glove', 'skateboard', 'surfboard', 'tennis racket',
    'bottle', 'N/A', 'wine glass', 'cup', 'fork', 'knife', 'spoon', 'bowl',
    'banana', 'apple', 'sandwich', 'orange', 'broccoli', 'carrot', 'hot dog', 'pizza',
    'donut', 'cake', 'chair', 'couch', 'potted plant', 'bed', 'N/A', 'dining table',
    'N/A', 'N/A', 'toilet', 'N/A', 'tv', 'laptop', 'mouse', 'remote', 'keyboard', 'cell phone',
    'microwave', 'oven', 'toaster', 'sink', 'refrigerator', 'N/A', 'book',
    'clock', 'vase', 'scissors', 'teddy bear', 'hair drier', 'toothbrush'
]
That’s all we need for this Python script. We will import this wherever we need it.
Writing Some Utilities Functions for Instance Segmentation
Now, let’s set up the utility script which will help us a lot in the tutorial. Basically, this will contain all the important functions like forward pass of the image through the model and applying the segmented mask on the image.
Things will become clearer when we will write the code. So, let’s jump directly into it.
All of this code will go into the
utils.py script inside the src folder.
The following are the imports that we need.
import cv2
import numpy as np
import random
import torch

from coco_names import COCO_INSTANCE_CATEGORY_NAMES as coco_names
Note that we importing the
COCO_INSTANCE_CATEGORY_NAMES from coco_names.py.
We have a total of 91 classes for segmentation and detection. And we want that each object of each class should have a different color mask. So, all in all, we want that we each object should have a different color mask.
We need to generate a different RGB tuple for each of the detected objects in an image. The following simple line of code will do that for us.
# this will help us create a different color for each class
COLORS = np.random.uniform(0, 255, size=(len(coco_names), 3))
We can use the above generated colors in OpenCV draw functions.
Function to Get the Ouputs
We will write a simple function to get the outputs from the model after inference. This function will provide us with all the output tensors that we need for proper visualization of the results. Let’s call this function
get_outputs().
The following is the function definition.
def get_outputs(image, model, threshold):
    with torch.no_grad():
        # forward pass of the image through the modle
        outputs = model(image)

    # get all the scores
    scores = list(outputs[0]['scores'].detach().cpu().numpy())
    # index of those scores which are above a certain threshold
    thresholded_preds_inidices = [scores.index(i) for i in scores if i > threshold]
    thresholded_preds_count = len(thresholded_preds_inidices)
    # get the masks
    masks = (outputs[0]['masks']>0.5).squeeze().detach().cpu().numpy()
    # discard masks for objects which are below threshold
    masks = masks[:thresholded_preds_count]

    # get the bounding boxes, in (x1, y1), (x2, y2) format
    boxes = [[(i[0], i[1]), (i[2], i[3])]  for i in outputs[0]['boxes'].detach().cpu()]
    # discard bounding boxes below threshold value
    boxes = boxes[:thresholded_preds_count]

    # get the classes labels
    labels = [coco_names[i] for i in outputs[0]['labels']]
    return masks, boxes, labels
The
get_outputs() function accepts three input parameters. The first one is the input image, the second one is the Mask R-CNN model, and the third is the thresholdvalue. The threshold value is a pre-defined score below which we will discard all the outputs to avoid too many false positives. Let’s get over the code step by step.
- At line 12, we obtain the outputs
outputsby forward passing the image through the model. It provides us with a list containing a dictionary. - At line 15, we get all the scores
scoresfrom the dictionary and load it onto the CPU. - Then at line 17, we have thresholded_preds_inidices
thresholded_preds_inidices. This contains all the index value from thescoresscoreswhich are above thethresholdthresholdthat we have provided. - Getting the length of the above list in thresholded_preds_count
thresholded_preds_countwill help us to extract all the masks and bounding boxes with only those scores. - At line 20, we obtain the masks
maskswhich are greater than or equal to 0.5. - Line 22 discards all the masks that are not within the threshold score. We only retain those masks which are at least above the threshold score.
- At lines 25 and 27, we obtain the bounding boxes and similarly discard all the low scoring box detections as we did in the case of masks.
- And line 30 gets all the COCO dataset label names by mapping the results labels
labelsindices with thecoco_namescoco_nameslist. - Finally, we return the masks
masks,boxesboxes, andlabelslabels.
I hope that you were able to understand the above steps. Try going over those again and you will get them for sure.
Applying Segmentation and Drawing Bounding Boxes
After we have the labels, masks, and the bounding boxes, now we can apply the color masks on the object and draw the bounding boxes as well.
We will again write a very simple function for that. The function is
draw_segmentation_map() which accepts four input parameters. They are image, masks, boxes, and labels. The image is the original image on which we will apply the resulting masks and draw the bounding boxes around the detected objects. Also, the labelswill help us to put the class name on top of each object.
The following is the function definition.
def draw_segmentation_map(image, masks, boxes, labels):
    alpha = 1
    beta = 0.6 # transparency for the segmentation map
    gamma = 0 # scalar added to each sum
    for i in range(len(masks)):
        red_map = np.zeros_like(masks[i]).astype(np.uint8)
        green_map = np.zeros_like(masks[i]).astype(np.uint8)
        blue_map = np.zeros_like(masks[i]).astype(np.uint8)

        # apply a randon color mask to each object
        color = COLORS[random.randrange(0, len(COLORS))]
        red_map[masks[i] == 1], green_map[masks[i] == 1], blue_map[masks[i] == 1]  = color
        # combine all the masks into a single image
        segmentation_map = np.stack([red_map, green_map, blue_map], axis=2)
        #convert the original PIL image into NumPy format
        image = np.array(image)
        # convert from RGN to OpenCV BGR format
        image = cv2.cvtColor(image, cv2.COLOR_RGB2BGR)
        # apply mask on the image
        cv2.addWeighted(image, alpha, segmentation_map, beta, gamma, image)

        # draw the bounding boxes around the objects
        cv2.rectangle(image, boxes[i][0], boxes[i][1], color=color,
                      thickness=2)
        # put the label text above the objects
        cv2.putText(image , labels[i], (boxes[i][0][0], boxes[i][0][1]-10),
                    cv2.FONT_HERSHEY_SIMPLEX, 1, color,
                    thickness=2, lineType=cv2.LINE_AA)

    return image
- First, we have alpha
alpha,beta, andgammagamma. Here,alphaalphaandbetadefine the weights of the original image and segmentation map when we will overlay the segmentation over the image.gammagammais the scalar that is added to each sum and keeping it to 0 is ideal in almost all cases. You can find more details in the OpenCV documentation. - From line 36, we start a
forloop for the number of masks that we have. - At lines 37, 38, and 39, we define three NumPy arrays containing only zeros whose dimensions match that of the current mask.
- Then at line 42, we obtain a random color tuple from the COLORS
COLORSlist. - Line 43 applies the above obtained color
colorto the object so that a mask is created. Now, the NumPy arrays contain some color rather than only being black. - Line 45 stacks the red_map
red_map,green_mapgreen_map, andblue_mapblue_mapto obtain the complete segmentation map for the current object. - At line 47, we convert the original image from the PIL Image format to NumPy format and then convert it to OpenCV BGR color format at line 49.
- At line 51, we combine the image and the segmentation map. Basically, we overlay the segmentation map with a weight of 0.6 on the original image. So, this will give us a bit of a translucent map on the image and we can easily infer what object is actually there.
- Lines 54 and 57 draw the bounding boxes and draw the label name for the current object respectively.
- Finally, we return the resulting image at line 61.
The above two functions were the most important parts of this tutorial. If you are with me till now, then the rest of the article is pretty easy to follow along.
Applying Mask R-CNN on Images
Now, we will be writing the code to apply Mask R-CNN model on images of our choice. This part is going to be pretty easy as we have already written most of our logic in the
utils.pyscript.
All of this code will go into the
mask_rcnn_images.py file.
Let’s start with the imports that we need.
import torch
import torchvision
import cv2
import argparse

from PIL import Image
from utils import draw_segmentation_map, get_outputs
from torchvision.transforms import transforms as transforms
We will be providing the path to the input image using command line arguments. So, let’s define our argument parser now.
parser = argparse.ArgumentParser()
parser.add_argument('-i', '--input', required=True,
                    help='path to the input data')
parser.add_argument('-t', '--threshold', default=0.965, type=float,
                    help='score threshold for discarding detection')
args = vars(parser.parse_args())
We also have the optional threshold score in the above code block. By default, we will be discarding any detections that have a score lower than 0.965. If you want you may either increase or decrease the value. Although keep in mind that increasing the value too much might lead to objects not being detected. And decreasing the value too much might lead to many false positives as well.
Prepare the Model and Define the Transform
The next step is preparing our Mask R-CNN model.
# initialize the model
model = torchvision.models.detection.maskrcnn_resnet50_fpn(pretrained=True, progress=True,
                                                           num_classes=91)
# set the computation device
device = torch.device('cuda' if torch.cuda.is_available() else 'cpu')
# load the modle on to the computation device and set to eval mode
model.to(device).eval()
At line 16, we are initializing the model. Note that we have provided the
pretrained argument as True. At line 21, we load the model into the computation device and get the model into eval()mode. Although a GPU is not very necessary as we will be working with images only, still, it is better if you have one.
The following block of code defines the transforms that we will apply to the images.
# transform to convert the image to tensor
transform = transforms.Compose([
    transforms.ToTensor()
])
We are just converting the images to tensors. We do not need to apply any other transform to the images before feeding them to the Mask R-CNN model.
Read the Image and Apply Instance Segmentation
We will be providing the path to the image as a command line argument. So, we will read the read image path from there. The next block of code reads the image and applies instance segmentation to it using Mask R-CNN model.
image_path = args['input']
image = Image.open(image_path).convert('RGB')
# keep a copy of the original image for OpenCV functions and applying masks
orig_image = image.copy()

# transform the image
image = transform(image)
# add a batch dimension
image = image.unsqueeze(0).to(device)

masks, boxes, labels = get_outputs(image, model, args['threshold'])

result = draw_segmentation_map(orig_image, masks, boxes, labels)

# visualize the image
cv2.imshow('Segmented image', result)
cv2.waitKey(0)

# set the save path
save_path = f"../outputs/{args['input'].split('/')[-1].split('.')[0]}.jpg"
cv2.imwrite(save_path, result)
- At line 26 we are capturing the image path and then reading the image using PIL at line 27. We are also keeping a copy of the original unformatted image at line 29.
- Then we apply the transformations at line 32 and add an extra batch dimension at line 34.
- Line 36 is where we call the get_outputs()
get_outputs()function of theutilsutilsscript. Here we feed the transformed image to the Mask R-CNN model. And this returns us themasksmasks,boxesboxes, andlabelslabels. - At line 38, we call the draw_segmentation_map()
draw_segmentation_map()function which overlays the segmentation masks for each object on the original image. - Then we visualize the resulting image on the screen.
- At line 45, we create a save_path
save_pathname from the original input path and save the resulting image to disk at line 46.
This is all the code we need to apply Mask R-CNN deep learning instance segmentation model to images. We are all set to execute our code and see the results.
Execute the mask_rcnn_images.py File
Let’s see how well the Mask R-CNN model is able to detect and segment objects in images. If you are using the downloaded images, then make sure that you have unzipped the file and extracted its content into the
inputfolder. It is all good if you wish to use your own images as well.
We will start with the first image from the
input folder. Open up your terminal/command prompt and cd into the src directory of the project. Then type the following command.
python mask_rcnn_images.py --input ../input/image1.jpg
The following is the resulting segmented image.
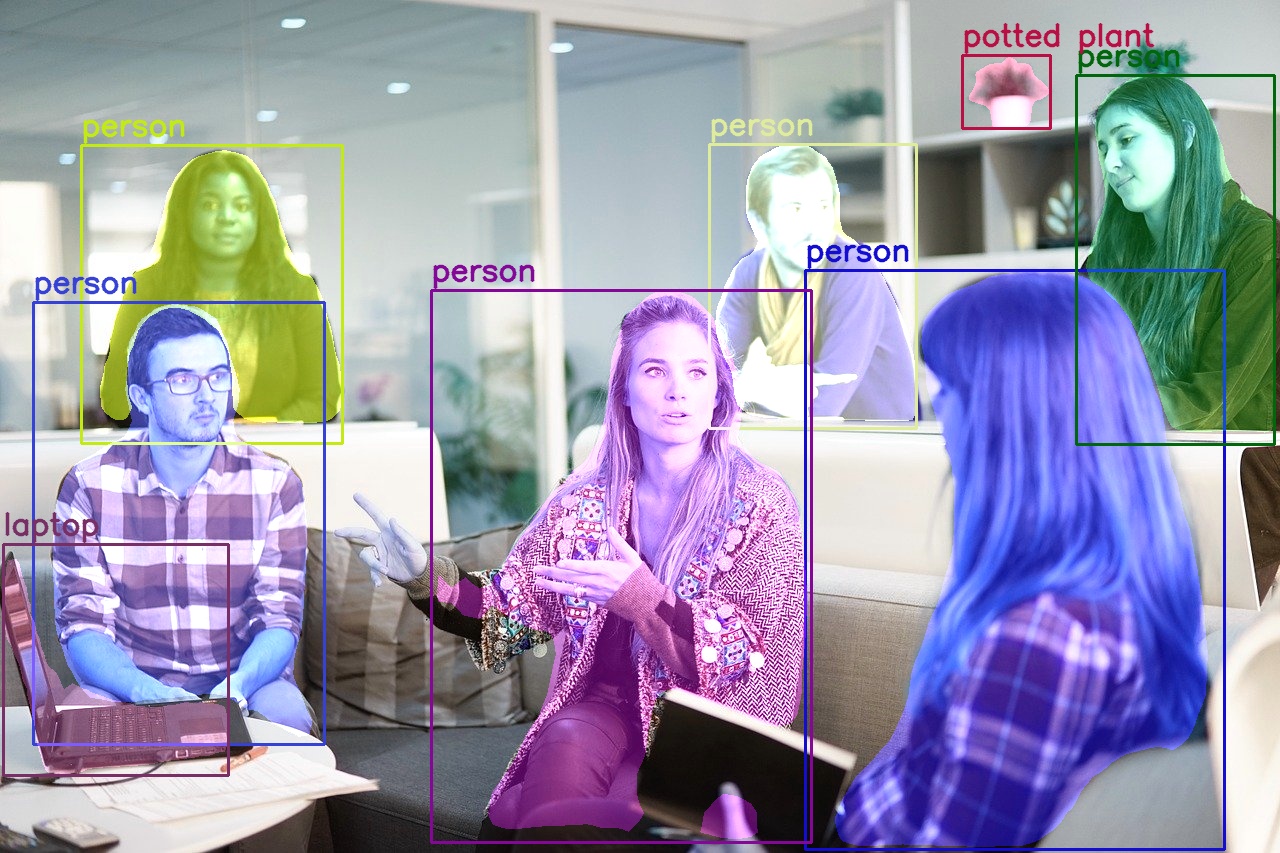
Looks like the model is really working well. Along with all the humans in the image, it is also able to detect and segment the laptop and the potted plant. Still, the Mask R-CNN model is not able to detect the hand of the woman in the middle completely. Apart from that, all other detections and segmentations look really nice.
Now, let’s try something which does not contain any human being.
python mask_rcnn_images.py --input ../input/image2.jpg
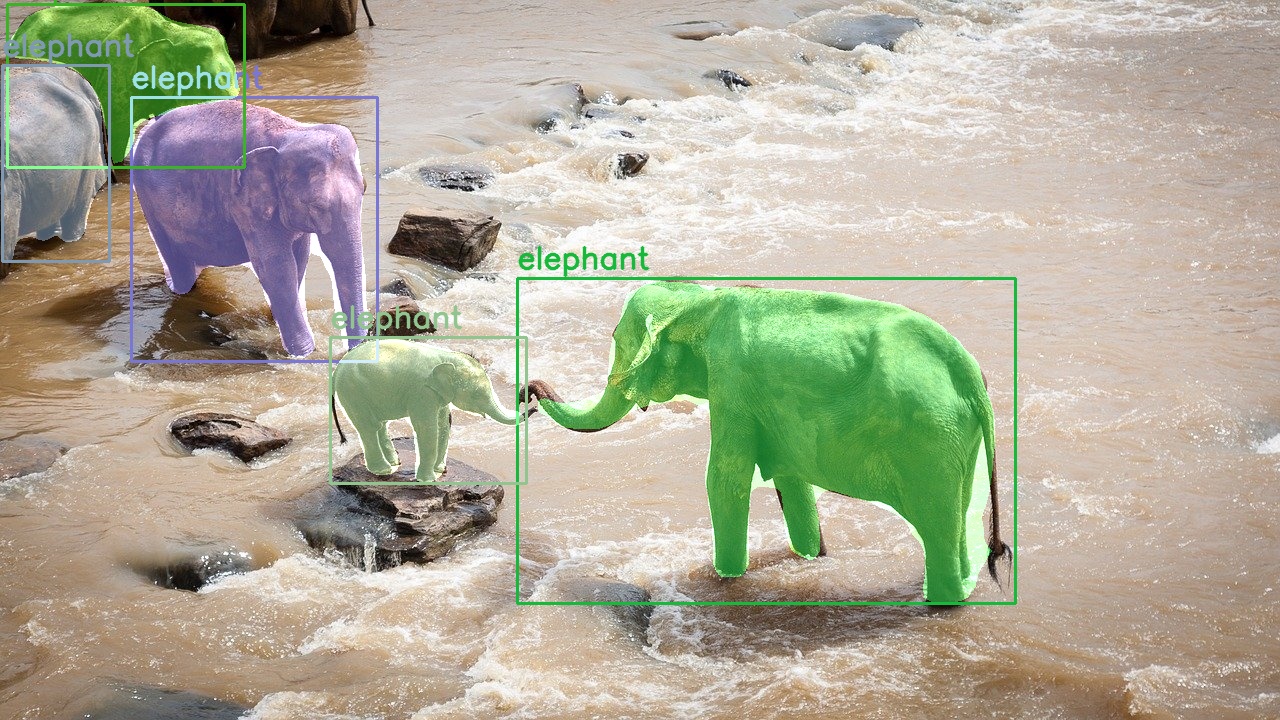
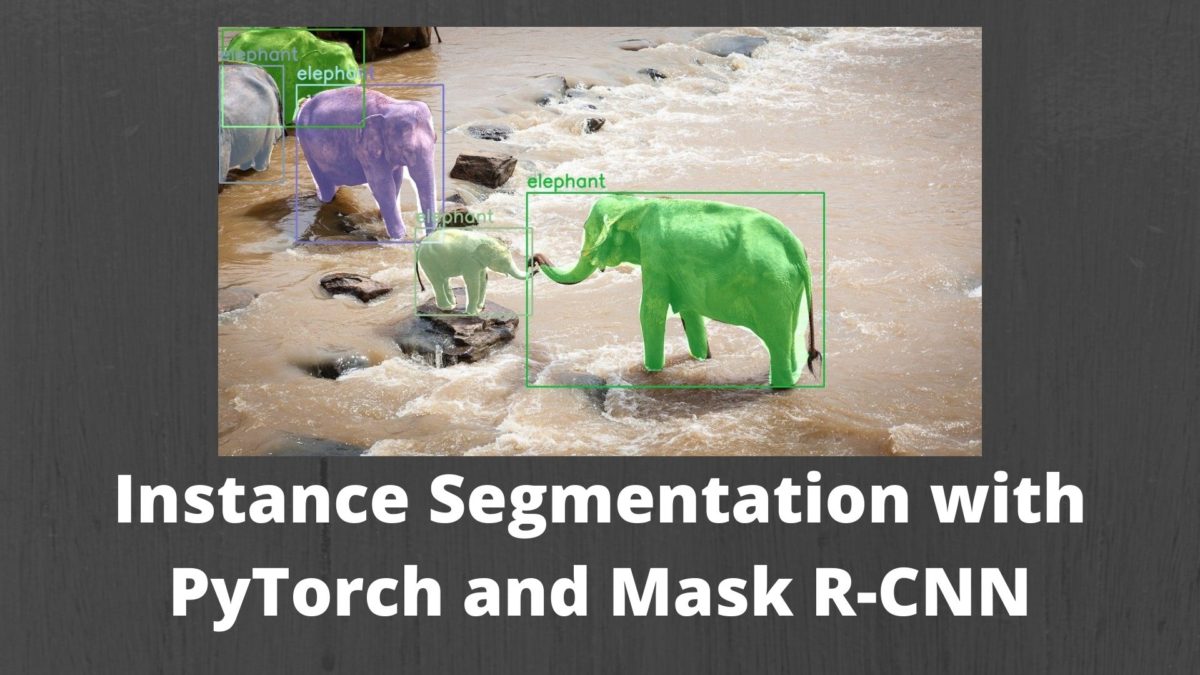
In figure 4, we can see that the Mask R-CNN model is able to detect and segment the elephants really well. It is even able to detect and segment a partially visible elephant at the far left side.
Until now, everything is working fine. Now, let’s see a case where the Mask R-CNN model fails to some extent. Let’s try the model on the third image.
python mask_rcnn_images.py --input ../input/image3.jpg
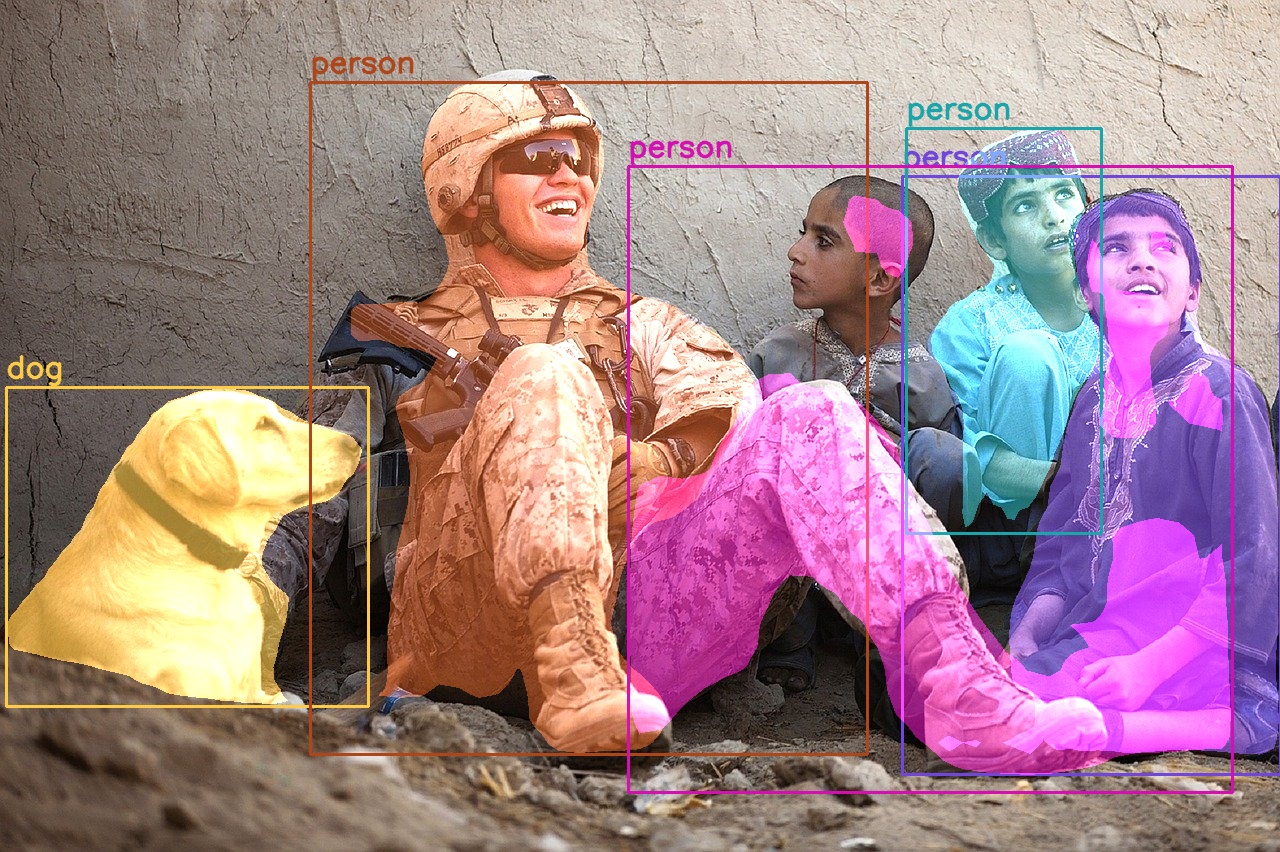
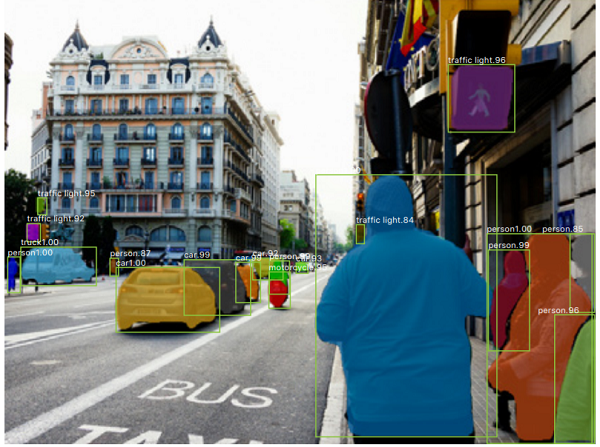
Figure 5 shows some major flaws of the Mask R-CNN model. It fails when it has to segment a group of people close together. Interestingly, the detections are all perfect. But the model fails in segmenting the boy next to the soldier, the boy on the far right, and the leg of the soldier properly. So, it fails to segment when objects are very close to each other.
If you want, you can also try some more images and tell about your findings in the comment section.
Summary and Conclusion
In this article, you learned about instance segmentation in deep learning. You got hands-on experience by applying instance segmentation on images using the PyTorch Mask R-CNN model. I hope that you have learned something new from this tutorial.
If you have any doubts, thoughts, or suggestions, then please leave them in the comment section. I will surely address them.
You can contact me using the Contact section. You can also find me on LinkedIn, and Twitter.
Recommend
About Joyk
Aggregate valuable and interesting links.
Joyk means Joy of geeK