
19

Linux操作系统基础的网络管理知识
source link: https://network.51cto.com/art/202005/616334.htm
Go to the source link to view the article. You can view the picture content, updated content and better typesetting reading experience. If the link is broken, please click the button below to view the snapshot at that time.
今天的笔记主要是关于Linux操作系统基础的相关知识。
网络管理
(1) 网络状态查看
在Linux中经常使用ifconfig,route和netstat查看网络状态,它们就是. net-tools工具,下面我来使用下。
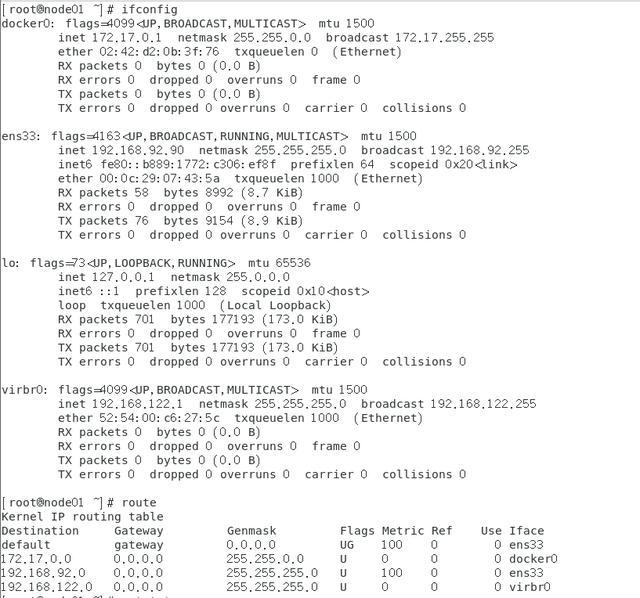
我就说下ifconfig和route。
在我们的linux中有很多网卡接口,比如eth0第一块网卡网络接口,eno1板载⽹网卡, ens33 PCI-E⽹网卡 。CentOS 7 使⽤用了⼀致性⽹络设备命名,以上都不匹配,则使⽤ eth0
- [root@node01 ~]# ifconfig eth0
- eth0: error fetching interface information: Device not found
- [root@node01 ~]# ifconfig ens33
- ens33: flags=4163<UP,BROADCAST,RUNNING,MULTICAST> mtu 1500
- inet 192.168.92.90 netmask 255.255.255.0 broadcast 192.168.92.255
- inet6 fe80::b889:1772:c306:ef8f prefixlen 64 scopeid 0x20<link>
- ether 00:0c:29:07:43:5a txqueuelen 1000 (Ethernet)
- RX packets 910 bytes 954985 (932.6 KiB)
- RX errors 0 dropped 0 overruns 0 frame 0
- TX packets 450 bytes 38942 (38.0 KiB)
- TX errors 0 dropped 0 overruns 0 carrier 0 collisions 0
(2) 网络配置文件
ifcfg-eth0,/etc/hosts
在配置hadoop,elasticsearch集群的时候需要在/etc/hosts配置集群IP和主机名,有时候你ping不了百度,可能域名解析不了,需要在/etc/sysconfig/network-scripts/ifcfg-eth0配置
- [root@node01 ~]# vim /etc/sysconfig/network
- #########
- HOSTNAME=node01
- [root@node01 ~]# vim /etc/hosts
- #########
- 192.168.92.90 node01
- 192.168.92.91 node02
- 192.168.92.92 node03
- [root@node01 ~]# 配置DNS,域名解析服务
- [root@node01 ~]# vim /etc/sysconfig/network-scripts/ifcfg-eth0
- DNS1=202.106.0.20
- DNS2=8.8.8.8
(3) 故障排除命令
第一,ping百度:查看目标机器的网络是否可通
- maoli@ubuntu:~$ ping baidu.com
- PING baidu.com (220.181.38.148) 56(84) bytes of data.
- 64 bytes from 220.181.38.148: icmp_seq=1 ttl=128 time=49.6 ms
- 64 bytes from 220.181.38.148: icmp_seq=2 ttl=128 time=48.2 ms
- --- baidu.com ping statistics ---
- 2 packets transmitted, 2 received, 0% packet loss, time 1001ms
- rtt min/avg/max/mdev = 48.223/48.948/49.673/0.725 ms
traceroute
- nslookup:nslookup www.baidu.com Server即为域名对应的ip
- maoli@ubuntu:~$ nslookup www.baidu.com
- Server: 127.0.1.1
- Address: 127.0.1.1#53
- Non-authoritative answer:
- www.baidu.com canonical name = www.a.shifen.com.
- Name: www.a.shifen.com
- Address: 182.61.200.6
- Name: www.a.shifen.com
- Address: 182.61.200.7
- maoli@ubuntu:~$ sudo tcpdump -i any -n port 80 -n
- tcpdump: verbose output suppressed, use -v or -vv for full protocol decode
- listening on any, link-type LINUX_SLL (Linux cooked), capture size 262144 bytes
- 10:28:11.003675 IP 192.168.92.1.53951 > 192.168.92.135.80: Flags [S], seq 185886164, win 64240, options [mss 1460,nop,wscale 8,nop,nop,sackOK], length 0
- 10:28:11.003875 IP 192.168.92.135.80 > 192.168.92.1.53951: Flags [S.], seq 2863640054, ack 185886165, win 64240, options [mss 1460,nop,nop,sackOK,nop,wscale 7], length 0
- 10:28:11.004114 IP 192.168.92.1.53951 > 192.168.92.135.80: Flags [.], ack 1, win 4106, length 0
- 10:28:11.010472 IP 192.168.92.1.53951 > 192.168.92.135.80: Flags [P.], seq 1:476, ack 1, win 4106, length 475: HTTP: GET /sqli-labs/ HTTP/1.1
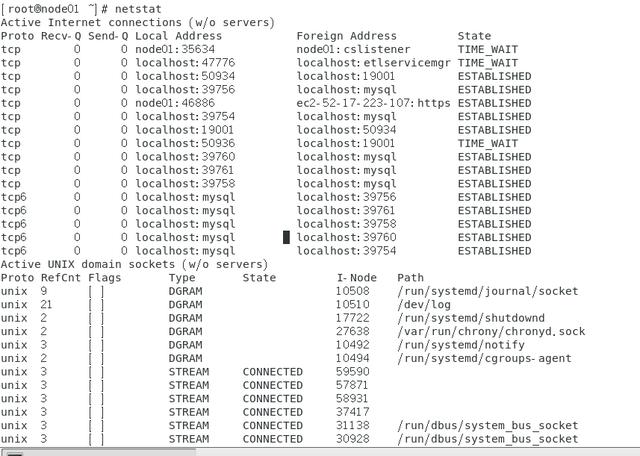
- maoli@ubuntu:~$ sudo netstat -ntlp
- 激活Internet连接 (仅服务器)
- Proto Recv-Q Send-Q Local Address Foreign Address State PID/Program name
- tcp 0 0 0.0.0.0:22 0.0.0.0:* LISTEN 1111/sshd
- tcp 0 0 127.0.0.1:631 0.0.0.0:* LISTEN 14200/cupsd
- tcp 0 0 127.0.0.1:3306 0.0.0.0:* LISTEN 1148/mysqld
- tcp 0 0 127.0.0.1:6379 0.0.0.0:* LISTEN 1165/redis-server 1
- tcp 0 0 127.0.1.1:53 0.0.0.0:* LISTEN 1285/dnsmasq
- tcp6 0 0 :::22 :::* LISTEN 1111/sshd
- tcp6 0 0 ::1:631 :::* LISTEN 14200/cupsd
- tcp6 0 0 :::9000 :::* LISTEN 2234/docker-proxy
- tcp6 0 0 :::80 :::* LISTEN 1842/apache2
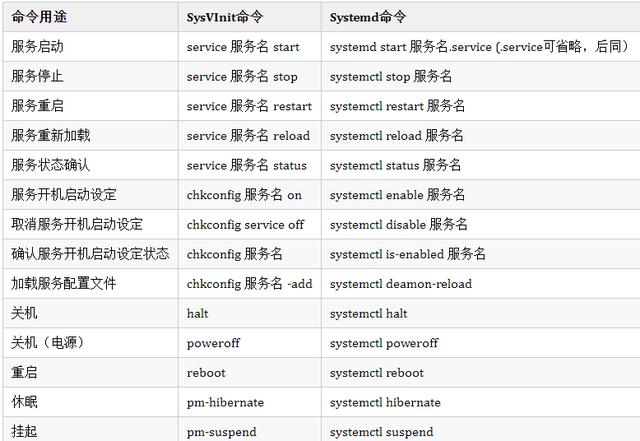
(4) 网络服务管理
⽹络服务管理程序分为两种,分别为SysV和systemd。现在Systemd已经基本取代了SysV的Init。
(5) 设置静态ip
在搭建任何集群,都是要设置静态ip的。
- [root@node01]# vim /etc/sysconfig/network-scripts/ifcfg-ens33
- ################
- BOOTPROTO=static
- ONBOOT="yes"
- # 网关地址根据系统的网络而定
- GATEWAY=192.168.92.2
- # 设置的静态ip
- IPADDR=192.168.92.92
- NETMASK=255.255.255.0
- # 配置DNS服务器
- DNS1=8.8.8.8
- DNS2=8.8.4.4
【编辑推荐】
【责任编辑:赵宁宁 TEL:(010)68476606】
点赞 0
大家都在看猜你喜欢
Recommend
About Joyk
Aggregate valuable and interesting links.
Joyk means Joy of geeK