

我的TensorFlow-GPU 2.0升级之路 – Python技术交流与分享
source link: http://www.feiguyunai.com/index.php/2020/01/05/python-dl-tf2-01/?
Go to the source link to view the article. You can view the picture content, updated content and better typesetting reading experience. If the link is broken, please click the button below to view the snapshot at that time.
文章目录 [show]
我这次TensorFlow的升级之路,可以用一句话来概括:“山重水复疑无路,柳暗花明又一村”
1.1环境分析
1、目标:升级到TensorFlow-GPU 2.0
2、原有环境:
Python3.6,TensorFlow-GPU 1.6,ubuntu16.04,GPU驱动为NVIDIA-SMI 387.26
3、“硬核”:
①如果要升级到TensorFlow-gpu 2.0,cuda 应该是10.+,而10.+,根据表1-1可知,GPU的Driver Version应该>=410+,但我目前的Driver Version 387.26。
②TensorFlow支持Python3.7
4、在安装TensorFlow-gpu 2.0之前需要做的事情
①升级GPU Driver Version>=410(最关键)
②安装Python3.7
③安装cuda 10
④安装TensorFlow-gpu 2.0
1.2参考资料
以下这些参考资料在安装过程中可能需要。
1、如何查找GPU型号与Driver version之间的关系?
安装新的支持cuda10+的驱动,具体安装驱动程序,可登录:
https://www.nvidia.com/Download/Find.aspx?lang=en-us 得到图1-1界面,输入对于GPU型号获取对于驱动程序。
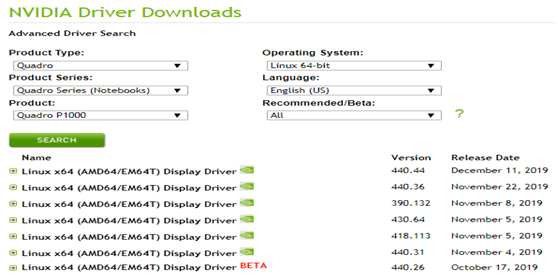
图1-1 GPU型号及产品系列兼容的Driver版本
2、安装GPU驱动有哪些常用方法?
安装GPU驱动有一些3种方法,前2种操作比较简单,第3种NVIDIA推荐的手动安装方法,定制比较高,但比较繁琐。
①使用标准Ubuntu仓库进行自动化安装
②使用PPA仓库进行自动化安装
③使用官方的NVIDIA驱动进行手动安装
3、如何查看当前内核?
安装过程中,可能会出现/boot目录空间问题,这些需要通过一些方法保证/boot空间,方法有删除一些非当前使用的内核或扩充/boot空间等方法。
①查看内核列表
sudo dpkg --get-selections |grep linux-image |
②查看当前使用的内核
uname -r |
③删除内核方法
sudo apt-get remove linux-image-***-generic |
1.3 安装的准备工作
1、查看显卡基本信息
通过命令nvidia-smi 查看显卡基本信息:
NVIDIA-SMI 387.26 Driver Version: 387.26
2、nvidia 驱动和cuda runtime 版本对应关系
查看nvidia官网:
https://docs.nvidia.com/cuda/cuda-toolkit-release-notes/index.html
表1-1 CUDA与其兼容的Driver版本
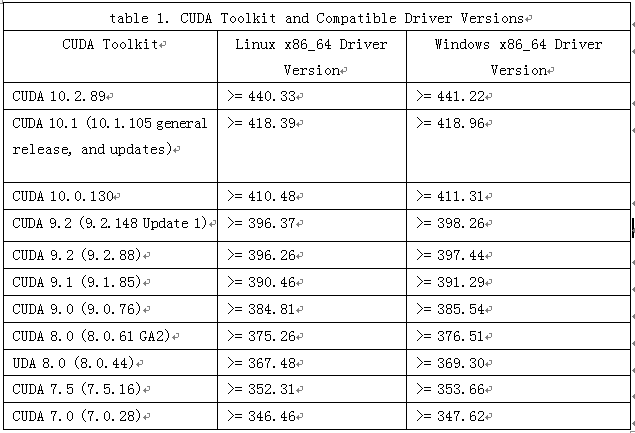
从上表可知,因我目前的GPU驱动版本为:Driver Version: 387.26,无法安装cudnn10+
需要升级GPU驱动。
1.4 升级GPU驱动
Ubuntu 社区建立了一个命名为 Graphics Drivers PPA 的全新 PPA,专门为 Ubuntu 用户提供最新版本的各种驱动程序,如Nvidia 驱动。因此我采用通过 PPA 为 Ubuntu 安装 Nvidia 驱动程序,即使用PPA仓库进行自动化安装。
1、卸载系统里的Nvidia低版本显卡驱动
sudo apt-get purge nvidia* |
2、把显卡驱动加入PPA
sudo add-apt-repository ppa:graphics-drivers |
3、更新apt-get
sudo apt-get update |
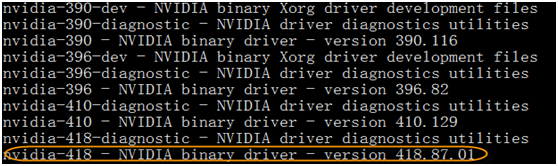
4、查找显卡驱动最新的版本号
sudo apt-get update |
返回如下信息
5、采用apt-get命令在终端安装GPU驱动
sudo apt-get install nvidia-418 nvidia-settings nvidia-prime |
6、重启系统并验证
(1)重启系统
sudo reboot |
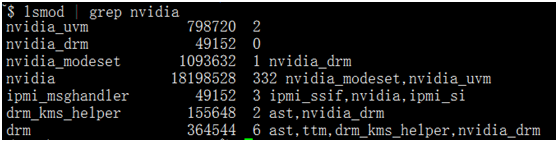
(2)查看安装情况
在终端输入以下命令行
lsmod | grep nvidia |
如果没有输出,则安装失败。成功安装会有如下类似信息。
(3)查看Ubuntu自带的nouveau驱动是否运行
lsmod | grep nvidia |
如果终端没有内容输出,则显卡驱动的安装成功!
(4)使用nvidia-smi查看GPU驱动是否正常
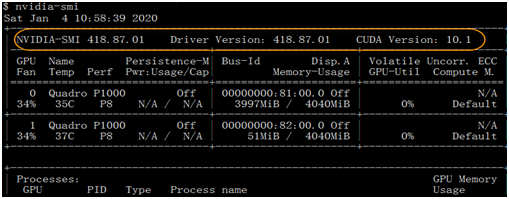
至此,GPU驱动已成功安装,驱动版本为418,接下来就可安装TensorFlow、Pytorch等最新版本了!
1.5安装Python3.7
1、安装python3.7
因TensorFlow-GPU 2.0支持python3.7,故需删除python3.6,安装python3.7
(1)使用rm -rf 命令删除目录:anaconda3
rm -rf anaconda3 |
(2)到anaconda官网下载最新的最新的anaconda3版本
登录:https://www.anaconda.com/distribution/
得到如下界面:
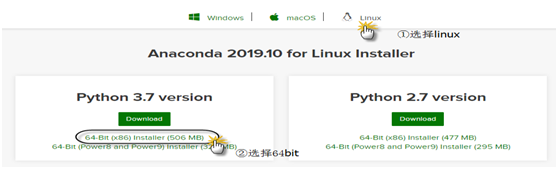
图1-2 下载anaconda界面
下载很快,506MB,5分钟左右就下载完成。
得到sh程序包:Anaconda3-2019.10-Linux-x86_64.sh
(3)安装python3.7
在命令行执行如下命令:
bash Anaconda3-2019.10-Linux-x86_64.sh |
安装过程中,会有几个问题,一般回答yes即可:
第一个问题:
Do you accept the license terms? [yes|no]
选择yes
第二个问题:
Anaconda3 will now be installed into this location:
~/anaconda3
- Press ENTER to confirm the location
- Press CTRL-C to abort the installation
- Or specify a different location below
按回车ENTER即可
第三个问题:
Do you wish the installer to initialize Anaconda3
by running conda init? [yes|no]
选择yes将把Python安装目录,自动写入.bashrc文件
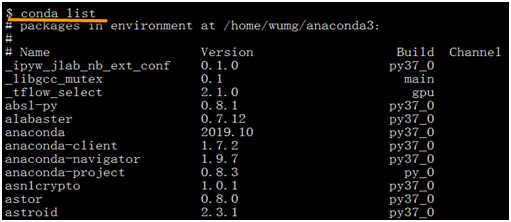
(4)使用命令conda list查看已安装的一些版本
1.6安装TensorFlow-GPU 2.0
如果使用conda安装TensorFlow-gpu 2.0,可用一个命令搞定,如果用pip安装需要3步。
1.6.1 用conda安装
使用conda安装tensorflow-gpu时,它会自动下载依赖项,比如最重要的cuda和cudnn等,其中cuda将自动安装10版本。
①先查看能安装的TensorFlow包
conda search tensorflw |
②安装TensorFlow-GPU 2.0
conda install tensorflow-gpu=2.0.0 |
1.6.2用pip安装
①先安装cudatoolkit
pip install cudatoolkit==10.0 |
②安装cudnn
pip install cudnn |
③安装TensorFlow-gpu 2.0
pip install tensorflow-gpu==2.0.0 |
【说明】
①如果使用conda环境(如果只有一个Python版本,也可不使用conda环境),创建环境时,采用conda create -n tf2 python=3.7,而不是之前版本的source create *。激活环境也是用conda activate tf2 。
②如果卸载需先卸载cudnn,然后再卸载cudatoolkit
1.7 Jupyter notebook的配置
可参考《Python深度学习基于TensorFlow》的8.3小节。
1.8 安装验证
1、验证tensorflow安装是否成功
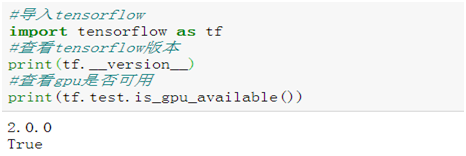
说明tensorflow-gpu安装成功,而且gpu使用正常。
1.9 TensorFlow一般方式处理实例
1.9、1.10小节,都基于以MNIST数据集,数据预处理相同,模型也相同。1.9节采用keras的一般模型训练方法,1.10节采用分布式处理方法,比较两种方式的处理逻辑、性能及所用时间等指标。
1.9.1导入需要的库
import os import sys import time import tensorflow as tf from matplotlib import pyplot as plt %matplotlib inline from tensorflow.keras.models import Sequential from tensorflow.keras.layers import Dense, Dropout, Flatten from tensorflow.keras.layers import Conv2D, MaxPooling2D |
1.9.2导入数据
#在Keras地自带数据集中导入所需的MNIST模块 from tensorflow.keras.datasets import mnist #加载数据到Keras (x_train, y_train), (x_test, y_test) = mnist.load_data() |
1.9.3数据预处理
(1)转换为4维数组
x_train = x_train.reshape(60000, 28, 28, 1) x_test = x_test.reshape(10000, 28, 28, 1) |
(2)获取通道信息
# 定义输入图像数据的行列信息 img_rows, img_cols = 28, 28 #导入backend模块,使用函数image_data_format()获取通道位置信息 from tensorflow.keras import backend as K if K.image_data_format() == 'channels_first': x_train = x_train.reshape(x_train.shape[0], 1, img_rows, img_cols) x_test = x_test.reshape(x_test.shape[0], 1, img_rows, img_cols) input_shape = (1, img_rows, img_cols) else: x_train = x_train.reshape(x_train.shape[0], img_rows, img_cols, 1) x_test = x_test.reshape(x_test.shape[0], img_rows, img_cols, 1) input_shape = (img_rows, img_cols, 1) |
(3)对数据进行缩放
x_train = x_train.astype('float32') x_test = x_test.astype('float32') x_train /= 255 x_test /= 255 |
(4)把标签数据转换为二值数据格式或one-hot格式
# 使用keras自带工具将标签数据转换成二值数据格式,以方便模型训练 import tensorflow.keras.utils as utils y_train =utils.to_categorical(y_train, 10) y_test = utils.to_categorical(y_test, 10) |
1.9.4构建模型
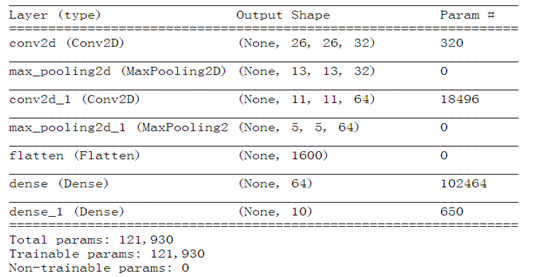
model = Sequential()#初始化序贯模型 model.add(Conv2D(32, kernel_size=(3, 3), activation='relu', input_shape=(28,28,1)))#二维卷积层 model.add(MaxPooling2D(pool_size=(2, 2)))#最大池化层 model.add(Conv2D(64, (3, 3), activation='relu'))#二维卷积层 model.add(MaxPooling2D(pool_size=(2, 2)))#最大池化层 model.add(Flatten())#Flatten层,把tensor转换成一维形式 model.add(Dense(64, activation='relu'))#定义全连接层 model.add(Dense(10, activation='softmax'))#定义输出层 model.summary()#查看模型结构 |
模型结构如下。
1.9.5编译模型
import tensorflow.keras as keras model.compile(loss=keras.losses.categorical_crossentropy, #optimizer=keras.optimizers.Adadelta(), optimizer=keras.optimizers.Adam(), metrics=['accuracy']) |
1.9.6训练模型
model.fit(x_train, y_train, batch_size=128, epochs=12, verbose=1, validation_data=(x_test, y_test)) |
运行结果如下。
Epoch 9/12
60000/60000 [==============================] - 5s 81us/sample - loss: 0.0133 - accuracy: 0.9958 - val_loss: 0.0259 - val_accuracy: 0.9915
Epoch 10/12
60000/60000 [==============================] - 5s 79us/sample - loss: 0.0101 - accuracy: 0.9969 - val_loss: 0.0264 - val_accuracy: 0.9916
Epoch 11/12
60000/60000 [==============================] - 5s 81us/sample - loss: 0.0083 - accuracy: 0.9973 - val_loss: 0.0338 - val_accuracy: 0.9892
Epoch 12/12
60000/60000 [==============================] - 5s 80us/sample - loss: 0.0082 - accuracy: 0.9973 - val_loss: 0.0308 - val_accuracy: 0.9910
1.9.7 GPU的使用情况
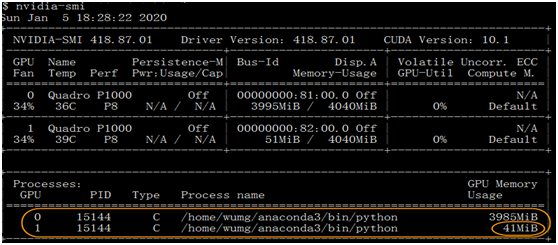
一般情况下,实际上只有一个GPU在使用,另一个几乎没有运行。
1.10 TensorFlow分布式处理实例
1.10.1概述
TensorFlow 2.0 开始支持更优的多 GPU 与分布式训练。Tensorflow的分布策略目前主要有四个Strategy:
MirroredStrategy
CentralStorageStrategy
MultiWorkerMirroredStrategy
ParameterServerStrategy
这里主要介绍第1种策略,即镜像策略(MirroredStrategy)。TensorFlow 2.0 在多 GPU 训练上是否更好了呢?是的,镜像策略用于单机多卡数据并行同步更新的情况,在每个GPU上保存一份模型副本,模型中的每个变量都镜像在所有副本中。这些变量一起形成一个名为MirroredVariable的概念变量。通过apply相同的更新,这些变量保持彼此同步。
镜像策略用了高效的All-reduce算法来实现设备之间变量的传递更新。默认情况下,它使用NVIDIA NCCL作为all-reduce实现。用户还可以在官方提供的其他几个选项之间进行选择。如图1-3所示。
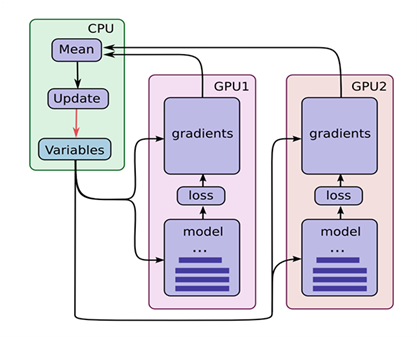
图1-3 TensorFlow使用多GPU示意图
(1)假设你的机器上有2个GPU。
(2)在单机单GPU的训练中,数据是一个batch一个batch的训练。 在单机多GPU中,数据一次处理2个batch(假设是2个GPU训练), 每个GPU处理一个batch的数据计算。
(3)变量,或者说参数,保存在CPU上。
(4)刚开始的时候数据由CPU分发给2个GPU, 在GPU上完成了计算,得到每个batch要更新的梯度。
(5)然后在CPU上收集完了2个GPU上的要更新的梯度, 计算一下平均梯度,然后更新参数。
(6)然后继续循环这个过程。
1.10.2创建一个分发变量和图形的镜像策略
strategy = tf.distribute.MirroredStrategy() print ('Number of devices: {}'.format(strategy.num_replicas_in_sync)) #训练脚本就会自动进行分布式训练。如果你只想用主机上的部分GPU训练 #strategy = tf.distribute.MirroredStrategy(devices=["/gpu:0", "/gpu:1"]) |
1.10.3定义批处理等变量
BUFFER_SIZE = len(x_train) BATCH_SIZE_PER_REPLICA = 64 GLOBAL_BATCH_SIZE = BATCH_SIZE_PER_REPLICA * strategy.num_replicas_in_sync EPOCHS = 12 |
1.10.4创建数据集并进行分发
train_dataset = tf.data.Dataset.from_tensor_slices((x_train, y_train)).shuffle(BUFFER_SIZE).batch(GLOBAL_BATCH_SIZE) test_dataset = tf.data.Dataset.from_tensor_slices((x_test, y_test)).batch(GLOBAL_BATCH_SIZE) train_dist_dataset = strategy.experimental_distribute_dataset(train_dataset) test_dist_dataset = strategy.experimental_distribute_dataset(test_dataset) |
1.10.5创建模型
def create_model(): model = tf.keras.Sequential([ tf.keras.layers.Conv2D(32, 3, activation='relu',input_shape=(28,28,1)), tf.keras.layers.MaxPooling2D(), tf.keras.layers.Conv2D(64, 3, activation='relu'), tf.keras.layers.MaxPooling2D(), tf.keras.layers.Flatten(), tf.keras.layers.Dense(64, activation='relu'), tf.keras.layers.Dense(10, activation='softmax') return model |
1.10.6创建存储检查点
# 创建检查点目录以存储检查点。 checkpoint_dir = './training_checkpoints' checkpoint_prefix = os.path.join(checkpoint_dir, "ckpt") |
1.10.7定义损失函数
with strategy.scope(): # 将减少设置为“无”,以便我们可以在之后进行这个减少并除以全局批量大小。 loss_object = tf.keras.losses.CategoricalCrossentropy( reduction=tf.keras.losses.Reduction.NONE) # 或者使用 loss_fn = tf.keras.losses.sparse_categorical_crossentropy def compute_loss(labels, predictions): per_example_loss = loss_object(labels, predictions) return tf.nn.compute_average_loss(per_example_loss, global_batch_size=GLOBAL_BATCH_SIZE) |
1.10.8定义性能衡量指标
如损失和准确性
ith strategy.scope(): test_loss = tf.keras.metrics.Mean(name='test_loss') #train_accuracy = tf.keras.metrics.SparseCategoricalAccuracy( train_accuracy = tf.keras.metrics.CategoricalAccuracy( name='train_accuracy') #test_accuracy = tf.keras.metrics.SparseCategoricalAccuracy( test_accuracy = tf.keras.metrics.CategoricalAccuracy( name='test_accuracy') |
1.10.9训练模型
(1)定义优化器、计算损失值
# 必须在`strategy.scope`下创建模型和优化器。 with strategy.scope(): model = create_model() optimizer = tf.keras.optimizers.Adam() checkpoint = tf.train.Checkpoint(optimizer=optimizer, model=model) with strategy.scope(): def train_step(inputs): images, labels = inputs with tf.GradientTape() as tape: predictions = model(images, training=True) loss = compute_loss(labels, predictions) gradients = tape.gradient(loss, model.trainable_variables) optimizer.apply_gradients(zip(gradients, model.trainable_variables)) train_accuracy.update_state(labels, predictions) return loss def test_step(inputs): images, labels = inputs predictions = model(images, training=False) t_loss = loss_object(labels, predictions) test_loss.update_state(t_loss) test_accuracy.update_state(labels, predictions) |
(2)训练模型
with strategy.scope(): # `experimental_run_v2`将复制提供的计算并使用分布式输入运行它。 @tf.function def distributed_train_step(dataset_inputs): per_replica_losses = strategy.experimental_run_v2(train_step, args=(dataset_inputs,)) return strategy.reduce(tf.distribute.ReduceOp.SUM, per_replica_losses, axis=None) @tf.function def distributed_test_step(dataset_inputs): return strategy.experimental_run_v2(test_step, args=(dataset_inputs,)) for epoch in range(EPOCHS): # 训练循环 total_loss = 0.0 num_batches = 0 for x in train_dist_dataset: total_loss += distributed_train_step(x) num_batches += 1 train_loss = total_loss / num_batches # 测试循环 for x in test_dist_dataset: distributed_test_step(x) if epoch % 2 == 0: checkpoint.save(checkpoint_prefix) template = ("Epoch {}, Loss: {}, Accuracy: {}, Test Loss: {}, " "Test Accuracy: {}") print (template.format(epoch+1, train_loss, train_accuracy.result()*100, test_loss.result(), test_accuracy.result()*100)) |
运行结果如下。
Epoch 9, Loss: 1.0668369213817641e-05, Accuracy: 99.91753387451172, Test Loss: 0.041710007935762405, Test Accuracy: 99.09666442871094
Epoch 10, Loss: 0.006528814323246479, Accuracy: 99.90166473388672, Test Loss: 0.04140192270278931, Test Accuracy: 99.10091400146484
Epoch 11, Loss: 0.001252010464668274, Accuracy: 99.90159606933594, Test Loss: 0.04158545285463333, Test Accuracy: 99.10043334960938
Epoch 12, Loss: 0.0014430719893425703, Accuracy: 99.90159606933594, Test Loss: 0.041613057255744934, Test Accuracy: 99.09874725341797
1.10.10 GPU使用情况
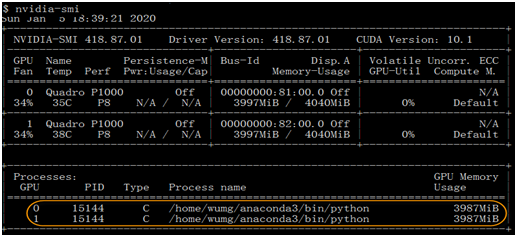
由此可知,采用分布式方式,两个GPU都得到充分使用。
1.11 建议使用conda安装TensorFlow
https://zhuanlan.zhihu.com/p/46599887
使用 TensorFlow 开展机器学习工作的朋友,应该有不少是通过 pip 下载的 TensorFlow。但是近日机器学习专家 Michael Nguyen 大声疾呼:“为了性能起见,别再用 pip 下载 TensorFlow了!”,他强力建议的理由基于以下两点:
1、更快的CPU性能Conda TensorFlow 包利用了用于深度神经网络或 1.9.0 版本以上的 MKL-DNN 网络的英特尔 Math Kernel Library(MKL),这个库能让性能大幅提升。如下图所示:

可以看到,相比 pip 安装,使用 Conda 安装后的性能足足提升了 8 倍。这对于仍然经常使用 CPU 训练的人来说,无疑帮助很大。我(Michael Nguyen——译者注)自己平时在把代码放到 GPU 驱动的机器之前,会先使用 CPU 机器跑一遍,使用 Conda 安装 TensorFlow 能大幅加快迭代速度。
MKL 库不仅能加快 TensorFlow 包的运行速度,也能提升其它一些广泛使用的程序库的速度,比如 Numpy、NumpyExr、Scikit-Learn。
2、简化 GPU 版的安装
Conda 安装会自动安装 CUDA 和 GPU 支持所需的 CuDNN 库,但 pip 安装需要你手动完成。大家都比较喜欢一步到位的吧,特别是下载很多个库的时候。
【说明】有些软件或版本使用conda安装可能找不到,这时需要使用pip安装,使用pip可以安装一些较新版本。
1.12 安装PyTorch
1、登录PyTorch官网
https://pytorch.org/
2、选择安装配置
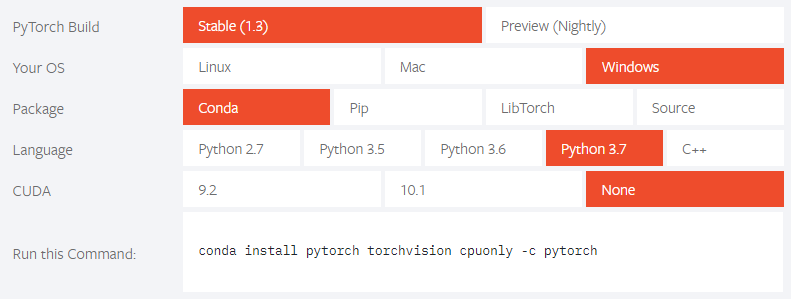
3、用conda安装
复制执行语句到命令行,进行执行,如安装cpu版的PyTorch
conda install pytorch torchvision cpuonly -c pytorch |
如果这种方式无法执行,或下载很慢,可把-c pytorch去掉, -c参数指明了下载pytorch的通道,优先级比清华镜像更高
使用指定的源(如清华源)可以采用如下命令,这样安装速度应该快很多。
【说明】如果在windows下安装pytorch出现对xx路径没有权重问题时,在进入cmd时,右键选择用管理员身份安装,如图所示:

#安装cpu版本 conda install pytorch torchvision cpuonly |
安装gpu conda 1010版本
#安装gpu版本 conda install pytorch torchvision cudatoolkit=10.1 |
4、使用pip安装
#安装GPU最新版本 pip install torch torchvision #安装CPU版本 pip install torch==1.4.0+cpu torchvision==0.5.0+cpu -f https://download.pytorch.org/whl/torch_stable.html |
5、验证安装是否成功
import torch print(torch.__version__) print(torch.cuda.is_available()) #查看GPU是否可用 |
1.13 修改安装源
我们用pip或conda安装软件时,很慢甚至时常报连接失败等问题,出现这些情况,一般是下载的源是国外的网站。可以修改安装源来大大加速下载速度及其稳定性,以下介绍几种利用清华源的方法。
1、修改conda安装源
在用户当前目录下,创建.condarc文件,然后把以下内容放入该文件即可。
channels: - https://mirrors.tuna.tsinghua.edu.cn/anaconda/pkgs/free/ - https://mirrors.tuna.tsinghua.edu.cn/anaconda/pkgs/main/ - https://mirrors.tuna.tsinghua.edu.cn/anaconda/cloud/pytorch/ - defaults show_channel_urls: true |
【说明】windows环境也是如此,如果没有.condarc文件,就创建。
2、修改pip安装源
为了和conda保持一致,选择还是清华的镜像源。步骤如下:
(1)修改 ~/.pip/pip.conf 文件。
vi ~/.pip/pip.conf |
【说明】如果是windows环境,在用户当前目录下,修改pip\pip.ini文件
没有就创建。
(2)添加源
[global] index-url = https://pypi.tuna.tsinghua.edu.cn/simple [install] trusted-host = pypi.tuna.tsinghua.edu.cn |
Recommend
About Joyk
Aggregate valuable and interesting links.
Joyk means Joy of geeK