

Taskbook: Like Trello but for the Terminal
source link: https://www.tuicool.com/articles/hit/IFVFraV
Go to the source link to view the article. You can view the picture content, updated content and better typesetting reading experience. If the link is broken, please click the button below to view the snapshot at that time.
Taskbook
:notebook: Tasks, boards & notes for the command-line habitat

Description
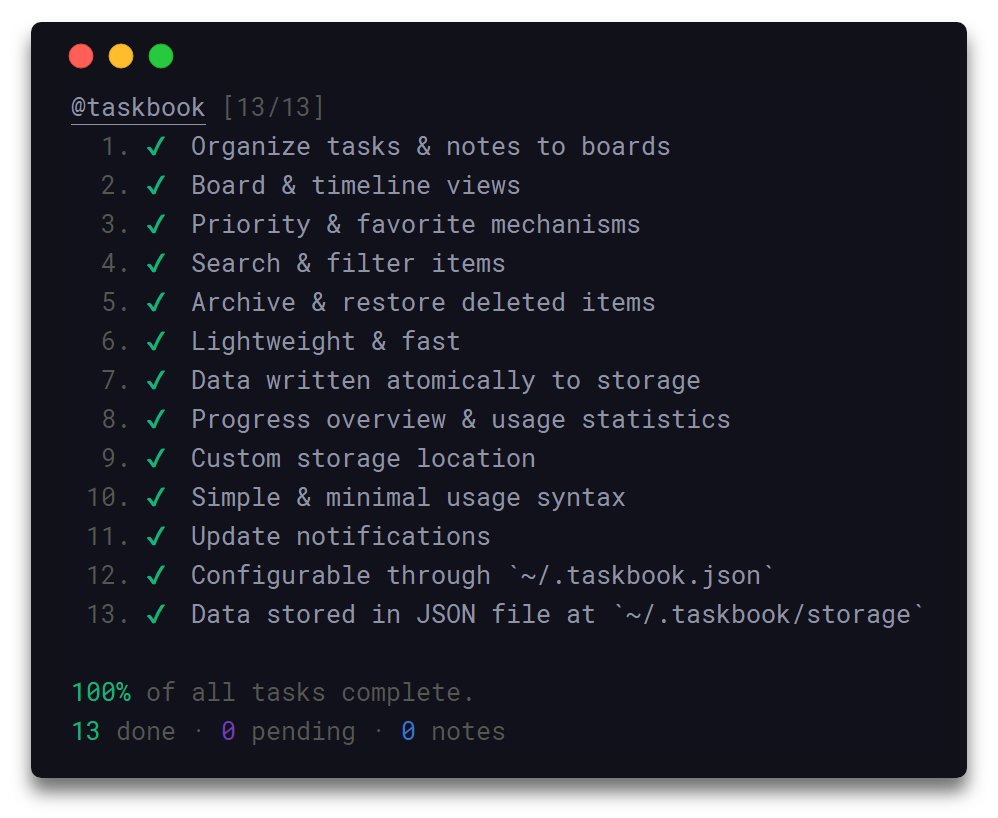
By utilizing a simple and minimal usage syntax, that requires a flat learning curve, taskbook enables you to effectively manage your tasks and notes across multiple boards from within your terminal. All data are written atomically to the storage in order to prevent corruptions, and are never shared with any third party entities. Deleted items are automatically archived and can be inspected or restored at any moment.
Visit the contributing guidelines to learn more on how to translate this document into more languages.
Come over to Gitter or Twitter to share your thoughts on the project.
Highlights
~/.taskbook.json
~/.taskbook/storage
View highlights in a taskbook board .
Contents
Install
npm install --global taskbook
Usage
$ tb --help

  Usage
    $ tb [<options> ...]

    Options
        none             Display board view
      --task, -t         Create task
      --note, -n         Create note
      --timeline, -i     Display timeline view
      --delete, -d       Delete item
      --check, -c        Check/uncheck task
      --star, -s         Star/unstar item
      --list, -l         List items by attributes
      --find, -f         Search for items
      --edit, -t         Edit item description
      --move, -m         Move item between boards
      --priority, -p     Update priority of task
      --archive, -a      Display archived items
      --restore, -r      Restore items from archive
      --help, -h         Display help message
      --version, -v      Display installed version

    Examples
      $ tb
      $ tb --task Make some buttercream
      $ tb --task @coding Improve documentation
      $ tb --task @coding @reviews Review PR #42
      $ tb --note @coding Mergesort worse-case O(nlogn)
      $ tb --check 1 2
      $ tb --delete 4
      $ tb --star 2
      $ tb --priority @3 2
      $ tb --timeline
      $ tb --edit @3 Merge PR #42
      $ tb --move @1 cooking
      $ tb --find documentation
      $ tb --list pending coding
      $ tb --archive
      $ tb --restore 4
Views
Board View
Invoking taskbook without any options will display all saved items grouped into their respective boards.
Timeline View
In order to display all items in a timeline view, based on their creation date, the --timeline / -i option can be used.

Configuration
To configure taskbook navigate to the ~/.taskbook.json file and modify any of the options to match your own preference. To reset back to the default values, simply delete the config file from your home directory.
The following illustrates all the available options with their respective default values.
{
  "taskbookDirectory": "",
  "displayCompleteTasks": true,
  "displayProgressOverview": true
}
In Detail
taskbookDirectory
String
~
Full filesystem path where the storage will be initialized, i.e; /home/username/the-cloud
If left undefined the home directory ~ will be used and taskbook will be set-up under ~/.taskbook/ .
displayCompleteTasks
Boolean
true
Display tasks that are marked as complete.
displayProgressOverview
Boolean
true
Display progress overview below the timeline and board views.
Flight Manual
The following is a minor walkthrough containing a set of examples on how to use taskbook. In case you spotted an error or think that an example is not to clear enough and should be further improved, please feel free to open an issue or pull request .
Create Task
To create a new task use the --task / -t option with your task's description following right after.
$ tb -t Improve documentation
Create Note
To create a new note use the --note / -n option with your note's body following right after.
$ tb -n Mergesort worse-case O(nlogn)
Create Board
Boards are automatically initialized when creating a new task or note. To create one or more boards, include their names, prefixed by the @ symbol, in the description of the about-to-be created item. As a result the newly created item will belong to all of the given boards. By default, items that do not contain any board names in their description are automatically added to the general purpose; My Board .
$ tb -t @coding @docs Update contributing guidelines
Check task
To mark a task as complete/incomplete, use the --check / -c option followed by the ids of the target tasks. Note that the option will update to its opposite the complete status of the given tasks, thus checking a complete task will render it as pending and a pending task as complete. Duplicate ids are automatically filtered out.
$ tb -c 1 3
Star Item
To mark one or more items as favorite, use the --star / -s option followed by the ids of the target items. The functionality of this option is the same as the one of the above described --check option.
$ tb -s 1 2 3
Display Boards
Invoking taskbook without any options will display all of saved items grouped into their respective boards.
$ tb
Display Timeline
In order to display all items in a timeline view, based on their creation date, the --timeline / -i option can be used.
$ tb -i
Set Priority
To set a priority level for a task while initializing it, include the p:x syntax in the task's description, where x can be an integer of value 1 , 2 or 3 . Note that all tasks by default are created with a normal priority - 1 .
$ tb -t @coding Fix issue `#42` p:3
To update the priority level of a specific task after its creation, use the --priority / -p option along with the id the target task, prefixed by the @ symbol, and an integer of value 1 , 2 or 3 . Note that the order in which the target id and priority level are placed is not significant.
$ tb -p @1 2
Move Item
To move an item to one or more boards, use the --move / -m option, followed by the target item id, prefixed by the @ symbol, and the name of the destination boards. The default My board can be accessed through the myboard keyword. The order in which the target id and board names are placed is not significant.
$ tb -m @1 myboard reviews
Delete Item
To delete one or more items, use the --delete / -d options followed by the ids of the target items. Note that deleted items are automatically archived, and can be inspected or restored at any moment. Duplicate ids are automatically filtered out.
$ tb -d 1 2
Display Archive
To display all archived items, use the --archive / -a option. Note that all archived items are displayed in timeline view, based on their creation date.
$ tb -a
Restore Items
To restore one or more items, use the --restore / -r option followed by the ids of the target items. Note that the ids of all archived items can be seen when invoking the --archive / -a option. Duplicate ids are automatically filtered out.
$ tb -r 1 2
List Items
To list a group of items where each item complies with a specif number of attributes, use the --list / -l option followed by the desired attributes. Board names along with item traits can be considered valid listing attributes. For example to list all items that belong to the default myboard and are pending tasks, the following could be used;
$ tb -l myboard pending
The by default supported listing attributes, together with their respective aliases, are the following;
-
myboard- Items that belong toMy board -
task,tasks,todo- Items that are tasks. -
note,notes- Items that are notes. -
pending,unchecked,incomplete- Items that are pending tasks. -
done,checked,complete- Items that complete tasks. -
star,starred- Items that are starred.
Search Items
To search for one of more items, use the --find / -f option, followed by your search terms.
$ tb -f documentation
Development
For more info on how to contribute to the project, please read the contributing guidelines .
- Fork the repository and clone it to your machine
- Navigate to your local fork:
cd taskbook - Install the project dependencies:
npm installoryarn install - Lint the code for errors:
npm testoryarn test
Related
Team
- Klaus Sinani (@klauscfhq)
License
Recommend
About Joyk
Aggregate valuable and interesting links.
Joyk means Joy of geeK