

Tutorial: Build an Interactive Virtual Globe with Three.js
source link: https://medium.com/gitconnected/tutorial-build-an-interactive-virtual-globe-with-three-js-33cf7c2090cb
Go to the source link to view the article. You can view the picture content, updated content and better typesetting reading experience. If the link is broken, please click the button below to view the snapshot at that time.
Tutorial: Build an Interactive Virtual Globe with Three.js
Get started with VR/3D by building an interactive, rotating planet Earth!
tl;dr: I recently became aware of the power of Virtual Reality, from its ability to create fun, immersive experiences to the impact it could have on the mental health field. I dove into three.js, a popular library for rendering 3D in the browser, to learn for myself how to build interactive, three-dimensional experiences with JavaScript. This post includes an introductory tutorial that will expose you to the library and teach you how to make an interactive rotating globe.
Click image to open demo (works best on a desktop computer)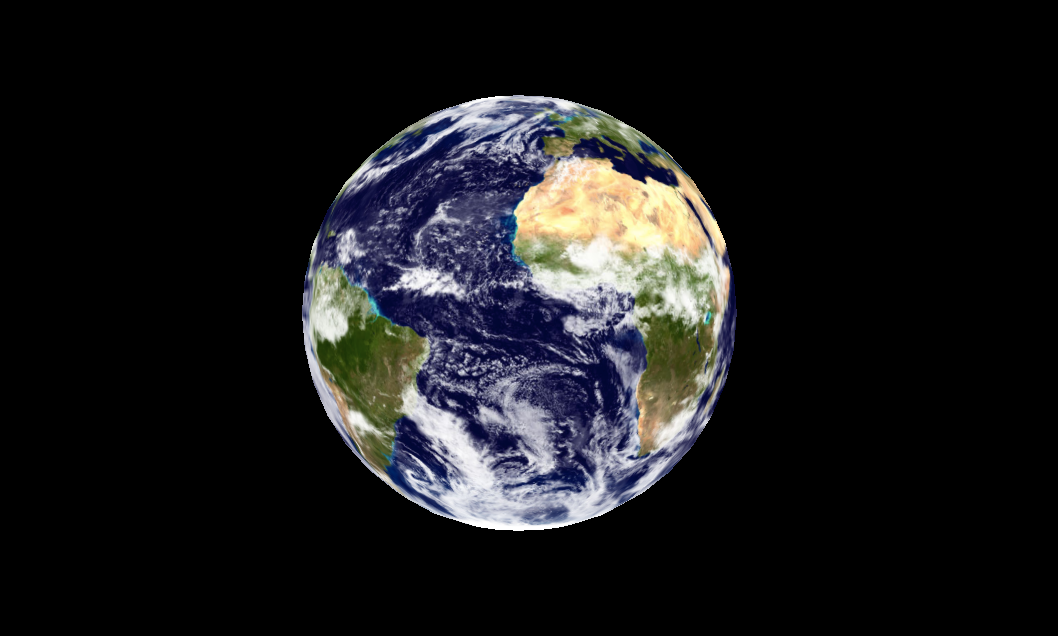
My Road to VR
When virtual reality first became a thing, I didn’t feel the hype. I was under the impression it was just for gamers, and thought, well, that’s not for me.
Then I got the Google Pixel, my first real smartphone. With it I began capturing 360° photos of places I wanted to revisit (like scenic landscapes, memorable get-togethers, the house I grew up in...). I also witnessed the excitement and nostalgia of friends and family as they visited their hometowns on Google Maps through my Google Cardboard, after not having been there for many years.
360 photo shot with my Google Pixel at Canyonlands National Park, UtahAs a programmer who formerly worked in the mental health field, I started to consider how VR could improve the lives of people with disabilities, special needs, and mental illnesses, notably by providing therapeutic experiences that users may not have access to otherwise. Needless to say, I started warming up to the world of VR.
“The incredible thing about the technology is that you feel like you’re actually present in another place with other people. People who try it say it’s different from anything they’ve ever experienced in their lives.”
The next obstacle between me and VR was actually getting my hands dirty with it. It seemed like rocket science to me, and I couldn’t begin to fathom the intricacies of building a three-dimensional, immersive, and interactive world with code. However, as I built more two-dimensional apps, gradually the idea of adding another dimension no longer felt so out of reach.
I’m still completely new to VR, but I’d like to take you along on my journey as I explore.
Today I’m going to teach you how to build a simple interactive 3D app with JavaScript. If you’re like me and want to get into the world of VR, I hope this tutorial will give you the confidence to start.
What We’re Going to Build
In this walkthrough we’ll be building a 3D scene using three.js, a popular library for rendering 3D in the browser.
The goal is to create a sphere (the planet Earth, maybe?) that rotates when you press the ← → ↑ ↓ buttons on your keyboard (and also while moving the mouse). While we’re not creating an immersive VR experience, it is 3D and it is interactive, so we’re off to a good start!
This is what it’s going to look like *.
*works best on a desktop computer/laptop
Getting Started
Note: If you’re not using Node, refer to the starter code in the three.js documentation rather than doing Steps 1 & 2 below.
1. Set up your files
If you look at my code, you’ll see an Express app using React on the front end to inject the 3D component into my HTML file. This is extraneous for the purpose of this tutorial, so your file structure can consist of simply a .html and a .js file. Make sure you’ve created your package.json file (you can run npm init --y). You’ll also need to install webpack to bundle your .js file with the three module.
Your HTML file can look something like this:
<!DOCTYPE html>
<html>
 <head>
 </head>
 <body>
     <div id="container" width="100vw" height="100vh" />
     <script src="bundle.js"></script>
 </body>
</html>
2. Install and add three.js
Install three.js by running npm install three, and then import it into your main .js file.
const THREE = require('three');3. Get the DOM element in which you want to attach the scene
const container = document.querySelector('#container');We’ll be appending our 3D renderer to the container div shortly.
Creating the 3D Renderer
To actually be able to display anything with three.js, we need three things: A scene, a camera, and a renderer so we can render the scene with the camera.(three.js documentation)
4. Create a WebGL renderer
WebGL (Web Graphics Library) renders interactive 2 and 3D graphics in the browser. This is what we will be creating and attaching to our HTML container divin just a bit (after we create all the components that will go into our renderer).
To instantiate it:
const renderer = new THREE.WebGLRenderer();
You’re also going to need to set the size of the renderer. I’ve set the width and height to that of the window:
const WIDTH = window.innerWidth;const HEIGHT = window.innerHeight;renderer.setSize(WIDTH, HEIGHT);
5. Create a camera
Three.js has a Camera class, inherited by its various sub-classes such as PerspectiveCamera (the one we’ll be using) or OrthographicCamera. PerspectiveCamera is most commonly used for 3D scenes because it mimics how the human eye sees.
First, we’ll set up the camera attributes:
const VIEW_ANGLE = 45;const ASPECT = WIDTH / HEIGHT;const NEAR = 0.1;const FAR = 10000;
And then instantiate the camera:
const camera = new THREE.PerspectiveCamera(VIEW_ANGLE, ASPECT, NEAR, FAR);
We’ll also set the camera’s position on the x, y, and z axes:
camera.position.set( 0, 0, 500 );
6. Create a scene
Almost done with setup! Now we create a scene:
const scene = new THREE.Scene();
And add a black background:
scene.background = new THREE.Color( 0x000 );
7. Add the camera to the scene
Now that we have a scene, we can add the camera to it:
scene.add(camera);
8. Attach the renderer to the DOM element.
And finally, as promised, we append our renderer to container.
container.appendChild(renderer.domElement);
Creating the Globe
Now we can move on to our globe!
9. Create a sphere
Three.js uses geometric meshes to create primitive 3D shapes like spheres, cubes, cylinders, etc. Since I’m going for a planet Earth look, I’ll be using a sphere.
We’ll start by defining the sphere’s attributes:
const RADIUS = 200;const SEGMENTS = 50;const RINGS = 50;
Then, because we want to texture the sphere with an image of the Earth, we’re going to create a group that will hold our sphere and its texture meshed together:
const globe = new THREE.Group();scene.add(globe);
And now, we’ll create our sphere and its texture, and mesh them together using three.js’s TextureLoader:
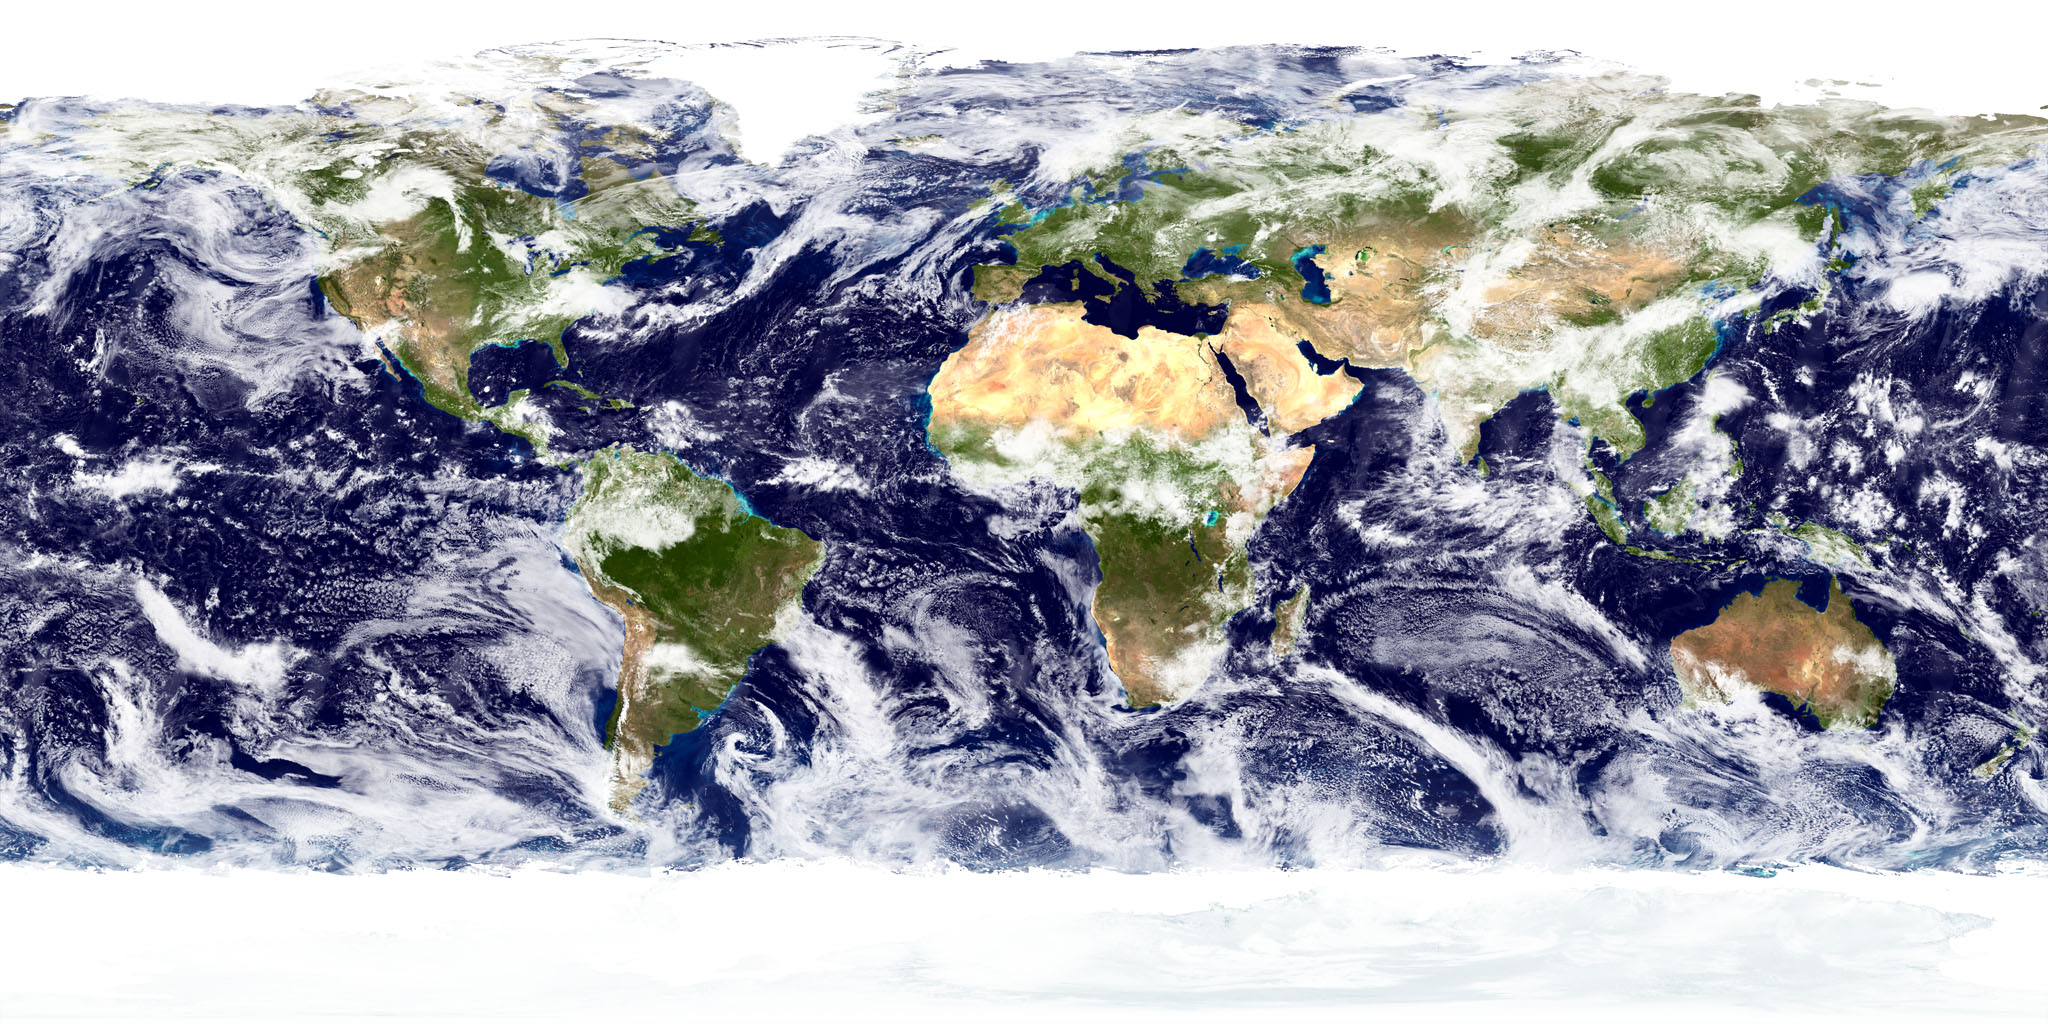
var loader = new THREE.TextureLoader();
We call the load method, which takes in our image url (here’s the image I used) as the first argument, and a function that: 1) creates a sphere with the predefined attributes, 2) maps the texture to the material (read more here about materials in the three.js docs), 3) creates a mesh of our sphere and the material, and 4) adds the mesh to our globe group.
Note: If you run into errors concerning the image link, use this: https://eoimages.gsfc.nasa.gov/images/imagerecords/57000/57735/land_ocean_ice_cloud_2048.jpg
loader.load( 'land_ocean_ice_cloud_2048.jpg', function ( texture ) {
  // Create the sphere  var sphere = new THREE.SphereGeometry( RADIUS, SEGMENTS, RINGS );
  // Map the texture to the material.   var material = new THREE.MeshBasicMaterial( { map: texture, overdraw: 0.5 } );
  // Create a new mesh with sphere geometry.  var mesh = new THREE.Mesh( sphere, material );
  // Add mesh to globe  globe.add(mesh);} );
Now that we have our sphere, let’s position it backwards (along the z axis) so that we can see it:
globe.position.z = -300;
10. Add lighting
Since we used MeshBasicMaterial in the previous step (a material which is not affected by lighting), this next step is dispensable, but I wanted to include it in this tutorial because it’s usually an important component of a 3D scene.
First we’ll create a point light (the library has several other types of light):
const pointLight = new THREE.PointLight(0xFFFFFF);
Now we set the light’s position:
pointLight.position.x = 10;pointLight.position.y = 50;pointLight.position.z = 400;
And then we add it to the scene:
scene.add(pointLight);
At this point, you should see a static globe if you open your HTML file in the browser. Let’s get to animating it!
Creating the Animation
I’m going to be creating two sets of functions: one for rotating the globe with the arrow keys (step 12), and another for rotating it on mouse movement (step 13). Note: I used mostly my own code here. Three.js does provide animation systems and controls, but I haven’t yet successfully implemented this built-in functionality myself.
11. Setup
First, we’re going to set up the updatefunction for the built-in requestAnimationFrame to initially render our scene, and to re-render our scene after changes:
function update () {
  //Render:  renderer.render(scene, camera);
  // Schedule the next frame:  requestAnimationFrame(update);  }
// Schedule the first frame:requestAnimationFrame(update);
12. Rotate on arrow key press
To get our globe rotating based on the arrow keys, first we’ll define a function that takes in a direction and rotates the globe accordingly (based on direction, rotate +-x or +-y):
function animationBuilder(direction) { return function animateRotate() { switch (direction) { case 'up': globe.rotation.x -= 0.2; break; case 'down': globe.rotation.x += 0.2; break; case 'left': globe.rotation.y -= 0.2; break; case 'right': globe.rotation.y += 0.2; break; default: break; } }}Next, we’ll create a directions object in which we’ll store the appropriate animation call per direction:
var animateDirection = { up: animationBuilder('up'), down: animationBuilder('down'), left: animationBuilder('left'), right: animationBuilder('right')}Now we’ll define the listener function we want to occur after a key has been pressed:
function checkKey(e) {  e = e || window.event;  e.preventDefault();
  //based on keycode, trigger appropriate animation:  if (e.keyCode == '38') {    animateDirection.up();  } else if (e.keyCode == '40') {    animateDirection.down();  } else if (e.keyCode == '37') {    animateDirection.left();  } else if (e.keyCode == '39') {    animateDirection.right();  }}
And finally, on key press we will invoke the above listener function:
document.onkeydown = checkKey;
At this point, you should be able to control the rotation of the globe with your arrow keys.
13. Rotate on mouse movement
This is my favorite part, because it almost feels like you’re spinning the globe with your own hands when you’re controlling it with your mouse or trackpad.
To start, we’ll set up an array that stores our previous mouse position, with its start value being at the center of the page:
var lastMove = [window.innerWidth/2, window.innerHeight/2];
Next, we’ll define a listener function to fire when the mouse moves:
function rotateOnMouseMove(e) {  e = e || window.event;
  //calculate difference between current and last mouse position  const moveX = ( e.clientX - lastMove[0]);  const moveY = ( e.clientY - lastMove[1]);  //rotate the globe based on distance of mouse moves (x and y)   globe.rotation.y += ( moveX * .005);  globe.rotation.x += ( moveY * .005);
  //store new position in lastMove  lastMove[0] = e.clientX;  lastMove[1] = e.clientY;}
And finally, we define our event listener:
document.addEventListener('mousemove', rotateOnMouseMove);And there you have it!
Feel free to experiment with the sphere’s texture/image (other planets?), background (add stars?), animations (zooming, resizing…), and so on. There are other three.js globes out there, and I’d love to see your own variations in the comments!
I hope you enjoyed this introductory exercise. Once you get comfortable using this library, be sure to try some more complex tutorials that will actually get you building an interactive VR experience. (Though I’ve got a long way to go myself to fully learning this library, I’m inspired to know that apps like A Short Journey and Paperplanes were created with it.)
You might also be interested in checking out Facebook’s React VR…I know I am!
Recommend
About Joyk
Aggregate valuable and interesting links.
Joyk means Joy of geeK