

Building a Budget Manager with Vue.js and Node.js (Part V)
source link: https://codeburst.io/building-a-budget-manager-with-vue-js-and-node-js-part-v-ae7ddb7d8426?gi=4cbbe5b1a34a
Go to the source link to view the article. You can view the picture content, updated content and better typesetting reading experience. If the link is broken, please click the button below to view the snapshot at that time.
Happy New Year Everyone!
The app is now completed and deployed
Hello everyone and welcome to the last part of this tutorial series, it’s been almost two months since I published part IV of this article. As I’m trying to find a remote or overseas job I had to take a time off to focus on my React & Redux studies, so I apologize for the delay.
The fourth part of this series is here
This is the last part of this tutorial series where we’ll learn how to build a complete Vue.js and Node.js Budget Manager application.
The GitHub repository for this tutorial is here.
Also don’t forget to comment any doubts you have during this tutorial, or even to correct me in any place that I might’ve explained something wrong. And if you know a better way to handle any part of this tutorial, feel free to comment or contact me!
What we’ll be doing today
We’ll be finishing this application, building the creation page so we can add new clients and budgets, their respective edit pages and the necessary improvements to our API.
API Improvements
First lets navigate to our models folder, and open our budget.js file:
We’ll add a description field to our model:
Now navigate to our app/api folder and open budget.js file:
We’ll fix our store function to properly save our new budgets, add the index function so we can get one selected budget, add an edit function to update our budgets, add a remove function to delete budgets and add a getByState function to filter our budgets:
And our client.js file inside our api folder we’ll do the same:
And finally lets add the new routes, go to our routes folder and open budget.js :
And our client.js :
That’s it for our API.
Improvements to our Router
Next we’ll add new components to our routes, so lets open our index.js file inside our router folder:
Here we imported and defined a component named Create and assigned it as a component to our Home route (don’t worry, we’ll build this component in a second).
Building our new Components
Create component
Lets start with the Create component. Navigate to our components/pages folder and create a new file named Create.vue :
The first named slot budget-creation is the component we’ll use to create new budgets, it’ll only be visible when budgetCreation is true and editPage is false, we’ll pass all our clients to it and a method named saveBudget .
The second named slot client-creation is the component used to create new clients, it’ll only be visible when budgetCreation is false and editPage is false, we’ll pass just the method saveClient to it.
The third named slot budget-edit is the component used to edit a selected budget, it’ll only be visible when budgetEdit and editPage are true. We pass all our clients to it, a selected budget and a method named fixClientNameAndUpdate .
And finally our last named slot is used to edit clients, it’ll only be visible when budgetEdit is false and editPage is true, we pass a selected client and a method named updateClient to it.
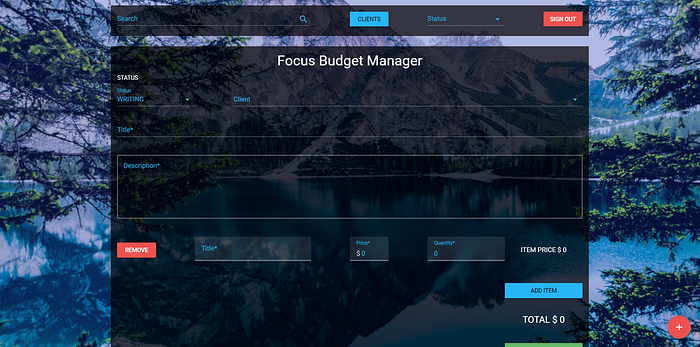
BudgetCreation component
Lets create our component used to create new budgets. Go to our components folder and create a new folder named Creation, and inside of it, create a component named BudgetCreation.vue
I’ll first explain the template of the component, since this is a rather big component:
Template
We first add a v-select to set the state of the budget, then a v-select to choose the desired client. Following that we’ll have a v-text-field for the title of the budget and a v-text-field for the description.
Then we iterate over budget.items so we can add and remove items from the budget item. We have a red button that calls removeItem function passing the item we want to remove.
Following that we have three v-text-field for the item’s title, price and quantity respectively.
At the end of the row we have a simple span which we show the subtotal for that item (quantity * price).
Below our items we have three more elements, a blue button which we use to add more items calling the addItem function, a span which we show the total price of this budget (the sum of every item subtotal) and a green button that we use to save the budget to our database calling saveBudget and passing the budget we want to save as a parameter.
Script
Now the script part:
First we receive two props, clients and saveBudget . These props come from our Home component.
Then we’ll define an object and an array as data. The first one is budget . This object is used to build our budget so we can bind values to it and to save it in our database, it has a title, a description, a state (writing by default), a client, a total price and items, each item has a title, a quantity, a price and a subtotal.
And a states array, which we use to select the state of our budget, every budget can either be writing, editing, pending, approved, denied or waiting.
Below the data we have a couple of methods, addItem and removeItem :
Every time we click the blue button we’ll call addItem , which as the name says, adds an item to our items array inside our budget object.
The removeItem does the opposite, everytime the red button is clicked, we removed the specified item from our budget’s items.
Style
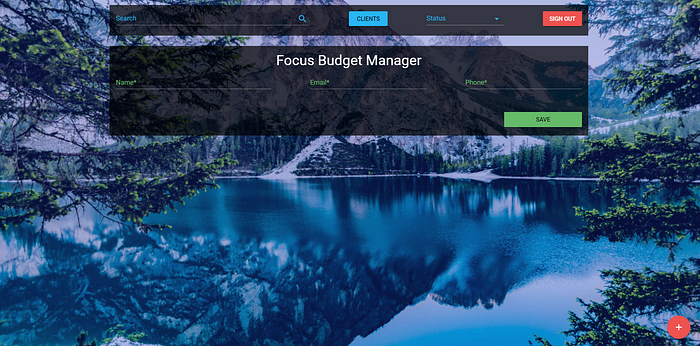
ClientCreation component
This component is a simpler, stripped-down version of our BudgetCreation component:
Template
Script
Style
BudgetEdit component
This component is a modified version of our BudgetCreation component:
Template
The only difference between BudgetEdit’s and BudgetCreation’s template is the save button, which we change the text to “Update” and change the method to fixClientNameAndUpdate instead of using saveBudget
Script
We start by receiving three props, clients , fixClientNameAndUpdate and selectedBudget . The data is identical to BudgetCreation’s. We have a budget object and a states array.
We then have a mounted lifecycle where we call parseBudget , a method we’ll create in a second.
And finally we have our methods :
We’ll have the same two functions from BudgetCreation, addItem and removeItem , but we’ll also have a new one, parseBudget :
We use this method to set this component’s budget object equal to our prop selectedBudget, but we all use it to keep our object subtotal and total price’s updating.
Style
ClientEdit component
Similarly to our last component, this will look just like our ClientCreation, except it’ll use a different method, instead of saveClient we’ll use updateClient
Template
Script
Style
That’s it for new components.
Improving our components
Now we just need to make a few improvements to our existing components and we are all set.
Let’s start by our ListBody component:
Template
We need to make a couple of fixes and additions to this component, we first adda new condition to our md-list-item ‘s v-if
parsedBudgets === null
And we also remove the first button, which we’d use to visualize our budget since it’s not necessary anymore as we’ll be able to see our budget when we click on edit.
We add getItemAndEdit method to our (now) first button and deleteItem to our last button, passing the item, the data and the budgetsVisible variable as parameters.
Below that we have another md-item-list block which we use to show filtered budgets from our search input.
Script
We receive a lot of props in this component:
- data: is either budgets or clients, never both
- budgetsVisible: to check if we’re seeing budgets or clients, it’s either true or false
- deleteItem: a function that accepts an item as a parameter
- getBudget: a function that we use to get a single budget so we can edit it
- getClient: a function that we use to get a single client so we can edit it
- parsedBudgets: budgets that we filtered using our search input
We have just one method for this component, getItemAndEdit , it accepts an item as a parameter and wether the item has a phone property we decide if it’s a client or a budget.
Style
Now lets improve our Header component:
Template
Firstly, we change the v-model of our search input to searchValue .
We also modify our v-select so we bind the method selectState to it’s change event.
Script
We added two new props, selectState which is a function and search which is a string.
We modified our data’s search to searchValue and lowercased our statusItem array items.
Style
And finally we’ll modify our Home component:
Template
This was by far the most modified component, now we pass budgetsVisible , selectState , search and toggleVisibleData as props, we also toggle another variable in toggleVisibleData and we add a v-model to search .
in our list tag we add a v-if so it’s only displayed when we are in a listing page, we added a lot of new props to our list-body .
we added a create tag, which acts similar to list , but we only display it when we are in a creation page, we pass all client and budgets data to it, and all get and update methods too.
We added two new buttons to our v-fab-transition so we can list budgets, clients and create budgets and clients.
Script
We added a lot of new data to this component
- parsedBudgets: we use this as an array to store all budgets filtered by our search
- budget: the selected budget so we can edit it
- client: the selected client so we can edit it
- state: the selected state so we can show only budget’s with this state
- search: our search filter used in our search input
- budgets: all budgets fetched from our API
- clients: all clients fetched from our API
- budgetHeaders: array used to render the texts of our table’s headers
- clientHeaders: array used to render the texts of our table’s headers
- budgetsVisible: used to define if we’re listing budgets or clients
- snackbar: used to display our snackbar
- timeout: snackbar’s timeout
- message: snackbar’s message
- fab: the state of our FAB, default is false
- listPage: used to check if we’re inside a listing page, default is true
- createPage: used to check if we’re inside a creation page, default is false
- editPage: used to check if we’re inside an edit page, default is false
- budgetCreation: used to check if we’re creating a budget or client, default is true
- budgetEdit: used to check if we’re editing a budget or client, default is true
- snackColor: color of our snackbar
Our mounted lifecycle is the same in this component, we fetch for all budgets and clients.
We added a watch function to our search input thanks to @mrmonkeytech for the simple regex solution (I was overengineering it).
We improved all our methods and added a lot of new ones:
getAllBudgets we added new parameters to our dataParser, and now we call errorHandler on our catch block.
The same for our getAllClients
we added getBudget and getClient which are responsible to fetching only the selected item from our API.
enableEdit accepts a string as parameter, sending us to the edit page of the respective item.
saveBudget and saveClient are used to save our item to our database
fixClientNameAndUpdate is used to set the right name to our client based on his id and to update the budget in our database calling updateBudget
updateBudget is used to update our budget in our database
updateClient is used to update our client in our database
deleteItem is a generic function used to delete an item from our database, it accepts a selected (which is the selected item) parameter, an items (which is either budgets or clients) parameter and an api parameter, which is a string
errorHandler is our method to handle errors
removeItem is used within deleteItem to remove the item from our app after it’s removed from the database
dataParser is still the same, we didnt change it
resetFields is used to reset all items to default after we create a new item, so the client can add as many budgets or clients as he wants without needing to delete every field after every save.
selectState is used to select the right state from our header’s v-select and filter our list based on it
getBudgetsByState is used within selectState to fetch just budgets with the selected state
Style
What’s next
We finally finished this tutorial series, I intend to write more tutorials as I’m learning just as much as you from them. I’ll start writing React + Redux tutorials and also Phaser tutorials for game development.
If you’re interested in more tutorials and articles from me, don’t forget to follow me here on medium or github.
This was a great opportunity for me to learn and to try and teach you what I could, if you think I could have done something differently dont hesitate to message me here or email me!
Thank you all for everything!
Recommend
About Joyk
Aggregate valuable and interesting links.
Joyk means Joy of geeK