

Build Custom “Serverless” Push Notifications for Any Website in 6 Minutes with S...
source link: https://medium.com/@jacoblee93/build-custom-serverless-push-notifications-for-any-website-in-6-minutes-with-stdlib-and-phantomjs-ea67c988801f
Go to the source link to view the article. You can view the picture content, updated content and better typesetting reading experience. If the link is broken, please click the button below to view the snapshot at that time.
Build Custom “Serverless” Push Notifications for Any Website in 6 Minutes with StdLib and PhantomJS
Push notifications are a great way to stay informed on content you’re interested in. However, not every website supports them. For example, have you ever wanted to know when one of your favorite npm packages updates? How about when your favorite author on Medium publishes a new story?
I’ll here show you how you can create custom push notifications that trigger when a website changes. We’ll use a Node binding for PhantomJS to get the contents of a webpage, then use a StdLib scheduled task to look for the changes we’re interested in and send a text message alert when appropriate.
The initial version of the service will trigger when a new version of an npm package is released, but you’ll be able to adapt it to any website that you want!
If you haven’t heard of StdLib before, we’re the fastest way to build backend web services and ship real business value. Built on “serverless” architecture, you never have to worry about managing servers or allocating resources for scale. Write a function, deploy, and you’re ready to go! We also have a growing ecosystem of easy-to-use integrations created by our developers.
Minute 1: Claim Your StdLib Namespace

Getting started with StdLib is easy — head over to our website, choose a username and hit “Claim Namespace”. Your namespace, or username, is where all your services get published. For instance, your push notification service will be called lib.<username>.custom-push-notifications.
Minute 2: Fork the Push Notification Sourcecode
In order to deploy services to StdLib, you’ll need to install our open source command line tools. If you don’t have at least Node.js version 8.x installed, you can download the latest version, along with npm, here.
With Node installed, you can install the StdLib CLI by opening up a terminal and running:
$ npm install lib.cli -g
Next, we’re going to create a workspace for your StdLib functions. Create a new folder and initialize it with the following commands:
$ mkdir stdlib-workspace
$ cd stdlib-workspace
$ lib init
You’ll be prompted to enter the credentials you just created earlier. Next, let’s get the starter code for your push notification service. Run the following command from your terminal:
$ lib create -s @jacoblee/custom-push-notifications
You’ll be prompted for a service name. You can name it whatever you’d like, but the rest of this tutorial will assume it’s custom-push-notifcations.
The previous command created a directory containing your service. You’ll do all management for your service from that directory. Navigate there with:
$ cd <username>/custom-push-notifications
Minute 3: Create Your Environment Variables
The logic for your service is contained entirely in the __main__.js file in the functions directory of the service. It retrieves the contents of a webpage at the url parameter you pass in, searches for a value (the npm version string in the default example) using a regex, then compares it to a stored value. If the value has changed, it sends an alert using the utils.sms function and updates the stored value. Pretty simple!
Before we deploy our service, we have to fill in some environment variables. Open the env.json file found in the root of the service directory you just created. There are two fields: STDLIB_TOKEN and ACCESS_KEY.
The STDLIB_TOKEN you supply is used to authorize the utils.storage StdLib function call. You can find a token in your StdLib dashboard under the “Library Tokens” tab. Paste it into all three fields of your env.json file: local, dev, and release.
ACCESS_KEY functions much like a password — it’s a token that you’ll generate ahead of time, then pass to your function so that only you can call it. You can use the following token generation service by opening your terminal and running:
$ lib steve.generateToken
You can also use this code snippet locally:
Or any other method you’d like. Paste the generated access key into the appropriate field in your service’s env.json file, again in all three places. Keep it handy, we’ll need it to test and run your service!
Minute 4: Test Your Service
As mentioned earlier, the default version of your service will check for updates to an npm package. To test this, we recommend publishing a new, test npm package so that you can publish new versions with no consequences.
From a new terminal window, create a directory using mkdir, then cd into it. If you haven’t signed up for npm, you can follow these directions to sign up.

Once you’ve logged into your created npm account, run $ npm init and name your package (it must be globally unique in npm’s registry). The defaults will do for the other prompted fields. This will create a package.json file in the directory. Finally, run $ npm publish to push your test package live.
Then, go back to the directory containing your StdLib service (stdlib-workspace/<username>/custom-push-notifications) and run the following command to test your service locally:
$ lib . \
--url https://npmjs.com/package/<your package name> \
--tel <your phone number> \
--accessKey <the ACCESS_KEY env variable you set earlier>
This will set the initial value of the npm package that your service will check against. Run the command again — you should not get a notification because the version number has not changed, and the service will return false.
Go back to your other terminal window and open the package.json file of the npm package you just created. Increment the version number of the package. Run npm publish again to republish your service.
Finally, run the above lib command again. The service will return true and you should get a text message notifying you that the website has changed!
Minute 5: Release The Kraken!
When you’re ready, run the following command from your service directory:
$ lib release
This will release your service to the StdLib registry, and will allow you to create a scheduled task with it. This task will run on a specified time interval, and will run your service to check for changes.
Minute 6: Run Your Service With a Scheduled Task
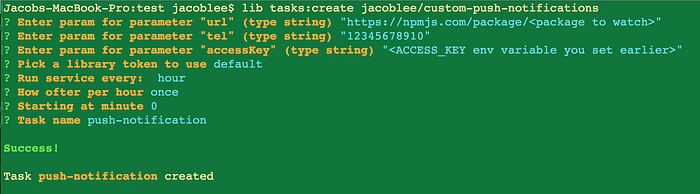
Now that you’ve tested and released your service, let’s set up a scheduled task to check for changes. Run the following from your terminal:
$ lib tasks:create <username>/custom-push-notifications
The resulting prompt will ask you for a URL. Type in the URL for the page of the actual npm package you want notifications for. Don’t forget to use quotes!
Then, supply your desired phone number and the access key you set earlier. Choose one of your StdLib library tokens and choose how often you want to check for changes. We recommend once every hour, but if you want to check more frequently, you can set your task to run more often. You can type lib tasks:list to see the created task.
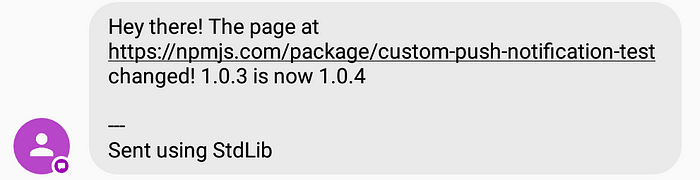
And that’s it! You now have a custom push notification when an npm package updates.
Extending to Other Notifications
You can customize the code to match other parts of a website and release it as another scheduled task by repeating the process in the article. Just modify the logic within the evaluate method in functions/__main__.js to use different logic tailored to the site you want to set up a push alert for. You can use something like Chrome’s devtools to inspect the DOM for a page and help you craft your query. Then test locally, release it as a new service with $ lib release, and create a new scheduled task with $ lib tasks:create.
You can also replace the lib.utils.sms function call to use any notification channel you want —for example, Slack is a great choice.
And that’s it! Thanks for reading! For more content, features, and announcements, stay tuned by following us on Twitter @StdLibHQ or me @hacubu. You can also join our Slack channel by going to our homepage and requesting an invite under the “Community” tab. Reach out anytime.
I can’t wait to see what you build!
Jacob Lee is one of the co-founders of StdLib and firm believer in the FaaS future. He’s an east-coast transplant and ex-Googler who loves skiing, playing squash, and traveling. Follow him on Twitter @hacubu!
Recommend
About Joyk
Aggregate valuable and interesting links.
Joyk means Joy of geeK