

Divide, compress and conquer: Building an Earth data server in Go (Part 1)
source link: https://medium.com/@p.rozas.larraondo/divide-compress-and-conquer-building-an-earth-data-server-in-go-part-1-d82eee2eceb1
Go to the source link to view the article. You can view the picture content, updated content and better typesetting reading experience. If the link is broken, please click the button below to view the snapshot at that time.
Divide, compress and conquer: Building an Earth data server in Go (Part 1)
This is the first article in a series of three, studying the problem of serving large satellite images using NASA’s Blue Marble image and the Go programming language. This first article presents options for storing large satellite images using files and discusses the differences in performance when accessing the data. The second article focuses on compression, demonstrating the benefits of fast compressors when storing and accessing large datasets. The third goes through the steps for exposing an efficient Blue Marble server using the Google Cloud Platform.
The Blue Marble is a famous image of the Earth taken from space by the crew of the Apollo 17 mission in 1972. In 2005, NASA released a new series of photo mosaics of the Earth named Blue Marble Next Generation. In this article, we will use one of these images and the Go programming language to create an efficient Earth data server that delivers tiles containing regions of the original image.
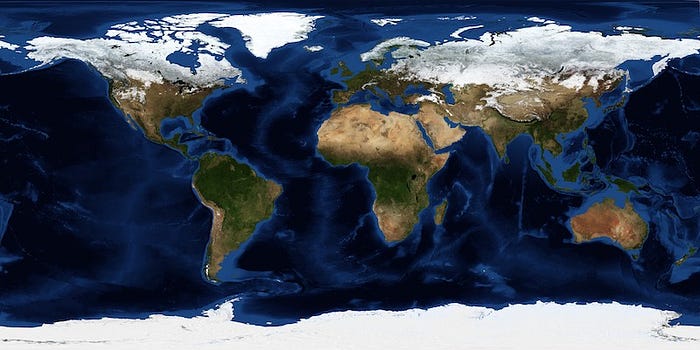
December 2004, Blue Marble Next Generation. Credit: Reto Stöckli, NASA Earth Observatory
This image is made available in different resolutions. The largest version containing the whole Earth is 21600 by 10800 pixels and the PNG file is 181 megabytes. This is quite a large image and you will notice that just opening it on your computer takes a few seconds.
Go has a great image manipulation package as part of the standard library, which includes decoders and encoders for image formats such as JPEG, PNG and GIF. Decoding a PNG image returns an image.Image interface which, in this case, has an underlying type of image.RGBA. This type declares a SubImage method which is very useful for selecting areas of an image. Using this method, we can easily create a function that returns a 400x400 pixel area centred around a pair of input coordinates representing any place in the world.
const (
     xSize  = 21600
     pixDeg = xSize / 360
     fileName = "world.topo.bathy.200412.3x21600x10800.png")func Region(lat, lon float64) image.Image {
     // i & j contain the pixel position of the input coordinates
     i := int(.5 + (lon+180)) * pixDeg
     j := int(.5 + (90-lat)) * pixDeg
     rect := image.Rect(i-200, j-200, i+200, j+200)     data, _ := os.Open(fileName)
     img, _ := png.Decode(data)
     tile := img.(*image.RGBA).SubImage(rect)

return tile
}
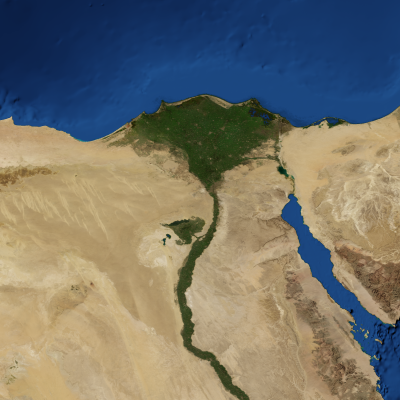
Blue Marble Next Gen. 400x400 tile centred around the Nile delta (lat=29.85, lon=31.0).
With my MacBook Pro, it takes around 9 seconds to generate each tile. Most of this time is spent decoding the original PNG image. This might be fine for certain applications, but in the case of exposing this functionality as a web service, each user would need to wait a long time before receiving a request. You might be thinking that decoding the image in each request is a bad idea, as we only need to load it once in the main function of the program. This is true in the case of serving a single image, but imagine you have thousands or even millions of different images that need to be exposed.
Using the PNG format might not be the most efficient way of serving large images, but in our case, memory consumption is a bigger problem, and will limit the scalability of our Earth data server even further. For each request, the entire image is loaded in memory, when users are requesting just a small subset of it. Once decompressed, the proposed PNG image grows from 181 to 890 megabytes. Thus, the server will need to allocate more than one gigabyte of memory per request. This imposes a huge limitation in the number of concurrent requests that our server can handle, as it will quickly run out of memory.
A simple solution that would both improve the data access time and reduce the memory footprint is to divide the original image into a set of adjacent tiles. Taking a tile size of 400x400 pixels, our original 21600x10800 pixels image would get divided in a 54x27 grid with a total of 1458 tiles. The following code shows how these tiles can be generated from the original Blue Marble image.
const (
     xSize  = 21600
     ySize  = 10800
     tileSize = 400
     tileName = "world.topo.bathy.200412.3x400x400.%02d.%02d.png"
)

func GenerateTiles(img image.Image) {
     for i := 0; i < xSize/tileSize; i++ {
          for j := 0; j < ySize/tileSize; j++ {
                rect := image.Rect(i*tileSize, j*tileSize,
                        (i+1)*tileSize, (j+1)*tileSize)
                tile := img.(*image.RGBA).SubImage(rect)
                out, _ := os.Create(fmt.Sprintf(tileName, i, j))
                png.Encode(out, tile)
          }
     }
}
The resulting tiles have sizes between 20 and 400 kilobytes, depending on the effect of the PNG compression on each image. As you can see in the code snippet above, each tile is uniquely identified, extending the original file name convention with a horizontal and a vertical index. By decomposing the original file in a collection of tiles, we are aiming to improve the access speed to the data and reduce its memory footprint. But there is one problem: the tiles we have created contain fixed, non-overlapping regions of the world, but it is unlikely that they contain exactly the region requested by our users.
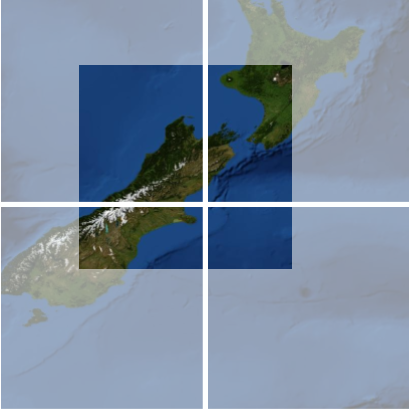
400x400 pixels region in New Zealand composed by cropping and stitching 4 adjacent tiles.
In order to generate an image of any region in the world, we need a way to identify the tiles that contain a given region, and also a method for stitching them into an image. The function below this paragraph, called Mosaic, contains similar functionality to the previous Region function. It receives a pair of coordinates and outputs the corresponding image, using the tiles just produced. This function might seem complicated at first, as it has to compute the indexes to locate each tile and also compute the indexes to crop each tile and to stitch them back at the right place into the output image. If you read the code, you’ll notice that this function basically consists of a double for loop that iterates through the tiles by rows tileR and columns tileC, stitching them into the output image using the image draw.Draw function.
const (
     xSize  = 21600
     pixDeg = xSize / 360
     tileSize = 400
     tileName = "world.topo.bathy.200412.3x400x400.%02d.%02d.png"
)func Mosaic(lat, lon float64) image.Image {
     i := int(.5+(lon+180)) * pixDeg
     j := int(.5+(90-lat)) * pixDeg     tileC0 := (i - 200) / tileSize
     tileC1 := (i + 199) / tileSize
     tileR0 := (j - 200) / tileSize
     tileR1 := (j + 199) / tileSize     canvas := image.NewRGBA(image.Rect(0, 0, tileSize, tileSize))     offYCanvas := 0
     for tileR := tileR0; tileR <= tileR1; tileR++ {
          y0 := 0
          y1 := tileSize
          if tileR == tileR0 {
                y0 = (j - 200) % tileSize
          }
          if tileR == tileR1 {
                y1 = (j+199)%tileSize + 1
          }
          offXCanvas := 0
          for tileC := tileC0; tileC <= tileC1; tileC++ {
                data, _ := os.Open(fmt.Sprintf(tileName, tileC, tileR))
                tile, _ := png.Decode(data)                x0 := 0
                x1 := tileSize
                if tileC == tileC0 {
                      x0 = (i - 200) % tileSize
                }
                if tileC == tileC1 {
                      x1 = (i+199)%tileSize + 1
                }                rect := image.Rect(offXCanvas, offYCanvas,      offXCanvas+x1-x0, offYCanvas+y1-y0)
                draw.Draw(canvas, rect, tile.(*image.RGBA), image.Pt(x0, y0), draw.Over)                offXCanvas += x1 - x0
          }
          offYCanvas += y1 - y0
     }     return canvas
}
This new function takes on my computer less than 100 milliseconds to complete for any location in the world. This is about 100 times faster than the original function, and, even better, uses about 1/350th of the memory. This is quite amazing and places us in a much better position when having to expose this functionality as a web service.
The complete code to reproduce these experiments can be found in this repository. The functionality is exposed as stand-alone programs that receive the latitude and longitude values as command line flags. In the third article of this series, we’ll cover how this service can be offered on the cloud. Meanwhile, you can easily wrap the Mosaic function as an http Handler interface and test it on your computer.
In the next article, we’ll see how these results can be improved even further, using a curious effect of compression — stay tuned!
Recommend
About Joyk
Aggregate valuable and interesting links.
Joyk means Joy of geeK