

An introduction to Joplin, an open source Evernote alternative | Opensource.com
source link: https://opensource.com/article/17/12/joplin-open-source-evernote-alternative
Go to the source link to view the article. You can view the picture content, updated content and better typesetting reading experience. If the link is broken, please click the button below to view the snapshot at that time.
An introduction to Joplin, an open source Evernote alternative

opensource.com
Joplin is an open source cross-platform note-taking and to-do application. It can handle a large number of notes, organized into notebooks, and can synchronize them across multiple devices. The notes can be edited in Markdown, either from within the app or with your own text editor, and each application has an option to render Markdown with formatting, images, URLs, and more. Any number of files, such as images and PDFs, can be attached to a note, and notes can also be tagged.
I started developing Joplin when Evernote changed its pricing model and because I wanted my 4,000+ notes to be stored in a more open format, free of any proprietary solution. To that end, I have developed three Joplin applications, all under the MIT License: for desktop (Windows, MacOS, and Linux), for mobile (Android and iOS), and for the terminal (Windows, MacOS, and Linux). All the applications have similar user interfaces and can synchronize with each other. They are based on open standards and technologies including SQLite and JavaScript for the backend, and Terminal Kit (Node.js), Electron, and React Native for the three front ends.
Joplin is offline-first, so data is always available on the device, even without an internet connection.
Synchronization
One of my goals when creating Joplin was to avoid being tied to any particular company or service for synchronization. As such, its synchronization is designed without any hard dependency to any particular service. Most of the synchronization process is done at an abstract level, and access to external services, such as OneDrive or Dropbox, is done via lightweight drivers. It is easy to support new services by creating simple drivers that provide a filesystem-like interface, i.e. the ability to read, write, delete, and list items.
Switching from one service to another or even to syncing to multiple services at once is possible. Each note, notebook, and tags, as well as the relationships between items, is transmitted in plaintext files during synchronization, which means the data can also easily be moved to a different application, backed up, inspected, etc. This synchronization backend is designed to be durable and future-proof.
Currently, synchronization is possible with OneDrive (by default) or the local file system (which allows synchronizing via a network share). A Dropbox driver will also be available once this React-Native bug is fixed. When syncing with OneDrive, Joplin creates a subdirectory in OneDrive, in /Apps/Joplin, and reads/writes the notes and notebooks from it. The application does not have access to anything outside this directory.
To initiate the synchronization process, follow these steps:
- Desktop application: Click on the Synchronise button in the sidebar. You will be asked to log into OneDrive to authorize the application (simply input your Microsoft credentials; you do not need to register with OneDrive). After that, the application will synchronize in the background whenever it is running, or you can click on Synchronise to start a manual synchronization.
- Terminal application: Type
:sync. You will be asked to follow a link to authorize the application. After that, the application will synchronize in the background whenever it is running. You can also synchronize outside of the user interface by typingjoplin syncfrom the terminal. This can be used to set up a cron script to synchronize at regular intervals. For example, this would do it every 30 minutes:*/30 * * * * /path/to/joplin sync - Mobile application: Click on the Synchronise button and input your OneDrive credentials.
Attachments
Any kind of file can be attached to a note; in Joplin these are called "resources." In Markdown, links to these files are represented as a simple ID to the resource. In the note viewer, image files will be displayed, and PDFs, text files, or other types of files are displayed as links. Clicking on the link will open the file in the default application.
Importing notes from Evernote
Joplin was designed as a replacement for Evernote, so it can import complete Evernote notebooks, as well as notes, tags, resources (attached files), and note metadata (such as author, geolocation, etc.) via ENEX files. To import Evernote data, first export your Evernote notebooks to ENEX files.
To import your notebooks to Joplin, follow these steps:
- Desktop application: Open the File menu and click Import Evernote notes, then select your ENEX file. This will open a new screen that will display the import progress. The notes will be imported into a separate, new notebook (this is so, in case of a mistake, the notes are not mixed up with any existing notes). If needed, they can then be moved to a different notebook, the notebook can be renamed, etc.
- Terminal application: In command-line mode, type
import-enex /path/to/file.enex. This will import the notes into a new notebook named after the filename. - Mobile application: Currently importing Enex files from the mobile application is not supported. The way to get notes from Evernote into the mobile app is to first import them from the desktop application, and then synchronize with the mobile one.
Comparing the desktop, mobile, and terminal applications
There are differences among the three applications.
Desktop application
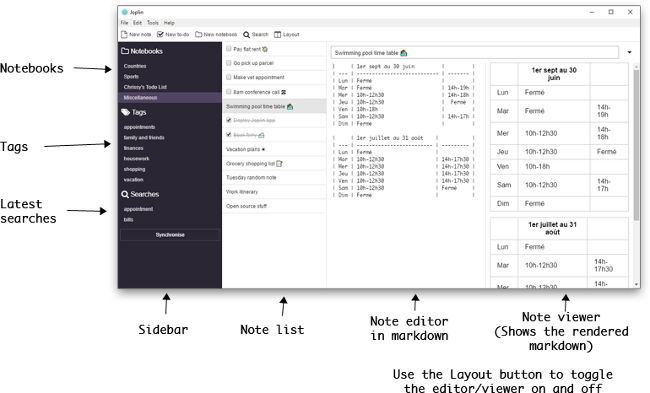
opensource.com
The desktop application is available on Windows, Linux, and MacOS. The main view shows a sidebar with the list of notebooks and tags, the list of notes, and the content of the currently selected note. The main difference in the desktop application is that notes are displayed in a dual view, with the editable Markdown text on one side and the rendered note on the other side. It is possible to display only the note editor, only the view, or both by clicking on the Layout button in the toolbar.
Terminal application
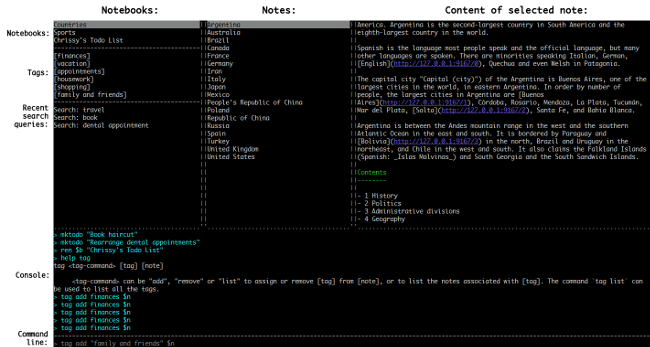
opensource.com
The terminal application is available on Windows (via WSL), Linux, and MacOS. To install it on Windows or Linux, type:
npm install -g joplinOn macOS it is preferable to use Homebrew, and install the application using:
brew install joplinIf the application does not install due to permission issues, please make sure that your global npm permissions are correct.
To start the application, type joplin. This will open the user interface, which has three main panes: Notebooks, Notes, and the text of the current note. There are also additional panels that can be toggled on and off via shortcuts. To create a new note, type tc. To edit a note, select it and press Enter.
Mobile application
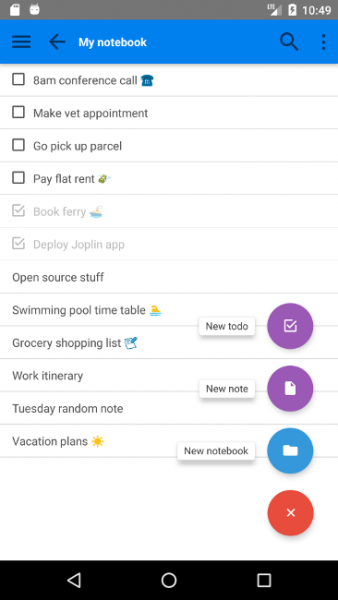 opensource.com |
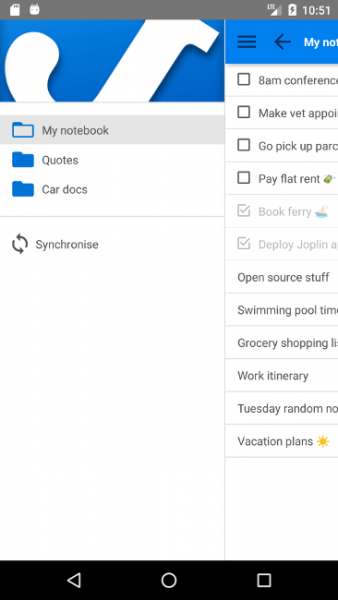 opensource.com |
The mobile application is available on iOS and Android. Like the other applications, it has a Markdown editor to enter the notes. Once the note has been created, it will display the rendered text with formatting. You can then switch between the editor and the rendered note with the Edit and Back buttons. The notes and notebooks can be synchronized with the desktop or terminal applications.
Interacting with Joplin
Joplin's user interface is partly based on the text editor Vim and offers two different modes to interact with the notes and notebooks:
- Normal mode allows moving from one pane to another using the Tab and Shift+Tab keys, and selecting/viewing notes using the arrow keys. The text area can be scrolled using the arrow keys, too. Press Enter to edit a note. Various other shortcuts are available.
- Command-line mode can be started by pressing
:. From there, Joplin commands such asmknoteorsearchare available. See the full list of commands.
While you can refer to a note or notebook by title or ID, the simplest way is to use one of these shortcuts to refer to the currently selected item:
| Shortcut | Description |
|---|---|
| $n | Refers to the currently selected note |
$b |
Refers to the currently selected notebook |
$c |
Refers to the currently selected item, e.g, if the note list is current active, $c will refer to the currently selected note. |
Here are some examples:
Create a new note with title "Wednesday's meeting":
Create a new to-do:
Move the currently selected note ($n) to the notebook with title "Personal":
Rename the currently selected notebook ($b) as "Something":
Attach a local file to the currently selected note ($n):
The configuration can also be changed from command-line mode. For example, to change the current editor to sublime text:
Getting help
Complete usage information is available in command-line mode by typing one of these commands:
| Command | Description |
|---|---|
help |
General help information |
help shortcuts |
Lists the available shortcuts |
help [command] |
Displays information about a particular command |
If the help is not fully visible, press Tab multiple times until the console is in focus, and use the arrow keys or Page Up/Page Down to scroll the text.
Recommend
About Joyk
Aggregate valuable and interesting links.
Joyk means Joy of geeK