

SAP Cloud Integration SOAP Sender
source link: https://community.sap.com/t5/technology-blogs-by-members/how-to-build-soap-service-in-sap-cloud-integration/ba-p/13669947
Go to the source link to view the article. You can view the picture content, updated content and better typesetting reading experience. If the link is broken, please click the button below to view the snapshot at that time.
In this post we will look at SOAP Sender adapter in SAP Cloud Integration and how to configure it, when building an endpoint, which will provide some kind of a service. We will go step by step.
1. Design
First of all we have to conceptually design our SOAP service - what it will be used for, what is the input, what is the output. In the end, all it does is it returns data based on data provided.
Let's say we are building a simple service, where the input will be an ORDER NUMBER, and the service returns ID and DATE of the related invoice, issued against this order. That is our simple conceptual design of the service.
2. WSDL
Next, we will need a WSDL, which is a data definition of a service, but this time it is a formal structured XML document. We can also look at it as our conceptual design, but converted into a language understood by a program.
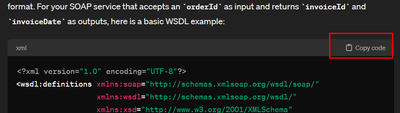
The easiest way how to get such WSDL is to request it from an AI tool. We will use ChatGPT. The request is quite straightforward: Create WSDL for a SOAP service. The input is 'orderId' and the output of that service is 'invoiceId' and 'invoiceDate'
ChatGPT will tell you a few words about the service and provide you with a full code. Just copy the code and save it locally on your computer. You can call the file 'Invoice-details.wsdl'. I also saved it as attachment to this post, you just need to rename the extension to .wsdl
As ChatGPT will also perfectly explain the service for you in more details, I will stick to the technical configuration here.
3. Integration flow
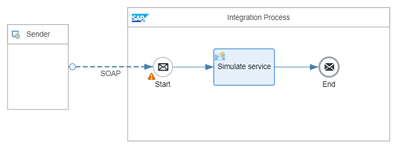
Now let's create an integration flow from scratch. Add a Sender component and drag a connector to the Start event. In the Adapter menu select SOAP and in the subsequent menu select SOAP 1.x
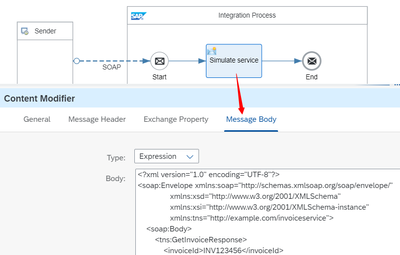
Place a Content modifier after the Start event component. It will be simulating our service - providing invoice Id and Date. Leave it empty for now, we will get back to it in point 6.
Our simple iflow now looks as follows:
4. SOAP adapter
Double click the SOAP adapter (the dashed line between Sender and Start event) and go to Connection tab. In the Address specify the name of the service, which will be the last string of our URL. We can call it '/invoice-details', as that is what the service will do - give us details about an invoice.
As Service Definition select 'WSDL'.
In URL to WSDL click 'Select', in the dialog window click 'Upload from File System' and select the WSDL we saved locally. If you can't see it, make sure you really named the file with .wsdl extension.
The tab should look like this:
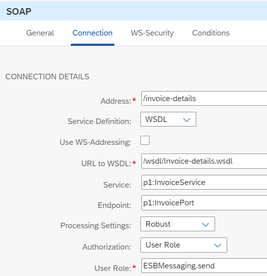
You can see that Service and Endpoint were filled out automatically from the WSDL provided.
Save your iflow now.
5. Namespace configuration
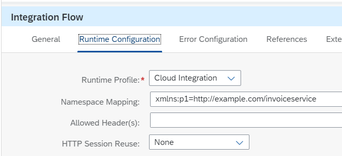
One more thing to check, just for info - click anywhere in the canvase around our iflow, so that the Integration Flow configuration pops up. Go to Runtime Configuration tab and see that the system also filled out the Namespace Mapping. The 'p1' in the SOAP adapter configuration represents the whole string of the namespace.
6. Service simulation
Last, let's simulate the service by Content modifier component. Our design said that it returns invoice Id and invoice Date based on an order Id. In the real life, there would be probably a Request Reply component, calling an ERP system, which actually returns the data. In our simple scenario, we just overwrite the message body. To stick to the WSDL, we format the response as follows (see as attachment to the blog as well).
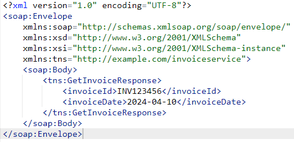
What we did is that we hard-coded the output values as invoiceId and invoiceDate. For the demonstration purpose this is sufficient, we are not dealing with the service logic here, rather with the SOAP endpoint instead.
Paste this text in the Content Modifier body:
7. Deploy
Save and deploy the iflow.
Wait a few minutes for the endpoint to take effect, then go to SCI Monitor -> Manage Integration Content, find your iflow (I named it 'soap_sender_test') and the URL will be available. The iflow must be deployed. If you undeploy it, the URL will disappear from here.
Remember we named the SOAP Address '/invoice-details'? So here we have it.

Great! We have a URL which we can call from external client or from SCI itself. In following blog post we will see how to do that.
Recommend
About Joyk
Aggregate valuable and interesting links.
Joyk means Joy of geeK