

HTTP命令行工具HTTPie
source link: https://www.biaodianfu.com/httpie.html
Go to the source link to view the article. You can view the picture content, updated content and better typesetting reading experience. If the link is broken, please click the button below to view the snapshot at that time.
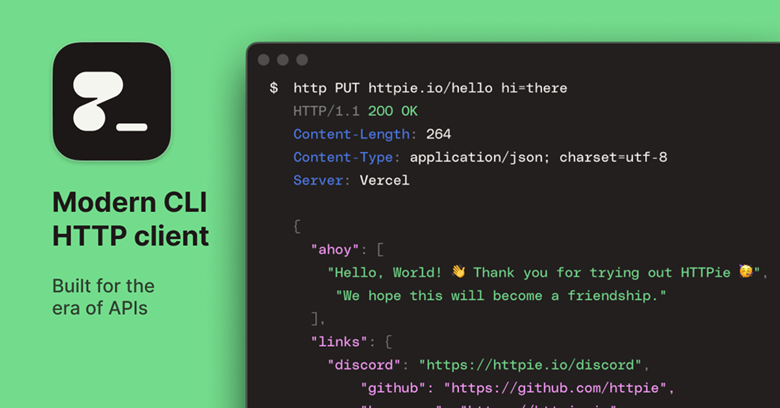
HTTPie简介
HTTPie是一个命令行HTTP客户端。它的目标是使CLI(命令行接口)交互变得更加人性化。它提供了一个简单、直观、自然语言感觉的语法,并且在网络上广为使用。它提供了一个简单的 http 命令,可以让我们用简单自然的表述发送任意 HTTP 请求 ,并且可以输出带代码高亮的结果。HTTPie 可以使用在测试、调试以及通用的与 HTTP 交互场景。
HTTPie的主要特性包括:
- 支持HTTP/1.1、HTTPS、HTTP/2、WebSocket等协议。
- 支持请求数据、文件、表单和JSON的发送。
- 支持基于数字证书、基本验证、摘要验证和自定义验证的认证。
- 支持自定义请求头。
- 支持请求和响应数据的美化、颜色标记和格式化。
- 支持多种会话方式。
- 支持插件。
HTTPie通常用于测试、调试和通常的HTTP通信,是一个易于使用的、功能丰富的HTTP命令行工具。
HTTPie 与CURL、wget的区别
HTTPie、CURL和Wget都是非常流行的HTTP命令行工具,它们都可以发送各种HTTP请求,下载文件,进行网络探测等。尽管它们有许多共同点,但在一些关键方面上存在一些重要的区别。
- 用户体验和易用性。HTTPie的设计目标之一就是建立一个对用户友好的HTTP客户端。它采用了易于理解的语法,对请求和响应数据进行彩色标记和格式化,使得在命令行中进行HTTP交互变得更加清楚和方便。相比之下,CURL和Wget的命令行参数和语法可能需要一些学习和熟悉。
- 功能。CURL和Wget提供了大量的选项和功能,它们可以完成网络上几乎任何可能的任务。CURL支持众多协议(如FTP,SFTP,SMTP等),并且提供了许多灵活的选项。Wget主要用于递归下载,即在下载网页时获取所有链接的内容。
- 相比之下,HTTPie主要专注于HTTP(s)协议,虽然它的功能可能不如CURL和Wget那么多,但它为HTTP提供了一些非常易用且强大的功能,比如自动JSON支持,语法高亮,表单和文件上传等。
- 广泛的使用。CURL和Wget由于历史更久,被广泛地用于各种系统和应用中,很多系统甚至在默认安装时就已经包含了这两个工具。HTTPie相对较新,但由于其易用性和强大的HTTP功能,也正在变得越来越流行。
总的来说,HTTPie、CURL和Wget各有优势,使用哪一个主要取决于你的具体需求和喜好。如果你需要一个简单易用且专注于HTTP的工具,那么HTTPie可能是一个不错的选择;如果你需要一个支持多种协议和复杂选项的工具,那么CURL可能更适合你;如果你需要进行递归下载,那么你可能需要使用Wget。
HTTPie的安装
Linux/MacOS上的安装
# 在Debian和Ubuntu上:
sudo apt-get install httpie
# 在Fedora上:
sudo dnf install httpie
# 在CentOS和RHEL上:首先你需要启用EPEL仓库,然后可以使用yum来安装:
sudo yum install httpie
# 在macOS上:如果你使用Homebrew,你可以通过以下命令来安装:
brew install httpie
Windows上的安装
HTTPie是用Python编写的,所以另一种跨平台的安装方法是通过Python的包管理器pip来安装:
pip install --upgrade httpie
这可能需要管理员权限,如果你没有这个权限,你可以把–user参数加到命令行的尾部:
pip install --upgrade --user httpie
以上安装完成后,你可以通过在命令行输入http –version来验证HTTPie是否已经成功安装。
HTTPie的使用
HTTPie的使用非常直观和简单,其基本的使用格式如下:
http [flags] [METHOD] URL [ITEM [ITEM]]
- `METHOD`是HTTP方法,如GET,POST,PUT,DELETE等。如果没有指定,HTTPie默认使用GET,但如果你提供了请求数据,它则默认使用POST。
- `URL`是你请求的网址。
- `ITEM`是可选的键值对,可以是请求头或请求数据。
在HTTPie的语法中,flags(或称为options)是用来改变HTTPie命令行行为的特殊参数。它们在命令行中以短格式(例如:-a)或长格式(例如:–auth)出现。
以下是一些常见的HTTPie flag:
- -h 或 –help:显示帮助信息。
- -v 或 –verbose:提供更详细的输出,包括请求头和响应头。
- -j 或 –json:让HTTPie把请求数据发送为JSON格式(设置Content-Type头为application/json)。
- -f 或 –form:让HTTPie把请求数据发送为表单格式(设置Content-Type头为application/x-www-form-urlencoded)。
- -a 或 –auth:用于身份验证,后面跟着用户名和密码。例如:–auth username:password。
- -p 或 –print:指定哪些组件(请求头、响应头、请求体、响应体等)应被打印出来。
这只是一小部分flag,HTTPie提供了很多其他用于调整行为、定制请求和控制输出的flag。具体的列表可以查看HTTPie的官方文档或在命令行中运行http –help来查看。
也可以使用 http –help 来查看更多使用方法。
下面主要以 http://httpbin.org 网站来进行测试
HTTP 方法
HTTP 方法的名称在 URL 参数之前:
http DELETE example.org/todos/7
这看起来就像是原生的 HTTP 请求发送的文本一样:
DELETE /todos/7 HTTP/1.1
GET请求
(base) PS C:\Users\biaod> http httpbin.org/get name==Zarten zhihu_id==Zarten
HTTP/1.1 200 OK
Access-Control-Allow-Credentials: true
Access-Control-Allow-Origin: *
Connection: keep-alive
Content-Length: 379
Content-Type: application/json
Date: Tue, 16 Apr 2024 11:29:50 GMT
Server: gunicorn/19.9.0

{
    "args": {
        "name": "Zarten",
        "zhihu_id": "Zarten"
    },
    "headers": {
        "Accept": "*/*",
        "Accept-Encoding": "gzip, deflate, br",
        "Host": "httpbin.org",
        "User-Agent": "HTTPie/3.2.2",
        "X-Amzn-Trace-Id": "Root=1-661e612e-7815cb6135499ba510afb2a0"
    },
    "origin": "36.154.120.82",
    "url": "http://httpbin.org/get?name=Zarten&zhihu_id=Zarten"
}
POST请求
(base) PS C:\Users\biaod> http httpbin.org/post name=Zarten
HTTP/1.1 200 OK
Access-Control-Allow-Credentials: true
Access-Control-Allow-Origin: *
Connection: keep-alive
Content-Length: 502
Content-Type: application/json
Date: Tue, 16 Apr 2024 11:30:35 GMT
Server: gunicorn/19.9.0

{
    "args": {},
    "data": "{\"name\": \"Zarten\"}",
    "files": {},
    "form": {},
    "headers": {
        "Accept": "application/json, */*;q=0.5",
        "Accept-Encoding": "gzip, deflate, br",
        "Content-Length": "18",
        "Content-Type": "application/json",
        "Host": "httpbin.org",
        "User-Agent": "HTTPie/3.2.2",
        "X-Amzn-Trace-Id": "Root=1-661e615b-5e4ed9bc5af76fb85040b15c"
    },
    "json": {
        "name": "Zarten"
    },
    "origin": "36.154.120.82",
    "url": "http://httpbin.org/post"
}
请求 URL
HTTPie 唯一必传的一个参数是请求 URL,默认的方案不出意料的是 http://,可以在请求的时候缺省 – http example.org 是没问题的
Querystring 参数
如果需要在命令行手动构建 URLs,你可能会觉得使用 param==value 添加参数的方式是 比较方便的,这样你就不需要担心命令行中转义链接字符串 & 的问题,当然参数中的特 殊字符也将被自动转义(除非已经转义过)。用下面的命令搜索 HTTPie logo 可以在 google 图片上结果:
http www.google.com search=='HTTPie logo' tbm==isch

GET /?search=HTTPie+logo&tbm=isch HTTP/1.1
localhost 的 URL 缩写
另外,类似 curl 的 localhost 缩写也是支持的。这表示你可以使用 :3000 来代替 http://localhost:3000, 如果不传入端口号,80 将会默认被使用
http :/foo

GET /foo HTTP/1.1
Host: localhost


http :3000/bar

GET /bar HTTP/1.1
Host: localhost:3000


http :

GET / HTTP/1.1
Host: localhost
自定义默认的方案
你可以使用 –default-scheme <URL_SCHEME> 参数来指定非 HTTP 的其它协义
alias https='http --default-scheme=https'
不同的请求项类型提供一种便捷的方法来指定 HTTP 头、简单的 JSON 、表单数据、文件、URL 参数
URL 参数后面紧随的是 键/值 对参数都会被拼装成请求发送。不同类型的 键/值 对分 割符号分别是::, =, :=, @, =@, :=@。用 @ 分割的参数表示文件路径
| 项类型(item type) | 描述(Description) |
| HTTP 头参数 Name:Value |
任意的 HTTP 头,比如:X-API-Token:123 |
| URL 参数 name==value |
通过分割符 == 表示一个查询字符串的 键/值 对 |
| 数据域 field=value, [email protected] |
请求一个默认会被序列化成 JSON 的数据域,或者表单类型 form-encoded(–form, -f) |
| 纯 JSON 域 field:=json, field:[email protected] |
当需要指定一个或者多数域参数类型 boolean, number .. 时非常有用, 比如:meals:='[“ham”,”spam”]’ or pies:=[1,2,3] (注意引号). |
| Form 表单文件域 | 仅当传入参数 –form, -f 时有效,比如 screenshot@~/Pictures/img.png 文件内容将会被序列化成 multipart/form-data 发送 |
数据域不是唯一的指定请求数据的方式,重定向输入也可以
字符转义规则
可以使用 \ 来转义不应该被用于分割符的情况。比如 foo\==bar 会被转义成一个数据 键值对(foo= 和 bar)而不是 URL 参数
通常情况需要使用引号包围值,比如 foo=’bar baz’
如果有一个域的名字或者 header 以减号开头,你需要把这些参数放在一个特殊符号 — 后面 ,这样做是为了和 –arguments 区分开
http httpbin.org/post  --  -name-starting-with-dash=foo -Unusual-Header:bar

POST /post HTTP/1.1
-Unusual-Header: bar
Content-Type: application/json

{
    "-name-starting-with-dash": "value"
}
JSON请求
JSON 是现代 web services 通用规范,HTTPie 也默认遵循了它的 不严格的数据类型
http PUT example.org name=John [email protected]

PUT / HTTP/1.1
Accept: application/json, */*
Accept-Encoding: gzip, deflate
Content-Type: application/json
Host: example.org

{
    "name": "John",
    "email": "[email protected]"
}
如果你的命令包含了一些请求项数据,它们将默认被序列化成 JSON 对象。HTTPie 会默认 自动添加下面两个 header 头,当然这两个头也可以重新传入
Content-Type	application/json
Accept	application/json, */*
你可以使用命令行参数 –json, -j 明确地设置 Accept 为 application/json 而无 需在意发送的数据是什么(这是个快捷方式,也可以使用普通的 header 注解:http url Accept:’application/json, */*’),另外,HTTPie 会试着检测 JSON 响应,即使 Content-Type 是不正常的 text/plain 或者未知类型
非字符串类型的 JSON 域使用 := 分割,这可以允许你嵌入原生纯 JSON 到结果对象,文 本和原生的纯 JSNO 文件也可以使用 =@ 和 :=G 嵌入
http PUT api.example.com/person/1 \
    name=John \
    age:=29 married:=false hobbies:='["http", "pies"]' \  # Raw JSON
    [email protected] \   # Embed text file
    bookmarks:[email protected]      # Embed JSON file

PUT /person/1 HTTP/1.1
Accept: application/json, */*
Content-Type: application/json
Host: api.example.com

{
    "age": 29,
    "hobbies": [
        "http",
        "pies"
    ],
    "description": "John is a nice guy who likes pies.",
    "married": false,
    "name": "John",
    "bookmarks": {
        "HTTPie": "http://httpie.org",
    }
}
不过请注意,当发送复杂数据的时候,这个例子使用的语法会显得很笨重。在这种情况下重定向输入 将会更合适:
http POST api.example.com/person/1 < person.json
提交表单和发送 JSON 请求很相似,通常情况下唯一的不同是添加额外的 –form, -f 参 数,这将确保数据域和 Content-Type 被设置成 application/x-www-form-urlencoded; charset=utf-8
普通的表单
http --form POST api.example.org/person/1 name='John Smith'

POST /person/1 HTTP/1.1
Content-Type: application/x-www-form-urlencoded; charset=utf-8

name=John+Smith
文件上传表单
如果有一个文件域,序列化方式和 content type 会是 multipart/form-data:
http -f POST example.com/jobs name='John Smith' cv@~/Documents/cv.pdf
上面的请求和下面的 HTML 表单发送请求是一样的:
<form enctype="multipart/form-data" method="post" action="http://example.com/jobs">
    <input type="text" name="name" />
    <input type="file" name="cv" />
</form>
注意 @ 用来模拟文件上传域,而 =@ 是把文件内容以文本的方式嵌入到数据域的值里面
设置请求头
可以使用 Header:Value 注解的形式来添加自定义头信息
http example.org  User-Agent:Bacon/1.0  'Cookie:valued-visitor=yes;foo=bar'  \
    X-Foo:Bar  Referer:http://httpie.org/

GET / HTTP/1.1
Accept: */*
Accept-Encoding: gzip, deflate
Cookie: valued-visitor=yes;foo=bar
Host: example.org
Referer: http://httpie.org/
User-Agent: Bacon/1.0
X-Foo: Bar
默认的请求头
有几个默认的请求头是 HTTPie 设置的
GET / HTTP/1.1
Accept: */*
Accept-Encoding: gzip, deflate
User-Agent: HTTPie/<version>
Host: <taken-from-URL>
空头和重新设置默认头
可以使用 Header: 来取消上面的几个默认头信息
http httpbin.org/headers Accept: User-Agent:
请求中的 Accept 和 User-Agent 头都会被移除
使用 Header; 表示添加一个为空的头信息,注意须使用引号
http -v httpbin.org/headers 'Host;'

GET /headers HTTP/1.1
Accept: */*
Accept-Encoding: gzip, deflate
Connection: keep-alive
Host:
User-Agent: HTTPie/0.9.9
...
HTTP 重定向
HTTP 重定向默认不会自动跳转,请求发出后命令行只会显示 第一次 收到的响应
http httpbin.org/redirect/3
按 header 头中的 location 字段值跳转
指定 –follow, -F 参数让 HTTPie 自动跟随 30x 响应头中的 location 字段值进行跳转,并且显示最终的响应内容
http –follow httpbin.org/redirect/3
显示中间的跳转响应
如果你也想看到更多的跳转信息,可以指定 –all 参数
http –follow –all httpbin.org/redirect/3
限制重定向最大次数
改变默认最大 30 次重定向值可以使用 –max-redirects=<limit> 参数
http –follow –all –max-redirects=5 httpbin.org/redirect/3
目前支持的验证方案有基础和摘要两种(查看更多 授权插件),有两种标识 来控制验证:
| 参数 | 说明 |
| –auth, -a | 把 用户名:密码 做为键值对参数传入,如果只指定用户名可以使用 -a 用户名,密码在接下来的提示符中输入,空密码使用 username:,username:password@hostname 格式的 URL 语法也是支持的,证书通过 -a 参数传入且具有更高的优先级 |
| –auth-type, -A | 指定指定身份验证机制。basic(默认) 和 digest 两种 |
Basic 授权
http -a username:password example.org
Digest 授权
http -A digest -a username:password example.org
密码提示
http -a username example.org<Paste>
.netrc
从你的 ~/.netrc 文件授权也可以
cat ~/.netrc
machine httpbin.org
login httpie
password test
http httpbin.org/basic-auth/httpie/test
HTTP/1.1 200 OK
授权插件
授权机制可以使用安装插件的方式来实现,可以在 Python Package 上面找到更多相关插件
你可以通过添加参数 –proxy 来指定各自协义(为了防止跨协义的重定向,协义被包含 在了参数值中)的代理服务器
http --proxy=http:http://10.10.1.10:3128 --proxy=https:https://10.10.1.10:1080 example.org
添加 basic 授权
http --proxy=http:http://user:[email protected]:3128 example.org
环境变量
也可以通过设置 HTTP_PROXY 和 HTTPS_PROXY 环境变量来配置代理,底层的 request 库也将使用这些代理配置,如果你想指定某些 host 不使用代理,可以通过添加 NO_PROXY 参数来实现
在你的 ~/.bash_profile 文件中(zsh 则在 ~/.zshrc 中)
export HTTP_PROXY=http://10.10.1.10:3128
export HTTPS_PROXY=https://10.10.1.10:1080
export NO_PROXY=localhost,example.com
Socks
要启用 socks 代理支持请使用 pip 安装 requests[socks] 库
pip install -U requests[socks]
用法与其它类型的代理相同:
http --proxy=http:socks5://user:pass@host:port --proxy=https:socks5://user:pass@host:port example.org
HTTPS
服务器 SSL 证书验证
使用参数 –verify=no 可以跳过主机 SSL 验证(默认:yes)
http –verify=no https://example.org
自定义 CA 包
使用 –verify=<CA_BUNDLE_PATH> 指定 CA 认证包路径
http --cert=client.pem https://example.org
客户端 SSL 证书
使用客户端 SSL 证书进行 SSL 通信,可以用 –cert 参数指定证书文件路径
http --cert=client.pem https://example.org
如果证书中不包含私钥,可以通过 –cert-key 参数指定密钥文件路径
http --cert=client.crt --cert-key=client.key https://example.org
SSL 版本
参数 –ssl=<PROTOCOL> 用来指定你想使用的 SSL 协义版本,默认是 SSL v2.3。这将 会协商服务端和你安装的 OpenSSL 支持的最高 SSL 协议版本。可用的版本有: ssl2.3, ssl3 , tls1 , tls1.1 , tls1.2 (实际上可用的协义可能有很多种,这由你安装 的 OpenSSL 决定)
# 指定容易受到攻击的 SSL v3 协义与老服务器进行通信
http --ssl=ssl3 https://vulnerable.example.org
服务器名称指示SNI(Server Name Indication)
如果你的 HTTPie 版本(可以使用 http –debug 查看版本)小于 2.7.9,又需要使用 SNI 与服务器会话。那么你需要安装额外的依赖
pip install --upgrade requests[security]
使用下面的命令测试 SNI 支持
http https://sni.velox.ch
HTTPie 默认只输出最终响应信息并且打印(header, body同样),你可以通过下面一些参 数控制打印内容:
| 命令行参数 | 描述 |
| –headers, -h | 仅打印响应头 |
| –body, -b | 仅打印响应体 |
| –verbose, -v | 打印所有的 HTTP 请求来回内容,这将默认开启 –all 参数 |
使用 –verbose 参数来调试请求或生成文档时是非常有用的
http --verbose PUT httpbin.org/put hello=world

PUT /put HTTP/1.1
Accept: application/json, */*
Accept-Encoding: gzip, deflate
Content-Type: application/json
Host: httpbin.org
User-Agent: HTTPie/0.2.7dev

{
    "hello": "world"
}


HTTP/1.1 200 OK
Connection: keep-alive
Content-Length: 477
Content-Type: application/json
Date: Sun, 05 Aug 2012 00:25:23 GMT
Server: gunicorn/0.13.4

{
    […]
}
哪部分的 HTTP 请求内容应该打印出来
所有的 HTTP 输出选项都属于更强大的 –print, -p 参数的快捷方式。–print, -p 接受一个字符串,字符串的每个字母都表示下面的 HTTP 某一部分
| 字符 | 代表 |
| H | 请求头 |
| B | 请求体 |
| h | 响应头 |
| b | 响应体 |
打印请求头和响应头:
http --print=Hh PUT httpbin.org/put hello=world
查看中间的请求/响应
使用 –all 参数可以查看 HTTP 通信中的所有信息,中间的 HTTP 通信包括跟随重定向 (使用参数–follow)和使用 HTTP 摘要授权时第一次未授权的请求(使用参数 –auth=diggest)
# 包括最终响应之前的所有响应信息
http --all --follow httpbin.org/redirect/3
中间请求/响应默认会使用 –print, -p 参数指定的值格式化,可以使用 –history-print, -P 指定, 参数和 –print, -p 是一样的。但是这只实用于 中 间请求
# 中间请求/响应信息使用 H 格式化,最终请求/响应信息使用 Hh 格式化:
http -A digest -a foo:bar --all -p Hh -P H httpbin.org/digest-auth/auth/foo/bar
条件化的 body 内容下载
做为一个优化项,响应体在仅作为输出一部分时才会被下载,这和 HEAD 类型的请求类似 (除了 HEAD 可以使用在任何 HTTP 请求中)
比如有一个 API 更新后会返回整个资源,但是你只对更新后响应头中的状态码感兴趣:
http --headers PATCH example.org/Really-Huge-Resource name='New Name'
由于我们在上面设置了只打印头信息,当响应头接收完成的时候服务器连接就会被关闭, 带宽和时间不会浪费在下载响应体,你可以不必在意。响应头总是会被下载的无论它是不是 输出部分
重定向输入
直接从 stdin (标准输入)管道传入请求数据是大部分人认为比较好的方法。 这些数据 被缓冲而且不需要更多的操作就可以做为请求体被使用,使用管道有下面几个好用的方法:
从一个文件重新定向
http PUT example.com/person/1 X-API-Token:123 < person.json
或者从其它程序的输出
grep '401 Unauthorized' /var/log/httpd/error_log | http POST example.org/intruders
当然也可以使用 echo 命令来传简单数据
echo '{"name": "John"}' | http PATCH example.com/person/1 X-API-Token:123
甚至可以使用 web services
http GET https://api.github.com/repos/jkbrzt/httpie | http POST httpbin.org/post
也可以使用 cat 命令来输入多行文本
cat | http POST example.com
<paste>
^D
cat | http POST example.com/todos Content-Type:text/plain
- buy milk
- call parents
^D
在 macOS 中可以使用 pbpaste 命令把剪贴板中的内容做为数据发送
pbpaste | http PUT example.com
通过 stdin 传递数据的方式 不能 和指定数据域的方式混合使用
echo 'data' | http POST example.org more=data # 不可以
从一个文件中取请求数据
指定文件路径(@/path/to/file)方式可以替代上面使用 stdin 的方式
这个方法有个优点,Content-Type 可以根据提供的文件扩展名自动设置成对应的。比如 下面的请求会被设置头 Content-Type: application/xml
http PUT httpbin.org/put @/data/file.xml
命令行输出
HTTPie 默认会做一些事情,目的是为了让命令行输出内容有更高的可读性
颜色和格式化
语法高亮会应用在 HTTP 请求的 headers 和 body 里面。如果你不喜欢默认的配色方案, 可以使用 –style 参数自定义(使用http –help命令查看更多选项)
还有下面几个格式化规则会被使用:
- HTTP 头会按名称排序
- JSON 数据会有缩进,并且按 key 名排序,unicode 序列会被转换成实际字符
下面这些参数可以用在处理输出结果中:
| 命令行参数 | 描述 |
| –pretty=all | 应用颜色和格式化,默认 |
| –pretty=colors | 仅应用颜色 |
| –pretty=format | 仅应用格式化 |
| –pretty=none | 不使用颜色和格式化,重定向时默认使用 |
二进制数据
二进制数据在命令行中会被禁止,这会使处理响应返回的二进制数据变得更安全,重定向时 也禁止二进制数据,但是会被装饰输出。一旦当我们知道响应体是二进制数据时,连接会关 闭
http example.org/Movie.mov
你几乎可以立即看见下面的提示:
HTTP/1.1 200 OK
Accept-Ranges: bytes
Content-Encoding: gzip
Content-Type: video/quicktime
Transfer-Encoding: chunked

+-----------------------------------------+
| NOTE: binary data not shown in terminal |
+-----------------------------------------+
重定向输出
与命令行输出相比,重定向输出使用了不同的默认值,不同之处在于:
- 格式化和种颜色默认不会使用(除非–pretty被指定)
- 只输出响应体(除非指定了输出参数)
- 二进制结果不会被禁止
原因是为了把 HTTPie 的结果直接 piping 到其它程序,并且使下载文件不需要额外的参数 标识。多数情况下输出重定向时只有响应体有意义
下载一个文件:
http example.org/Movie.mov > Movie.mov
下载 Octocat 图片,使用 ImageMagick 修改大小,上传到其它地方:
http octodex.github.com/images/original.jpg | convert - -resize 25% - | http example.org/Octocats
强制使用格式化与颜色,在 less 的分页中显示请求和响应
http --pretty=all --verbose example.org | less -R
-R 标识告诉 less 命令解析 HTTPie 输出中的颜色序列
你可以使用下面的 bash 函数代码建立一个调用 HTTPie 分页格式化且高亮输出的快捷方式:
function httpless {
    # `httpless example.org'
    http --pretty=all --print=hb "$@" | less -R;
}
HTTPie 具有下载模式,这和 wget 命令类似
使用 –download, -d 标识启用,响应头会打印到命令行,下载响应体的进度条也会显示
http --download https://github.com/jkbrzt/httpie/archive/master.tar.gz
HTTP/1.1 200 OK
Content-Disposition: attachment; filename=httpie-master.tar.gz
Content-Length: 257336
Content-Type: application/x-gzip

Downloading 251.30 kB to "httpie-master.tar.gz"
Done. 251.30 kB in 2.73862s (91.76 kB/s)
下载文件的文件名
如果没有指定参数 –output, -o,文件名将由 Content-Disposition 决定,或者通过 URL 及其 Content-Type,如果名字已占用,HTTPie 会添加唯一后缀
下载的同时 piping
即使响应头和进度状态显示在命令行中,你仍然可以将响应重定向到其它的程序
http -d https://github.com/jkbrzt/httpie/archive/master.tar.gz | tar zxf -
恢复下载
如果指定 –output, -o,你可以 –continue, -c 恢复部分下载。不过仅当服务器支持 Range 请求而且响应返回 206 Partial Content 才可以,如果服务器不支持这个功能,那就只会下载整个文件
http -dco file.zip example.org/file
其它注意事项
- –download仅更改响应正文的处理方式
- 仍然可以使用自定义 header 头、使用 session 会话,–verbose, -v等
- –download意味着启用 –follow
- 如果文件没有被完全下载完,HTTPie 将会返回错误状态码1 并退出
- Accept-Encoding不能和 –download 一起使用
响应体会被以块的形式下载和打印,这使程序在不使用大量内存情况下进行流式传输和下载,然而如果使用颜色和格式化参数,整个响应体会被缓冲,然后立即处理
禁用缓冲
可以使用 –stream, -S 进行下面的操作:
- 输出内容以更小的块更新,不需要任何缓冲,这使得 HTTPie 表现的像tail -f 命令 一样
- 即使输出被美化,流也会启用:它将应用于响应的每一行并立即更新。这样就可以为持续 时间长的请求提供一个漂亮的输出,例如一个 Twitter 的流 API
示例
修饰过的流响应
http --stream -f -a YOUR-TWITTER-NAME https://stream.twitter.com/1/statuses/filter.json track='Justin Bieber'
像 tail -f 一样小块的流输出
http --stream -f -a YOUR-TWITTER-NAME https://stream.twitter.com/1/statuses/filter.json track=Apple \
| while read tweet; do echo "$tweet" | http POST example.org/tweets ; done
默认情况下,同一个 host 每个 HTTPie 发出的请求完全独立
然而,HTTPie 支持使用 –session=SESSION_NAME_OR_PATH 参数进行持久会话。在同一 个 host 的会话中,自定义 header(除了以Content- 和 If- 开头)、authorization、 cookies(手动指定或者服务器发送) 会持续保存
# 创建一个新会话
http --session=/tmp/session.json example.org API-Token:123

# 复制用已存在的会话 API-Token 会自动设置
http --session=/tmp/session.json example.org
所有的会话数据都会被存储成纯文本,这表示会话文件可以使用编辑器手动添加或者修改—— 其实就是 JSON 数据
具名会话
每个 host 都可以建一个或者多个会话,比如:下面的命令将为 host 是 example.org 的请求建一个名为 name1 的会话:
http --session=user1 -a user1:password example.org X-Foo:Bar
从现在起,你就通过名字来选择会话,当你选择使用一个会话时,之前用过的授权、HTTP 头都会被自动添加:
http --session=user1 example.org
创建或者重用不同的会话,只需要指定不同的名字即可:
http --session=user2 -a user2:password example.org X-Bar:Foo
具名会话将被以 JSON 的数据格式存储在 ~/.httpie/sessions/<host>/<name>.json 下面(windows下则是 %APPDATA%\httpie\sessions\<host>\<name>.json)
匿名会话
不同与具名会话,你也可以直接使用一个文件路径来指定会话文件的存储地址,这也可以在 不同的 host 间复用会话:
http --session=/tmp/session.json example.org
http --session=/tmp/session.json admin.example.org
http --session=~/.httpie/sessions/another.example.org/test.json example.org
http --session-read-only=/tmp/session.json example.org
只读会话
如果复用一个会话又不想更新会话信息,可以通过指定 –session-read-only=SESSION_NAME_OR_PATH 来实现
HTTPie 使用了一个简单的 JSON 配置文件
配置文件路径
默认的配置文件路径在 ~/.httpie/config.json (window 在 %APPDATA%\httpie\config.json),配置文件的路径也可以通过修改环境变量 HTTPIE_CONFIG_DIR 来更改,可以使用 http –debug 命令查看当前配置文件路径
可配置的参数
JSON 配置文件包含以下的键:
default_options
参数默认值数组(默认为空),数组里面的参数会被应用于每次 HTTPie 的调用
比如说,你可以使用这个选项改变默认的样式和输出参数:”default_options”: [“–style=fruity”, “–body”] ,另外一个常用的默认参数是 “–session=default”, 这会让 HTTPie 总是使用会话(名称为default)。也可以使用 –form 改变默认 不严格的 JSON 类型为 form 类型
**meta**
HTTPie 自动存储了一些它自己的元数据,不要动它
取消之前指定的参数
配置文件中的参数和其它任何指定参数的方法,都可以使用 –no-OPTION 参数来取消, 比如:–no-style 或者 –no-session
当你在 shell 脚本中使用 HTTPie 的时候,–check-status 标识会比较好用。这个标识 将告知 HTTPie 如果响应状态码是 3xx, 4xx, 5xx 时程序将退出并显示对应的错误 码 3(除非 –follow 参数被指定), 4, 5
#!/bin/bash

if http --check-status --ignore-stdin --timeout=2.5 HEAD example.org/health &> /dev/null; then
    echo 'OK!'
else
    case $? in
        2) echo 'Request timed out!' ;;
        3) echo 'Unexpected HTTP 3xx Redirection!' ;;
        4) echo 'HTTP 4xx Client Error!' ;;
        5) echo 'HTTP 5xx Server Error!' ;;
        6) echo 'Exceeded --max-redirects=<n> redirects!' ;;
        *) echo 'Other Error!' ;;
    esac
fi
在非交互式调用的情况下通常不希望使用 stdin 的默认行为,可以使用 –ignore-stdin 参数来禁止它
如果没有这个选项,HTTPie 可能会挂起,这是一个常见的问题。发生的场景可能是——例如 从定时任务中调用HTTPie时,stdin 未连接到终端。因此,重定向输入的规则适用,即 HTTPie 开始读取它,希望请求体将被传递。由于没有数据也没有 EOF,它会被卡住。因此 ,除非你将一些数据传递给 HTTPie,否则应在脚本中使用此标志
当然使用 –timeout 参数手动设置(默认 30 秒)延迟时间是个比较好的做法
超越命令行
HTTPie除了命令行版本外,还有网页版及桌面版。
网页版地址为:https://httpie.io/app
桌面版下载地址:Download HTTPie for Desktop – HTTPie
参考链接:
Recommend
About Joyk
Aggregate valuable and interesting links.
Joyk means Joy of geeK