

How to Add Electronic and Digital Signatures to PDFs in ASP.NET Core C# and Angu...
source link: https://www.textcontrol.com/blog/2024/03/20/how-to-add-electronic-and-digital-signatures-to-pdfs-in-asp-net-core-c-sharp-and-angular/
Go to the source link to view the article. You can view the picture content, updated content and better typesetting reading experience. If the link is broken, please click the button below to view the snapshot at that time.
How to Add Electronic and Digital Signatures to PDFs in ASP.NET Core C# and Angular
In this article, you will learn how to sign a document and export it as a PDF using Angular and an ASP.NET Core backend. Using TX Text Control .NET Server for ASP.NET and the Document Viewer for Angular, the electronic signature is captured and applied to a signature field that is digitally signed with a certificate to ensure that your documents are secure and reliable.
TX Text Control provides all the necessary capabilities to capture signatures from end users and process the document to create a fully signed and secure PDF document. It provides the server-side API to generate the PDF and the front-end UI tools for a modern, reliable and effortless signature experience.
Signature Support
TX Text Control provides two different types of signatures: Electronic signatures and digital signatures.
- Electronic Signature
An electronic signature is a signature that is captured using a touch screen or a mouse. It is a visual representation of a signature that is placed on a document. It is not necessarily cryptographically secured, but can be digitally signed. - Digital Signature
A digital signature is a cryptographic signature that is applied to a document. It is cryptographically secured and ensures that the document has not been tampered with. It is based on a certificate that is issued by a trusted authority.
In most typical scenarios, the two types are combined so that visual signature fields contain the visual representation and are digitally signed with a certificate.
Document Viewer for Angular
The Document Viewer for Angular is a modern, web-based document viewer that is available for many platforms and provides all the functionality needed to capture signatures.
-
Out-of-the-box UI
The Document Viewer for Angular provides a ready-to-use UI to display and sign documents. It is customizable and can be integrated into any Angular application.
-
Signature Fields
The Document Viewer for Angular provides support for signature fields that can be placed on the document to capture electronic signatures. These fields can be digitally signed with a certificate to ensure that the document is secure and reliable.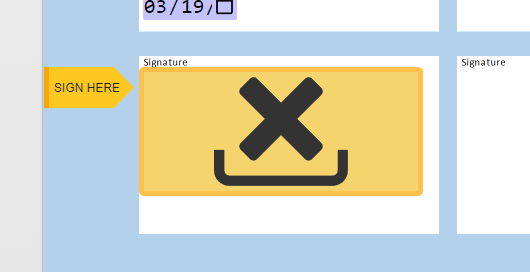
-
Form Filling
The Document Viewer for Angular provides support for form fields that can be placed on the document to capture data. These fields can be exported as a PDF form.
-
Draw, Type or Upload Signatures
The Document Viewer for Angular provides different ways to capture signatures. Users can draw, type or upload a signature image to sign the document.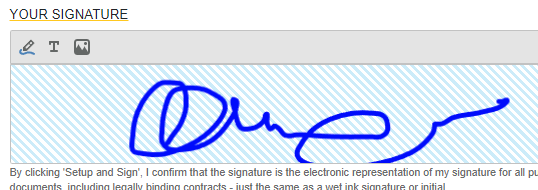
Prerequisites
In order to get started, you will need the following components:
- A trial or full version of TX Text Control .NET Server for ASP.NET.
- Visual Studio 2022.
npm and Angular command-line interface (CLI)
The client-side part of this tutorial can also be built independently of Visual Studio using the Angular CLI. To learn how to create an Angular CLI application using the TX Text Control, read this article.
Creating the Application
The following tutorial will show you how to create an Angular with ASP.NET Core application that includes the client-side npm package and the required backend middleware.
-
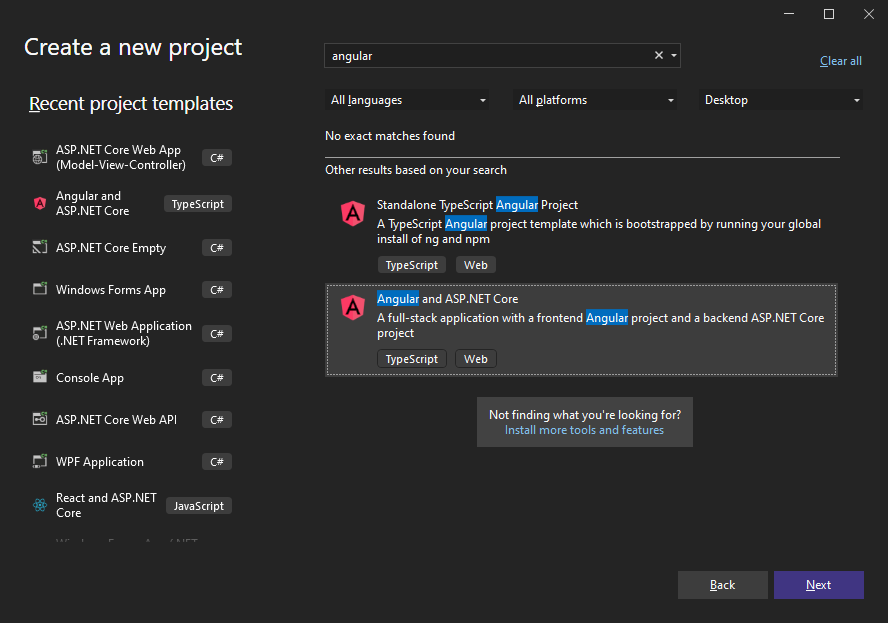
In Visual Studio 2022, create a new project, select Angular with ASP.NET Core as the project template and continue with Next.
-
Select a project name and location confirm with Next.
-
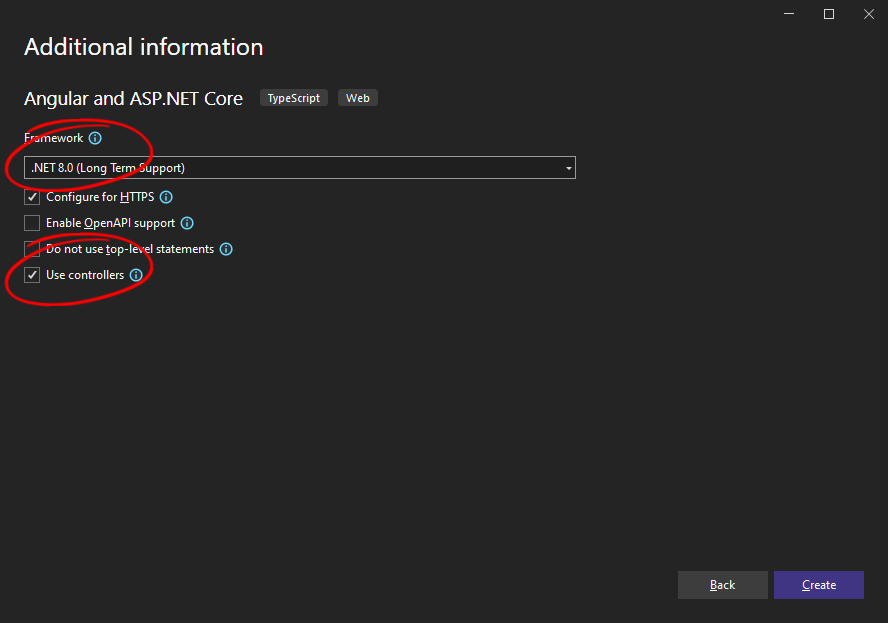
Choose .NET 8 (Long Term Support) as the Framework, enable Use Controllers and continue with Create.
Adding NuGet Packages
-
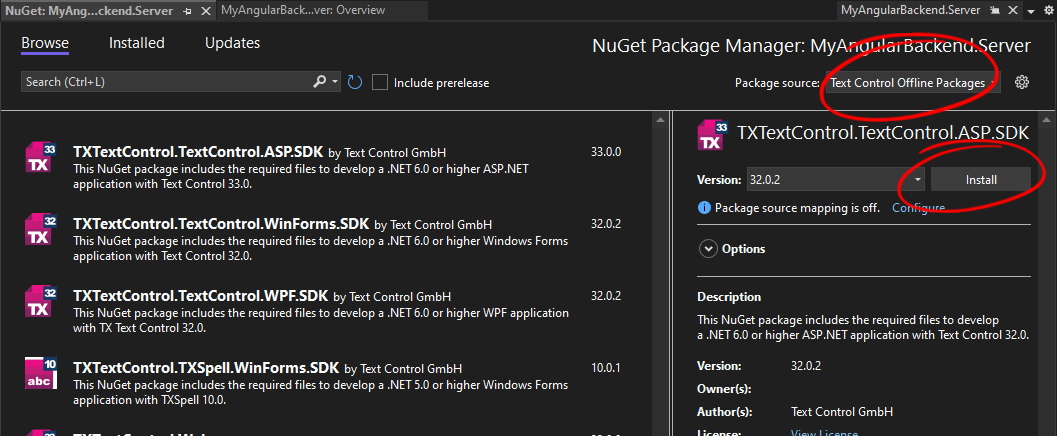
Right-click on the project that ends with .Server in the Solution Explorer and select Manage NuGet Packages....
Select Text Control Offline Packages from the Package source drop-down.
Install the latest versions of the following packages:
- TXTextControl.TextControl.ASP.SDK
- TXTextControl.Web.DocumentViewer
-
Switch the package source to nuget.org and choose Installed to check for available updates. Update the installed packages to the most current version.
Preparing the Pipeline
-
Open the file Program.cs in the .Server project and a replace the complete code with the following code:
Adding npm Packages
The Angular application has already been created by the Visual Studio project template and is available in the Solution Explorer ending with .client.
-
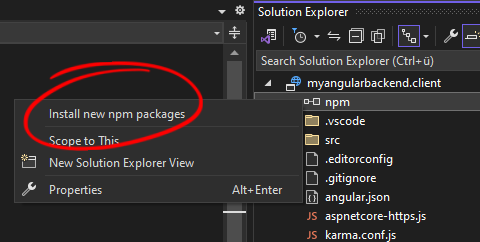
In the Solution Explorer, expand the Angular application node, right-click npm, and select Install new npm packages from the context menu.
-
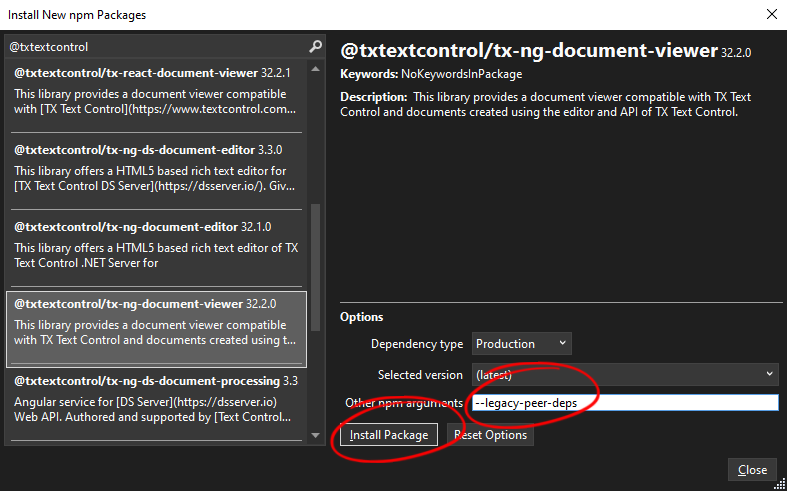
Search for @txtextcontrol/tx-ng-document-viewer and install the package. Add --legacy-peer-deps as a Other npm arguments to force the installation for newer Angular versions.
-
Open the file src -> app -> app.module.ts, add replace the complete content with the following code and save it:
Creating the Self-Signed Certificate
In the next steps, a self-signed certificate is created using Windows PowerShell.
-
Use the New-SelfSignedCertificate PowerShell cmdlet to create a self signed certificate. Open a PowerShell and type in the following command:
After running this command, the certificate is added to the certificate store (specified in the "-CertStoreLocation" parameter). The output of the command shows the certificate's thumbprint.
-
Copy this thumbprint and insert it into the following command:
-
The file textcontrol_self.pfx is created in the same folder. Copy this to your application's folder from where you want to load the certificate (App_Data in our Web API sample above).
Creating the Controller
-
Right-click on the Controllers folder in the .Server project and select Add -> Controller.... Choose MVC Controller - Empty and confirm with Add. Name it DocumentController and click Add.
-
Replace the complete content of the DocumentController.cs with the following code:
Adding the Document Viewer
-
Open the file src -> app -> app.component.ts and replace the complete content with the following code:
-
Open the file src -> app -> app.component.html and replace the complete content with the following code:
The port number in the code (in this case 7275) can be found in the Properties -> launchSettings.json file of your .Server application.
-
Open the file src -> proxy.conf.js and replace the code with the following code:
Replace the port number with the appropriate port number, similar to the previous step.
Adding a Sample Document
-
Download the sample document document.tx and save it to the App_Data folder of the .Server project. Create the folder, if it doesn't exist.
Running the Application
-
Run the application by pressing F5 in Visual Studio. The application starts and the Document Viewer is loaded with the sample document.
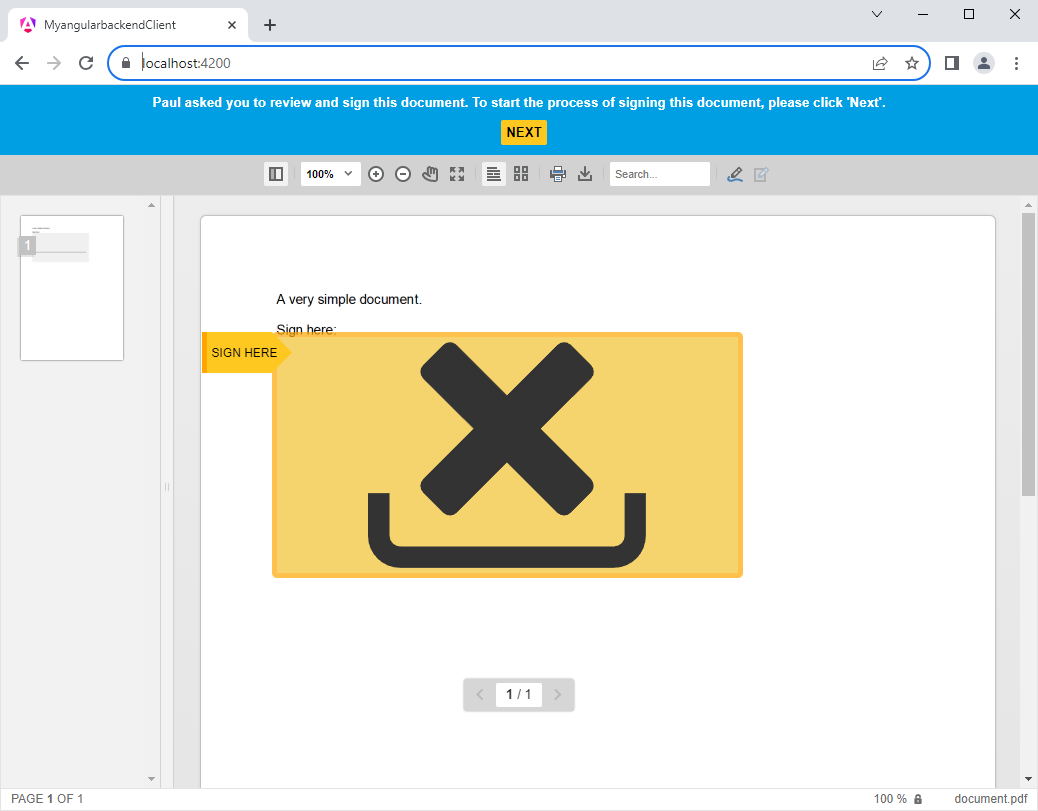
-
Click on the signature field to sign the document. The signature dialog is opened and the signature can be drawn, typed or uploaded.
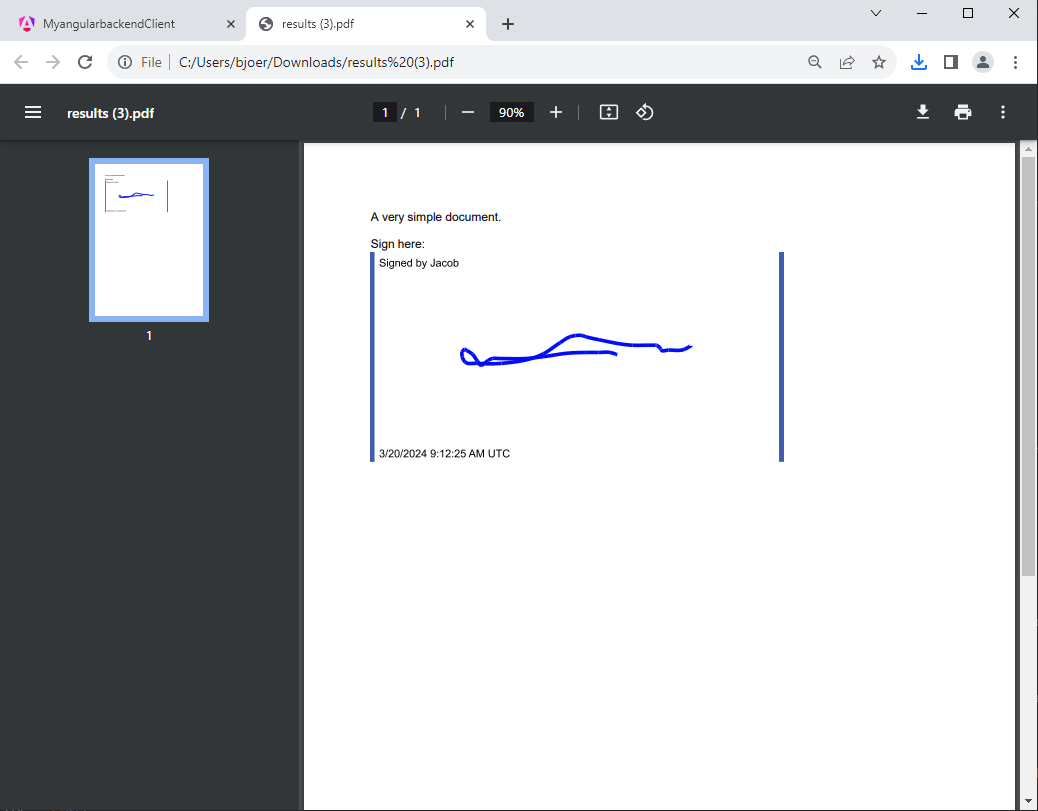
-
After signing the document, the signature is applied and the document is digitally signed with the certificate.
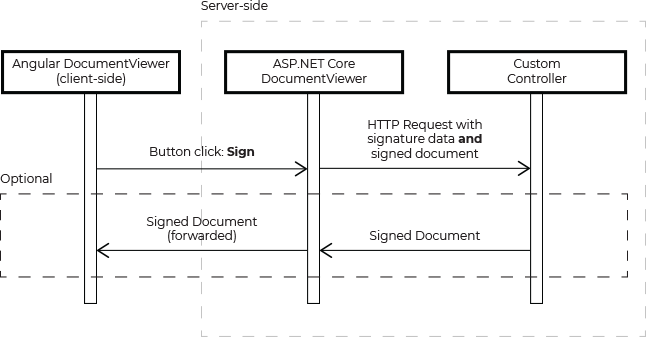
Workflow Explanation
The following is a step-by-step description of the signing process.
Loading the Document
When the application is started, the document is loaded from the server and displayed in the Document Viewer. This is done using an HttpGet method that retrieves the template from the server.
Server-side, the Load method returns the document to be loaded and returned as a base64-encoded string.
Signing the Document
When all signature fields are signed, the Sign method is called. The implemented HttpPost endpoint Sign is requested by the Document Viewer after the signing process. In this method, a digital certificate is applied to the signed electronic signature representation using the SignatureFields property. This property specifies an array of DigitalSignature objects, each of which defines an X.509 certificate and is associated with a SignatureField in the document. These certificates can be used to digitally sign a PDF or a PDF/A file.
The following diagram illustrates the signature workflow.
Conclusion
This tutorial showed how to create an Angular application with an ASP.NET Core backend that uses the Document Viewer to display and sign PDF documents. The Document Viewer provides all the necessary UI and API to capture signatures and to digitally sign the document with a certificate. The server-side API provides the necessary methods to load and save the document and to apply the digital signature.
Download the sample from GitHub and test the signature process with your own certificate.
Recommend
About Joyk
Aggregate valuable and interesting links.
Joyk means Joy of geeK