

【前端工程化】Nextjs项目工程化最佳实践总结(献给2023-1024的礼物)
source link: https://blog.vadxq.com/article/nextjs-engineering-project/
Go to the source link to view the article. You can view the picture content, updated content and better typesetting reading experience. If the link is broken, please click the button below to view the snapshot at that time.
【前端工程化】Nextjs项目工程化最佳实践总结(献给2023-1024的礼物)
时间已经是2023年了,马上也2024年了,自己去Web3世界闯荡已经一年多了。记得两年前在写文章的时候,发现自己对新领域的狂热在减弱,但是经过在新领域的锤炼,仿佛换起来自己的新狂热程度。时过境迁,React十周年了,Nextjs v13发布也一年了,App Dir(App router)模式的出现,对于自己的吸引力非常大,刚出没多久就在研究和完善相关的工程化,而今经过在企业化项目的实践里,已经锤炼出了一套自认为可以使用的Starter和经验积累。正值1024节,特为大家献上一片总结!
可以配合我总结并且近期也更新的一个starter项目进行理解哟:nextjs-web3-starter
Nextjs介绍和它自v13版本的技术的改进
Nextjs是一个React的元框架
Nextjs在我的印象里是SSR框架,最初使用v12时,了解其SSG概念。之后深入了解,是一个很不错的全干元框架。2022年v13版本发布,beta版本出来的App Dir,当时是这样叫它的,后来定义为APP Router。这种结合React Server Components范式和React Suspense,让人着迷。当时beta版就开始研究并且引入到正式项目里。后来Turbopack的出现,更让人兴奋,但初时由于Turbopack不够完善,许多包都没法兼容,后来提Issue,改包引用或者自己手撸代码造轮子替代,最后剩下的老大难aws的sdk无法兼容也被手撸代码替代了,最后Nextjsv13+Turbopack,开发体验非常爽!如果遇见不兼容Turbopack的包,建议沉下心手撸替代或者是提交PR。
React Server Components
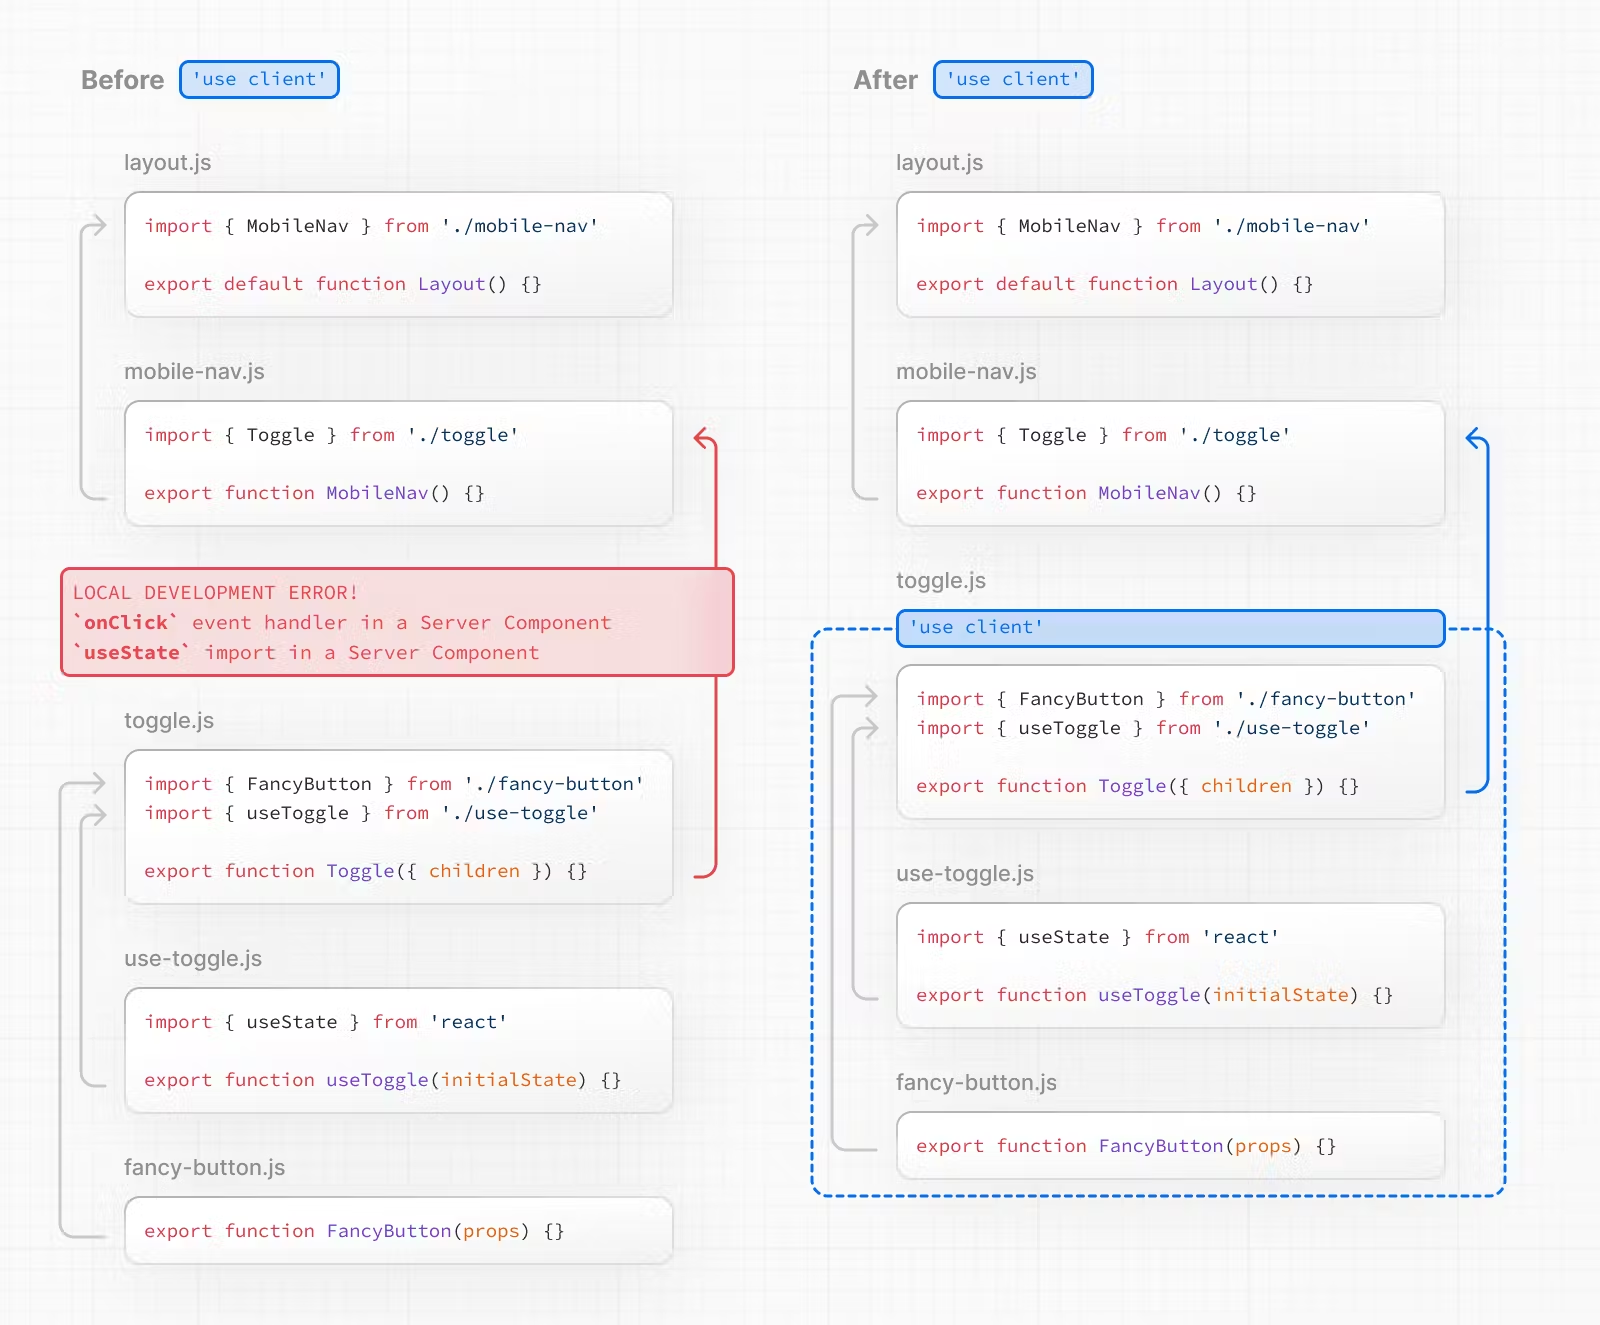
React Server Components(简称RSC)是一种全新范例的名称,我们可以创建专门在服务器上运行的组件。这使我们能够在 React 组件中执行诸如编写数据库查询之类的操作。传统的react组件被叫做client组件,在RSC上,默认情况下所有组件都被假定为服务器组件。当然服务器组件更多需要结合编译工具才能发挥它的特性,所以Nextjs天生适合做这一块东西。可以结合这两篇文章去了解RSC和Nextjs是如何做的:Making Sense of React Server Components / Nextjs Server Components。
在处理RSC的时候,最让人困惑的应该就是它的边界状态问题了,应该不少小伙伴第一次来看这个RSC的时候,都会产生疑惑,Server和Client组件嵌套后的是否会重新渲染问题,状态变量如何保存和变更等等。当然请注意,React有这些规则:客户端组件无法渲染服务器组件,服务器组件永远不会重新渲染。所以有状态的hooks是在client组件里进使用的。在server组件里,无法使用useEffect和useStae等。Server组件传递的props也是不变的。
但是当涉及到这种边界时,父子组件的关系就不那么重要了,可以通过父子组件来进行拆分和处理状态量。我们来看看Nextjs是怎么做的:Nextjs结合Suspense,服务器组件呈现为一种特殊的数据格式,叫做React 服务器组件有效负载(简称RSC Payload),然后结合Client JavaScript指令在服务器组合成Html。
self.__next['$1024'] = {
  type: 'p',
  props: null,
  children: "Hello world!",
};
然后在客户端:HTML用于初始页面加载,然后RSC Payload协调客户端和服务器组件树,并更新 DOM,JavaScript指令用于水合客户端组件并使应用程序具有交互性。结合Streaming流式传输,性能优化明显,服务器组件不包含在我们的JS包中,这减少了需要下载的JavaScript数量以及需要水合的组件数量,大大提升了性能和加载速度!
Nextjs工程化技术栈和架构
了解了Nextjs v13+的新特性,我们来聊聊Nextjs工程化的一些事吧。
Nextjs工程化技术栈
大致可以根据传统的工程化领域划分为如下:
- 编程语言:TypeScript 5.x
- 构建工具:Nextjs Turbpack + Webpack
- 前端框架:Nextjs
- 路由工具:Nextjs文件路由
- 状态管理:React Context
- CSS:Tailwindcss+ Postcss
- HTTP 工具:Fetch
- 国际化:Nextjs Middleware + intl-localematcher + negotiator
- 多环境:ENV Config
- 数据库ORM:Prisma
- Git Hook 工具:Husky + Lint-staged
- 代码规范:EditorConfig + Prettier + ESLint
- 提交规范:Commitlint
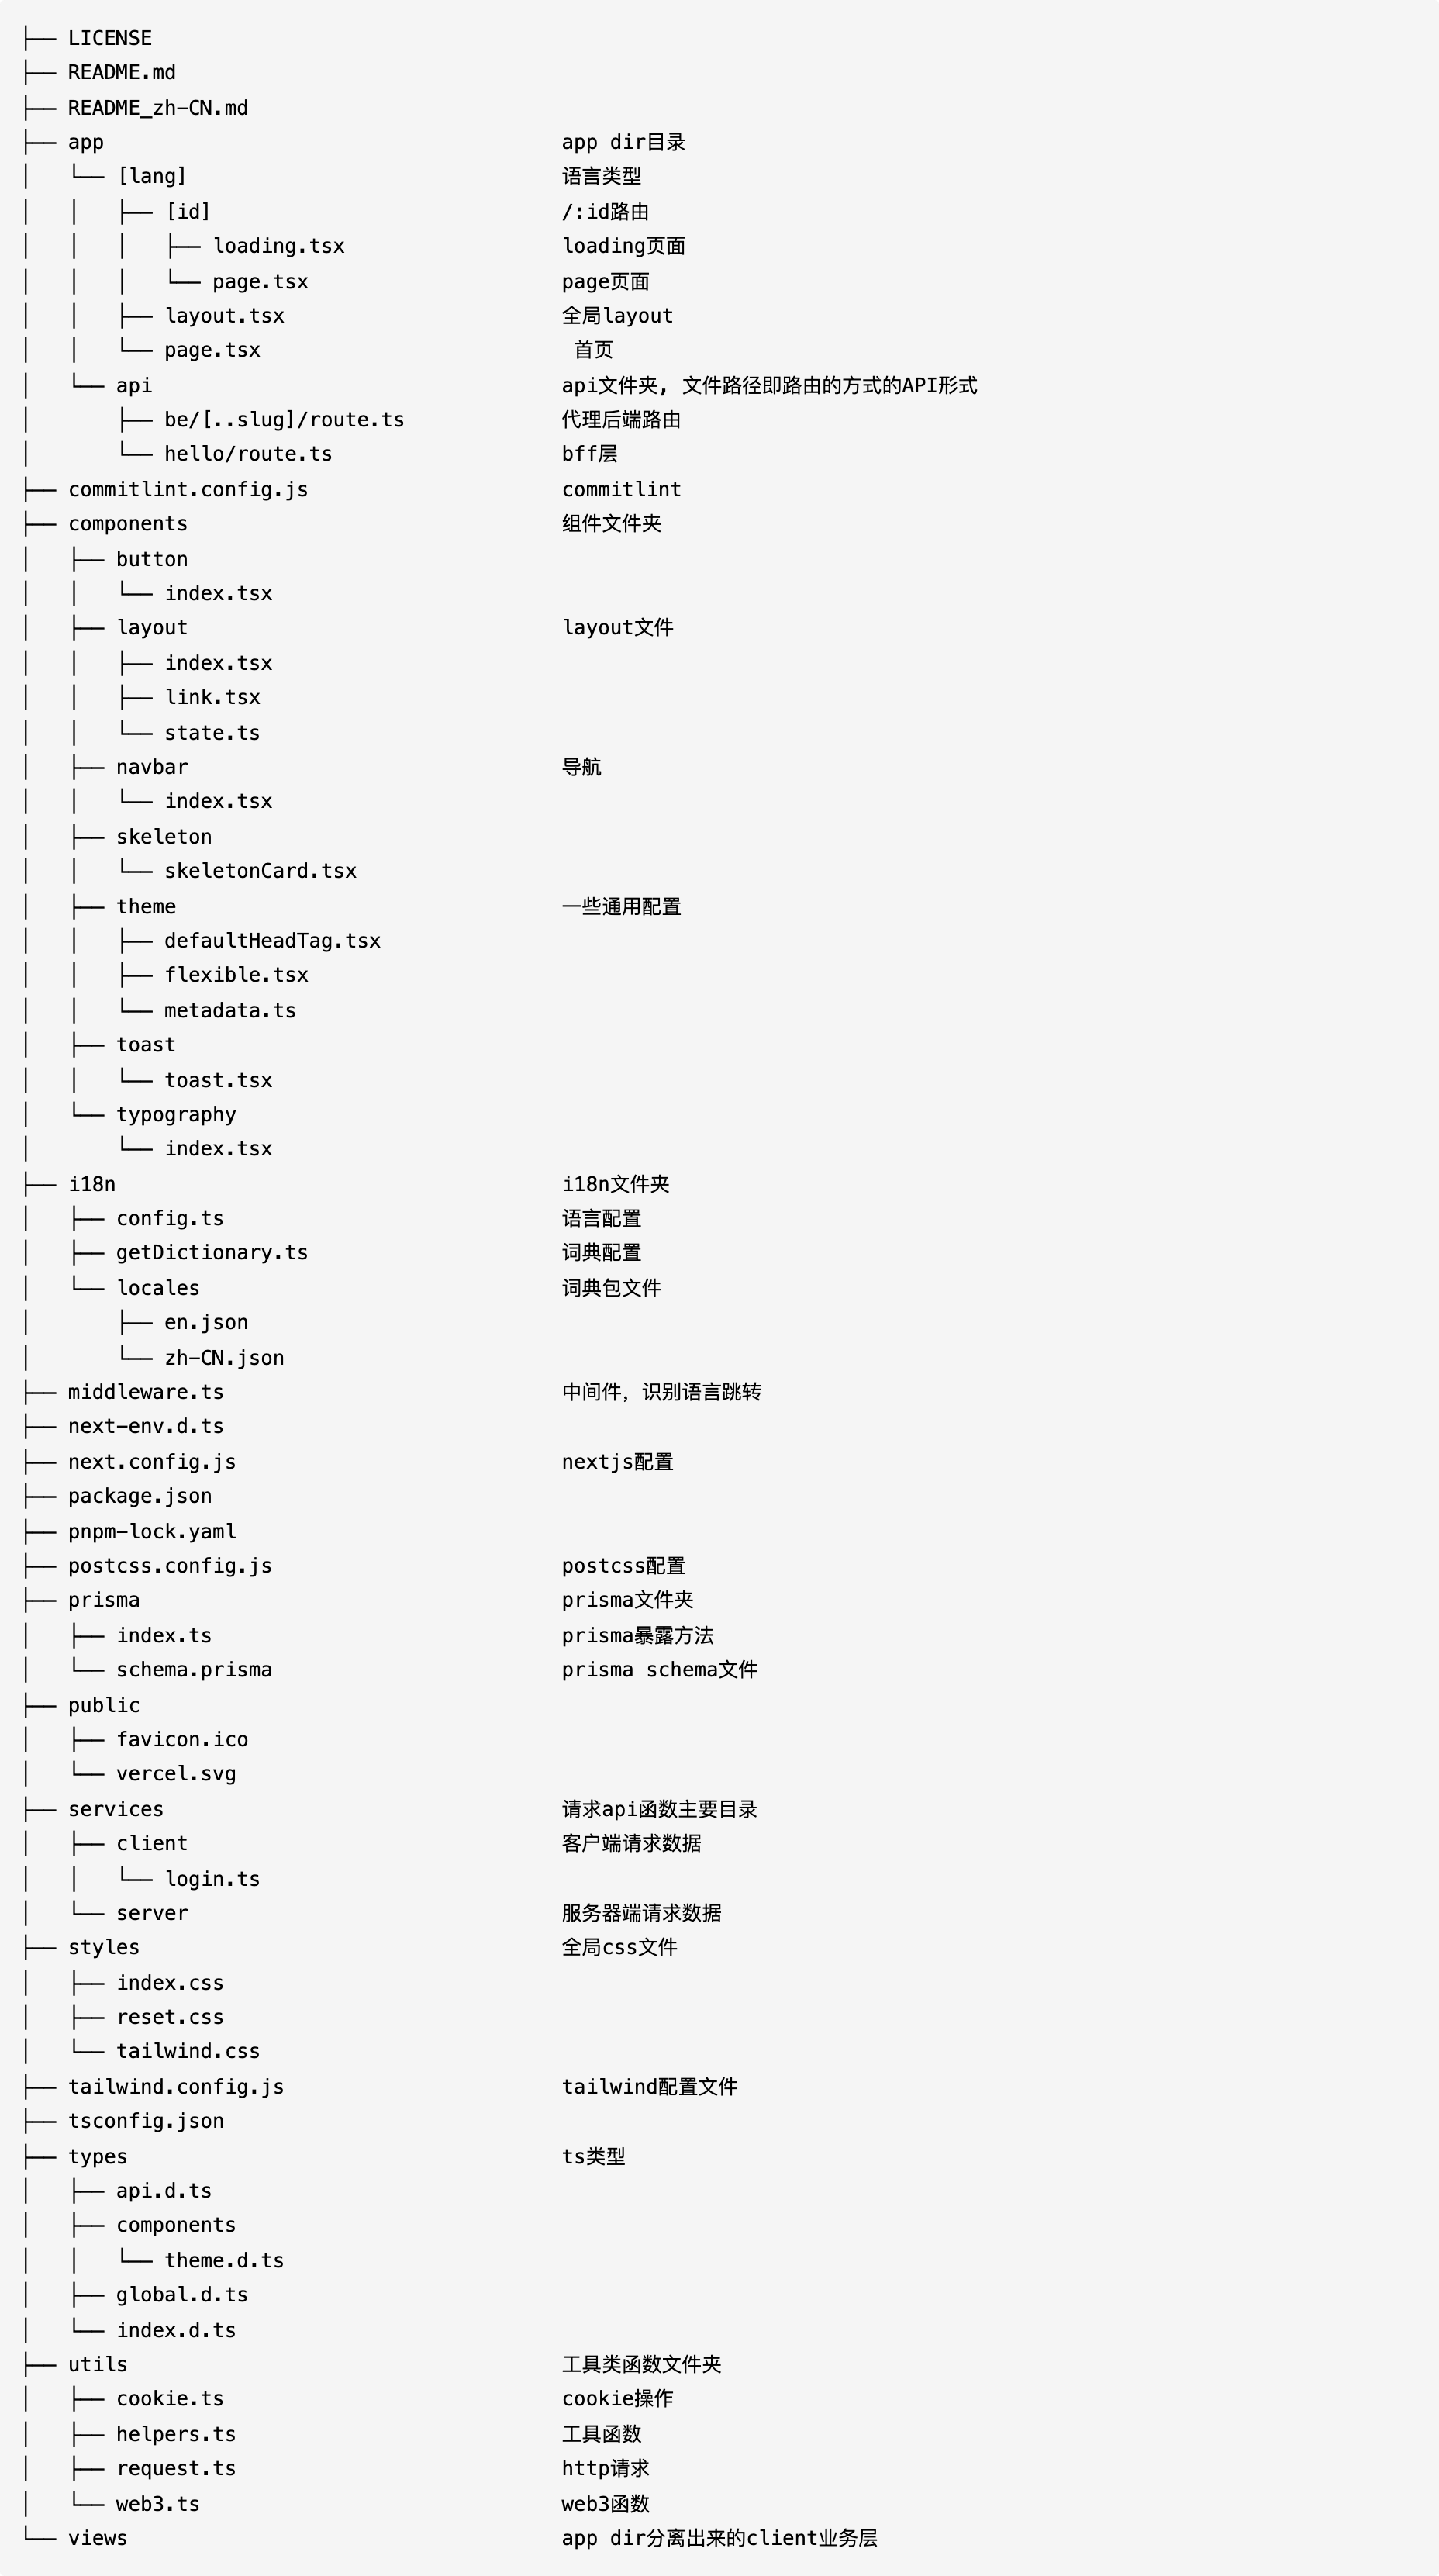
Nextjs工程化目录结构
Nextjs 工程化的一些其他细节
关于API请求
这里使用了fetch进行请求,服务端请求和客户端请求保持了一致性。
// server端
import { cookies } from 'next/headers';

export const nextFetchGet = async (api: string) => {
  const nextCookies = cookies();
  const token = nextCookies.get('token') || '';
  const role = nextCookies.get('role');
  const roleId = nextCookies.get('roleId');
  const url =
    `${process.env.BASE_FETCH_URL}/api/be${api}`;
  const res = await fetch(url, {
    headers: token ? { Authorization: 'Bearer ' + token } : {}
  });
  if (!res.ok) {
    throw new Error('Failed to fetch data');
  }
  return res.json();
};
// client端参考
import { getCookie } from './cookie';
import { getApiUrl } from './helpers';

interface RequestOptions extends RequestInit {
  responseType?:
    | 'TEXT'
    | 'JSON'
    | 'BLOB'
    | 'ARRAYBUFFER'
    | 'text'
    | 'json'
    | 'blob'
    | 'arraybuffer';
  body?: any;
}

// 发送数据请求
const request = async (url: string, config?: RequestOptions) => {
  const finalUrl: string = getApiUrl(url);

const inital: RequestOptions = {
    method: 'GET',
    body: null,
    headers: {
      'Content-Type': 'application/json',
      Authorization: getCookie('token') ? 'Bearer ' + getCookie('token') : ''
    },
    credentials: 'include',
    cache: 'no-cache',
    mode: 'cors',
    responseType: 'JSON'
  };

const configs: RequestOptions = {
    ...inital,
    ...config
  };
  if (config && config.headers)
    configs.headers = {
      ...inital.headers,
      Authorization: getCookie('token') ? 'Bearer ' + getCookie('token') : '',
      ...config.headers
    };

// 基于fetch请求数据
  const finalConfig: RequestInit = {
    method: configs.method?.toUpperCase(),
    credentials: configs.credentials,
    mode: configs.mode,
    cache: configs.cache,
    headers: configs.headers,
    body: configs.body
  };

return fetch(`${finalUrl}`, finalConfig)
    .then((response: Response) => {
      // 走到这边不一定是成功的:
      // Fetch的特点的是,只要服务器有返回结果,不论状态码是多少,它都认为是成功
      const { status } = response;

if (status >= 200 && status < 400) {
        // 真正成功获取数据
        let result: any;
        switch (configs.responseType && configs.responseType.toUpperCase()) {
          case 'TEXT':
            result = response.text();
            break;
          case 'JSON':
            result = response.json();
            break;
          case 'BLOB':
            result = response.blob();
            break;
          case 'ARRAYBUFFER':
            result = response.arrayBuffer();
            break;
          default:
            result = response.json();
        }
        return result;
      }
      // 失败的处理
      return Promise.reject(response);
    })
    .catch((reason: any) => {
      // @2:断网
      if (typeof window !== 'undefined' && navigator && !navigator.onLine) {
        console.log('Your network is break!');
      }
      // @1:状态码失败
      if (reason && reason.status) {
        switch (reason.status) {
          case 400:
            console.log('Please verify your info!');
            break;
          case 401:
            console.log('Please Login!');
            break;
          case 403:
            console.log('You have no access to this');
            break;
          case 500:
            console.log("Oops, there's something wrong!");
            break;
          case 504:
            console.log("Oops, there's something wrong!");
            break;
          default:
        }
      } else {
        // @3:处理返回数据格式失败
        console.log("Oops, there's something wrong!");
      }

return Promise.reject(reason);
    });
};

export default request;
关于代理API问题
这里看自己需要,如果Nextjs的资源不及后端接口,还是不建议直接代理所有接口,只需要编写服务器组件所需要的接口代理就行了。如果需要全局代理后端接口,可以使用rewrites的方式,不建议使用以前proxy包的方式了:
const nextConfig = {
  rewrites: () => {
    return [
      {
        // 注意,加了一个be/,为什么?为了区分我们项目写的接口,避免被代理进去了。我们只需要代理外部的接口
        // Note that a be/ is added, why? In order to distinguish the interface written by our project, avoid being proxied. We only need to proxy the external interface
        source: '/api/be/:slug*',
        destination: `${process.env.BACKEND_URL}/api/:slug*`
      }
    ];
  }
};
Nextjs 国际化
使用了Nextjs中间件模式和intl-localematcher + negotiator进行国际化处理的,由于nextjs版本的更新导致输出的结构变化,所以中间件随着版本更新需要进行维护,如果在生产上版本更新需要注意,最新版中间件如下:
pnpm add @formatjs/intl-localematcher negotiator
// middleware.ts
import { NextResponse } from 'next/server';
import type { NextRequest } from 'next/server';

import { i18n } from '@/i18n/config';

import { match as matchLocale } from '@formatjs/intl-localematcher';
import Negotiator from 'negotiator';

function getLocale(request: NextRequest): string | undefined {
  // Negotiator expects plain object so we need to transform headers
  const negotiatorHeaders: Record<string, string> = {};
  request.headers.forEach((value, key) => (negotiatorHeaders[key] = value));

// Use negotiator and intl-localematcher to get best locale
  const languages = new Negotiator({ headers: negotiatorHeaders }).languages();
  const locales: string[] = i18n.locales as unknown as string[];
  return matchLocale(languages, locales, i18n.defaultLocale);
}

export function middleware(request: NextRequest) {
  const pathname = request.nextUrl.pathname;

// Check if there is any supported locale in the pathname
  const pathnameIsMissingLocale = i18n.locales.every(
    (locale) => !pathname.startsWith(`/${locale}/`) && pathname !== `/${locale}`
  );

// Redirect if there is no locale
  if (pathnameIsMissingLocale) {
    const locale = getLocale(request);

// e.g. incoming request is /products
    // The new URL is now /en-US/products
    return NextResponse.redirect(
      new URL(`/${locale}${pathname === '' ? '/' : pathname}`, request.url)
    );
  }
}

export const config = {
  // 2023-8-28 update
  matcher: '/((?!api|static|.*\\..*|_next).*)'
};
我们配置获取语言和数据,目前由于Turbopack的一些bug,导致需要使用如下方式引用json:
// getDictionary.ts
import 'server-only';
import type { Locale } from './config';
import enJson from '@/i18n/locales/en.json' assert { type: 'json' };
import zhCNJson from '@/i18n/locales/zh-CN.json' assert { type: 'json' };

// We enumerate all dictionaries here for better linting and typescript support
// We also get the default import for cleaner types
const dictionaries = {
  en: () => enJson,
  'zh-CN': () => zhCNJson
  // https://github.com/vercel/next.js/issues/47595
  // en: () =>
  // import('@/i18n/locales/en.json', { assert: { type: 'json' } }).then(
  //   (module) => module.default
  // ),
  // 'zh-CN': () =>
  //   import('@/i18n/locales/zh-CN.json', { assert: { type: 'json' } }).then(
  //     (module) => module.default
  //   )
};

export const getDictionary = async (locale: Locale) => dictionaries[locale]();
// config.ts
export const i18n = {
  defaultLocale: 'en',
  locales: ['en', 'zh-CN']
} as const;

export type Locale = (typeof i18n)['locales'][number];
Nextjs PWA
参考目前市面上的Nextjs PWA插件,目前采取了@ducanh2912/next-pwa,需要修改next.config.js,参考如下,具体细节和定义可以看包文档:
// next.config.js
// eslint-disable-next-line @typescript-eslint/no-var-requires
const withPWA = require('@ducanh2912/next-pwa').default({
  dest: 'public',
  cacheOnFrontEndNav: true,
  aggressiveFrontEndNavCaching: true
});

/** @type {import('next').NextConfig} */
const nextConfig = {
  reactStrictMode: true,
};

module.exports = withPWA(nextConfig);
请注意,需要在public目录配置mainfest.json
同时layout.tsx记得引入mainfest.json
import { Metadata } from 'next';

export async function generateMetadata(): Promise<Metadata> {
  return {
    ...DefaultMetadata,
    title: 'Create Next App',
    description: 'Generated by create next app',
    applicationName: 'vadxq',
    manifest: '/mainfest.json',
    themeColor: '#FFFFFF',
    appleWebApp: {
      capable: true,
      statusBarStyle: 'default',
      title: 'vadxq'
    },
    formatDetection: {
      telephone: false
    },
    icons: {
      shortcut: '/favicon.ico',
      apple: [{ url: '/favicon.ico', sizes: '180x180' }]
    }
  };
}
对了,会自动生成一堆文件在public目录下,本地开发的话建议将这些添加到gitignore下:
public/sw.js
public/swe-worker-*
public/workbox-*
关于Nextjs环境区分变量
这里建立使用env环境变量来控制,同时增加本地.env.local配置,进行gitignore忽略,这样大家可以愉快的修改配置文件调试。
关于Nextjs包引入优化
近期Nextjs v13.5+版本更新了,更新了一部分Nextjs配置,在experimental配置项中,增加了optimizePackageImports配置,可以进行包优化!同时更新优化了性能,可以查看此文阅读最新信息Next.js 13.5
关于Nextjs的全局变量
可以使用React的createContext提供,然后通过父子组件嵌套,使其在Client端水合产生作用。这里提供一份代码,用于触发路由进行loading加载进度条的demo,供参考:
// state.ts
'use client';

import { createContext } from 'react';

const StartRouterChangeContext = createContext<() => void>(() => {});

export default StartRouterChangeContext;
// link.tsx
'use client';

import Link from 'next/link';
import { useContext } from 'react';
import StartRouterChange from './state';

export default function LayoutLink({
  href,
  style,
  children,
  className
}: React.ComponentProps<'a'>) {
  const startChange = useContext(StartRouterChange);
  const useLink = href && href.startsWith('/');
  if (useLink)
    return (
      <Link
        href={href}
        className={className}
        onClick={() => {
          const { pathname, search, hash } = window.location;
          if (href !== pathname + search + hash) startChange();
        }}
        style={style}
      >
        {children}
      </Link>
    );
  return (
    <a href={href} style={style} className={className}>
      {children}
    </a>
  );
}
// index.tsx
'use client';

import { useCallback, useEffect, useState } from 'react';
import { usePathname, useSearchParams } from 'next/navigation';
import NProgress from 'nprogress';
import StartRouterChangeContext from './state';

function RouterEventWrapper({
  onStart = () => null,
  onComplete = () => null,
  children
}: React.PropsWithChildren<{ onStart?: () => void; onComplete?: () => void }>) {
  const [isChanging, setIsChanging] = useState(false);
  const pathname = usePathname();
  const searchParams = useSearchParams();
  useEffect(() => setIsChanging(false), [pathname, searchParams]);

useEffect(() => {
    if (isChanging) onStart();
    else onComplete();
  }, [isChanging]);

return (
    <StartRouterChangeContext.Provider value={() => setIsChanging(true)}>
      {children}
    </StartRouterChangeContext.Provider>
  );
}

export default function RootLayout({ children }: React.PropsWithChildren) {
  const onStart = useCallback(() => NProgress.start(), []);
  const onComplete = useCallback(() => NProgress.done(), []);
  return (
    <RouterEventWrapper onStart={onStart} onComplete={onComplete}>
      {children}
    </RouterEventWrapper>
  );
}
关于日志收集
目前有vercel的日志收集和第三方的Sentry。
Sentry直接使用Sentry提供的插件即可。
关于Nextjs操作数据库
我的starter提供了Prisma的调用案例,当然注释了,需要进行以下操作:
pnpm add @prisma/client
pnpm add -D prisma
"script": {
  "prisma:push": "npx prisma db push",
  "prisma:generate": "npx prisma generate",
}
- next.config.js
experimental: {
  serverComponentsExternalPackages: ['@prisma/client'] // prisma support
},
- prisma文件目录
// prisma/index.ts
import { PrismaClient } from '@prisma/client';

// PrismaClient is attached to the `global` object in development to prevent
// exhausting your database connection limit.
//
// Learn more:
// https://pris.ly/d/help/next-js-best-practices

const globalForPrisma = global as unknown as { prisma: PrismaClient };

export const prisma = globalForPrisma.prisma || new PrismaClient();

if (process.env.NODE_ENV !== 'production') globalForPrisma.prisma = prisma;

export default prisma;
// prisma/schema.prisma
// This is your Prisma schema file,
// learn more about it in the docs: https://pris.ly/d/prisma-schema

generator client {
  provider = "prisma-client-js"
}

datasource db {
  provider = "mysql"
  url      = env("DATABASE_URL")
}

model Post {
  id        String      @id @default(cuid())
  title     String
  content   String?     @db.LongText
  published Boolean     @default(false)
  comments  Comment[]
  @@map(name: "posts")
}

model Comment {
  id        String      @id @default(cuid())
  content   String?
  post      Post?       @relation(fields: [postId], references: [id])
  postId    String?
  published Boolean     @default(false)
}
然后就可以愉快的使用了Prisma orm进行操作数据库啦!其他细节可以查看Prisma文档!
关于 Nextjs持续集成和部署
Nextjs部署最佳方式也许就是Vercel了。但是各大云服务平台也可以,包括AWS在内对于Nextjs进行了优化,访问速度非常不错。
如果是个人项目或者是付费团队项目可以直接使用vercel进行部署。如果是想使用自己的Action或者是自己的部署平台进行部署上传到vercel,以下提供一个action yaml仅供参考:
# VERCEL_ORG_ID就是vercel的组织ID,VERCEL_PROJECT_ID就是vercel的这个项目的ID,VERCEL_TOKEN就是Vercel的api token
name: Production Deployment

env:
  VERCEL_ORG_ID: ${{ secrets.VERCEL_ORG_ID }}
  VERCEL_PROJECT_ID: ${{ secrets.VERCEL_PROJECT_ID }}

on:
  push:
    branches: [main]

jobs:
  build:
    runs-on: ubuntu-latest

steps:
      - uses: actions/checkout@v2
      - name: Install Vercel CLI
        run: npm install --global vercel@canary
      - uses: pnpm/action-setup@v2
        with:
          version: latest
      - uses: actions/setup-node@v3
        with:
          node-version: 18
          cache: 'pnpm'
      - name: Pull Vercel Environment Information
        run: vercel pull --yes --environment=production --token=${{ secrets.VERCEL_TOKEN }}
      - name: Build Project Artifacts
        run: vercel build --prod --token=${{ secrets.VERCEL_TOKEN }}
      - name: Deploy Project Artifacts to Vercel
        run: vercel deploy --prebuilt --prod --token=${{ secrets.VERCEL_TOKEN }}
限制pnpm工具
// pacakge.json
"scripts": {
  "preinstall": "npx only-allow pnpm",
}
关于Husky/lint-staged
配置在提交代码前进行代码检测是非常重要的!
# 安装husky和lint-staged
pnpm add -D husky lint-staged pretty-quick
配置检测,在根目录下的.husky下需要配置命令,可以参考demo
// pacakge.json
"scripts": {
  "prepare": "husky install",
  "lint:lint-staged": "lint-staged -c ./.husky/lintstagedrc.js",
  "lint:pretty": "pretty-quick --staged",
  "lint": "pnpm lint:lint-staged && pnpm lint:pretty",
}
.husky目录下文件
- lintstagedrc.js
module.exports = {
  '*.{js,jsx,ts,tsx}': ['eslint --fix', 'prettier --write'],
  '{!(package)*.json}': ['prettier --write--parser json'],
  'package.json': ['prettier --write'],
  '*.vue': ['eslint --fix', 'prettier --write', 'stylelint --fix'],
  '*.{vue,css,scss,postcss,less}': ['stylelint --fix', 'prettier --write'],
  '*.md': ['prettier --write']
};
- pre-commit
#!/bin/sh
. "$(dirname "$0")/_/husky.sh"
. "$(dirname "$0")/common.sh"

[ -n "$CI" ] && exit 0

# Format and submit code according to lintstagedrc.js configuration
npm run lint:lint-staged

npm run lint:pretty
common.sh
#!/bin/sh
command_exists () {
  command -v "$1" >/dev/null 2>&1
}

# Workaround for Windows 10, Git Bash and Pnpm
if command_exists winpty && test -t 1; then
  exec < /dev/tty
fi
关于配置commitlint检测
使用了@commitlint/cli和@commitlint/config-conventional,配置文件为:commitlint.config.js,
# 添加包以来
pnpm add -D @commitlint/cli @commitlint/config-conventional
module.exports = {
  ignores: [(commit) => commit.includes('init')],
  extends: ['@commitlint/config-conventional'],
  rules: {
    'body-leading-blank': [2, 'always'],
    'footer-leading-blank': [1, 'always'],
    'header-max-length': [2, 'always', 108],
    'subject-empty': [2, 'never'],
    'type-empty': [2, 'never'],
    'type-enum': [
      2,
      'always',
      [
        'feat',
        'fix',
        'perf',
        'style',
        'docs',
        'test',
        'refactor',
        'build',
        'ci',
        'chore',
        'revert',
        'wip',
        'workflow',
        'types',
        'release'
      ]
    ]
  }
};
然后结合husky配置进行检测,配置文件为commit-msg:
#!/bin/sh

# shellcheck source=./_/husky.sh
. "$(dirname "$0")/_/husky.sh"

npx --no-install commitlint --edit "$1"
生成commit log文件
使用了conventional-changelog和@commitlint/cli然后使用生成log文件
// pacakge.json
"scripts": {
  "log": "npx conventional-changelog --config ./node_modules/@commitlint/cli -i CHANGELOG.md -s -r 0"
}
好了,这次的总结就到此结束了。Nextjs在正式项目上,几乎毫无压力,工程化的沉淀也差不多就这样啦,具体的业务表现就自由发挥啦。
今天是2023年的1024~在此祝所有程序员节日快乐~我们的狂欢🎉!献给2023-1024的礼物!
by: vadxq
2023.10.24 shanghai
参考文章:
[1] https://www.joshwcomeau.com/react/server-components
[2] https://nextjs.org/docs/app/building-your-application/rendering/server-components
Recommend
About Joyk
Aggregate valuable and interesting links.
Joyk means Joy of geeK