

Progressively migrating from AngularJS to Vue.js at Unbabel
source link: https://medium.com/unbabel-dev/progressively-migrating-from-angularjs-to-vue-js-at-unbabel-581eb4ae022d
Go to the source link to view the article. You can view the picture content, updated content and better typesetting reading experience. If the link is broken, please click the button below to view the snapshot at that time.
Progressively migrating from AngularJS to Vue.js at Unbabel

We recently decided to migrate some of our existing web applications from AngularJS to Vue.js and set Vue as the new standard framework to create UIs at Unbabel.
Because completely rewriting an existing production application would be very time consuming and prevent the application roadmap of moving forward, we’ve found it’s almost always better to make small changes and release often. The only requirement here is to have a clear vision about where you want to be when it’s done.
Doing this, we were able to progressively migrate our old Angular 1.2 applications into Vue.
We can break the process down to the following 3 steps:
1 — Baby steps
The first application we decided to migrate is part of what we call The Core, a monolith that aggregates several services within Unbabel — a perfect application candidate for what we wanted to do.
Configuration-wise, we want to keep things simple. Fortunately Vue comes to our rescue. In the Getting Started section you’ll find that you can get started just by including a script on your page and start writing a Vue component.
Including Vue in your page
Because it’s so easy to use, we were able to create the first components without any extra tools and continue to deliver new features. One of the first things we developed was a new sidebar for our application.
Creating your first component
Once this new set of components was done and integrated into the page, it was time to connect it to the main application.
Our new sidebar receives information from the main application and displays it in a specific format. Because we are already including jQuery on our page, one very simple way to communicate between Angular and Vue is to use jQuery Events to pass information around. We can use .trigger()on the Angular side and then catch the result using .on().
Sending data from Main application to Sidebar in Vue
When the code in main-application.js runs, the sidebar will catch the event, receive the data and call the internal method handleUpdateSidebarData which then updates the component state.
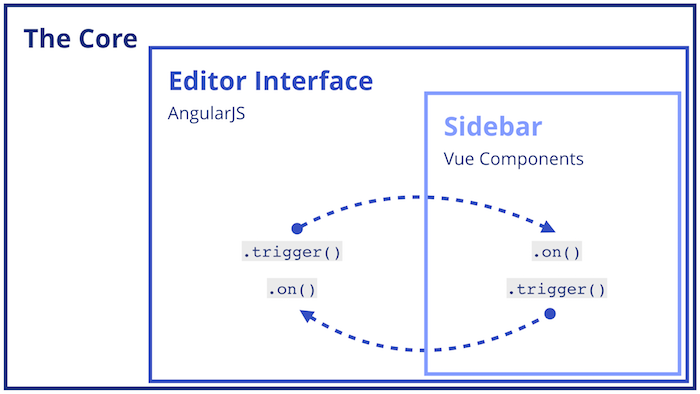
This way we can easily communicate between the two sides using existing tools and if we need to send data from the sidebar to the main application, we just do the opposite.
If you need to have Vue components inside our existing Angular application, that is also possible.
Create a mounting point for your Vue component, append it to the desired location on the target DOM element, then create your component and mount it to the previously created mounting point.
Don’t forget to call $destroy() on ComponentVM when not necessary anymore to clean up its connections with other existing vms, unbind all its directives, and turn off all event listeners.

Illustrated example of Vue components inside Angular controllers
2 — Preparing the tools to scale
As developers, we like tools that make our life easier and allow us to be faster and better at what we do. After moving the application templates and assets to its own project, it was now time to implement the best tools to develop with Vue.
Just like React has create-react-app, Vue also has a similar set of tools that provide developers with Webpack configured with hot reload, linting, css extraction and vue-loader, which enables you to use the awesome Single File Components. You can find it here vuejs-templates/webpack.
We wanted to have all these great tools because it makes developing with Vue a lot better, so we downloaded the template and adapted the configuration files to our own project structure.
Once the tools were properly set-up, we had the task of moving the components we had created before and move them to Single File Components, this was quite simple, we just needed to merge together the template and the component we had created before, into the same file.
Here you have a simple Vue component with its template declared in HTML.
When used, it will render <h1>Hello World!</h1>
And here is the equivalent component written using Single File Components
All the code related to this component is in one single file, so its much easier to maintain and to understand.
Take a look at vuejs-templates/webpack if you want to start using Single File Components right away.
Managing common dependencies
If you have dependencies that are shared between Angular and Vue, such as jQuery, you should add those as a requirement of your Vue application and expose them to the window. This will allow jQuery to be used by the Angular application just like before.
If you’re referencing jQuery through $ variable, you’ll also need to expose it to window like this window.$ = jQuery
3 — Healthy growth
Having tests is a crucial part of any web application that needs to scale and be maintained properly, so we definitely had to have those. We made sure to have our new components fully testable from day 1 and eventually, after some tests with different frameworks, we decided what unit test tool to use.
Currently we are using Jest by Facebook. It’s a very productive tool from the first minute you install it. Depending on your development configuration, the first and only thing you need is to create any file that matches with .test.js or .spec.js, write some tests and then run Jest. It will automatically find any files whose name matches the previous pattern and make any assertions inside. Take a look at the getting started section to have a proper look on how to start using Jest.
Jest also reports code coverage if you run it with --coverage as an option. You can use this option to understand what parts of your code you haven’t tested. You don’t need to strive for 100% code coverage, if you’re above 80% you’re already pretty good.
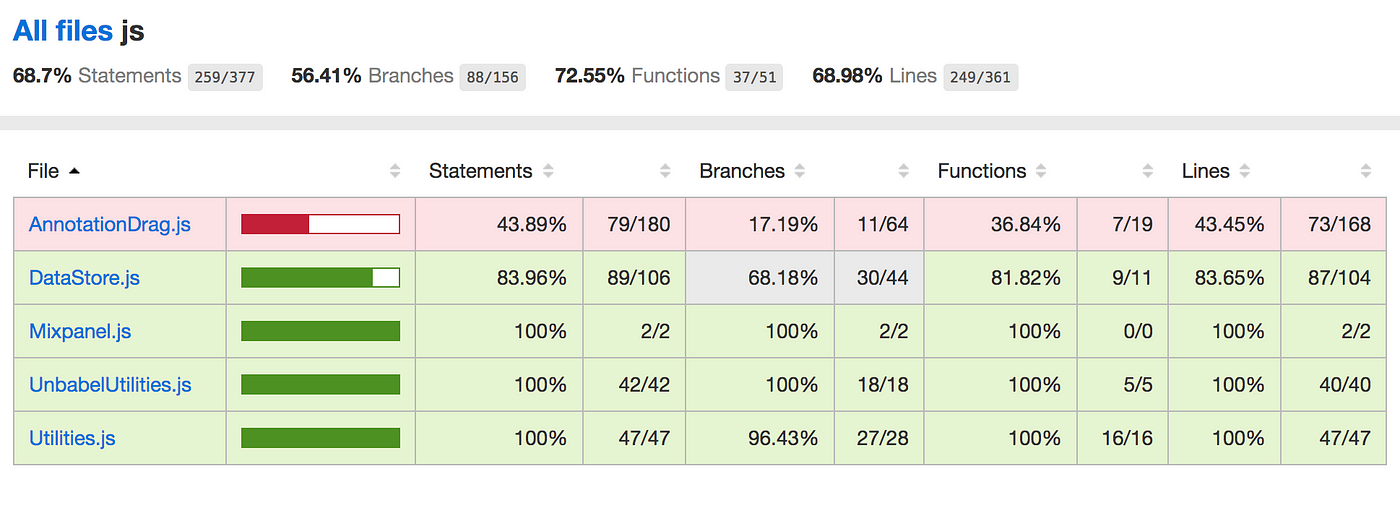
Example of code coverage reported by Jest using the included Istanbul Code Coverage
Because you’re reading this article, you’re probably already using Vue or planning to use Vue, so here are some tips on Jest that may be useful given the motivations of this article.
Add "test": "jest --coverage" to the scripts section in your package.json file, then run the command npm test to see the results. As a reminder, any other commands in the scripts section can be executed with the following command npm run :script-name:.
You can configure Jest by creating a jest.config.js and placing it in the same directory as your package.json file.
Using relative imports
If you’re importing your files using the @ alias, for example import Header from @/components/Header, you’ll want to have the same behaviour and ease of use in your Jest test files. To have that, you need to add the following configurations.
rootDiris where your source code is located relative to the config file.moduleNameMapperis the equivalent of Webpack alias.@/Utilswill load the file./webapp/src/Utils
This will allow you to use the relative imports you already have in Webpack.
Adding Babel and support for .vue files
If you are using ES6 features you will need to include Babel (no relation to us!), and if you’re using .vue files you need to include support for those as well.
To do that, you need to run npm install --save-dev babel-jest jest-vue to add babel-jest and jest-vue, then you need to add the following transforms to jest.config.js
Defining mapCoverage to true is important for jest-vue to report proper code coverage.
Mocking dependencies
Another thing you’ll eventually run into is the need to mock project dependencies. A good example is a service that makes network requests to fetch information.
In this example I show a function that preforms a network request, and returns a Promise with the result in JSON.
If you’re testing a component that has Api.js as a dependency, you will want to mock this service and return a specific output when fetchData() is called.
To do that, you first create the mock version, like so.
As you can see, both files implement the fetchData() method, so we can easily swap one with the other and our code can be executed as expected.
Now we need an easy way to say to Jest that when @/Api is imported, we want to return @/ApiMock, and we want to do this without modifying our source code in any way.
Jest has a whole page talking about mocking function, but the essential to know how to handle the previous example is the following. You have to create a file where you will define your mocks, let’s call it setup-mocks.js.
Inside you will declare that, when a file requests @/Api, Jest will return @/ApiMock instead.
The final step is to add this file to your setupFiles option inside jest.config.js.
setupFiles: [
  '<rootDir>/src/tests/setup-mocks.js',
],
Now, when you run your tests, the method fetchData() will always return a Promise with the value { message: 'This is a static value', } instead of doing a network request.
TL;DR
It’s very easy to migrate from Angular to Vue. You can start by including Vue in your page with a single <script> tag, and author your first components. When you’re ready to grow, you can add great tools like Webpack that offer hot reloading and allow you to use Single File components. You will need to add tests to your application to guarantee sustainable growth, and for that you can use Jest, it’s very simple to configure and start writing tests.
Recommend
About Joyk
Aggregate valuable and interesting links.
Joyk means Joy of geeK