

Figma prototyping for beginners: the basics features and tips you should know fo...
source link: https://uxplanet.org/figma-prototyping-921ce6c0f846
Go to the source link to view the article. You can view the picture content, updated content and better typesetting reading experience. If the link is broken, please click the button below to view the snapshot at that time.
Figma prototyping for beginners: the basics features and tips you should know
An introduction to Figma prototyping for beginners

Creating prototypes is an essential part of your work process as a product designer. An interactive prototype is a valuable tool for explaining the designs you are working on to your team, clients, stakeholders, and users.
It wasn’t that long ago that a product designer had to learn a lot of tricks to make a good prototype, and Invision was the only tool to do that. Today, this task is much easier with Figma prototype features, allowing us to make great prototypes with Smart animate and other features that make the prototypes as real as possible.
Although Figma’s many features and options, the basic prototype features (like connected screens) are the simplest and most efficient way to create prototypes that give us a lot of value.
Based on my experience, it’s not necessary to make a fancy prototype to explain the design, and I usually build the simplest one (Of course, it depends on the product, the user, and the business).
Because Figma provides many advanced features for prototyping (like animations and sections), people can find it challenging to understand if they are new to Figma; I will explain the basics of prototyping in this blog post.
I want to teach those who are new to Figma or need to learn how to make prototypes. That way, they can use the basic features and techniques that are enough to make an efficient prototype.
Prototypes have different purposes
Prototypes help you explain your designs for four reasons, and it usually depends on what you’re trying to achieve.
Usability Testing: Creating prototypes for usability testing allows you to gather user feedback and test your assumptions before sending your design to development. You can create these prototypes as real as possible to give the users the feeling of a real product or create basic prototypes with wireframes screens to test your assumptions.
Design to development handoff: Prototypes also help developers understand the flow and functionality of your design. Often, a basic prototype without many animations and extensive explanations can be enough to make the handoff process more efficient and smoother.
Explaining ideas to stakeholders: Prototypes can also be used to present your ideas and solutions to stakeholders, such as product managers, the CEO, or other company members. This type of prototype can be very close to the real product (with animations and many options) or very basic, showing only the user flow.
It depends on stakeholders, product, domain, and the stage you are at in the design process. Early in the design project process, you can make a low-fidelity prototype demonstrating your app's main flow. In contrast, a high-fidelity prototype showing animations can be used before the design-to-development handoff to show the final product as real as possible.
Understanding and feeling the design: Creating prototypes can help you understand how the design feels and ensure that it provides the desired user experience so you can be confident about your design before moving forward.
How to organize the prototypes in Figma
You can organize the prototypes in different ways inside Figma. There is no one correct answer. Let’s see the possibilities.
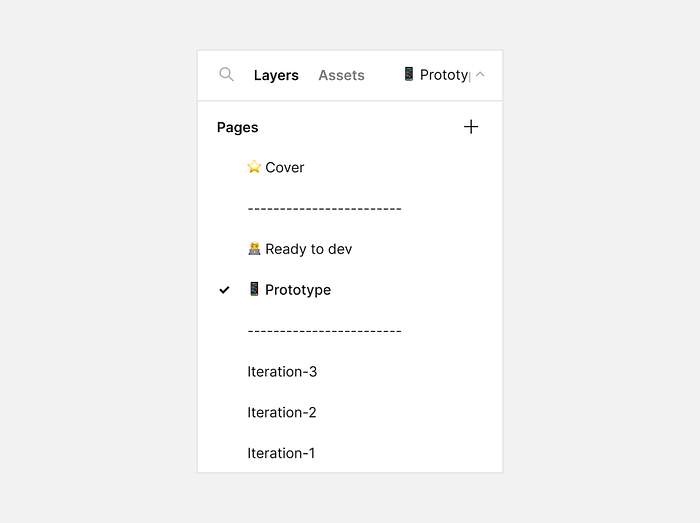
Same page: The most straightforward way is to build the prototype on the same page with your design screens. I like this approach because it saves time and effort by preventing duplication of work.
Different page: You copy your design screens to a separate page and make a prototype there. A separate prototype page makes sharing the prototype with other team members or stakeholders easy without sharing the design page with all your notes.
However, it’s less efficient since you have to switch between multiple pages, and it’s harder to keep the design and prototype in sync if you change one but not the other. You can share the prototype without the design file, but this way, everyone sees all the screens in one view, which makes it easier to understand.
Different Figma file pages: For a huge prototype, dividing it into different Figma file can make the file lighter and easier to work with. However, I think building a real product with a no-code tool is better if we have to build such big prototypes. Creating a complex prototype can take a lot of time, and creating a real product with a no-code tool should be much easier and more accurate.
Ensuring prototype quality
Before sharing your Figma prototype with others, make sure you test it thoroughly. This will ensure that the flow works seamlessly and there are no errors in your prototype, for example, screens that are not connected well.
Test the prototype yourself, just like a chef should taste the food before serving it to guests.
The basic features you should know to create a prototype in Figma
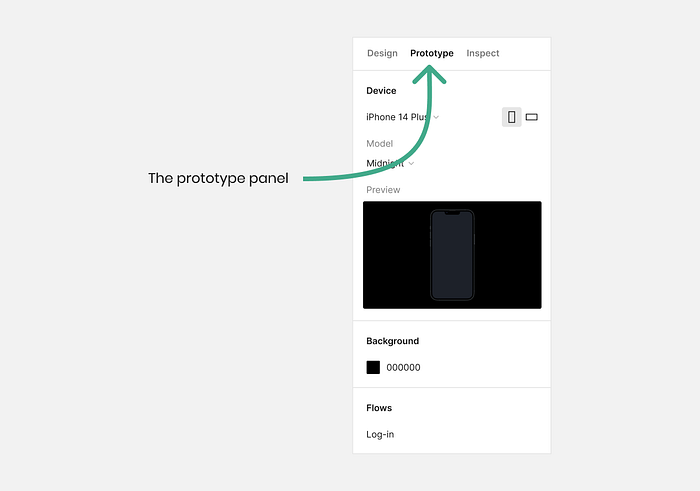
Accessing the prototype panel
You’ll need to access the Prototype panel to start working with Figma’s prototyping features. To do this, first, select the frame you want to work on in your design file.
Then click on the “Prototype” tab on the right menu of the Figma interface to see all the prototyping options and settings. You can start connecting frames, adding interactions, and customizing your prototype’s behavior from here.
Be aware that after the finish to work on the prototype, you should click on the “Design” tab on the right menu to go back to the design mode.
Connecting frames
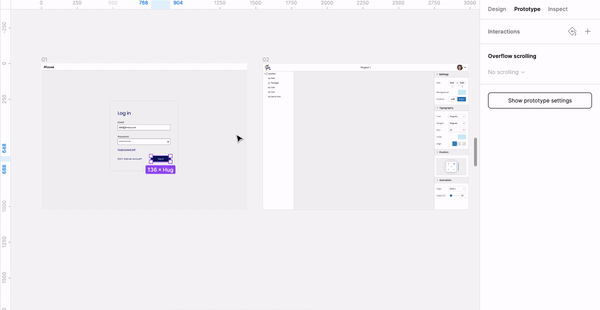
Connecting frames is one of the most basic steps in prototyping. It creates interactive relationships between different screens in your prototype.
To connect frames, select a UI component (for example, a button) and simply click on the plus icon. Then, drag the node (or “noodle”) from one frame to another. This way, you will link the frames. Now, when the user clicks on the button, it will take them to the next page.
If you want to delete the connection, click it and hit “Delete” on the keyboard.
Setting and managing the starting point
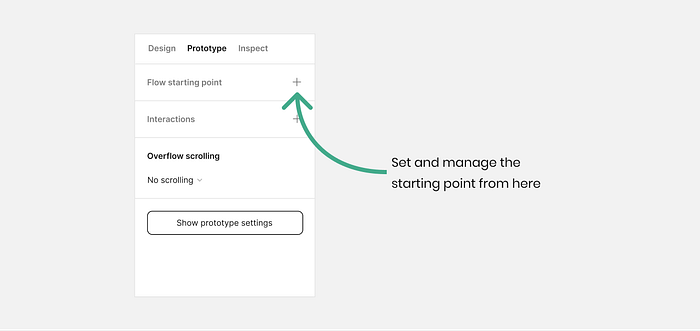
The starting point is the first screen users see when interacting with your prototype.
To set the starting point, click on the frame you want to use and then click on “Flow starting point” in the right menu. You will notice that a small rectangle appears in the top-left corner of the frame.
Select the rectangle and drag it to another frame to change the starting point.
I highly recommend naming each starting point by double-clicking on the rectangle. This will help keep your prototype organized, especially if you have multiple starting points.
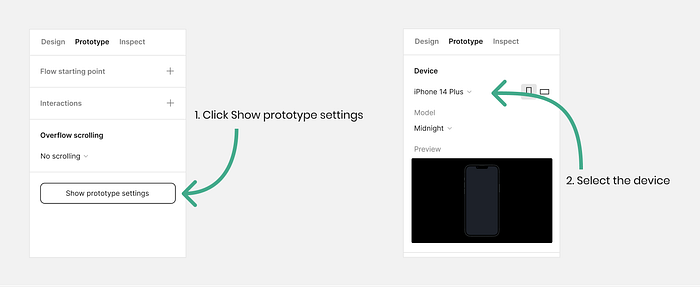
Selecting a device to present your Figma prototype
You can choose a specific device for your prototype in Figma, which helps you showcase it with the device it’s designed for. As a result, your prototype will look more realistic and accurate.
To set the device, select the frame you want to work on and click on “Show Prototype Settings” in the right-hand menu. Then, select the device you want from the select menu at the top of the right panel.
Play with the prototype in the “Present” mode
Figma’s “Present” mode (prototyping mode) is the feature that allows you to showcase your prototypes in an interactive environment. This mode gives you a realistic preview of your design’s flow, interactions, and overall user experience.
Each time users click on a UI element with a connection you set, they navigate to the next screen. This will help you gather valuable feedback and insights to improve your design.
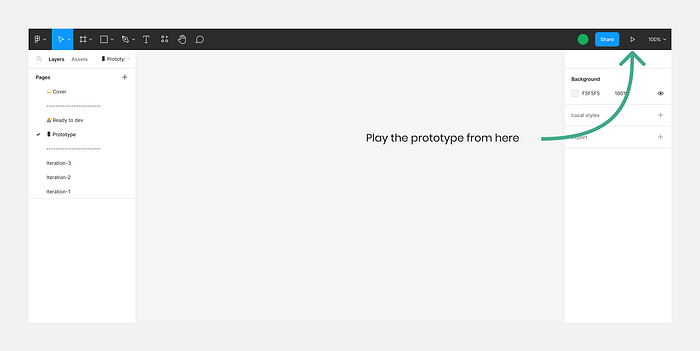
To access “Present mode”, click the “Play” icon in the Figma interface’s top-right corner. This will open your clickable prototype in a new browser tab. The first screen you will see is the screen with the starting point you set.
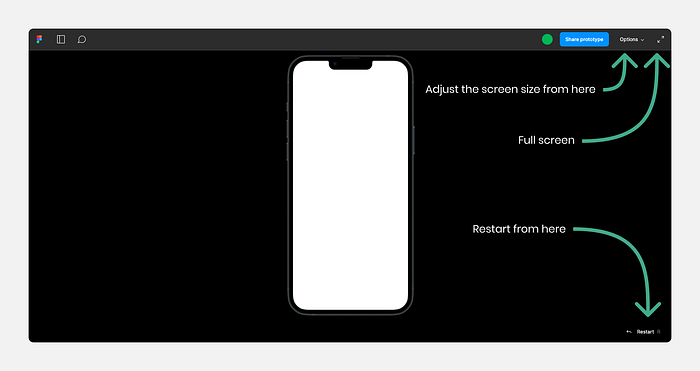
You can adjust the screen size by clicking the “Options” menu. There are four options (Actual size (100%), Fit to screen, Fit width, and Fill screen). I suggest you experiment and choose the size that fits your needs best.
In addition, you can view your Figma prototype in full-screen mode by clicking the full-screen icon in the top-right corner.
To reset the prototype, click the restart button in the screen’s bottom-right corner. It allows you to reset your prototype and return to its starting point.
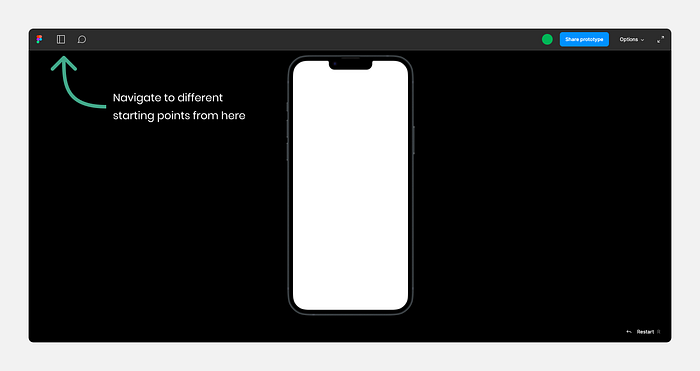
Navigate to different starting points in the “Present” mode
You can select between various starting points directly from the left panel. This will allow you and the users to quickly switch between different prototype parts, making navigation more efficient.
For example, imagine you’re designing an e-commerce app and have created two distinct user flows: registered users and guest users. You’ve set up separate starting points for each flow — “Registered User Home” and “Guest User Home.”
Sharing Figma prototypes with others
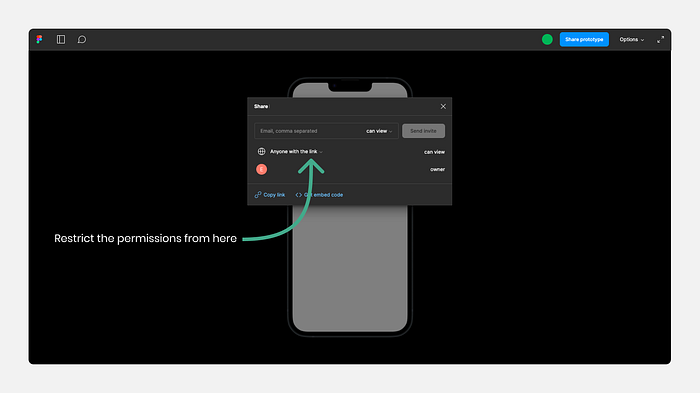
To share your prototype, access “Present” mode by clicking the “play” icon button in the top-right corner of the Figma interface. Once in Present mode, click the “Share” button at the screen’s top-right corner.

This will open a modal where you can copy the prototype’s shareable link or directly invite people via email.
You can also restrict the permissions from the modal for people who access the prototype. You can set it to anyone with the link or only invited people. As a general rule, set it to “Only people invited to this file” to ensure the information remains secure.
The difference between sharing a prototype and sharing a Figma file is that sharing a prototype provides people with a link to interact with your design in the present mode, whereas sharing the Figma file gives access to the actual design file.
For example, if you conduct a usability test, you can share the link to the present mode with the users because they do not need to see more than that.
But if you want to share the prototype with the product manager or another stakeholder from your team, you can share the Figma file. This way, they will have access to the file and the prototype.They can click the “play” button icon from the file to see the prototype.
To summary
In this article, I wanted to show you how you can use Figma’s prototyping feature to showcase your ideas. This is helpful if you’re not an expert and don’t know all its features. It is enough to do the basics to achieve good results.
First, I showed you the different purposes of prototypes and some basic tips on organizing your prototypes in Figma.
After that, we covered the basics of Figma prototyping, including accessing the prototype panel, connecting frames, managing starting points, presenting your prototypes, and sharing them with others.
Understanding and applying these foundational principles allows you to create effective, interactive prototypes that help you communicate your vision and gather valuable feedback.
Want to take your Figma skills to the next level?
Get one-on-one tutoring with me! Whether you’re a beginner or looking to refine your skills, I’ll work with you to help you gain confidence and improve your Figma skills.
Ready to take the first step? Simply fill out this form, and let’s get started!
Thank you for reading the article. I hope that this article helped you understand the basics of Figma prototyping. Please feel free to share it with your friends or team members, and if you have any questions, please let me know.
If you enjoyed my article, I suggest you follow me and subscribe so you’ll receive an email whenever I post.
Want to get the most out of Medium? Click here to become a member. As a member, you’ll support me and lots of other writers.
Recommend
About Joyk
Aggregate valuable and interesting links.
Joyk means Joy of geeK