

Real-Time Video Processing with WebCodecs and Streams: Processing Pipelines (Par...
source link: https://webrtchacks.com/real-time-video-processing-with-webcodecs-and-streams-processing-pipelines-part-1/
Go to the source link to view the article. You can view the picture content, updated content and better typesetting reading experience. If the link is broken, please click the button below to view the snapshot at that time.
Real-Time Video Processing with WebCodecs and Streams: Processing Pipelines (Part 1)
WebRTC used to be about capturing some media and sending it from Point A to Point B. Machine Learning has changed this. Now it is common to use ML to analyze and manipulate media in real time for things like virtual backgrounds, augmented reality, noise suppression, intelligent cropping, and much more. To better accommodate this growing trend, the web platform has been exposing its underlying platform to give developers more access. The result is not only more control within existing APIs, but also a bunch of new APIs like Insertable Streams, WebCodecs, Streams, WebGPU, and WebNN.
So how do all these new APIs work together? That is exactly what W3C specialists, François Daoust and Dominique Hazaël-Massieux (Dom) decided to find out. In case you forgot, W3C is the World Wide Web Consortium that standardizes the Web. François and Dom are long-time standards guys with a deep history of helping to make the web what it is today.
This is the first of a two-part series of articles that explores the future of real-time video processing with WebCodecs and Streams. This first section provides a review of the steps and pitfalls in a multi-step video processing pipeline using existing and the newest web APIs. Part two will explore the actual processing of video frames.
I am thrilled about the depth and insights these guides provide on these cutting-edge approaches – enjoy!
{“editor”, “chad hart“}

About Processing Pipelines
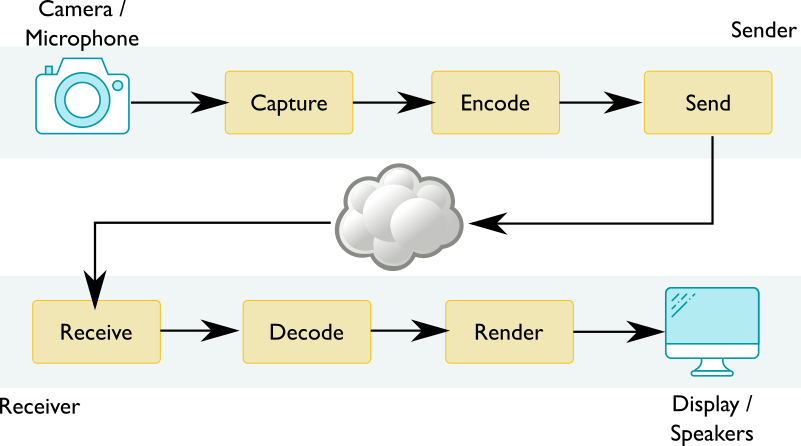
In simple WebRTC video conferencing scenarios, audio and video streams captured on one device are sent to another device, possibly going through some intermediary server. The capture of raw audio and video streams from microphones and cameras relies on getUserMedia. Raw media streams then need to be encoded for transport and sent over to the receiving side. Received streams must be decoded before they can be rendered. The resulting video pipeline is illustrated below. Web applications do not see these separate encode/send and receive/decode steps in practice – they are entangled in the core WebRTC API and under the control of the browser.
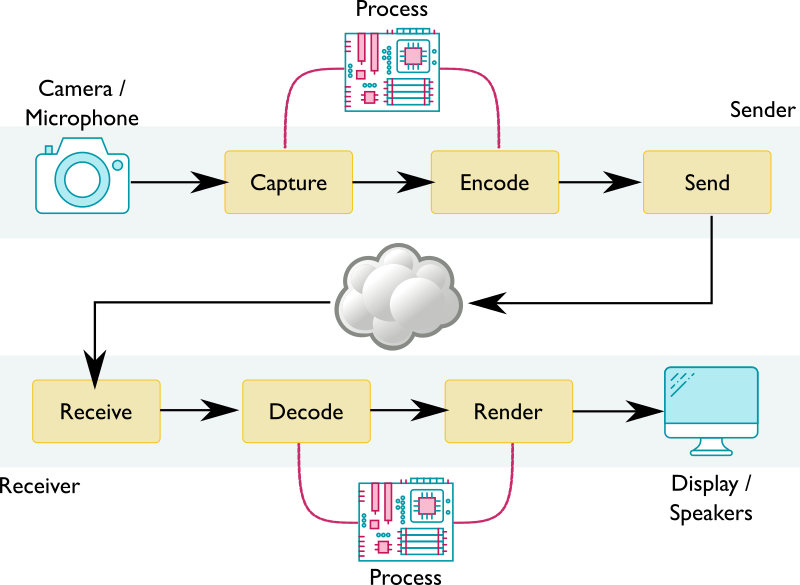
If you want to add the ability to do something like remove users’ backgrounds, the most scalable and privacy respective option is to do it client-side before the video stream is sent to the network. This operation needs access to the raw pixels of the video stream. Said differently, it needs to take place between the capture step and encode steps. Similarly, on the receiving side, you may want to give users options like adjusting colors and contrast, which also require raw pixel access between the decode and render steps. As illustrated below, this adds an extra process steps to the resulting video pipeline.
This made Dominique Hazaël-Massieux and me wonder how web applications can build such media processing pipelines.
The main problem is raw frames from a video stream cannot casually be exposed to web applications. Raw frames are:
- large – several MB per frame,
- plentiful – 25 frames per second or more,
- not easily exposable – GPU to CPU read-back often needed, and
- browsers need to deal with a variety of pixel formats (RGBA, YUV, etc.) and color spaces under the hoods.
As such, whenever possible, web technologies that manipulate video streams on the web (HTMLMediaElement, WebRTC, getUserMedia, Media Source Extensions) treat them as opaque objects and hide the underlying pixels from applications. This makes it difficult for web applications to create a media processing pipeline in practice.
Fortunately, the VideoFrame interface in WebCodecs may help, especially if you couple this with the MediaStreamTrackProcessor object defined in MediaStreamTrack Insertable Media Processing using Streams that creates a bridge between WebRTC and WebCodecs. WebCodecs lets you access and process raw pixels of media frames. Actual processing can use one of many technologies, starting with good ol’ JavaScript and including WebAssembly, WebGPU, or the Web Neural Network API (WebNN).
After processing, you could get back to WebRTC land through the same bridge. That said, WebCodecs can also put you in control of the encode/decode steps in the pipeline through its VideoEncoder and VideoDecoder interfaces. These can give you full control over all individual steps in the pipeline:
- For transporting the processed image somewhere while keeping latency low, you could consider WebTransport or WebRTC’s
RTCDataChannel. - For rendering, you could render directly to a canvas through
drawImage, using WebGPU, or via an<video>element throughVideoTrackGenerator(also defined in MediaStreamTrack Insertable Media Processing using Streams).
Inspired by sample code created by Bernard Aboba – co-editor of the WebCodecs and WebTransport specifications and co-chair of the WebRTC Working Group in W3C – Dominique and I decided to spend a bit of time exploring the creation of processing media pipelines. First, we wanted to better grasp media concepts such as video pixel formats and color spaces – we probably qualify as web experts, but we are not media experts and we tend to view media streams as opaque beasts as well. Second, we wanted to assess whether technical gaps remain. Finally, we wanted to understand where and when copies get made and gather some performance metrics along the way.
This article describes our approach, provides highlights of our resulting demo code, and shares our learnings. The code should not be seen as authoritative or even correct (though we hope it is), it is just the result of a short journey in the world of media processing. Also, note the technologies under discussion are still nascent and do not yet support interoperability across browsers. Hopefully, this will change soon!
Note: We did not touch on audio for lack of time. Audio frames take less memory, but there are many more of them per second and they are more sensitive to timing hiccups. Audio frames are processed with the Web Audio API. It would be very interesting to add audio to the mix, be it only to explore audio/video synchronization needs.
The demo
Our demo explores the creation of video processing pipelines, captures performance metrics, evaluates the impacts of choosing a specific technology to process frames, and provides insights about where operations get done and when copies are made. The processing operations loop through all pixels in the frame and “do something with them” (what they actually do is of little interest here). Different processing technologies are used for testing purposes, not because they would necessarily be a good choice for the problem at hand.
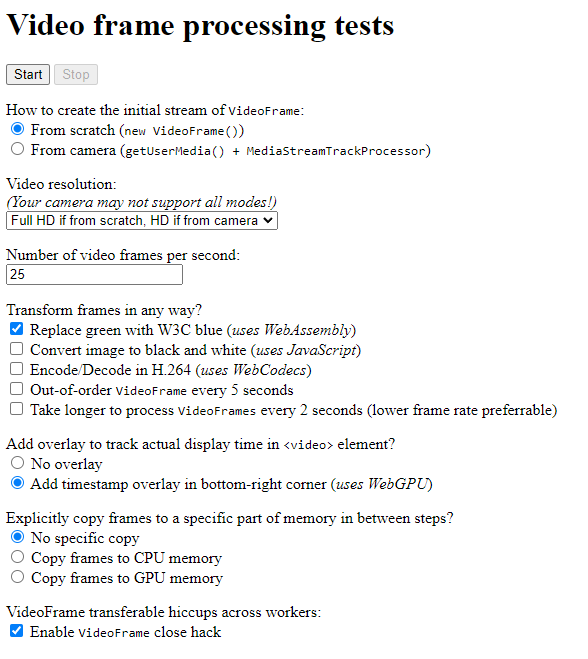
The demo lets the user:
- Choose a source of input to create an initial stream of VideoFrame: either a Nyan-cat-like animation created from scratch using
OffscreenCanvas, or a live stream generated from a camera. The user may also choose the resolution and framerate of the video stream. - Process video frames to replace green with blue using WebAssembly.
- Process video frames to turn them into black and white using pure JavaScript.
- Add an H.264 encoding/decoding transformation stage using WebCodecs.
- Introduce slight delays in the stream using regular JavaScript.
- Add an overlay to the bottom right part of the video that encodes the frame’s timestamp. The overlay is added using WebGPU and WGSL.
- Add intermediary steps to force copies of the frame to CPU memory or GPU memory, to evaluate the impact of the frame’s location in memory on transformations.
Once you hit the “Start” button, the pipeline runs and the resulting stream is displayed on the screen in a <video> element. And… that’s it, really! What mattered to us was the code needed to achieve that and the insights we gained from gathering performance metrics and playing with parameters. Let’s dive into that!
Note: these APIs are new and may not work in your browser
Technologies discussed in this article and used in the demo are still “emerging” (at least as of March 2023). The demo currently only runs in Google Chrome Canary with WebGPU enabled (“Unsafe WebGPU” flag set in chrome://flags/). Hopefully, the demo can soon run in other browsers too. Video processing with WebCodecs is available in the technical preview of Safari (16.4) and is under development in Firefox. WebGPU is also under development in Safari and Firefox. A greater unknown is support for MediaStreamTrack Insertable Media Processing using Streams in other browsers. For example, see this tracking bug in Firefox.
Timing Stats
Timing statistics are reported to the end of the page at the end and as objects to the console (this requires opening the dev tools panel). Provided the overlay was present, display times for each frame are reported too.
We’ll discuss more on this in the Measuring Performance section.
The role of WebCodecs in client-side processing
WebCodecs is the core of the demo and the key technology we’re using to build a media pipeline. Before we dive more into this, it may be useful to reflect on the value of using WebCodecs in this context. Other approaches could work just as well.
What about the Canvas? Do we need WebCodecs?
In fact, client-side processing of raw video frames has been possible on the web ever since the <video> and <canvas> elements were added to HTML, with the following recipe:
- Render the video onto a
<video>element. - Draw the contents of the
<video>element onto a<canvas>with drawImage on a recurring basis, e.g. using requestAnimationFrame or the more recent requestVideoFrameCallback that notifies applications when a video frame has been presented for composition and provides them with metadata about the frame. - Process the contents of the <canvas> whenever it gets updated.
We did not integrate this approach in our demo. Among other things, the performance here would depend on having the processing happen out of the main thread. We would need to use an OffscreenCanvas to process contents in a worker, possibly coupled with a call to grabFrame to send the video frame to the worker.
WebCodecs advantages
One drawback to the Canvas approach is that there is no guarantee that all video frames get processed. Applications can tell how many frames they missed if they hook onto requestVideoFrameCallback by looking at the presentedFrames counter, but missed frames were, by definition, missed. Another drawback is that some of the code (drawImage or grabFrame) needs to run on the main thread to access the <video> element.
WebGL and WebGPU also provide mechanisms to import video frames as textures directly from a <video> element, e.g. through the importExternalTexture method in WebGPU. This approach works well if the processing logic can fully run on the GPU.
WebCodecs gives applications a direct handle to a video frame and mechanisms to encode/decode them. This allows applications to create frames from scratch, or from an incoming stream, provided that the stream is in non-containerized form.
Note on containerized media
One important note – media streams are usually encapsulated in a media container. The container may include other streams along with timing and other metadata. While media streams in WebRTC scenarios do not use containers, most stored media files and media streamed on the web use adaptive streaming technologies (e.g. DASH, HLS) that are in a containerized form (e.g. MP4, ISOBMFF). WebCodecs can only be used on non-containerized streams. Applications that want to use WebCodecs with containerized media need to ship additional logic on their own to extract the media streams from their container (and/or to add streams to a container). For more information about media container formats, we recommend The Definitive Guide to Container File Formats by Armin Trattnig.
Processing streams using… Streams
So, having a direct handle on a video frame seems useful to create a media processing pipeline. It gives a handle to the atomic chunk of data that will be processed at each step.
Pipe chains
WHATWG Streams are specifically designed to create pipe chains to process such atomic chunks. This is illustrated in the Streams API concepts MDN page:
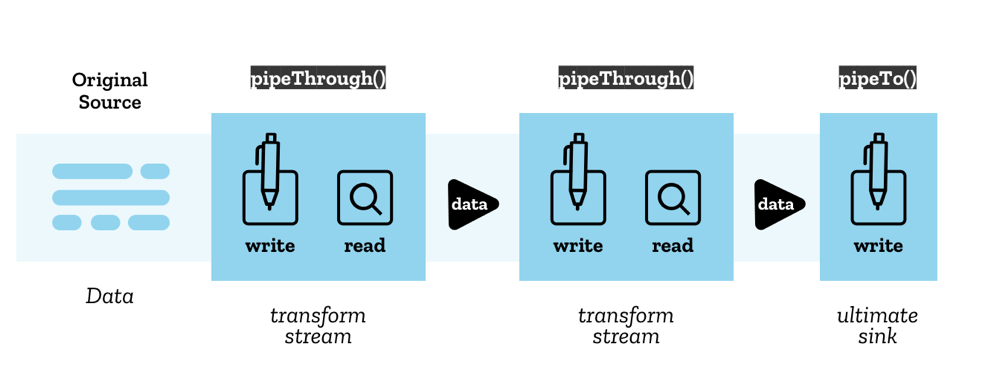
Streams API concepts diagram by Mozilla Contributors is licensed under CC-BY-SA 2.5.
WHATWG Streams are also used as the underlying structure by some of the technologies under consideration, such as WebTransport, VideoTrackGenerator, and MediaStreamTrackProcessor.
Backpressure
Finally, Streams provide backpressure and queuing mechanisms out of the box. As defined in the WHATWG Streams standard, backpressure is the process of
normalizing flow from the original source according to how fast the chain can process chunks.
When a step in a chain is unable to accept more chunks in its queue, it sends a signal that propagates backward through the pipe chain and up to the source to tell it to adjust its rate of production of new chunks. With backpressure, no need to worry about overflowing queues, the flow will naturally adapt to the maximum speed at which processing can run.
Creating a pipeline
Broadly speaking, creating a media processing pipeline using streams translates to:
- Create a stream of
VideoFrameobjects – somehow - Use
TransformStreamto create processing steps – compose them as needed - Send/Render the resulting stream or
VideoFrameobjects – somehow
The Devil is of course in the somehow. Some technologies can ingest or digest a stream of VideoFrame objects directly – not all of them can. Connectors are needed.
Pipelining is like a game of dominoes
We found it useful to visualize possibilities through a game of dominoes:


The left side of each domino is a type of input. The right side of the diagram shows the type of output. There are three main types of dominoes:
- generators,
- transformers, and
- consumers.
As long as you match the input of a domino with the output of the preceding one, you may assemble them any way you like to create pipelines. Let’s look at them in more detail:
Generating a stream
From scratch

You may create a VideoFrame from the contents of a canvas (or a buffer of bytes for that matter). Then, to generate a stream, just write the frame to a WritableStream at a given rate. In our code, this is implemented in the worker-getinputstream.js file. The logic creates a Nyan-cat-like animation with the W3C logo. As we will describe later, we make use of the WHATWG Streams backpressure mechanism by waiting for the writer to be ready:
await writer.ready; const frame = new VideoFrame(canvas, ...); writer.write(frame); |
From a camera or a WebRTC track


In WebRTC contexts, the source of a video stream is usually a MediaStreamTrack obtained from the camera through a call to getUserMedia, or received from a peer. The MediaStreamTrackProcessor object (MSTP) can be used to convert the MediaStreamTrack to a stream of VideoFrame objects.
Note: MediaStreamTrackProcessor is only exposed in worker contexts… in theory, but Chrome currently exposes it on the main thread and only there.
From a WebTransport stream


WebTransport creates WHATWG streams, so there is no need to run any stream conversion. That said, it is fairly inefficient to transport raw decoded frames given their size. Thus why all media streams travel encoded through the cloud! As such, the WebTransportReceiveStream will typically contain encoded chunks, to be interpreted as EncodedVideoChunk. To get back to a stream of VideoFrame objects, each chunk needs to go through a VideoDecoder. Simple chunk encoding/decoding logic (without WebTransport) can be found in the worker-transform.js file.
What about WebTransport?
The demo does not integrate WebTransportyet. We encourage you to check Bernard Aboba’s WebCodecs/WebTransport sample. Both the sample and approach presented here are limited in that only one stream is used to send/receive encoded frames. Real-life applications would likely be more complex to avoid head-of-line blocking issues. They would likely use multiple transport streams in parallel, up to one per frame. On the receiving end, frames received on individual streams then need to be reordered and merged to re-create a unique stream of encoded frames. The IETF Media over QUIC (moq) Working Group develops such a low-latency media delivery solution (over raw QUIC or WebTransport).
What about Data Channels?
RTCDataChannel could also be used to transport encoded frames, with the caveat that some adaptation logic would be needed to connect RTCDataChannel with Streams.
Transforming a stream

Once you have a Stream of VideoFrame objects, video processing can be structured as a TransformStream that takes a VideoFrame as input and produces an updated VideoFrame as output. Transform streams can be chained as needed, although it is always a good idea to keep the number of steps that need to access pixels to a minimum, since accessing pixels in a video frame typically means looping through millions of them (ie 1920 * 1080 = 2 074 600 pixels for a video frame in full HD).
Note: Part 2 explores technologies that can be used under the hood to process the pixels. We also review performance considerations.
Sending/Rendering a stream
Some apps only need to extract information from the stream – like in the case of gesture detection. However, in most cases, the final stream needs to be rendered or sent somewhere.
To a <canvas> element

A VideoFrame can be directly drawn onto a canvas. Simple!
canvasContext.drawImage(frame, 0, 0); |
Rendering frames to a canvas gives the applications full control over when to display those frames. This seems particularly useful when a video stream needs to be synchronized with something else, e.g. overlays and/or audio. One drawback is that, if the goal is to end up with a media player, you will have to re-implement that media player from scratch. That means adding controls, support for tracks, accessibility, etc. This is no easy task…
To a <video> element


A stream of VideoFrame objects cannot be injected into a <video> element. Fortunately, a VideoTrackGenerator (VTG) can be used to convert the stream into a MediaStreamTrack that can then be injected into a <video> element.
Notes and Caveats
Only for Workers
Note VideoTrackGenerator is only exposed in worker contexts… in theory, but as for MediaStreamTrackProcessor, Chrome currently exposes it on the main thread and only there.
VideoTrackGenerator is the new MediaStreamTrackGenerator
Also note: VideoTrackGenerator used to be called MediaStreamTrackGenerator. Implementation in Chrome has not yet caught up with the new name, so our code still uses the old name!
To the cloud with WebTransport


WebTransport can be used to send the resulting stream to the cloud. As noted before, it would require too much bandwidth to send unencoded video frames in a WebTransportSendStream. They need to be encoded first, using the VideoEncoder interface defined in WebCodecs. Simple frame encoding/decoding logic (without WebTransport) can be found in the worker-transform.js file.
Handling backpressure
Streams come geared with a backpressure mechanism. Signals propagate through the pipe chain and up to the source when the queue is building up to indicate it might be time to slow down or drop one or more frames. This mechanism is very convenient to avoid accumulating large decoded video frames in the pipeline that could exhaust memory. 1 second of full HD video at 25 frames per second happily takes 200MB of memory once decoded.
The API also makes it possible for web applications to implement their own buffering strategy. If you need to process a live feed in real-time, you may want to drop frames that cannot be processed in time. Alternatively, if you need to transform recorded media then you can slow down and process all frames, no matter how long it takes.
One structural limitation is that backpressure signals only propagate through the pipeline in parts where WHATWG streams are used. They stop whenever the signals bump into something else. For instance, MediaStreamTrack does not expose a WHATWG streams interface. As a result, if a MediaStreamTrackProcessor is used in a pipeline, it receives backpressure signals but signals do not propagate beyond it. The buffering strategy is imposed: the oldest frame will be removed from the queue when room is needed for a new frame.
In other words, if you ever end up with a VideoTrackGenerator followed by a MediaStreamTrackProcessor in a pipeline, backpressure signals will be handled by the MediaStreamTrackProcessor and will not propagate to the source before the VideoTrackGenerator. You should not need to create such a pipeline, but we accidentally ended up with that configuration while writing the demo. Keep in mind that this is not equivalent to an identity transform.


Workers, TransformStream and VideoFrame
So far, we have assembled dominoes without being explicit about where the underlying code is going to run. With the notable exception of getUserMedia, all the components that we have discussed can run in workers. Running them outside of the main thread is either good practice or mandated as in the case of VideoTrackGenerator and MediaStreamTrackProcessor – though note these interfaces are actually only available on the main thread in Chrome’s current implementation.
Multiple Workers?
Now if we are going to have threads, why restrict yourself to one worker when you can create more? Even though a media pipeline describes a sequence of steps, it seems useful at first sight to try and run different steps in parallel.
To run a processing step in a worker, the worker needs to gain access to the initial stream of VideoFrameobjects which may have been created in another worker. Workers typically do not share memory but the postMessage API may be used for cross-worker communication. A VideoFrame is not a simple object but it is defined as a transferable object, which essentially means that it can be sent from one worker to another efficiently, without requiring a copy of the underlying frame data.
Note: Transfer detaches the object being transferred, which means that the transferred object can no longer be used by the worker that issued the call to postMessage.
One approach to run processing steps in separate workers would be to issue a call to postMessage for each and every VideoFrame at the end of a processing step to pass it over to the next step. From a performance perspective, while postMessage is not necessarily slow, the API is event-based and events still introduce delays. A better approach would be to pass the stream of VideoFrame objects once and for all when the pipeline is created. This is possible because ReadableStream, WritableStream and TransformStream are all transferable objects as well. Code to connect an input and output stream to another worker could then become:
worker.postMessage({ type: 'start', inputStream: readableStream, outputStream: writableStream }, [readableStream, writableStream]); |
Now, the fact that streams get transferred does not mean that the chunks that get read from or written to these streams are themselves transferred. Chunks are rather serialized. The nuance is thin (and should have a very minimal impact on performance) but particularly important for VideoFrame objects. Why? Because a VideoFrame needs to be explicitly closed through a call to its close method to free the underlying media resource that the VideoFrame points to.
When a VideoFrame is transferred, its close method is automatically called on the sender side. When a VideoFrame is serialized, even though the underlying media resource is not cloned, the VideoFrame object itself is cloned, and the close method now needs to be called twice: once on the sender side and once on the receiver side. The receiver side is not an issue: calling close() there is to be expected. However, there is a problem on the sender’s side: a call like controller.enqueue(frame) in a TransformStream attached to a readable stream transferred to another worker will trigger the serialization process, but that process happens asynchronously and there is no way to tell when it is done. In other words, on the sender side, code cannot simply be:
controller.enqueue(frame); frame.close(); // Too early! |
If you do that, the browser will rightfully complain when it effectively serializes the frame that it cannot clone it because the frame has already been closed. And yet the sender needs to close the frame at some point. If you don’t, one of two things could happen:
- the browser will either report a warning that it bumped into dangling
VideoFrameinstances (which suggests a memory leak) or - the pipeline simply freezes after a couple of frames are processed.
The pipeline freeze happens, for example, when the VideoFrame is tied to hardware-decoded data. Hardware decoders use a very limited memory buffer, so pause until the memory of already decoded frames gets freed. This is a known issue. There are ongoing discussions to extend WHATWG streams with a new mechanism that would allow it to explicitly transfer ownership of the frame so that the sender side does not need to worry about the frame anymore. See for example the Transferring Ownership Streams Explained proposal.
Note: Closing the frame synchronously as in the code above sometimes works in practice in Chrome depending on the underlying processing pipeline. We found it hard to reproduce the exact conditions that make the browser decide to clone the frame right away or delay it. As far as we can tell, the code should not work in any case.
Learning: use a single worker for now
For now, it is probably best to stick to touching streams of VideoFrame objects from one and only one worker. The demo does use more than one worker. It keeps track of frame instances to close at the end of the processing pipeline. However, we did that simply because we did not know initially that creating multiple workers would be problematic and require such a hack.
Measuring performance
The timestamp property of a VideoFrame instance provides a good identifier for individual frames, and allows applications to track them throughout the pipeline. The timestamp even survives encoding (and respectively decoding) with a VideoEncoder (and respectively with VideoDecoder).
In the suggested pipeline model, a transformation step is a TransformStream that operates on encoded or decoded frames. The time taken to run the transformation step is thus simply the time taken by the transform function, or more precisely the time taken until the function calls controller.enqueue(transformedChunk) to send the updated frame down the pipe. The demo features a generic InstrumentedTransformStream class that extends TransformStream to record start and end times for each frame in a static cache. The class is a drop-in replacement for TransformStream:
const transformStream = new InstrumentedTransformStream({ name: 'super-duper', transform(chunk, controller) { const transformedChunk = doSomethingWith(chunk); controller.enqueue(transformedChunk); |
Recorded times then get entered in an instance of a generic StepTimesDB class to compute statistics such as minimum, maximum, average, and median times taken by each step, as well as time spent waiting in queues.
This works well for the part of the pipeline that uses WHATWG Streams, but as soon as the pipeline uses opaque streams, such as when frames are fed into a VideoTrackGenerator, we lose the ability to track individual frames. In particular, there is no easy way to tell when a video frame is actually displayed to a <video> element. The requestVideoFrameCallback function reports many interesting timestamps, but not the timestamp of the frame that has been presented for composition.
The workaround implemented in the demo encodes the frame’s timestamp in an overlay in the bottom-right corner of the frame and then copies the relevant part of frames rendered to the <video> element to a <canvas> element whenever the requestVideoFrameCallback callback is called to decode the timestamp. This does not work perfectly – frames can be missed in between calls to the callback function, but it is better than nothing.
Note: requestVideoFrameCallback is supported in Chrome and Safari but not in Firefox for now.
It is useful for statistical purposes to track the time when the frame is rendered. For example, one could evaluate jitter effects. Or you could use this data for synchronization purposes, like if video needs to be synchronized with an audio stream and/or other non-video overlays. Frames can of course be rendered to a canvas instead. The application can then keep control over when a frame gets displayed to the user (ignoring the challenges of reimplementing a media player).
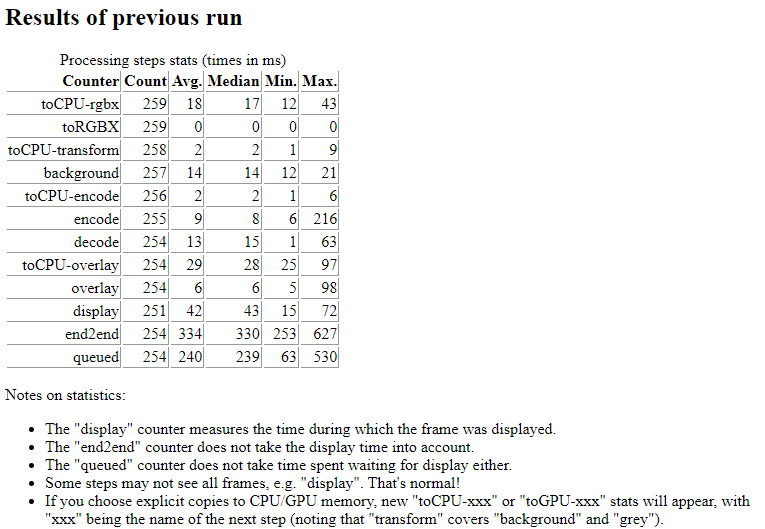
A typical example of statistics returned to the console at the end of a demo run is provided below:
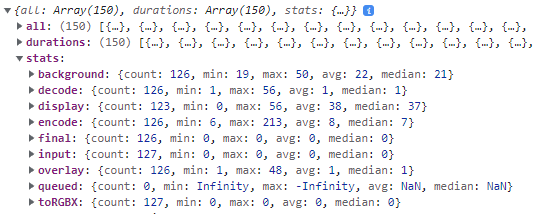
A look at the console output of the video frame processing tests demo
The times are per processing step and per frame. The statistics include the average times taken by each step per frame. For this example: background removal took 22ms, adding the overlay 1ms, encoding 8 ms, decoding 1ms, and frames stayed on display during 38ms.
How to Process VideoFrames
This article explored the creation of a real-time video processing pipeline using WebCodecs and Streams, along with considerations on handling backpressure, managing the VideoFrame lifecycle, and measuring performance. The next step is to actually start processing the VideoFrame objects that such a pipeline would expose. Please stay tuned, this is the topic of part 2!
{“author”: “François Daoust“}
Attributions
– WHATWG Stream logo: https://resources.whatwg.org/logo-streams.svg
Licensed under a Creative Commons Attribution 4.0 International License: https://streams.spec.whatwg.org/#ipr
– Film strip: https://www.flaticon.com/free-icons/film
Film icons created by Freepik – Flaticon
Recommend
About Joyk
Aggregate valuable and interesting links.
Joyk means Joy of geeK