

New Scanning and Text Capabilities with VisionKit [FREE]
source link: https://www.kodeco.com/36652642-new-scanning-and-text-capabilities-with-visionkit
Go to the source link to view the article. You can view the picture content, updated content and better typesetting reading experience. If the link is broken, please click the button below to view the snapshot at that time.
New Scanning and Text Capabilities with VisionKit
VisionKit comes with new Scanning and Text Capabilities. In this tutorial, you’ll learn how to use Apple’s latest VisionKit update to take advantage of the new capabilities.
By Warren Burton.
When you’re building apps, the entry barrier to some features, including text recognition, is high. Even experienced coders take a lot of time and code to get text recognition working in video.
DataScannerViewController from the powerful VisionKit is a self-contained scanner for text and barcodes that removes most of the difficulties from this task.
If you need to get text information into your app, this API might be for you. An inconvenience is that DataScannerViewController is a UIViewController and isn’t directly exposed to SwiftUI. That’s OK because UIKit is not going away soon. It’s easy to combine UIKit and SwiftUI.
In this tutorial, you learn how to use and customize DataScannerViewController in a UIKit based app while mixing in SwiftUI components.
To do this tutorial, you need:
- Xcode 14.0.1 or higher.
- An iPhone or iPad running iOS 16 with an A12 Bionic processor or better (Late 2017 forward).
- Basic SwiftUI knowledge.
Getting Started
Slurpy is an app that uses DataScannerViewController to capture text and barcodes and store them for future use. For instance, a student visiting a museum could use Slurpy to capture text from exhibit information cards for later use.
Download the project using the Download Materials link at the top or bottom of the tutorial. Open the folder Starter, and open the project file Slurpy.xcodeproj.
You’ll build to your device for the tutorial. Connect the device to your Mac and select it as the run destination. The name in the bar will be the name of your device.
Select the project file in the Project navigator:
- Select the target Slurpy.
- Switch to the Signing and Capabilities tab.
- Set your own Development Team.
- Change the Bundle ID to your specific team value.

Build and run. You see a premade tabbed interface with two tabs “Ingest” and “Use” to keep you focused on the cool content. Your next step will be to add DataScannerViewController to your interface.

Using DataScannerViewController
In this section, you create and configure the DataScannerViewController from VisionKit and add that to the “Ingest” tab of the interface. You’ll soon be able to see what the camera recognizes in the view.
Creating a Delegate
Delegate protocols (or the delegation pattern) are common all through the Apple SDKs. They allow you to change a class behavior without needing to create a subclass.
In the Project navigator, in the group ViewControllers, open ScannerViewController.swift. You see an empty class declaration for ScannerViewController.
Below the line import UIKit add the import statement:
import VisionKit
Next, add the following code at the bottom of ScannerViewController.swift:
extension ScannerViewController: DataScannerViewControllerDelegate {
  func dataScanner(
    _ dataScanner: DataScannerViewController,
    didAdd addedItems: [RecognizedItem],
    allItems: [RecognizedItem]
  ) {
  }

  func dataScanner(
    _ dataScanner: DataScannerViewController,
    didUpdate updatedItems: [RecognizedItem],
    allItems: [RecognizedItem]
  ) {
  }

  func dataScanner(
    _ dataScanner: DataScannerViewController,
    didRemove removedItems: [RecognizedItem],
    allItems: [RecognizedItem]
  ) {
  }

  func dataScanner(
    _ dataScanner: DataScannerViewController,
    didTapOn item: RecognizedItem
  ) {
  }
}
In this extension, you conform ScannerViewController to the protocol DataScannerViewControllerDelegate. DataScannerViewControllerDelegate has methods that are called when DataScannerViewController begins to recognize or stops recognizing objects in its field of view.
Come back here later once you have the scanner running. For now, this extension must exist to prevent compiler errors.
Next, extend DataScannerViewController with a function that instantiates and configures it to your needs.
Extending DataScannerViewController
In this section, make a DataScannerViewController and set it up to scan text and barcodes.
Add this extension at the bottom of ScannerViewController.swift:
extension DataScannerViewController {
  static func makeDatascanner(delegate: DataScannerViewControllerDelegate)
    -> DataScannerViewController {
    let scanner = DataScannerViewController(
      recognizedDataTypes: [
         // restrict the types here later
         .text()
      ],
      isGuidanceEnabled: true,
      isHighlightingEnabled: true
    )

    scanner.delegate = delegate
    return scanner
  }
}
In makeDatascanner you instantiate DataScannerViewController. The first argument to init, recognizedDataTypes is an array of RecognizedDataType objects. The array is empty for now — you’ll add items you want to recognize soon.
The arguments isGuidanceEnabled and isHighlightingEnabled add extra UI to the view to help you locate objects. Finally, you make ScannerViewController the delegate of DataScannerViewController. This property assignment connects the DataScannerViewControllerDelegate methods you added before.
Adding the Scanner to the View
You’re ready to add the scanner to the view. At the top of ScannerViewController.swift locate the class declaration for ScannerViewController and add the following inside the class body:
var datascanner: DataScannerViewController?
Keep a reference to the scanner you create so you can start and stop the scanner. Next, add this method to the class body:
 func installDataScanner() {
  // 1.
  guard datascanner == nil else {
    return
  }

  // add guard here

  // 2.
  let scanner = DataScannerViewController.makeDatascanner(delegate: self)
  datascanner = scanner
  addChild(scanner)
  view.pinToInside(scanner.view)

  // 3.
  addChild(scanner)
  scanner.didMove(toParent: self)

  // 4.
  do {
    try scanner.startScanning()
  } catch {
    print("** oh no (unable to start scan) - \(error)")
  }
}
In this code you:
- Check for an existing scanner, so don’t add one twice.
- Create a scanner using
makeDatascannerthen pin the view ofDataScannerViewControllerinside thesafeAreaLayoutGuidearea ofScannerViewController.pinToInsideis an Auto Layout helper included with the starter project. - Add your
DataScannerViewControllertoScannerViewControlleras a child view controller, then tell the scanner it moved to a parent view controller. - Start the
DataScannerViewController.
The last step is call installDataScanner when the view appears. Add this code inside the body of ScannerViewController:
override func viewDidAppear(_ animated: Bool) {
  super.viewDidAppear(animated)
  installDataScanner()
}
You’re ready to fire up the app. Build and run. You see the app immediately crash with a console message similar to this:
[access] This app has crashed because it attempted to access privacy-sensitive data without a usage description. The app's Info.plist must contain an NSCameraUsageDescription key with a string value explaining how the app uses this data.
When an app needs to access the camera, it needs to explain why it should be permitted. Add the necessary key next.
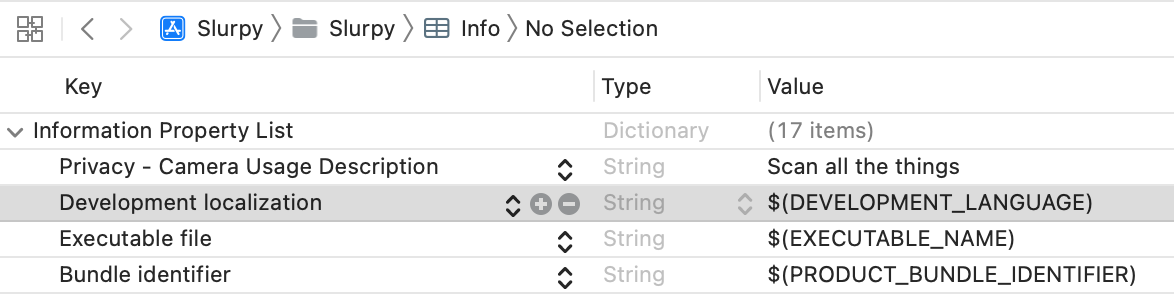
Adding Camera Usage Description
You now need to change the Info.plist to get your app working.
- Locate and open Info.plist in the Project navigator.
- Copy this key, NSCameraUsageDescription.
- Select the top level object Information Property List
- Click the + control that appears to add a value to the dictionary.
- In the field that appears, paste the key NSCameraUsageDescription and press Return. See the key changes to a human-readable value of “Privacy — Camera Usage Description.”
- Add the description “Scan all the things” to the Value field.
Build and run. You see a permission alert appear with the text from the camera usage description you added.

Touch OK to grant permission. You have a working camera.
Point your camera at some text, and you see a bounding rectangle. This behavior is toggled by isHighlightingEnabled that you met earlier.
The default state for DataScannerViewController is to recognize everything it can. That’s fun, but it might not be what you want. In the next section, you’ll learn how to limit DataScannerViewController to only recognize what you need.
Restricting Recognized Types
Barcode Symbologies
A barcode symbology is standard coding for a piece of data. If you encode your data using QR symbology, anybody with a QR reader can decode it.
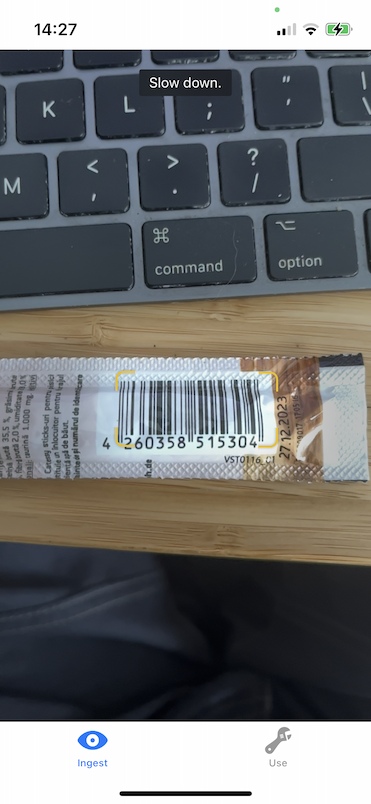
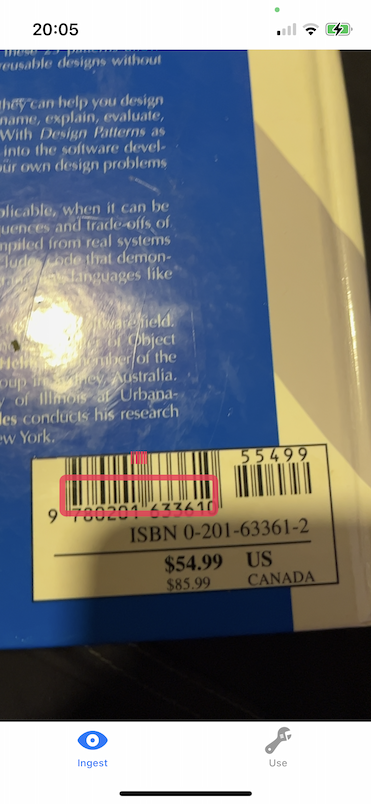
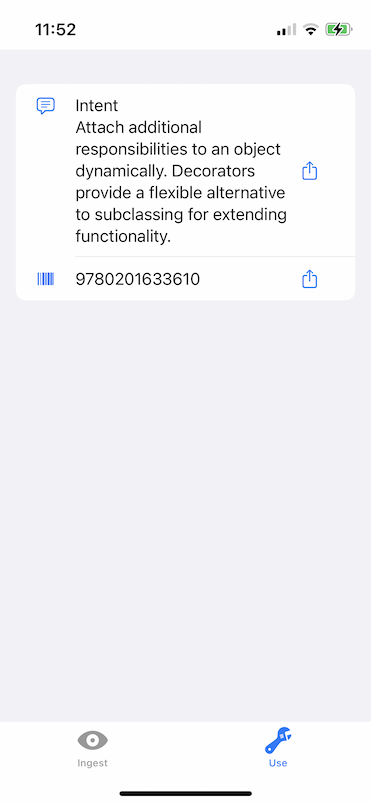
For instance, your museum or library visitor would like to scan some text or the ISBN of a book. An ISBN is a 13-digit number. A ISBN should use EAN-13 symbology in barcode format. Restrict your scanning to that type.
VNBarcodeSymbology declares all the types that you can read with VisionKit. Among those types is the EAN-13 standard.
Configuring the Scanner
In ScannerViewController, locate makeDatascanner and find the comment // add types here.
Delete the comment, then add this code to the array in the parameter recognizedDataTypes
.barcode(
  symbologies: [
    .ean13
  ]),
.text(languages: ["en", "pt"])
You have told the DataScannerViewController to look for one type of barcode and English or Portuguese text. Feel free to customize the languages array with the ISO 639-1 language code for your own country.
Build and run, then scan the barcodes above again. Notice how Slurpy is quicker at locking onto the barcodes and spends less time jumping around locking onto other items in the field of view.
Customizing the Scanner View
The UI that DataScannerViewController provides is effective, but say you want something else. Pink is hot right now so next you’ll learn to make a custom guide rectangle.
DataScannerViewController has a property overlayContainerView. Any views placed inside this container won’t interfere with the hit testing in the scanner. This means you can still touch items to add them to your catalog. Make a SwiftUI based renderer for the recognized items you scan.
Adding a Model
You’re at the point in your app where you need a model layer to keep track of the objects that DataScannerViewController recognizes. To save time and keep focus on the tutorial topic, the starter project includes a simple model layer.
DataScannerViewController uses VisionKit.RecognizedItem to describe an object that it sees.
In the Project navigator, open the Model group. Open TransientItem.swift. TransientItem is a wrapper around RecognizedItem. You have this structure so your app is not dependent on the data structure of RecognizedItem.
The next data structure is StoredItem.swift. StoredItem is Codable and can be persisted between sessions.
The last file in the Model group is DataStore.swift. DataStore is an ObservableObject and a container for both StoredItem that you want to keep and TransientItem that DataScannerViewController recognizes during a scanning session.
DataStore manages access to the two @Published collections collectedItems and transientItems. You’ll plug it into your SwiftUI code later.
In the next section, you’ll use this model to build an overlay view.
Creating an Overlay View
You’re now ready to create that cool 1980s-inspired interface you’ve always wanted. In the Project navigator, select the Views group.
- Press Command-N to present the File Template picker.
- Select SwiftUI View and press Next.
- Name the file Highlighter.swift and press Create.
In Highlighter.swift replace everything inside of Highlighter with this code:
@EnvironmentObject var datastore: DataStore

var body: some View {
  ForEach(datastore.allTransientItems) { item in
    RoundedRectangle(cornerRadius: 4)
      .stroke(.pink, lineWidth: 6)
      .frame(width: item.bounds.width, height: item.bounds.height)
      .position(x: item.bounds.minX, y: item.bounds.minY)
      .overlay(
        Image(systemName: item.icon)
          .position(
            x: item.bounds.minX,
            y: item.bounds.minY - item.bounds.height / 2 - 20
          )
          .foregroundColor(.pink)
      )
  }
}
In this View you draw a RoundedRectangle with a pink stroke for each recognized item seen. Above the rectangle, you show an icon that shows whether the item is a barcode or text. You’ll see this in action soon.
Hosting a SwiftUI View
In the Project navigator, open the ViewControllers group and open PaintingViewController.swift. Add this import above PaintingViewController:
import SwiftUI
Add this code inside PaintingViewController:
override func viewDidLoad() {
  super.viewDidLoad()

  let paintController = UIHostingController(
    rootView: Highlighter().environmentObject(DataStore.shared)
  )
  paintController.view.backgroundColor = .clear
  view.pinToInside(paintController.view)
  addChild(paintController)
  paintController.didMove(toParent: self)
}
Here you wrap Highlighter in a UIHostingController and inject the shared instance of DataStore into the view hierarchy. Use this pattern more times in this tutorial.
The general sequence for hosting a SwiftUI View in a UIViewController is:
- Create a
UIHostingControllerfor your SwiftUI view. - Add the
viewof theUIHostingControllerto the parentUIViewController. - Add the
UIHostingControlleras a child of the parentUIViewController. - Call
didMove(toParent:)to notifyUIHostingControllerof that event.
Open ScannerViewController.swift again. Inside the body of ScannerViewController, add the following property below var datascanner: DataScannerViewController?.
let overlay = PaintingViewController()
Next in makeDataScanner, locate the parameter isHighlightingEnabled and set it to false so the default UI doesn’t appear under your much better version.
Finally, add this line at the end of installDataScanner:
scanner.overlayContainerView.pinToInside(overlay.view)
The Highlighter view is now part of the view hierarchy. You’re almost ready to go.
Using Delegate Methods
Return to ScannerViewController.swift and locate extension ScannerViewController: DataScannerViewControllerDelegate that you added earlier. In that extension are four methods:
The top method is:
func dataScanner(
  _ dataScanner: DataScannerViewController,
  didAdd addedItems: [RecognizedItem],
  allItems: [RecognizedItem]
)
This delegate method is called when DataScannerViewController starts recognizing an item. Add this code to the body of dataScanner(_:didAdd:allItems:):
DataStore.shared.addThings(
  addedItems.map { TransientItem(item: $0) },
  allItems: allItems.map { TransientItem(item: $0) }
)
Here you map each RecognizedItem to a TransientItem, then forward the mapped collections to DataStore.
Next do a similar task for dataScanner(_:didUpdate:allItems:), which is called when an item is changed:
Add this code to the body of dataScanner(_:didUpdate:allItems:):
DataStore.shared.updateThings(
  updatedItems.map { TransientItem(item: $0) },
  allItems: allItems.map { TransientItem(item: $0) }
)
Follow up with the the third delegate dataScanner(_:didRemove:allItems:), which is called when DataScannerViewController stops recognizing an item:
Add this code to the body of dataScanner(_:didRemove:allItems:):
DataStore.shared.removeThings(
  removedItems.map { TransientItem(item: $0) },
  allItems: allItems.map { TransientItem(item: $0) }
)
The final delegate dataScanner(_:didTapOn:) is called when you touch the screen inside a recognized region:
Add this line to the body of dataScanner(_:didTapOn:):
DataStore.shared.keepItem(TransientItem(item: item).toStoredItem())
keepItem uses a StoredItem because you are trying to persist the object so you convert TransientItem to StoredItem using a helper.
In that section, you routed the changes from DataScannerViewController to DataStore, performing all the necessary mapping at the client side.
Build and run to see the new hotness.

You now have a scanner capable of recording text and ISBN numbers. Next, build a list to display all the items you collect.
Making a List
You’re going to use SwiftUI to build a table then put that table in the second tab named “Use” of the application.
Creating a Table
In the Project navigator, select the group Views, then add a new SwiftUI View file named ListOfThings.swift.
Delete everything inside of ListOfThings, then add this code inside ListOfThings:
@EnvironmentObject var datastore: DataStore

var body: some View {
  List {
    ForEach(datastore.collectedItems, id: \.id) { item in
      // 1.
      HStack {
        Label(
          item.string ?? "<No Text>",
          systemImage: item.icon
        )
        Spacer()
        ShareLink(item: item.string ?? "") {
          Label("", systemImage: "square.and.arrow.up")
        }
      }
    }
    // 2.
    .onDelete { indexset in
      if let index = indexset.first {
        let item = datastore.collectedItems[index]
        datastore.deleteItem(item)
      }
    }
  }
}
This code generates a List. The table content is bound to the @Published array collectedItems from the DataStore instance.
- Each cell has a label with an icon at the leading edge and a share icon at the trailing edge. A touch gesture will present a standard iOS share sheet.
- A standard swipe gesture deletes the stored item.
Hosting a Table
Embed ListOfThings in a UIHostingController. In the Project navigator, go to the ViewControllers group and then open ListViewController.swift.
Insert this import above ListViewController:
import SwiftUI
Add this code inside ListViewController:
override func viewDidLoad() {
  super.viewDidLoad()

  let datastore = DataStore.shared
  let listController = UIHostingController(
    rootView: ListOfThings().environmentObject(datastore)
  )
  view.pinToInside(listController.view)
  addChild(listController)
  listController.didMove(toParent: self)
}
That’s the same pattern you used when adding Highlighter to the overlay container of DataScannerViewController.


Scan a book barcode and tap on the recognized region. Also, scan a piece of text. If you can’t find any of your own, you can use the ones above. Now when you tap on a recognized item it’s added to the data store. Switch to the Use tab and you see the items listed.
Touch any of the items and share the content using a standard share sheet.

Congratulations! You have the core of your app all built up. You can scan barcodes and text, and share the scanned content. The app isn’t quite customer-ready, so next perform tasks to make it ready for a wider audience.
Working with Availability and Permissions
In this section, you’ll handle some scenarios where the scanner might not start. This can happen for two main reasons.
- The users device is too old and doesn’t support DataScannerViewController.
- The user has declined permission to use the camera or has removed permission to use the camera.
Deal with handling that availability now.
Handling Device Support Checks
You need some UI to display to users when their devices aren’t supported or available. You can create a general-purpose banner for warning purposes.
In the Project navigator, select the group Views and add a new SwiftUI View file named FullScreenBanner.swift to the group.
Replace everything inside FullScreenBanner.swift below import SwiftUI with this code:
struct FullScreenBanner: View {
var systemImageName: String
var mainText: String
var detailText: String
var backgroundColor: Color
var body: some View {
Rectangle()
.fill(backgroundColor)
.overlay(
VStack(spacing: 30) {
Image(systemName: systemImageName)
.font(.largeTitle)
Text(mainText)
.font(.largeTitle)
.multilineTextAlignment(.center)
Text(detailText)
.font(.body)
.multilineTextAlignment(.center)
.padding(EdgeInsets(top: 0, leading: 20, bottom: 0, trailing: 20))
}
.foregroundColor(.white)
)
.edgesIgnoringSafeArea(.all)
}
}
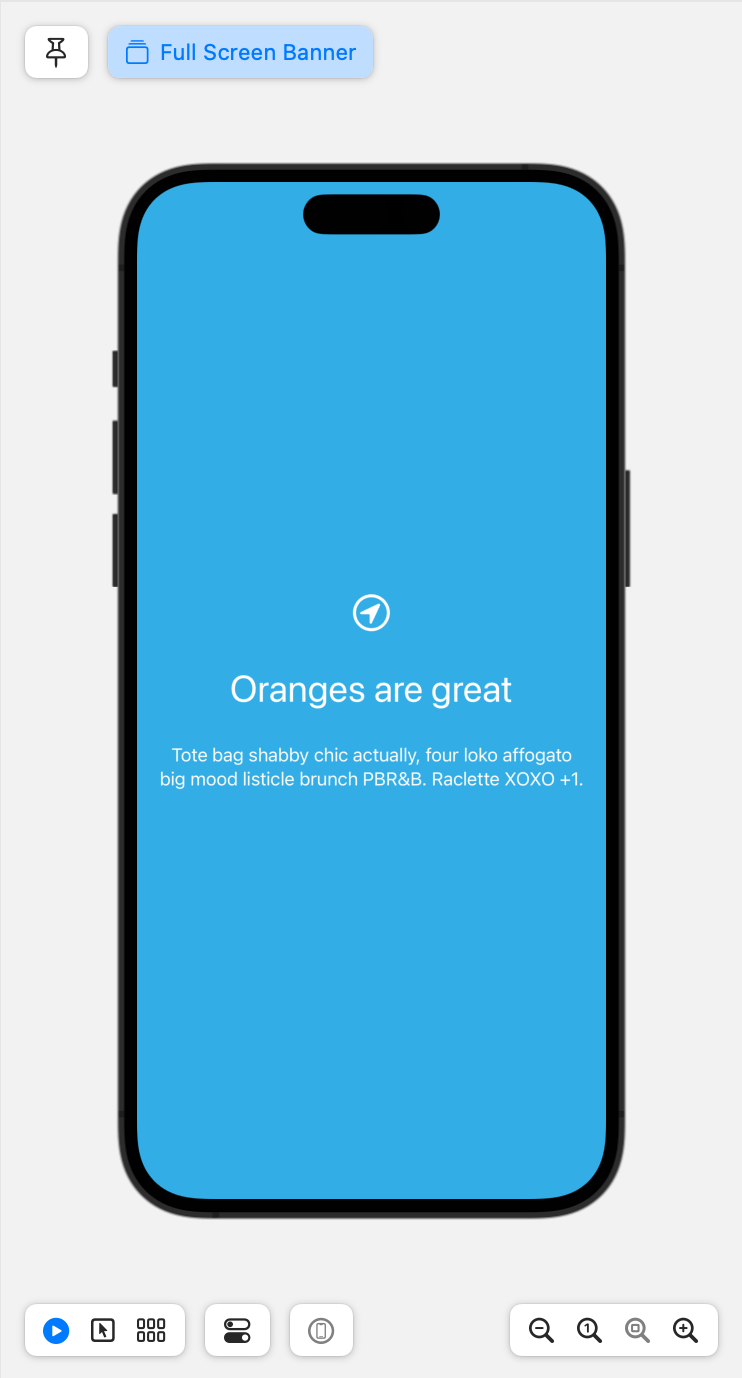
struct FullScreenBanner_Previews: PreviewProvider {
static var previews: some View {
FullScreenBanner(
systemImageName: "location.circle",
mainText: "Oranges are great",
detailText: "Lorem ipsum dolor sit amet, consectetur adipiscing elit",
backgroundColor: .cyan
)
}
}
You declare a View with a vertical stack of one image and two text blocks. Display the Preview canvas to see what that looks like:
Now, add a device support check to your application logic.
In the Project navigator, in the group ViewControllers, open ScannerViewController.swift.
Add this method and property to ScannerViewController:
var alertHost: UIViewController?

func cleanHost() {
  alertHost?.view.removeFromSuperview()
  alertHost = nil
}
In cleanHost, you remove any previously installed view from the view hierarchy of ScannerViewController.
Add this import below import VisionKit:
import SwiftUI
Now add these two similar methods to ScannerViewController:
func installNoScanOverlay() {
cleanHost()
let scanNotSupported = FullScreenBanner(
systemImageName: "exclamationmark.octagon.fill",
mainText: "Scanner not supported on this device",
detailText: "You need a device with a camera and an A12 Bionic processor or better (Late 2017)",
backgroundColor: .red
)
let host = UIHostingController(rootView: scanNotSupported)
view.pinToInside(host.view)
alertHost = host
}
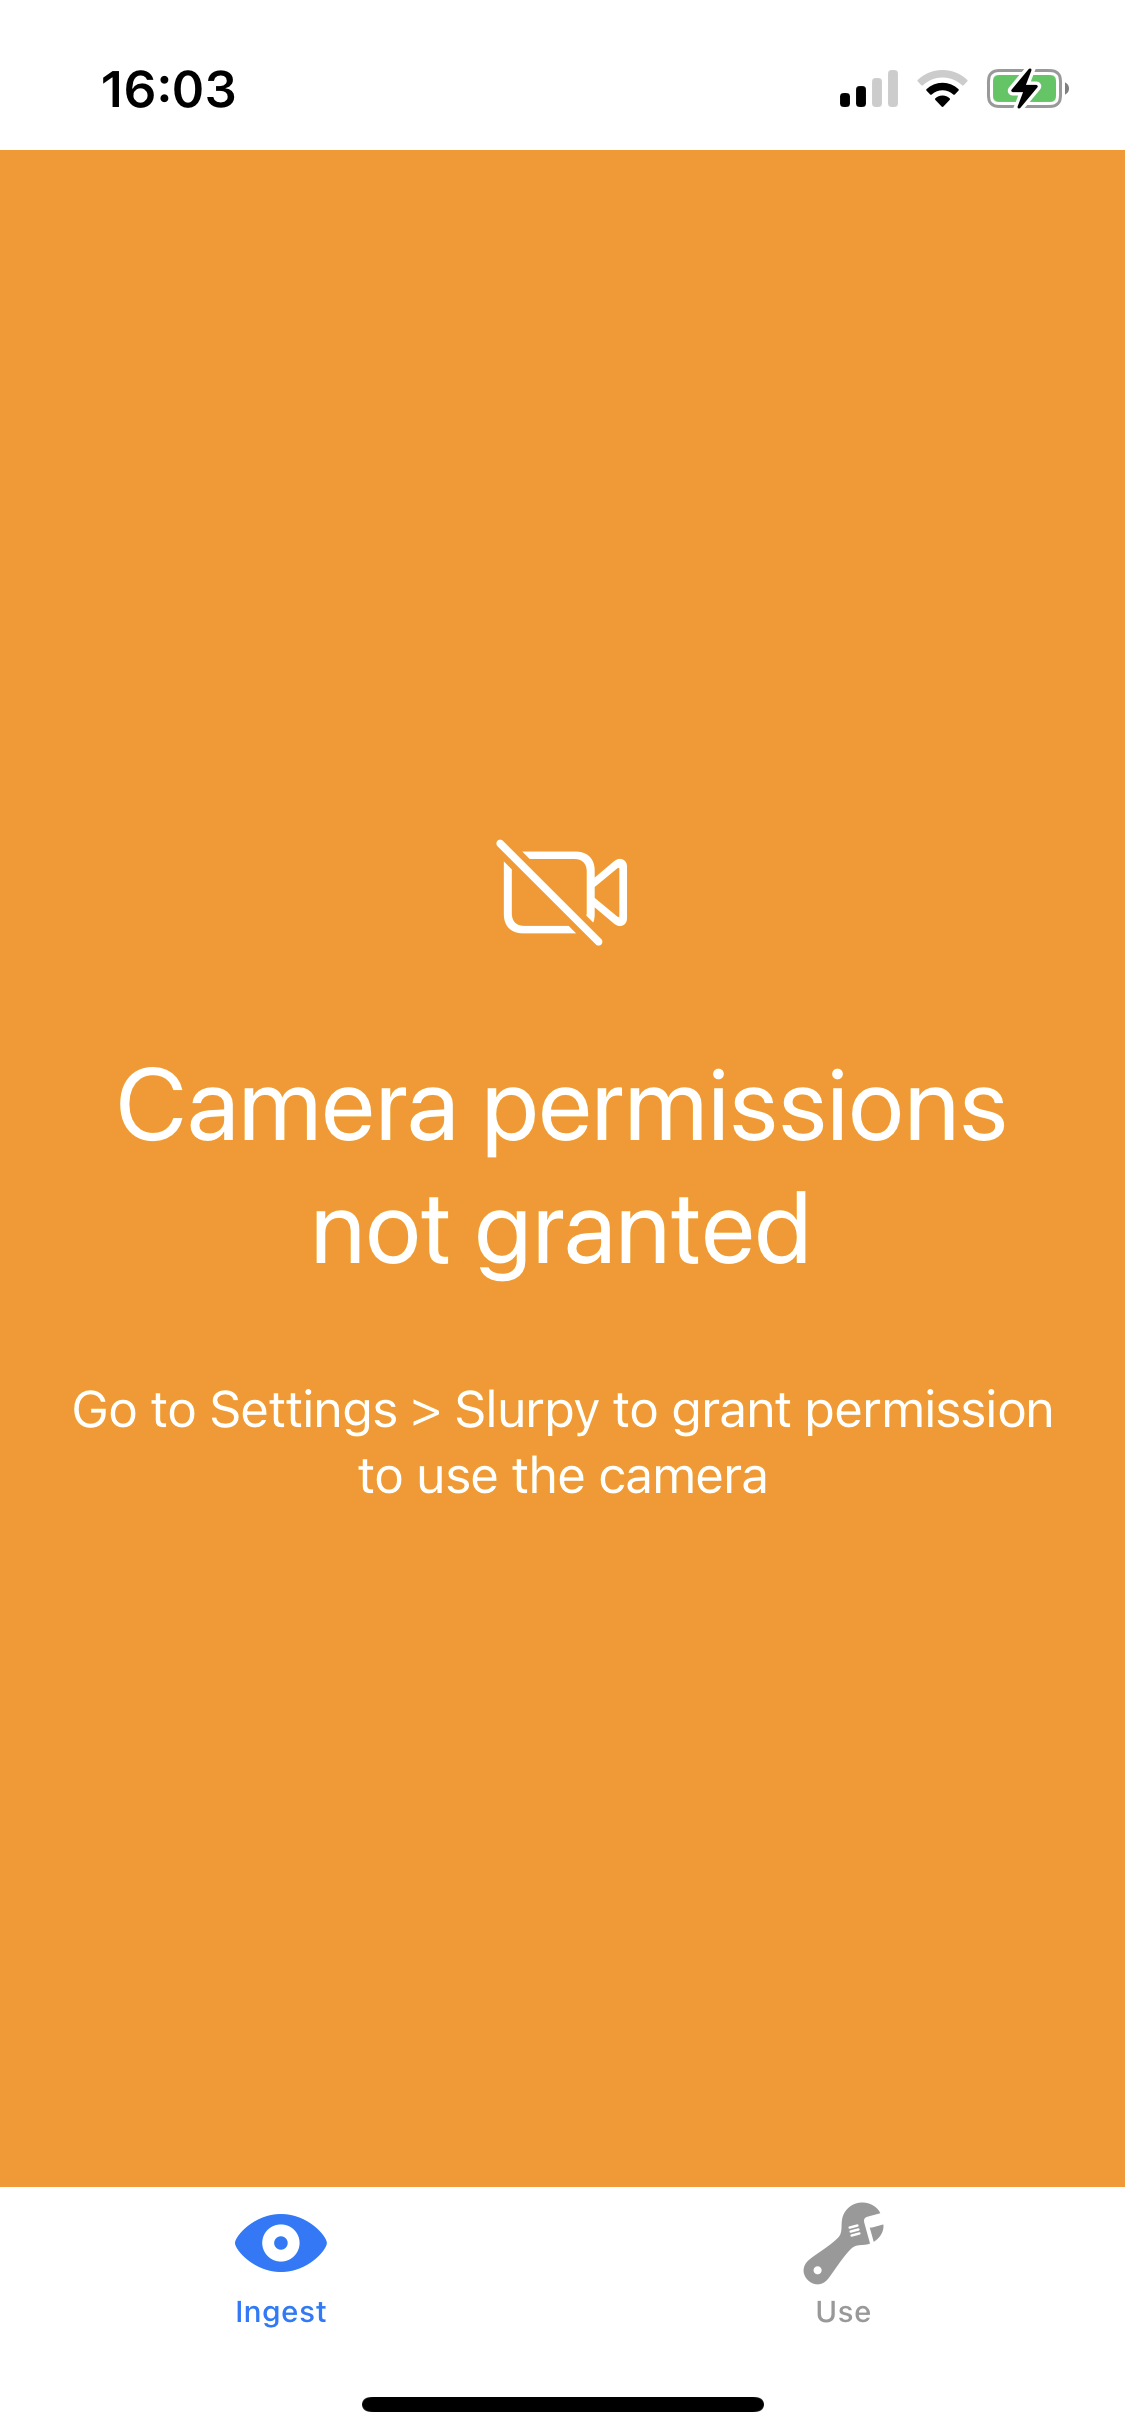
func installNoPermissionOverlay() {
cleanHost()
let noCameraPermission = FullScreenBanner(
systemImageName: "video.slash",
mainText: "Camera permissions not granted",
detailText: "Go to Settings > Slurpy to grant permission to use the camera",
backgroundColor: .orange
)
let host = UIHostingController(rootView: noCameraPermission)
view.pinToInside(host.view)
alertHost = host
}
These two methods configure a FullScreenBanner and then place that View into the view hierarchy.
Then add this code to ScannerViewController:
var scanningIsSupported: Bool {
  false
  // DataScannerViewController.isSupported
}

var scanningIsAvailable: Bool {
  DataScannerViewController.isAvailable
}
DataScannerViewController has a static property isSupported you can use to query whether the device is up to date. For this run-only, you ignore it and return false so you can test the logic.
Finally, to prevent a crash, don’t install the scanner for a nonsupported device.
Locate installDataScanner in ScannerViewController: At the top of installDataScanner add this code at the comment // add guards here:
guard scanningIsSupported else {
  installNoScanOverlay()
  return
}

guard scanningIsAvailable else {
  installNoPermissionOverlay()
  return
}
Those two guards prevent you from instantiating DataScannerViewController, if the preconditions aren’t met. Camera permissions can be withdrawn at any time by the user and need to be checked every time you want to start the camera.
Build and run. You see the view ScanNotSupported instead of the camera.

Go back to var scanningIsSupported to remove the mock Boolean value.
- Delete the line
false. - Uncomment the line
DataScannerViewController.isSupported.
Build and run.
At this point, you can go to Settings > Slurpy on your device and switch off “Allow Slurpy to Access Camera” to observe the no permission view in place. If you do, switch permission back on to continue with the tutorial.
Stopping the Scanner
When working with any iOS camera API, shut the camera down when you are done using it. You start the scanner in viewDidAppear so now stop it in viewWillDisappear. Add this code to ScannerViewController:
func uninstallDatascanner() {
  guard let datascanner else {
    return
  }
  datascanner.stopScanning()
  datascanner.view.removeFromSuperview()
  datascanner.removeFromParent()
  self.datascanner = nil
}

override func viewWillDisappear(_ animated: Bool) {
  super.viewWillDisappear(animated)
  uninstallDatascanner()
}
In uninstallDatascanner you stop DataScannerViewController then remove it from the view. You stop using resources that you no longer need.
Providing User Feedback
When you scanned the book barcode and a text fragment, you probably weren’t sure whether the item saved. In this section, you’ll provide some haptic feedback to the user when they save an item.
Providing Haptic Feedback
Haptic feedback is when your device vibrates in response to an action. Use CoreHaptics to generate these vibrations.
Add this import at the top of ScannerViewController below import SwiftUI:
import CoreHaptics
Then, add this property to the top of ScannerViewController:
let hapticEngine: CHHapticEngine? = {
  do {
    let engine = try CHHapticEngine()
    engine.notifyWhenPlayersFinished { _ in
      return .stopEngine
    }
    return engine
  } catch {
    print("haptics are not working - because \(error)")
    return nil
  }
}()
Here you create a CHHapticEngine and configure it to stop running by returning .stopEngine once all patterns have played to the user. Stopping the engine after use is recommended by the documentation.
Add this extension to ScannerViewController.swift:
extension ScannerViewController {
  func hapticPattern() throws -> CHHapticPattern {
    let events = [
      CHHapticEvent(
        eventType: .hapticTransient,
        parameters: [],
        relativeTime: 0,
        duration: 0.25
      ),
      CHHapticEvent(
        eventType: .hapticTransient,
        parameters: [],
        relativeTime: 0.25,
        duration: 0.5
      )
    ]
    let pattern = try CHHapticPattern(events: events, parameters: [])
    return pattern
  }

  func playHapticClick() {
    guard let hapticEngine else {
      return
    }

    guard UIDevice.current.userInterfaceIdiom == .phone else {
      return
    }

    do {
      try hapticEngine.start()
      let pattern = try hapticPattern()
      let player = try hapticEngine.makePlayer(with: pattern)
      try player.start(atTime: 0)
    } catch {
      print("haptics are not working - because \(error)")
    }
  }
}
In hapticPattern, you build a CHHapticPattern that describes a double tap pattern. CHHapticPattern has a rich API that is worth exploring beyond this tutorial.
playHapticClick plays your hapticPattern. Haptics are only available on iPhone, so if you’re using an iPad, use an early return to do nothing. You’ll soon do something else for iPad.
You start CHHapticEngine just before you play the pattern. This connects to the value .stopEngine that you returned in notifyWhenPlayersFinished previously.
Finally, locate extension ScannerViewController: DataScannerViewControllerDelegate and add this line at the end of dataScanner(_:didTapOn:):
playHapticClick()
Build and run to feel the haptic pattern when you tap a recognized item. In the next section, you’ll add a recognition sound for people using an iPad.
Adding a Feedback Sound
To play a sound, you need a sound file. You can make your own, but for this tutorial, use a a sound that’s included in the starter project.
Go to the top of ScannerViewController.swift and add this import below the other imports:
import AVFoundation
Add this property inside ScannerViewController:
var feedbackPlayer: AVAudioPlayer?
Finally, add this extension to ScannerViewController.swift:
extension ScannerViewController {
  func playFeedbackSound() {
    guard let url = Bundle.main.url(
      forResource: "WAV_Jinja",
      withExtension: "wav"
    ) else {
      return
    }
    do {
      feedbackPlayer = try AVAudioPlayer(contentsOf: url)
      feedbackPlayer?.play()
    } catch {
      print("Error playing sound - \(error)!")
    }
  }
}
Inside dataScanner(_:didTapOn:), below playHapticClick() add this call:
playFeedbackSound()
Build and run. Ensure that the device isn’t muted and volume is not zero. When you touch a recognized item, a sound will ring out.
Congratulations. You have a made a barcode and text scanner focused on students or librarians who want to collect ISBN numbers and text fragments.
That’s all the material for this tutorial, but you can browse the documentation for DataScannerViewController to see other elements of this API.
Using DataScannerViewController in a SwiftUI project
In this tutorial, you’ll use a UIKit-based project. If you want to use DataScannerViewController in a SwiftUI project, you’ll need to host it in a UIViewControllerRepresentable SwiftUI View. UIViewControllerRepresentable is the mirror API of UIHostingViewController.
- Use SwiftUI views in UIKit with
UIHostingViewController. - Use UIKit view controllers in SwiftUI with
UIViewControllerRepresentable.
Learning how to implement UIViewControllerRepresentable is out of scope for this tutorial, but what you’ve learned about DataScannerViewController will apply when you do.
Where to Go From Here
You can download the completed project using the Download Materials link at the top or bottom of the tutorial.
In this tutorial you covered:
- Starting and stopping DataScannerViewController.
- Working with the data structures that DataScannerViewController provides.
- Integrating SwiftUI views in UIKit components.
- Working with camera hardware availability and user permissions.
- Using haptics and sound to provide user feedback.
DataScannerViewController opens up a world of interaction — at minimal development cost — with the physical and textual worlds.
Have some fun and create a game or use it to hide information in plain sight. A QR code can hold up to 7,000 characters depending on size. If you use encryption only, people with the key can read that data. That’s an information channel even when internet access is blocked, unavailable or insecure.
Please share what you develop in the forum for this tutorial using the link below. I look forward to seeing what you do.

Recommend
About Joyk
Aggregate valuable and interesting links.
Joyk means Joy of geeK