

DevOps实战系列【第三章】:详解Maven仓库及环境搭建
source link: https://blog.51cto.com/u_15909716/5996615
Go to the source link to view the article. You can view the picture content, updated content and better typesetting reading experience. If the link is broken, please click the button below to view the snapshot at that time.
DevOps实战系列【第三章】:详解Maven仓库及环境搭建
精选 原创个人亲自录制全套DevOps系列实战教程 : 手把手教你玩转DevOps全栈技术
Maven私有仓库,就不多说了,我们这里选用最新的Nexus3的3.17版本,平时公司使用的都是Nexus 2.x,新的3.x版本做了很多的升级,包括存储方式等,
这里选用新版本的一个原因就是也想了解下新版本的变化。
参考官网:
https://help.sonatype.com/repomanager3/installation-and-upgrades/installation-methods
docker pull sonatype/nexus3:3.17.0
注意:宿主机需提前创建/docker/nexus3/data目录,用于和容器的数据目录进行映射,
# 所以/docker/nexus3/data需要给200授权,为了方便我使用的是777权限。
chmod -R 777 /docker/nexus3/data
version: '3'
services:
nexus3:
image: 'sonatype/nexus3:3.17.0'
restart: always
container_name: 'nexus3'
hostname: 'nexus3'
environment:
- NEXUS_CONTEXT=nexus # 默认不指定上下文为根/,这是和nexus2不同的地方
ports:
- '9081:8081'
networks:
- 'exist-net-bloom'
volumes:
- '/docker/nexus3/data:/nexus-data'
- '/etc/timezone:/etc/timezone:ro'
- '/etc/localtime:/etc/localtime:ro'
networks:
exist-net-bloom:
external:
name: devops
查看密码:
进入容器的cat /nexus-data/admin.password文件中查看。
# http://10.10.1.199:9081/nexus/
# 注意如果去掉NEXUS_CONTEXT=nexus的设置,入口就是http://10.10.1.199:9081/
用户名:admin
Nexus 仓库类型
- hosted:maven-releases、maven-snapshots,接收客户端提交过来的依赖包(jar包,mvn deploy),也可从中心库下载依赖包。在2.x老版本中还会有一个3th party库,用来从第三方获取jar包然后上传到该库中管理。
- proxy:maven-central,正常客户端下载依赖包顺序,优先查找hosted库是否存在,不存在则通过proxy库到中心库查找并下载保存到本地仓库。
- group:maven-public,这个仓库就是前两个的汇总,它包含所有仓库的依赖包。
本地全局settings.xml配置
<localRepository>/mvnrepo/repo</localRepository>
<servers>
<! -- 设置私服登录需要的用户名/密码(注意:一般会单独给研发创建账号避免权限过大)
注意此处id需要和项目pom->distributionManagement->repository->id相匹配 -- >
<server>
<id>nexus3</id>
<username>admin</username>
<password>123456</password>
</server>
<! -- 以下两个会在下边再次讲到 -- >
<server>
<id>omv-releases</id>
<username>admin</username>
<password>123456</password>
</server>
<server>
<id>omv-snapshots</id>
<username>admin</username>
<password>123456</password>
</server>
</servers>
<profiles>
<profile>
<id>omv-profile</id>
<! -- 指定使用group库,即汇总有hosted和proxy为一体的库,这样只需配置一个即可 -- >
<repositories>
<repository>
<id>omv-central</id>
<url>http://10.10.1.199:9081/nexus/repository/maven-public/</url>
<releases><enabled>true</enabled></releases>
<snapshots><enabled>true</enabled></snapshots>
</repository>
<! -- 错误配置:阿里云提供的远程中心仓库【后边解释】 -- >
<! -- 疑问:这里如果配置2个或多个repository会以什么顺序拉取依赖? -- >
<! -- 解答:因为maven的配置是按顺序来的,并且这多个repository对于maven来说都是私服,
他会先从最上边的repository查,查不到再到第二个,最后到central中心库 -- >
<repository>
<! -- 阿里云这个只为演示错误 -- >
<id>aliyun</id>
<name>aliyun Repository</name>
<url>https://maven.aliyun.com/repository/public</url>
<! -- 不使用snapshot库,默认是true,所以release库是可用的 -- >
<snapshots>
<enabled>false</enabled>
</snapshots>
</repository>
</repositories>
<! -- 如果有私服中有插件也要单独指定下插件库 -- >
<pluginRepositories>
<pluginRepository>
<id>omv-central-plugin</id>
<url>http://10.10.1.199:9081/nexus/repository/maven-public/</url>
<releases><enabled>true</enabled></releases>
<snapshots><enabled>true</enabled></snapshots>
</pluginRepository>
</pluginRepositories>
</profile>
</profiles>
<activeProfiles>
<! -- 激活omv-profile这个配置:只配置不激活不生效 -- >
<activeProfile>omv-profile</activeProfile>
</activeProfiles>
<! -- 注意:以上配置后,客户端去下载依赖的流程是:①先在自己本地库查找 ②再到私服nexus的库查找 ③再由私服到远程中心库查找 -- >
<! -- 问题:阿里云怎么用的?不应该去阿里云拉取吗?-- >
<! -- 目的:我们本意是想让私服拉取不到后,不要去默认的远程中心库拉取而是去阿里云拉取,而上边配置后是达不到目的的,只能让拉取变得混乱,需要使用mirror镜像 -- >
<mirrors>
<mirror>
<! -- 目的:就是要屏蔽掉<mirrorOf>指定的<repository>的id对应的仓库,就是如果要访问屏蔽的仓库,会被重定向到url指向的仓库 -- >
<! -- 默认的中心仓库id=central,所以指定屏蔽掉它,用阿里云作为他的镜像就可以了 -- >
<id>omv-mirror</id>
<mirrorOf>central</mirrorOf>
<url>https://maven.aliyun.com/repository/public</url>
</mirror>
</mirrors>
</settings>
关于中心仓库:通过镜像方式重定向中心仓库只是其中是一种方式,也可以在nexus的web页面,直接将maven-central这个代理仓库代理的中心仓库改成我们期望的仓库。
比如还可以在nexus中增加一个proxy的maven-cental,让他直接代理阿里云仓库,这样上边的镜像到的url就可以直接使用自己的私服nexus地址了。
项目pom.xml文件设置
settings.xml中定义了拉取依赖的库(私服和阿里云),那下边我们来定义通过maven打包后部署jar包到哪个库的配置,即怎么向nexus上传分发。
<! -- 分发管理:就是打包后上传到哪里,因为客户端主动上传只能用nexus的hosted库,只有release和snapshot -- >
<distributionManagement>
<! -- 遇到<version>xxx-RELEASE</version>的包都会上传到release库 -- >
<repository>
<id>omv-releases</id>
<name>Releases</name>
<url>http://10.10.1.199:9081/nexus/repository/maven-releases/</url>
</repository>
<! -- SNAPSHOT,原理同上 -- >
<snapshotRepository>
<id>omv-snapshots</id>
<name>Snapshot</name>
<url>http://10.10.1.199:9081/nexus/repository/maven-snapshots/</url>
</snapshotRepository>
</distributionManagement>
</project>
<! --
问题:当我们打包deploy时会报权限问题
因为nexus设置了鉴权,所以需要授权,授权需要settings.xml中配置<service>,id要和这里的id一致
-- >
问题:当我们打包deploy时会报权限问题
答案:因为nexus设置了鉴权,所以需要授权,授权需要settings.xml中配置,id要和这里的id一致
关于一个异常
关于loger error:通过nexus的日志,我们发现有一个ssl的请求超时,他是去访问国外网站了,鉴于这个功能我们不使用,所以直接屏蔽掉
路径:admin登录->System->Capabilities->Outreach: Management->Disable
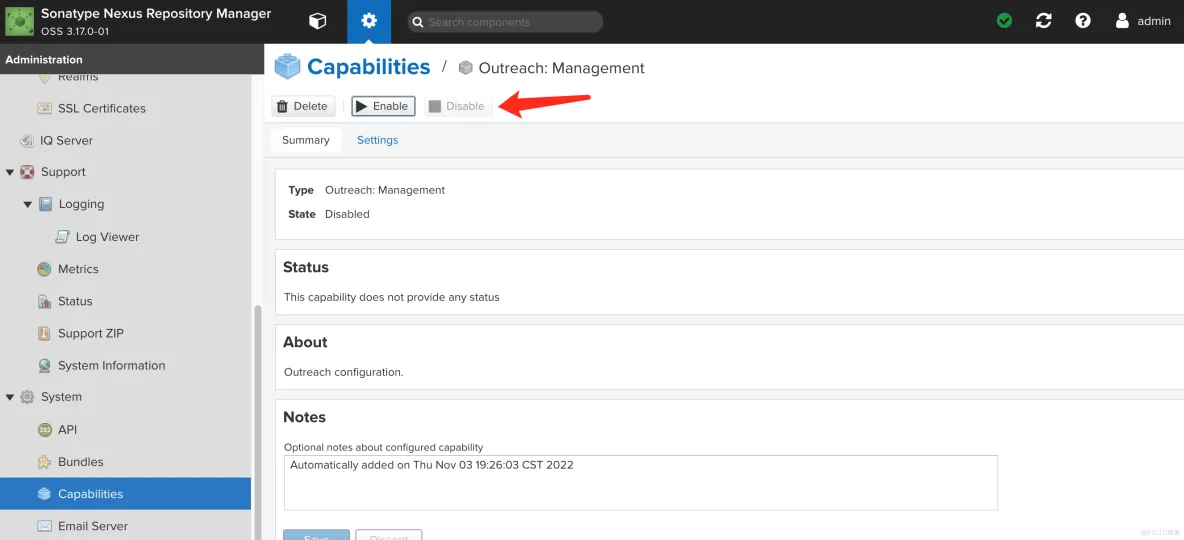
根据官方文档描述这是一个从仓库对外提供数据的插件,因为nexus3升级后不只是maven仓库还可以做其他仓库,比如docker,而这个功能看上去和maven没什么关系。
- 1赞
- 1收藏
- 评论
- 分享
- 举报
Recommend
About Joyk
Aggregate valuable and interesting links.
Joyk means Joy of geeK