
1

openssl 配置自签名证书
source link: https://blog.51cto.com/waringid/5884433
Go to the source link to view the article. You can view the picture content, updated content and better typesetting reading experience. If the link is broken, please click the button below to view the snapshot at that time.
openssl 配置自签名证书
精选 原创CentOS 7 的最小化安装模式,通过 YUM 更新到最新版本。openssl 使用系统自带版本
2.自建CA
2.1.生成 CA 私钥
openssl genrsa -out /etc/pki/CA/private/cakey.pem 4096 |
2.2.生成 CA 证书请求
openssl req -new -key /etc/pki/CA/private/cakey.pem -out /etc/pki/CA/private/cakey.csr |
2.3.生成 CA 根证书
openssl x509 -req -in /etc/pki/CA/private/cakey.csr -extensions v3_ca \ -signkey /etc/pki/CA/private/cakey.pem -out /etc/pki/CA/certs/cacert.pem -days 3650 |
3.自建 server 端证书
3.1.生成 server 私钥
openssl genrsa -out /etc/pki/CA/private/myj.lan.pem 4096 |
3.2.生成 server 证书请求
openssl req -new -key /etc/pki/CA/private/myj.lan.pem -out /etc/pki/CA/private/myj.lan.csr -days 365 |
3.3.生成 server 端证书
openssl x509 -days 365 -req -in /etc/pki/CA/private/myj.lan.csr -extensions v3_req \ -CAkey /etc/pki/CA/private/cakey.pem -CA /etc/pki/CA/certs/cacert.pem -CAcreateserial \ -out /etc/pki/CA/private/myj.lan.crt |
4.WBE 配置
将 myj.lan.crt he myj.lan.pem 配置文件内容复杂到 nginx 的配置文件。或者通过 konga 的配置完成。
5.完整配置
mkdir CA cd CA/ openssl genrsa -out ./myCA.key 4096 openssl req -x509 -new -key myCA.key -out myCA.cer -days 3650 -subj /CN="MeiYiJia" openssl genrsa -out ./test.lan.key 2048 openssl req -new -out ./test.lan.req -key ./test.lan.key -subj \ /CN=sso.test.lan/CN=sso.test.lan/CN=192.168.111.11 openssl x509 -req -in ./test.lan.req -out ./test.lan.cer -CAkey \ ./myCA.key -CA ./myCA.cer -days 720 -CAcreateserial -CAserial ./test.lan.serial openssl pkcs12 -export -in ./test.lan.cer -inkey ./test.lan.key -out ./test.lan.p12 -name "sso.test.lan" |
6.泛域名和多域名配置
目标:生成针对 test.lan 的泛域名证书
6.1.证书请求中字段说明
Country Name | 证书持有者所在国家 | 要求填写国家代码,用2个字母表示 | |
State or Province Name | 证书持有者所在州或省份 | 填写全称,可省略不填 | |
Locality Name | 证书持有者所在城市 | 可省略不填 | |
Organization Name | 证书持有者所属组织或公司 | 最好还是填一下 | |
Organizational Unit Name | 证书持有者所属部门 | 可省略不填 | |
Common Name | 证书持有者的通用名 | 对于非应用证书,它应该在一定程度上具有惟一性; 对于应用证书,一般填写服务器域名或通配符样式的域名。 | |
Email Address | 证书持有者的通信邮箱 | 可省略不填 |
6.2.证书附加用途说明
extendedKeyUsage 可以指定证书目的,即用途,一般有:
- serverAuth:保证远程计算机的身份
- clientAuth:向远程计算机证明你的身份
- codeSigning:确保软件来自软件发布者,保护软件在发行后不被更改mailProtection:保护电子邮件消息
- timeStamping:允许用当前时间签名数据
如果不指定,则默认为 所有应用程序策略
6.3.使用配置文件生成证书
1、参照步骤2生成根证书
2、生成 test.lan 的域名 key
openssl genrsa -out test.lan.key 2048 |
3、配置证书生成文件
cat > ./web-ca.conf <<EOF [ req ] default_bits = 4096 prompt = no default_md = sha256 req_extensions = req_ext distinguished_name = dn [ dn ] C = CN ST = GuangDong L = DongGuan O = LingFang OU = Cloud CN = *.test.lan [ req_ext ] subjectAltName = @alt_names [ alt_names ] DNS.1 = test.lan DNS.2 = *.test.lan DNS.3 = webproxy.test.lan IP.1 = 192.168.112.98 IP.2 = 192.168.112.99 IP.3 = 192.168.112.100 [ v3_ext ] authorityKeyIdentifier=keyid,issuer:always basicConstraints=CA:FALSE keyUsage=keyEncipherment,dataEncipherment,nonRepudiation,digitalSignature extendedKeyUsage=serverAuth,clientAuth subjectAltName=@alt_names |
4、生成泛域名证书
openssl req -new -key test.lan.key -out test.lan.csr -config web-ca.conf openssl x509 -req -in test.lan.csr -CA cacert.pem -CAkey cakey.pem -CAcreateserial \ -out test.lan.crt -days 3650 -extensions v3_ext -extfile web-ca.conf |
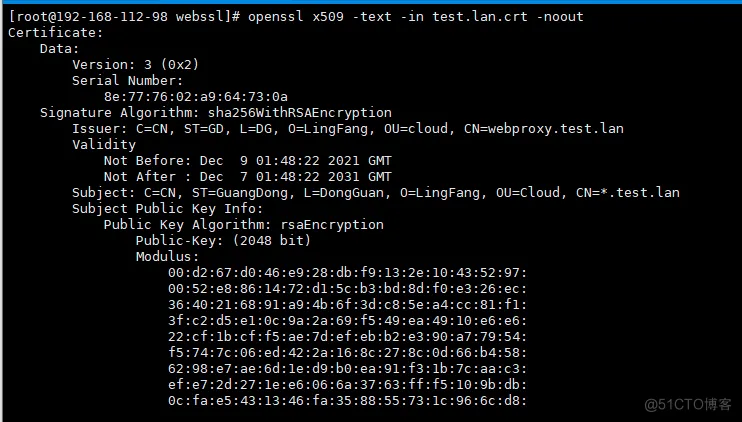
5、验证证书情况
openssl x509 -text -in test.lan.crt -noout |

7.新版版本
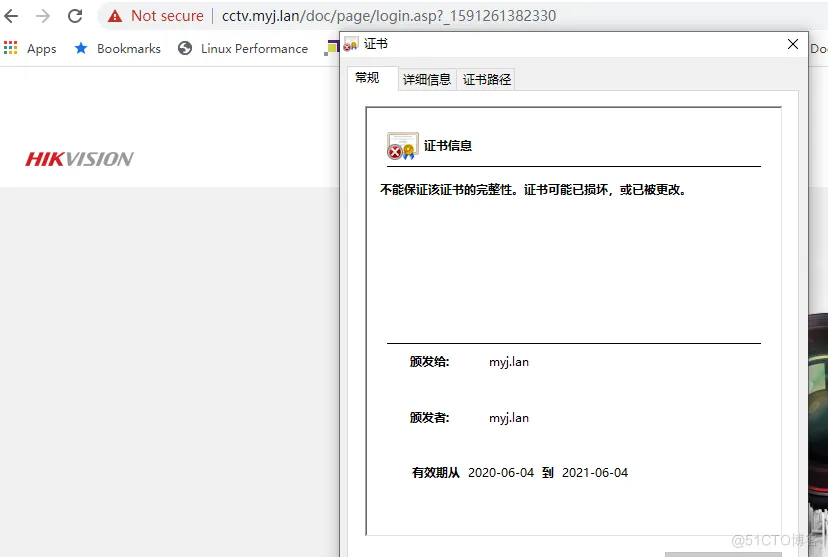
openssl genrsa -out ca.key 2048 openssl req -x509 -new -nodes -key ca.key -sha256 -days 3650 -out ca.pem openssl req -new -sha256 -nodes -out myj.lan.csr -newkey rsa:2048 -keyout myj.lan.key -config web-ca.conf openssl x509 -req -in myj.lan.csr -CA ca.pem -CAkey ca.key -CAcreateserial \ -out myj.lan.crt -days 3650 -sha256 -extfile v3.ext openssl x509 -text -in myj.lan.crt -noout openssl pkcs12 -export -in myj.lan.crt -inkey myj.lan.key -out myj.lan.pfx cat > ./web-ca.conf <<EOF [ req ] default_bits = 2048 prompt = no default_md = sha256 distinguished_name = dn [ dn ] C = CN ST = GuangDong L = DongGuan O = LingFang OU = Cloud CN = myj.lan EOF cat > ./v3.ext <<EOF authorityKeyIdentifier=keyid,issuer:always basicConstraints=CA:FALSE keyUsage=keyEncipherment,dataEncipherment,nonRepudiation,digitalSignature extendedKeyUsage=serverAuth,clientAuth subjectAltName=@alt_names [ alt_names ] DNS.1 = myj.lan DNS.2 = *.myj.lan DNS.3 = localhost IP.1 = 192.168.0.101 EOF |
- 打赏
- 赞
- 收藏
- 评论
- 分享
- 举报
Recommend
About Joyk
Aggregate valuable and interesting links.
Joyk means Joy of geeK