

再学一遍android:fitsSystemWindows属性
source link: https://blog.csdn.net/guolin_blog/article/details/123023395
Go to the source link to view the article. You can view the picture content, updated content and better typesetting reading experience. If the link is broken, please click the button below to view the snapshot at that time.
再学一遍android:fitsSystemWindows属性
本文同步发表于我的微信公众号,扫一扫文章底部的二维码或在微信搜索 郭霖 即可关注,每个工作日都有文章更新。
对于android:fitsSystemWindows这个属性你是否感觉又熟悉又陌生呢?
熟悉是因为大概知道它可以用来实现沉浸式状态栏的效果,陌生是因为对它好像又不够了解,这个属性经常时灵时不灵的。
其实对于android:fitsSystemWindows属性我也是一知半解,包括我在写《第一行代码》的时候对这部分知识的讲解也算不上精准。但是由于当时的理解对于我来说已经够用了,所以也就没再花时间继续深入研究。
而最近因为工作的原因,我又碰上了android:fitsSystemWindows这个属性,并且我之前的那些知识储备已经不够用了。所以这次趁着这个机会,我把这部分知识又重新学习了一遍,并整理成一篇文章分享给大家。
我们都不会无缘无故去接触一个属性。我相信用到android:fitsSystemWindows的朋友基本都是为了去实现沉浸式状态栏效果的。
这里我先解释一下什么是沉浸式状态栏效果。
Android手机顶部用于显示各种通知和状态信息的这个栏叫做状态栏。
通常情况下,我们应用程序的内容都是显示在状态栏下方的。但有时为了实现更好的视觉效果,我们希望将应用程序的内容延伸到状态栏的背后,这种就可以称之为沉浸式状态栏。
那么借助android:fitsSystemWindows属性是如何实现沉浸式状态栏效果的呢?这个属性为什么又总是时灵时不灵呢?接下来我们就来一步步学习和揭秘。
我相信按照绝大多数人的美好设想,android:fitsSystemWindows属性就应该像是一个开关一样,设置成true就可以打开沉浸式状态栏效果,设置成false就可以关闭沉浸式状态栏效果。但现实并非如此。
下面我们通过代码示例来演示一下。首先为了验证沉浸式状态栏的效果,需要将系统的状态栏改成透明色,代码如下所示:
class MainActivity : AppCompatActivity() {

    override fun onCreate(savedInstanceState: Bundle?) {
        super.onCreate(savedInstanceState)
        setContentView(R.layout.activity_main)
        window.statusBarColor = Color.TRANSPARENT
    }

}
接下来,我们给activity_main.xml的根布局加上android:fitsSystemWindows属性,并且给该布局设置了一个背景色用于观察效果:
<?xml version="1.0" encoding="utf-8"?>
<FrameLayout
    xmlns:android="http://schemas.android.com/apk/res/android"
    android:layout_width="match_parent"
    android:layout_height="match_parent"
    android:background="#ff66ff"
    android:fitsSystemWindows="true">

</FrameLayout>
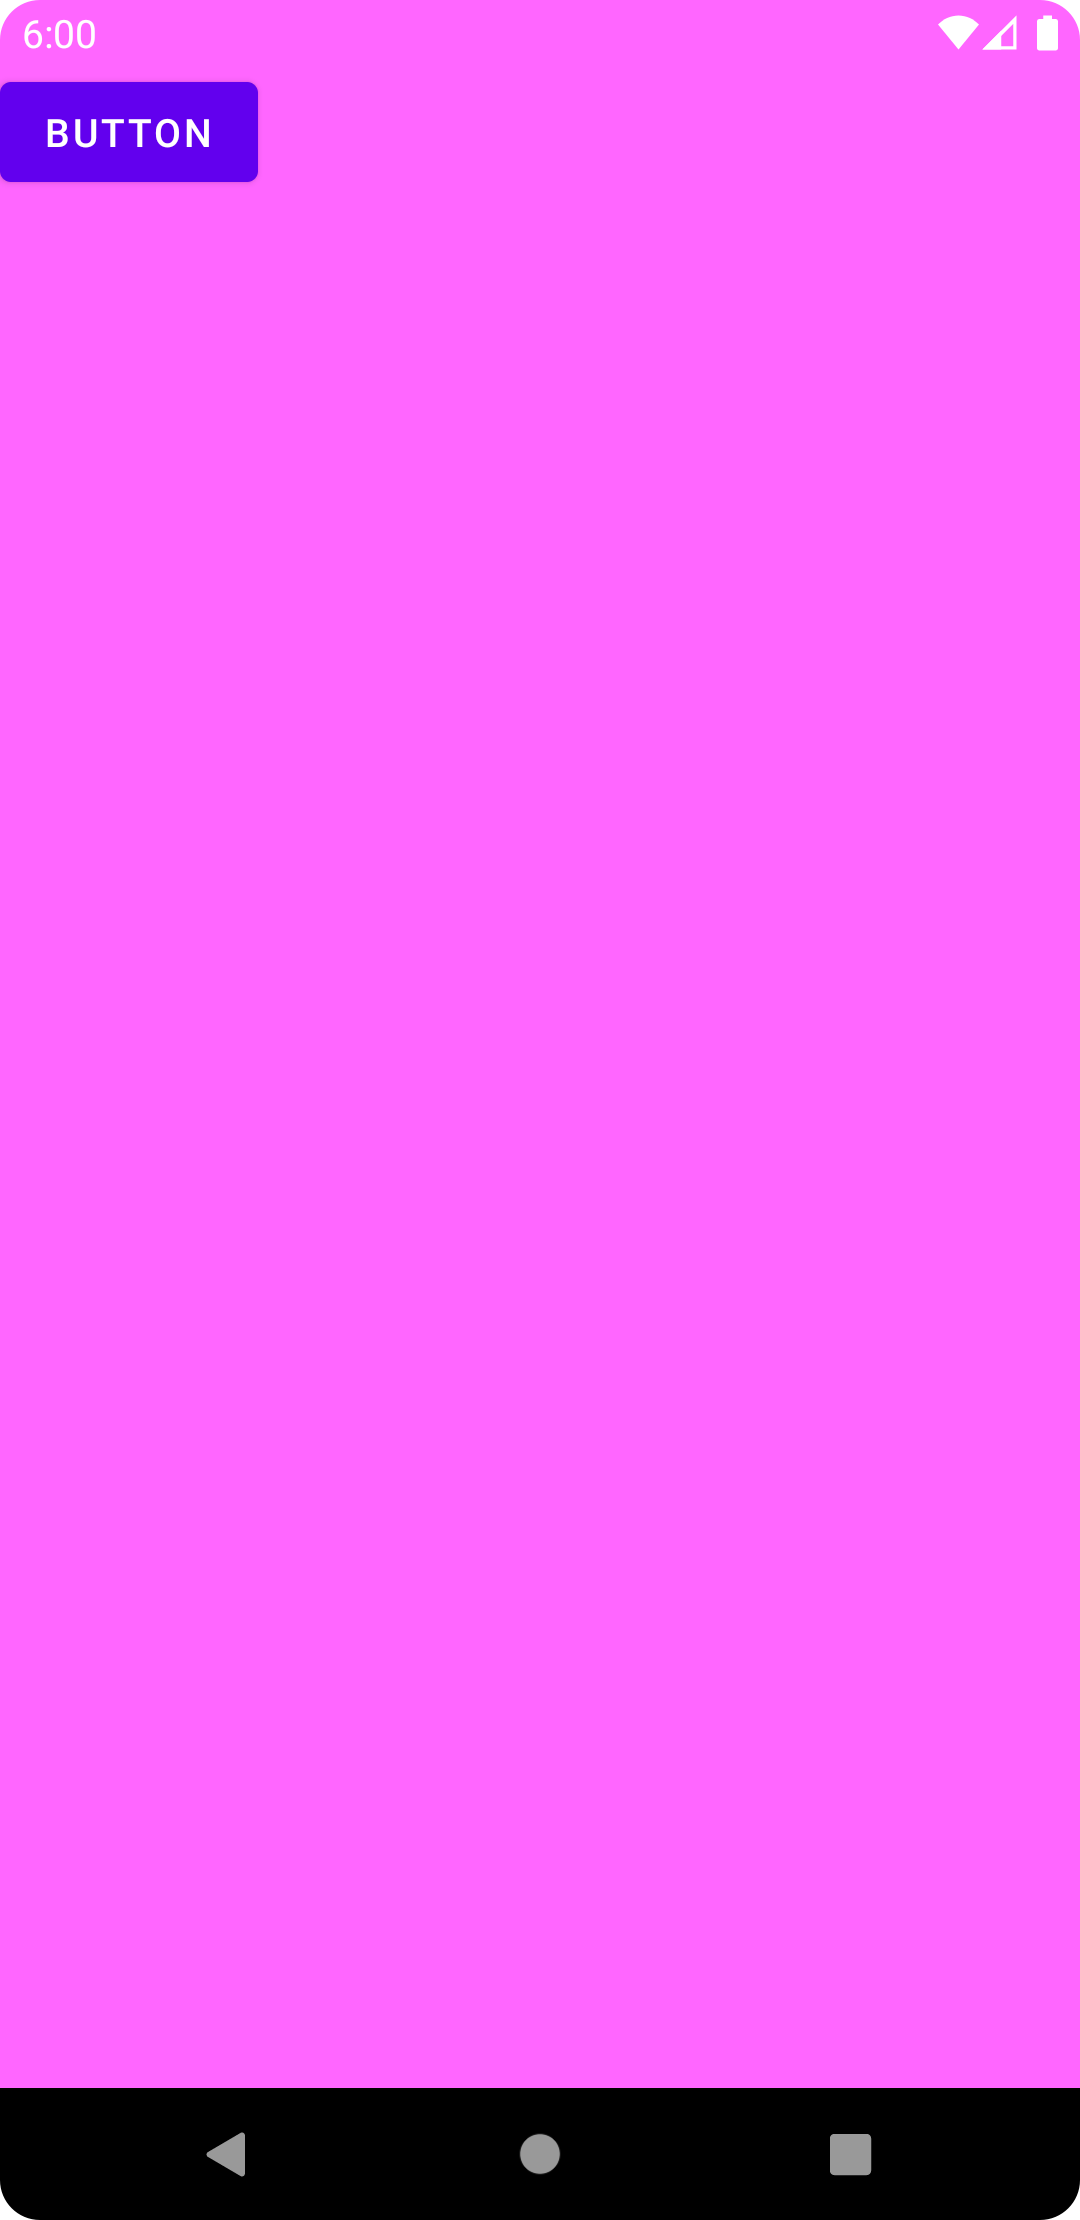
运行一下代码,效果如下图所示:
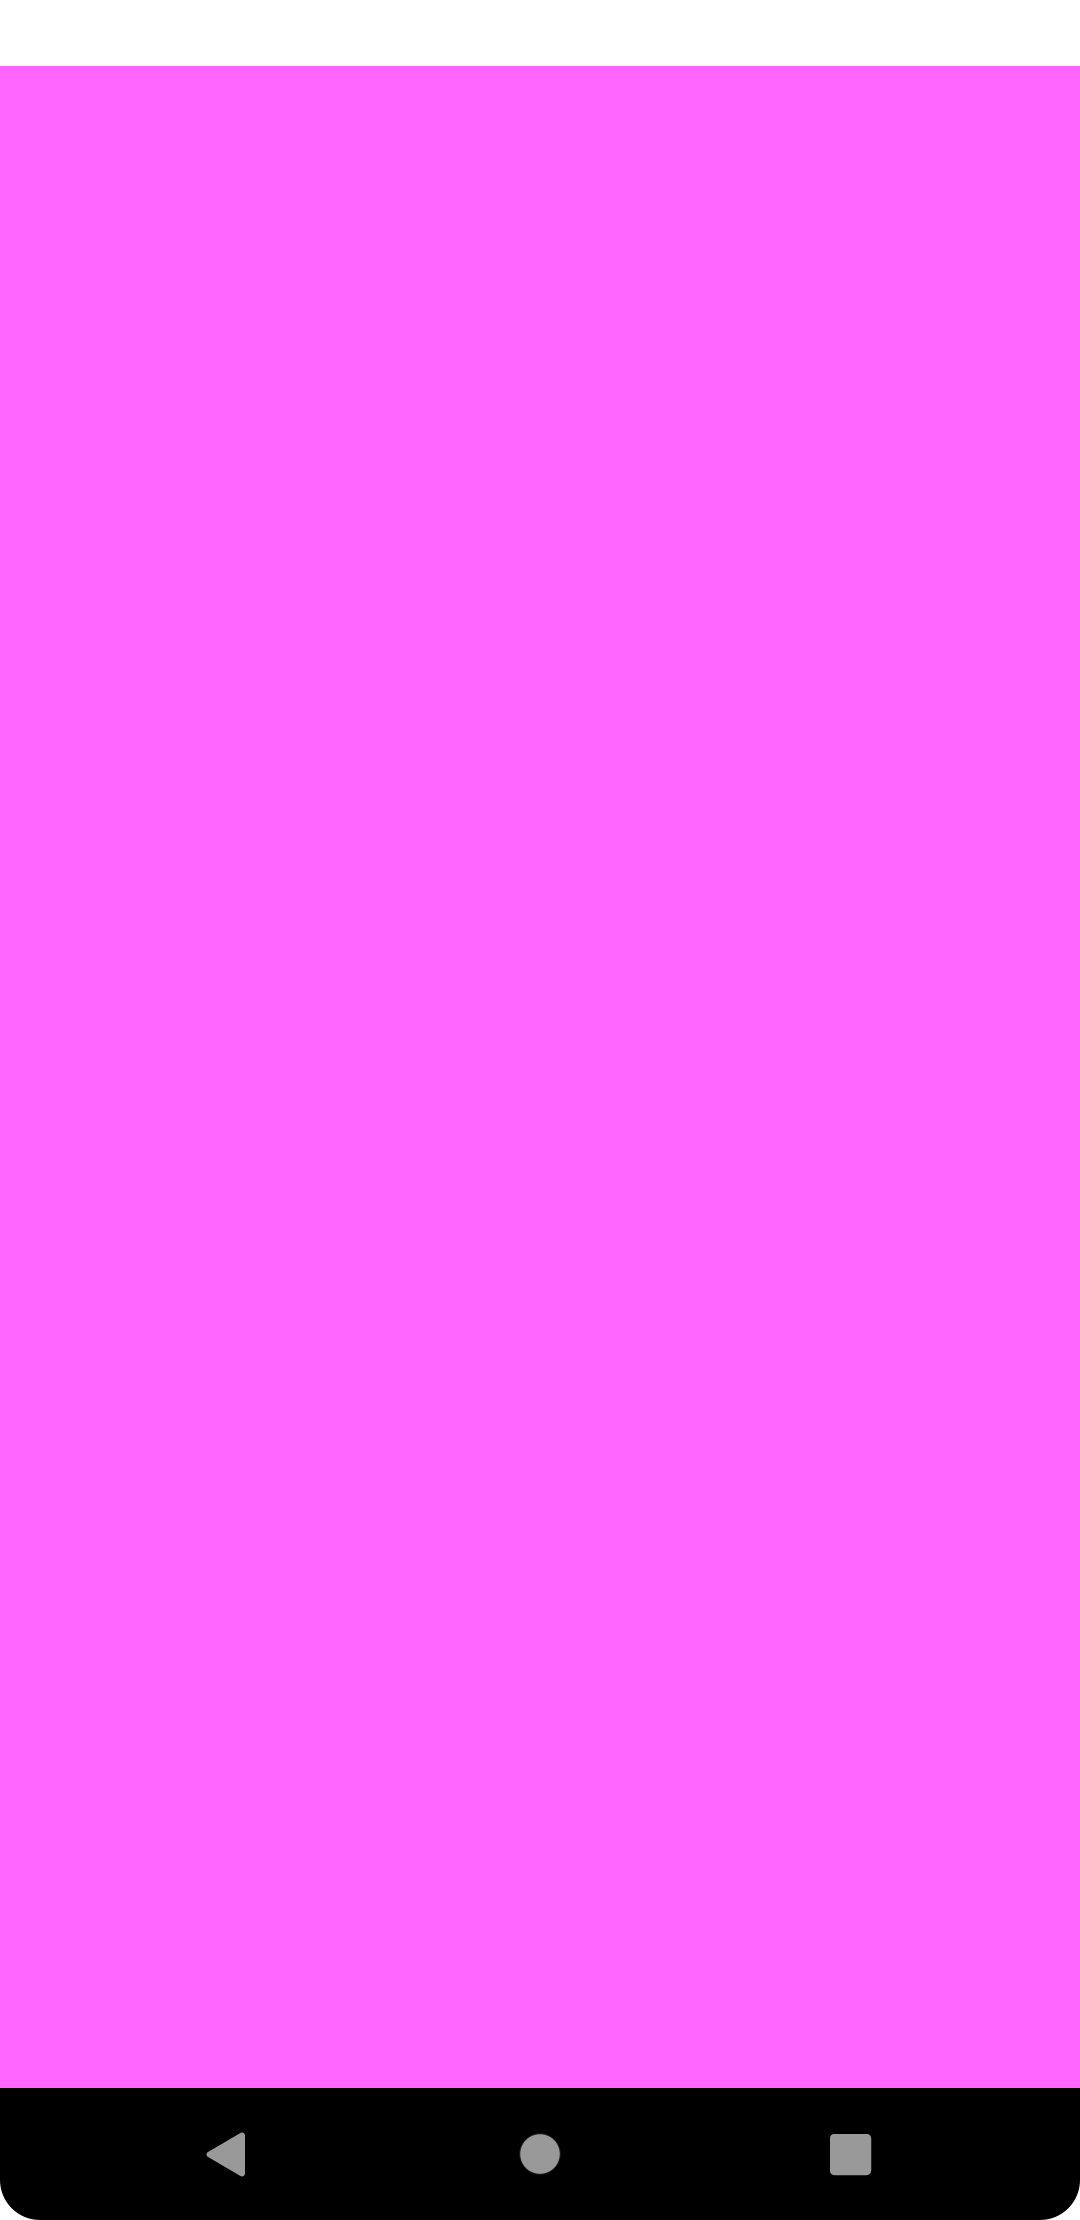
通过布局的背景色我们可以看出,该布局的内容并没有延伸到系统状态栏的背后。也就是说,即使设置了android:fitsSystemWindows属性,我们也没有实现沉浸式状态栏效果。
但是不要着急,接下我们只需要做出一点小修改,如下所示:
<?xml version="1.0" encoding="utf-8"?>
<androidx.coordinatorlayout.widget.CoordinatorLayout
    xmlns:android="http://schemas.android.com/apk/res/android"
    android:layout_width="match_parent"
    android:layout_height="match_parent"
    android:background="#ff66ff"
    android:fitsSystemWindows="true">

</androidx.coordinatorlayout.widget.CoordinatorLayout>
可以看到,这里只是将根布局从FrameLayout修改成了CoordinatorLayout,其他都没有任何变化。然后重新运行程序。效果如下图所示:
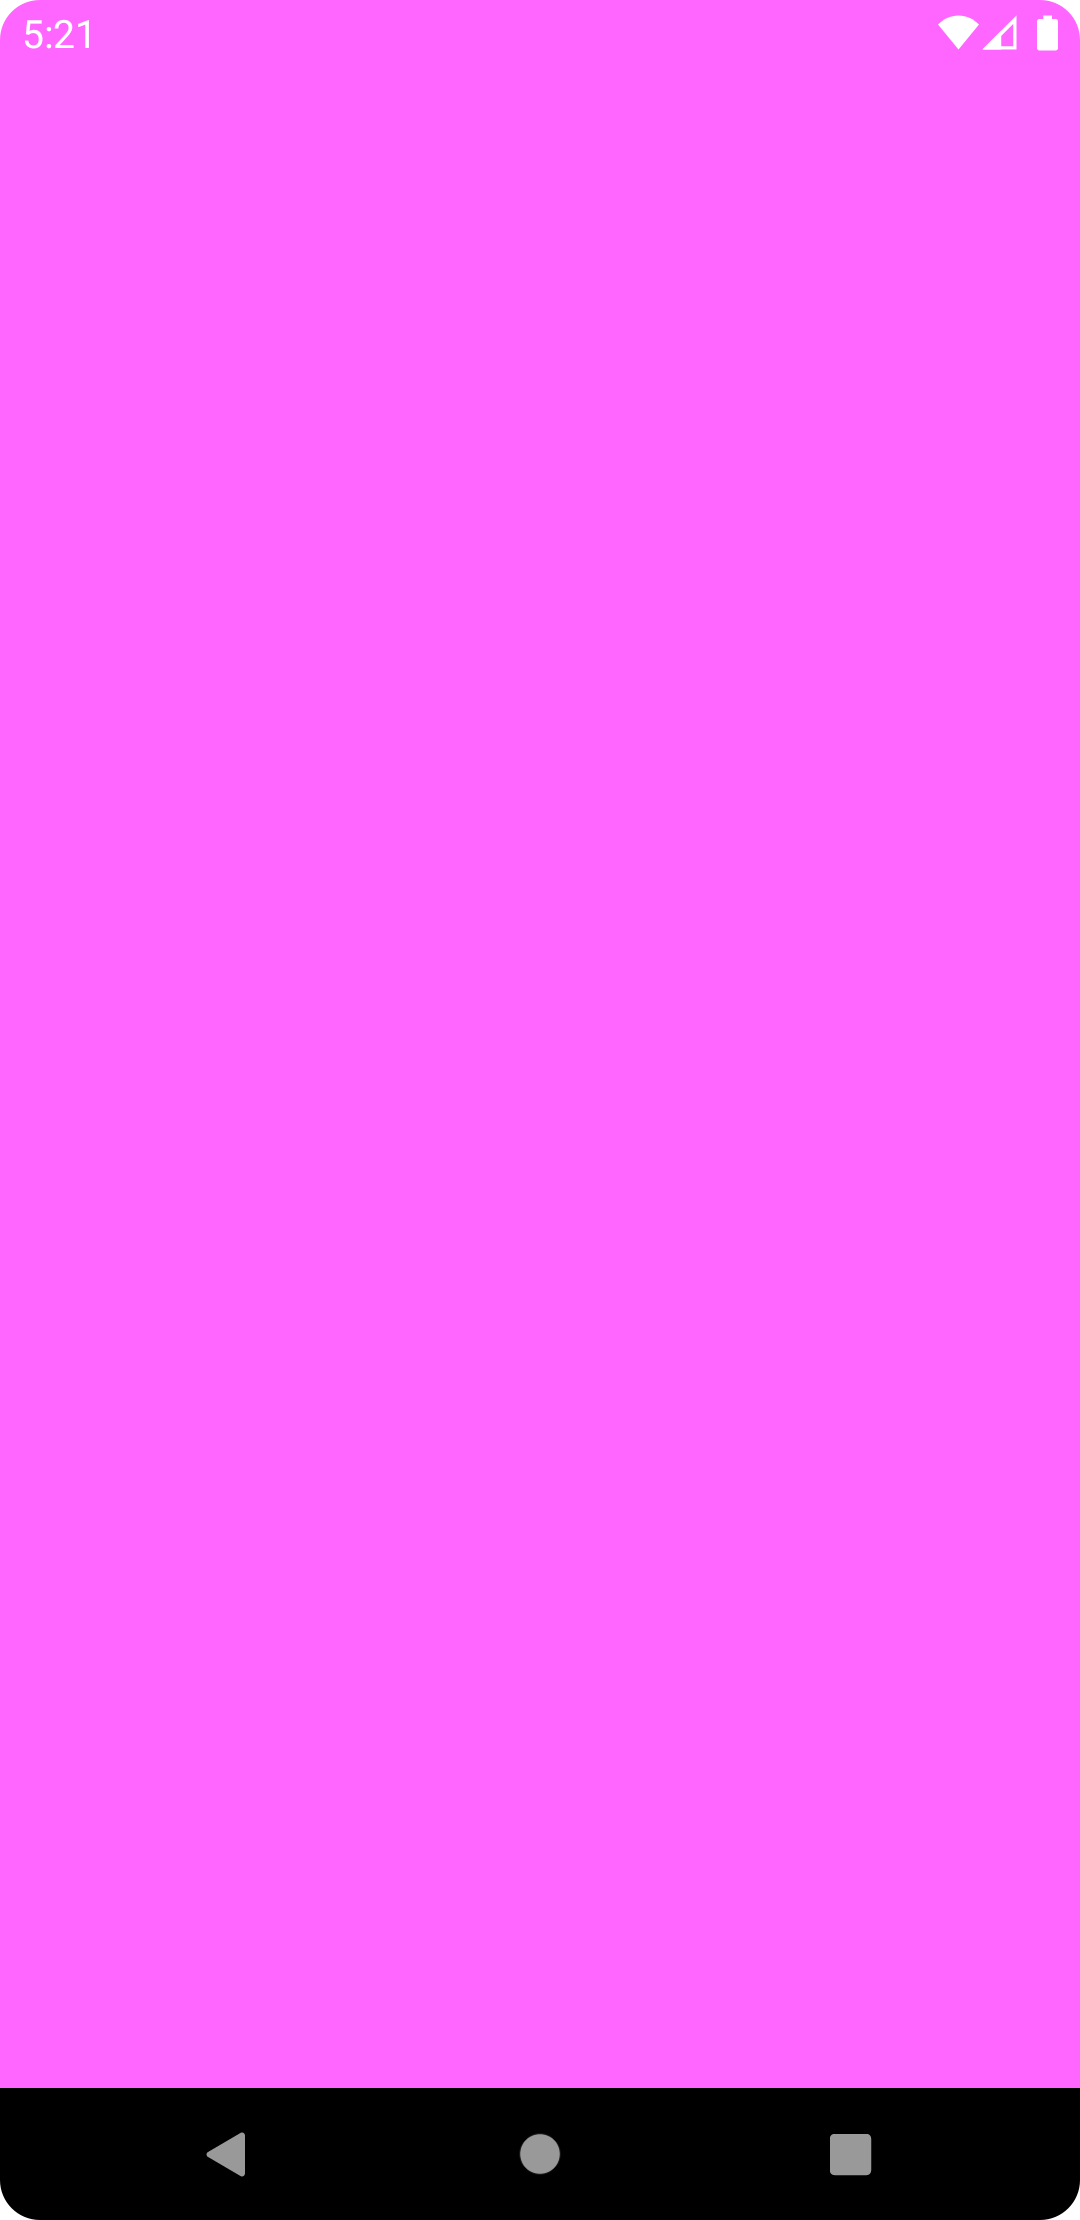
这样就可以成功实现沉浸式状态栏效果了。
话说为什么android:fitsSystemWindows属性,设置在CoordinatorLayout布局上就能生效,设置在FrameLayout布局上就没有效果呢?
这是因为,xml中的配置毕竟只是一个标记,如果想要在应用程序当中产生具体的效果,那还是要看代码中是如何处理这些标记的。
很明显,FrameLayout对于android:fitsSystemWindows属性是没有进行处理的,所以不管设不设置都不会产生什么变化。
而CoordinatorLayout则不同,我们可以观察它的源码,如下所示:
private void setupForInsets() {
    if (Build.VERSION.SDK_INT < 21) {
        return;
    }

    if (ViewCompat.getFitsSystemWindows(this)) {
        if (mApplyWindowInsetsListener == null) {
            mApplyWindowInsetsListener =
                    new androidx.core.view.OnApplyWindowInsetsListener() {
                        @Override
                        public WindowInsetsCompat onApplyWindowInsets(View v,
                                WindowInsetsCompat insets) {
                            return setWindowInsets(insets);
                        }
                    };
        }
        // First apply the insets listener
        ViewCompat.setOnApplyWindowInsetsListener(this, mApplyWindowInsetsListener);

        // Now set the sys ui flags to enable us to lay out in the window insets
        setSystemUiVisibility(View.SYSTEM_UI_FLAG_LAYOUT_STABLE
                | View.SYSTEM_UI_FLAG_LAYOUT_FULLSCREEN);
    } else {
        ViewCompat.setOnApplyWindowInsetsListener(this, null);
    }
}

可以看到,这里当发现CoordinatorLayout设置了android:fitsSystemWindows属性时,会对当前布局的insets做一些处理,并且调用了下面一行代码:
setSystemUiVisibility(View.SYSTEM_UI_FLAG_LAYOUT_STABLE
                | View.SYSTEM_UI_FLAG_LAYOUT_FULLSCREEN);
这行代码是一切的关键所在。准确来讲,就是因为执行了这行代码,我们才能将布局的内容延伸到系统状态栏区域。
是不是感觉解密了?但事实上CoordinatorLayout所做的事情还远不止这些。
因为沉浸式状态栏其实会带来很多问题。让布局的内容延伸到状态栏的背后,如果一些可交互的控件被状态栏遮挡了怎么办?这样这些控件可能就无法点击和交互了。
CoordinatorLayout为了解决这个问题,会对所有内部的子View都进行一定程度的偏移,保证它们不会被状态栏遮挡住。
比如我们在CoordinatorLayout当中再添加一个按钮:
<?xml version="1.0" encoding="utf-8"?>
<androidx.coordinatorlayout.widget.CoordinatorLayout xmlns:android="http://schemas.android.com/apk/res/android"
    android:layout_width="match_parent"
    android:layout_height="match_parent"
    android:background="#ff66ff"
    android:fitsSystemWindows="true">

    <Button
        android:layout_width="wrap_content"
        android:layout_height="wrap_content"
        android:text="Button"
        />

</androidx.coordinatorlayout.widget.CoordinatorLayout>
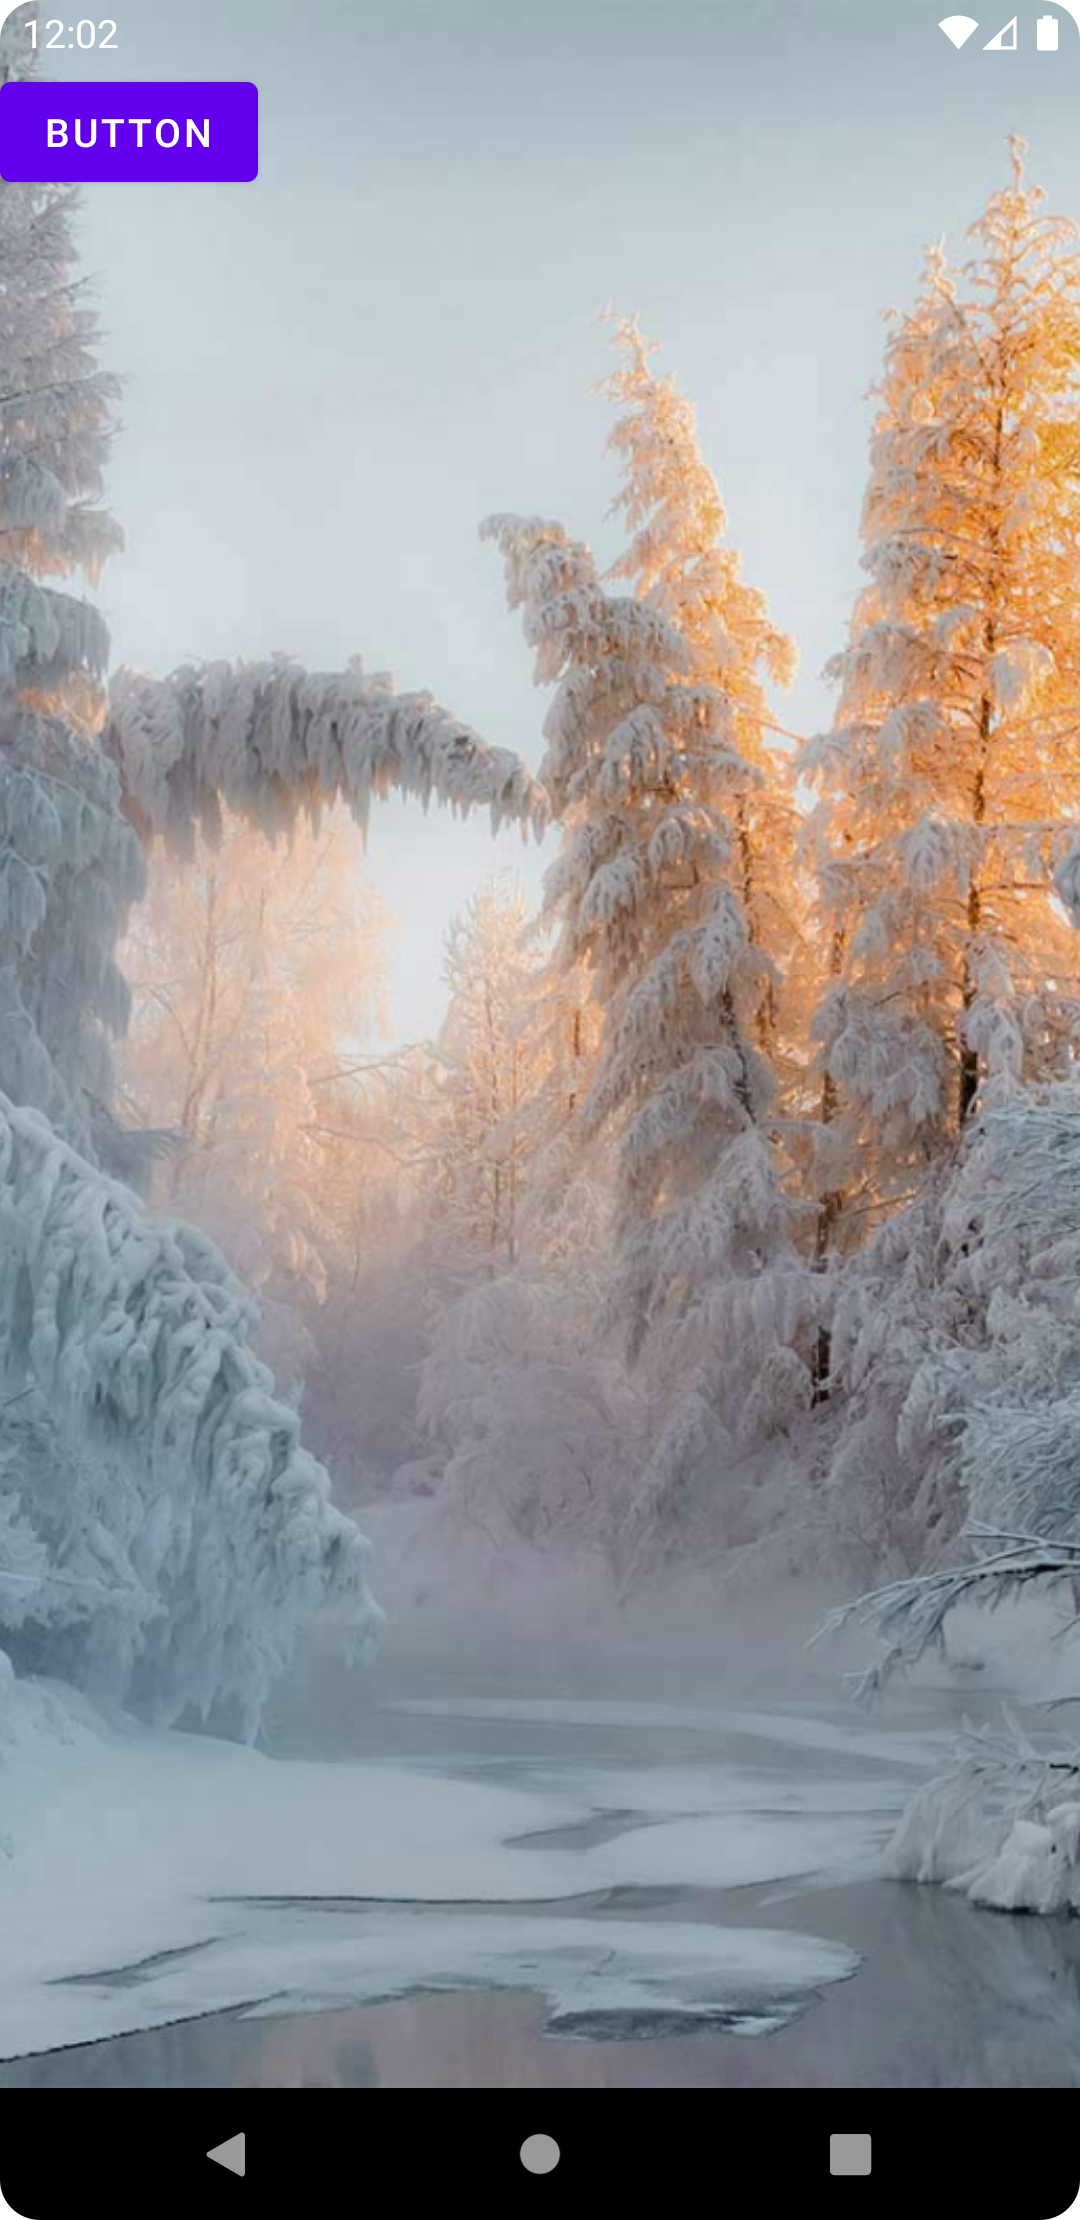
运行一下程序,效果如下图所示:
可以看到,虽然CoordinatorLayout延伸到了状态栏区域,但是它所包含的按钮是不会进入状态栏区域的,这样就避免了可交互控件被遮挡的情况出现。
但有的朋友会说,如果有些子控件我就是想要让它也延伸到状态栏区域内呢?比如我在CoordinatorLayout内放了一张图片,按照这个规则,图片也是不会显示在状态栏背后的,这样就达不到想要的效果了。
我们可以来试一下这种场景。比如在CoordinatorLayout中再添加一个ImageView,代码如下所示:
<?xml version="1.0" encoding="utf-8"?>
<androidx.coordinatorlayout.widget.CoordinatorLayout xmlns:android="http://schemas.android.com/apk/res/android"
    android:layout_width="match_parent"
    android:layout_height="match_parent"
    android:background="#ff66ff"
    android:fitsSystemWindows="true">

    <ImageView
        android:layout_width="match_parent"
        android:layout_height="match_parent"
        android:scaleType="centerCrop"
        android:src="@drawable/bg"
        />

    <Button
        android:layout_width="wrap_content"
        android:layout_height="wrap_content"
        android:text="Button"
        />

</androidx.coordinatorlayout.widget.CoordinatorLayout>
现在运行一下程序,效果如下图所示:

确实,图片是不会进入状态栏区域的,和我们之前所解释的理论相符合。
但是很明显,这并不是我们想要的效果,那么有什么办法可以解决呢?
这里我们可以借助其他布局来实现。在Google提供的诸多布局当中,并不是只有CoordinatorLayout会处理android:fitsSystemWindows属性,像CollapsingToolbarLayout、DrawerLayout也是会对这个属性做处理的。
现在对activity_main.xml进行如下修改:
<?xml version="1.0" encoding="utf-8"?>
<androidx.coordinatorlayout.widget.CoordinatorLayout xmlns:android="http://schemas.android.com/apk/res/android"
    android:layout_width="match_parent"
    android:layout_height="match_parent"
    android:background="#ff66ff"
    android:fitsSystemWindows="true">

    <com.google.android.material.appbar.CollapsingToolbarLayout
        android:layout_width="match_parent"
        android:layout_height="match_parent"
        android:fitsSystemWindows="true">

        <ImageView
            android:layout_width="match_parent"
            android:layout_height="match_parent"
            android:scaleType="centerCrop"
            android:src="@drawable/bg"
            android:fitsSystemWindows="true"
            />

    </com.google.android.material.appbar.CollapsingToolbarLayout>

    <Button
        android:layout_width="wrap_content"
        android:layout_height="wrap_content"
        android:text="Button"
        />

</androidx.coordinatorlayout.widget.CoordinatorLayout>
可以看到,这里我们在ImageView的外面又包裹了一层CollapsingToolbarLayout,并且给CollapsingToolbarLayout也设置了android:fitsSystemWindows属性,这样CollapsingToolbarLayout就可以将内容延申到状态栏区域了。
接着我们给ImageView同样设置了android:fitsSystemWindows属性,如此一来,就可以让图片显示在状态栏的背后了。
重新运行一下程序,效果如下图所示:
需要注意的是,CollapsingToolbarLayout一定要结合着CoordinatorLayout一起使用,而不能单独使用。因为CollapsingToolbarLayout只会对内部控件的偏移距离做出调整,而不会像CoordinatorLayout那样调用setSystemUiVisibility()函数来开启沉浸式状态栏。
看到这里,相信大家都已经知道应该如何去实现沉浸式状态栏效果了。但是可能有的朋友会说,由于项目限制的原因,他们无法使用CoordinatorLayout或CollapsingToolbarLayout,而是只能使用像FrameLayout或LinearLayout这样的传统布局,这种情况怎么办呢?
其实我们知道CoordinatorLayout实现沉浸式状态栏的原理之后,自然也就知道如何自己手动实现了,因为本质就是调用setSystemUiVisibility()函数。
现在我们将activity_main.xml改成用传统FrameLayout布局的写法:
<?xml version="1.0" encoding="utf-8"?>
<FrameLayout xmlns:android="http://schemas.android.com/apk/res/android"
    android:id="@+id/root_layout"
    android:layout_width="match_parent"
    android:layout_height="match_parent"
    android:background="#ff66ff">

    <ImageView
        android:layout_width="match_parent"
        android:layout_height="match_parent"
        android:scaleType="centerCrop"
        android:src="@drawable/bg"
        />

    <Button
        android:id="@+id/button"
        android:layout_width="wrap_content"
        android:layout_height="wrap_content"
        android:text="Button"
        />

</FrameLayout>
为了实现沉浸式状态栏的效果,我们手动在MainActivity当中调用setSystemUiVisibility()函数,来将FrameLayout的内容延伸到状态栏区域:
class MainActivity : AppCompatActivity() {

    override fun onCreate(savedInstanceState: Bundle?) {
        super.onCreate(savedInstanceState)
        setContentView(R.layout.activity_main)
        window.statusBarColor = Color.TRANSPARENT
        val frameLayout = findViewById<FrameLayout>(R.id.root_layout)
        frameLayout.systemUiVisibility = (SYSTEM_UI_FLAG_LAYOUT_STABLE
                or SYSTEM_UI_FLAG_LAYOUT_FULLSCREEN)
    }

}
这里提醒一点,setSystemUiVisibility()函数其实已经被废弃了。从Android 11开始,Google提供了一个新的API WindowInsetsController来实现同样的功能,不过本篇文章就不往这方面展开了。
现在重新运行一下程序,效果如下图所示:

可以看到,现在我们仍然实现了沉浸式状态栏的效果,但问题是FrameLayout中的按钮也延伸到状态栏区域了,这就是前面所说的可交互控件被状态栏遮挡的问题。
出现这个问题的原因也很好理解,因为之前我们是使用的CoordinatorLayout嘛,它已经帮我们考虑好到这些事情,自动会将内部的控件进行偏移。而现在FrameLayout显然是不会帮我们做这些事情的,所以我们得想办法自己解决。
这里其实可以借助setOnApplyWindowInsetsListener()函数去监听WindowInsets发生变化的事件,当有监听到发生变化时,我们可以读取顶部Insets的大小,然后对控件进行相应距离的偏移。
修改MainActivity中的代码,如下所示:
class MainActivity : AppCompatActivity() {

    override fun onCreate(savedInstanceState: Bundle?) {
        super.onCreate(savedInstanceState)
        setContentView(R.layout.activity_main)
        window.statusBarColor = Color.TRANSPARENT
        val frameLayout = findViewById<FrameLayout>(R.id.root_layout)
        frameLayout.systemUiVisibility = (SYSTEM_UI_FLAG_LAYOUT_STABLE
                or SYSTEM_UI_FLAG_LAYOUT_FULLSCREEN)

        val button = findViewById<Button>(R.id.button)
        ViewCompat.setOnApplyWindowInsetsListener(button) { view, insets ->
            val params = view.layoutParams as FrameLayout.LayoutParams
            params.topMargin = insets.systemWindowInsetTop
            insets
        }
    }

}
可以看到,当监听到WindowInsets发生变化时,我们调用systemWindowInsetTop即可获取到状态栏的高度,然后对不需要延伸到状态栏区域的控件进行相应的偏移即可。
重新运行程序,效果如下图所示:

好了,到这里为止,我们就将实现沉浸式状态栏背后的原理,以及具体的多种实现方式都介绍完了。
这次你学懂android:fitsSystemWindows属性了吗?
如果想要学习Kotlin和最新的Android知识,可以参考我的新书 《第一行代码 第3版》,点击此处查看详情。
关注我的技术公众号,每天都有优质技术文章推送。
微信扫一扫下方二维码即可关注:

Recommend
About Joyk
Aggregate valuable and interesting links.
Joyk means Joy of geeK