

How To Use SingleStore Pipelines With Kafka, Part 2 of 3
source link: https://dzone.com/articles/how-to-use-singlestore-pipelines-with-kafka-part-2
Go to the source link to view the article. You can view the picture content, updated content and better typesetting reading experience. If the link is broken, please click the button below to view the snapshot at that time.
Abstract
In this second part of our Pipelines series, we'll write some Java code to simulate our sensors sending temperature readings. We then store these readings in a SingleStore database. A Producer application will generate and send the temperature readings to the Confluent Cloud. A Consumer will then read these values from the Confluent Cloud and connect to SingleStore using JDBC, where the sensor readings will be stored in our temperatures table.
The SQL scripts, Java code, and notebook files used in this article series are available on GitHub. The notebook files are available in DBC, HTML, and iPython formats.
Introduction
This is a three-part article series, and it is structured as follows:
- Load the Sensor data into SingleStore.
- Demonstrate Producer-Consumer using Java and JDBC.
- Demonstrate SingleStore Pipelines.
This second article covers Part 2, Demonstrate Producer-Consumer using Java and JDBC.
Producer-Consumer Java Code
Confluent provides many code examples under the Apache 2.0 License. Therefore, we can adapt some existing Producer-Consumer code for our use case. The Confluent documentation provides instructions and suitable Java code on GitHub.
Visually, Figure 1 shows our Producer-Consumer architecture using JDBC.
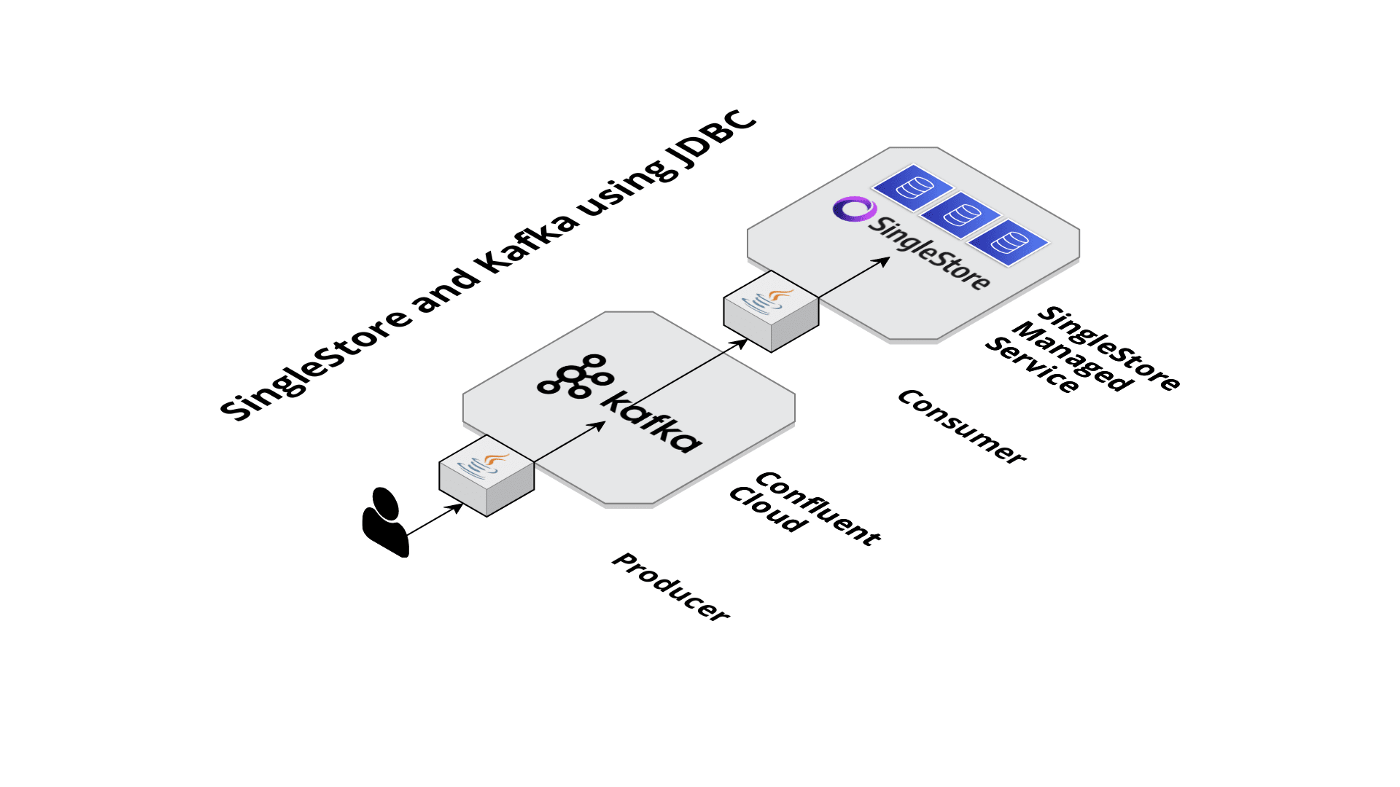
Figure 1. SingleStore and Kafka using JDBC.
First, let's focus on the Producer. This will take three command-line parameters:
- Location of the java.config file that contains the Kafka cluster configuration. The examples in this article assume that this file is located at
$HOME/.confluent/java.config. - The Kafka topic.
- The number of messages that we wish to generate. If we pass the value -1 as the number of messages, the application will continue to generate messages until interrupted.
Here are some of the critical parts of our main code:
final Properties props = loadConfig(args[0]);
// Create topic if needed
topic = args[1];
createTopic(topic, props);
final long numMessages = Long.parseLong(args[2]);
...
// Produce sample data
if (numMessages == -1) { System.out.println("Producing events endlessly ..."); While (true) {// Endless events generation until the app is interrupted
produceEvent(producer);
try {Thread.sleep(100);
} catch (InterruptedException ex) {throw new RuntimeException(ex);
}
}
} else {// Finite events generation
for (long nEvents = 0; nEvents < numMessages; nEvents++) {produceEvent(producer);
}
}
The message data will consist of a unique identifier, a temperature reading, and a timestamp, as shown below. To keep everything simple, we'll use a CSV record format.
public static void produceEvent(Producer<String, String> producer) {// Produce sample data
Random rnd = new Random();
String sensorId = String.valueOf(rnd.nextInt(1000));
float temp = rnd.nextInt(110);
long time = new Date().getTime();
String record = String.format("%s,%s,%s", sensorId, temp, time); System.out.printf("Producing record: %s%n", record); producer.send(new ProducerRecord<>(topic, sensorId, record), (m, e) -> { if (e != null) {e.printStackTrace();
} else { System.out.printf("Produced record to topic %s partition [%d] @ offset %d%n", m.topic(), m.partition(), m.offset());}
});
}
Now, let's focus on the Consumer. This will take two command-line parameters:
- Location of the java.config file that contains the Kafka cluster configuration. The examples in this article assume that this file is located at
$HOME/.confluent/java.config. - The Kafka topic.
In our Consumer code, we'll also need to provide details of the SingleStore cluster, as follows:
private static final String HOSTNAME = "<TO DO>";
private static final String PORT = "3306";
private static final String USER = "admin";
private static final String PASSWORD = "<TO DO>";
private static final String DATABASE = "sensor_readings";
The <TO DO>'s for HOSTNAME and PASSWORD should be replaced with the values obtained from the SingleStore Managed Service when creating a cluster. Rather than hard-coding these values, we could use alternative ways to provide this information, such as passing these values in as command-line parameters or using environment variables.
We can then read messages from the Kafka cluster and write them to SingleStore, as follows:
String connection = String.format("jdbc:mysql://%s:%s/%s", HOSTNAME, PORT, DATABASE);Connection conn = DriverManager.getConnection(connection, USER, PASSWORD);
PreparedStatement stmt = conn.prepareStatement("INSERT IGNORE INTO temperatures (sensorid, temp, ts) VALUES (?, ?, ?)");
while (true) {ConsumerRecords<String, String> records = consumer.poll(100);
for (ConsumerRecord<String, String> record : records) {int sensorId = Integer.parseInt(record.key());
String[] value = record.value().split(",");double temp = Double.parseDouble(value[1]);
Timestamp ts = new Timestamp(Long.parseLong(value[2]));
stmt.setInt(1, sensorId);
stmt.setDouble(2, temp);
stmt.setTimestamp(3, ts);
stmt.executeUpdate();
}
}
The java.config is as follows:
# Required connection configs for Kafka producer, consumer, and admin
bootstrap.servers={{ BROKER_ENDPOINT }}security.protocol=SASL_SSL
sasl.jaas.config=org.apache.kafka.common.security.plain.PlainLoginModule required username='{{ CLUSTER_API_KEY }}' password='{{ CLUSTER_API_SECRET }}';sasl.mechanism=PLAIN
# Required for correctness in Apache Kafka clients prior to 2.6
client.dns.lookup=use_all_dns_ips
# Best practice for Kafka producer to prevent data loss
acks=all
We need to add values for {{ BROKER_ENDPOINT }} , {{ CLUSTER_API_KEY }} and {{ CLUSTER_API_SECRET }} . These values are available from Confluent Cloud when creating a cluster. We'll see how to do this shortly.
Using the pom.xml provided by Confluent, we also need to add the following dependency:
<dependency>
<groupId>org.mariadb.jdbc</groupId>
<artifactId>mariadb-java-client</artifactId>
<version>2.7.3</version>
</dependency>
Configure Confluent Cloud
First, we need to log in to our Confluent Cloud account.
We'll select Create cluster, as shown in Figure 2.
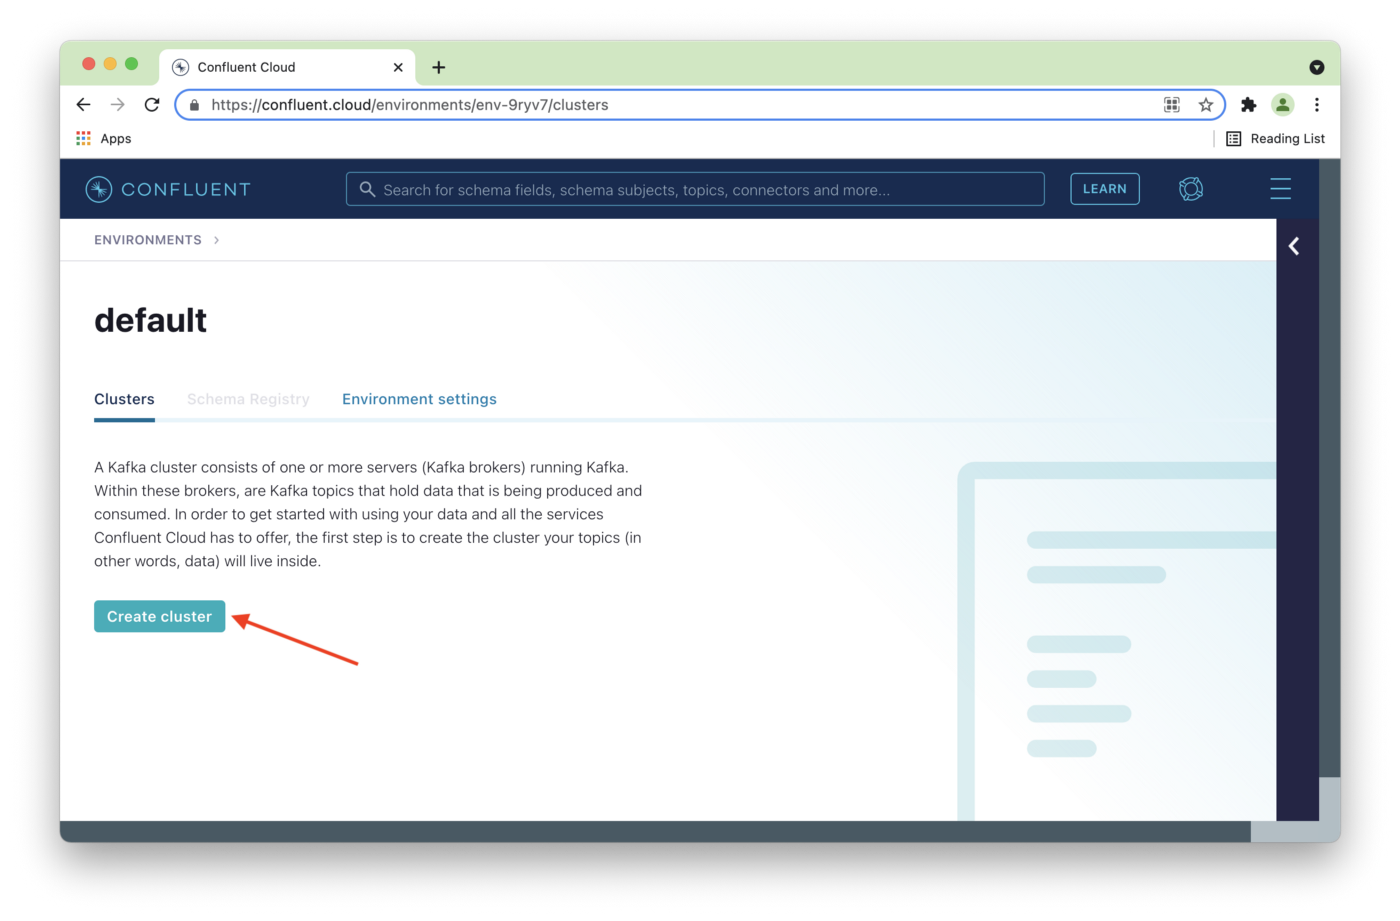
Figure 2. Create cluster.
On the Create cluster page, we'll select Basic (1) and then Begin Configuration (2), as shown in Figure 3.
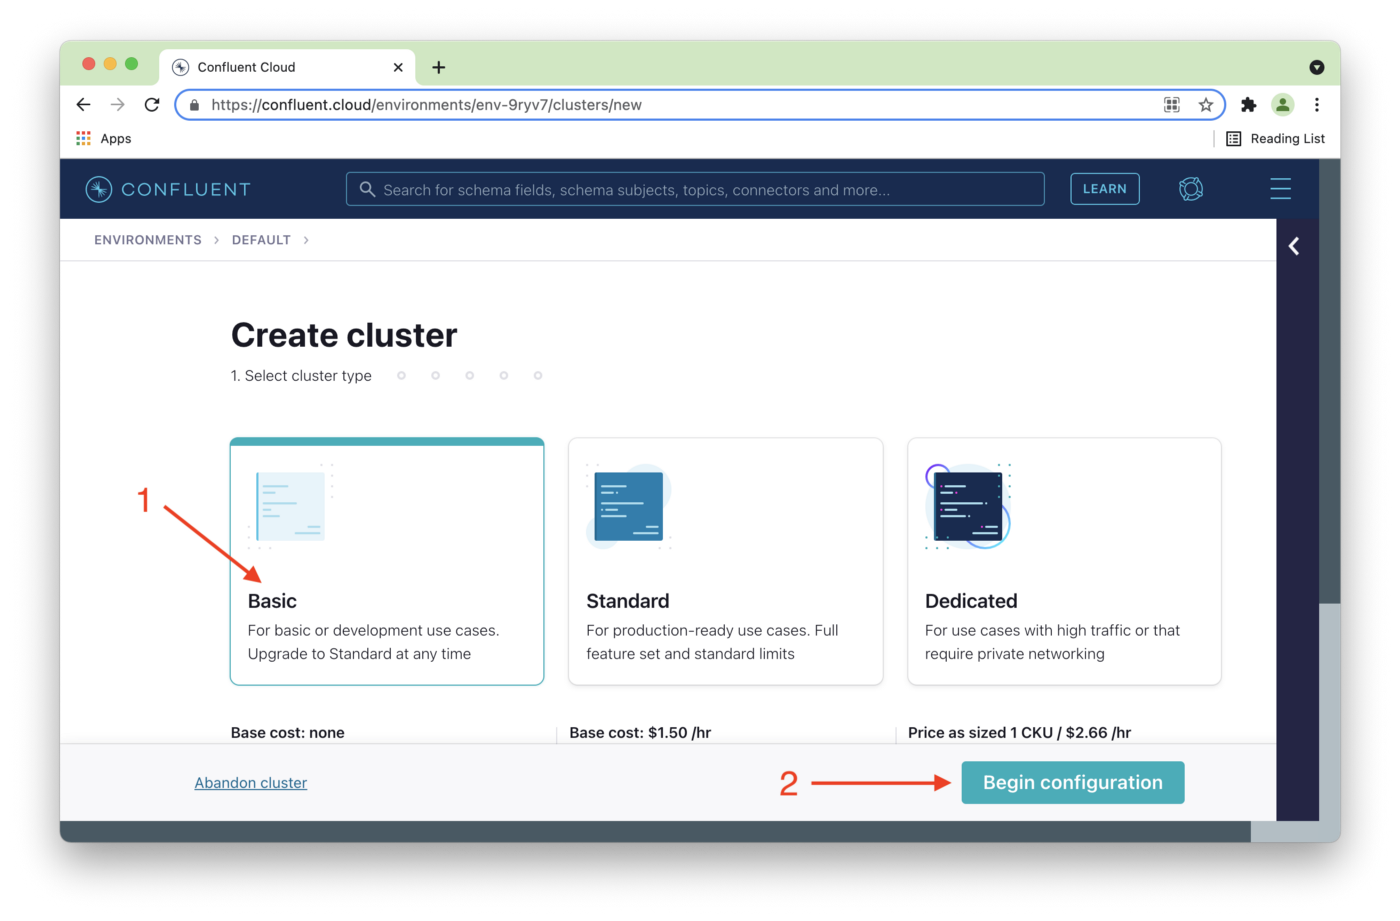
Figure 3. Choose Basic.
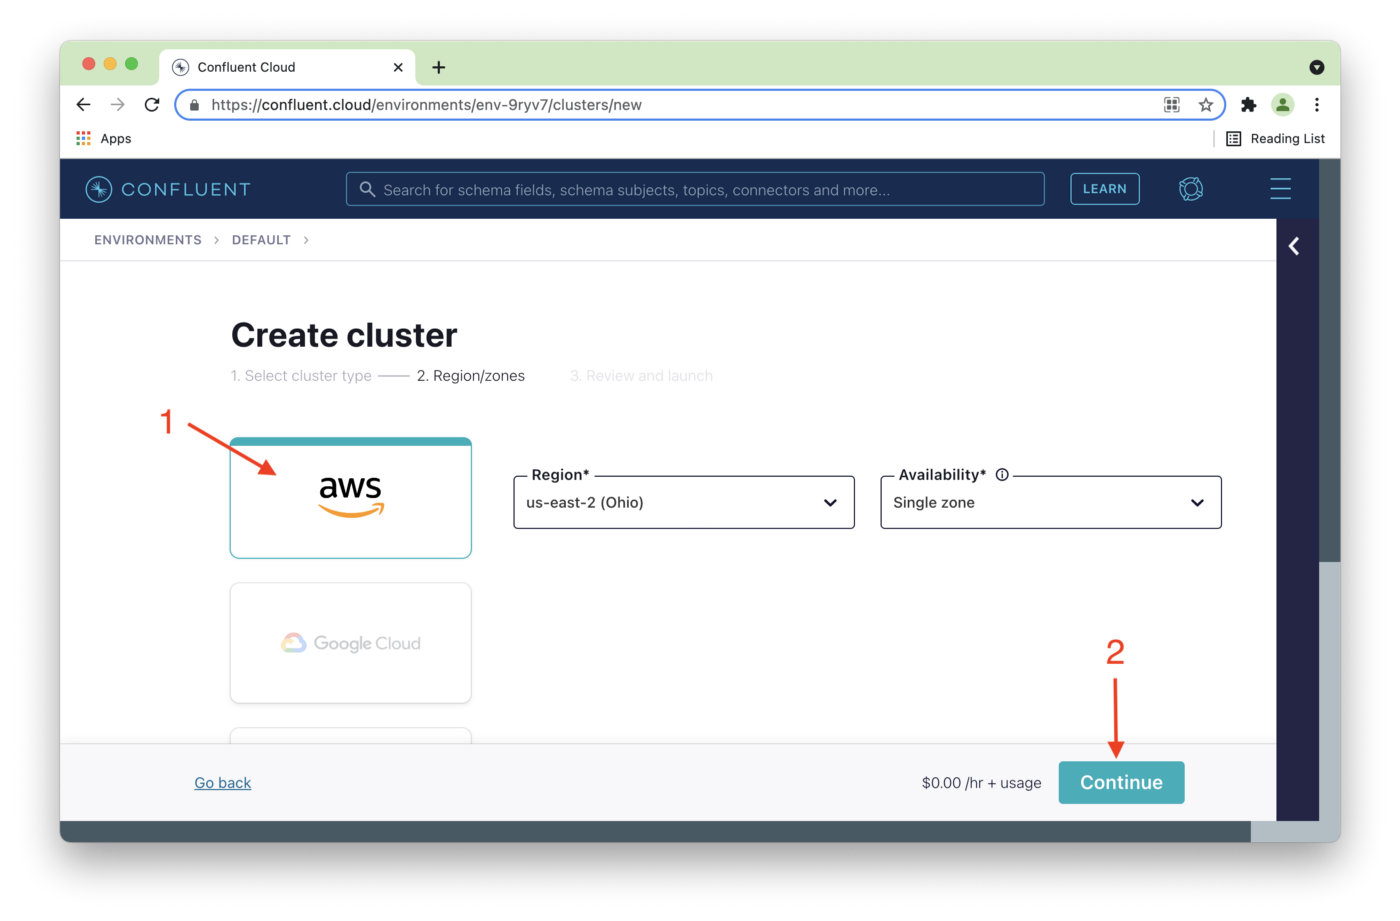
Next, we'll choose a cloud provider. Figure 4 shows AWS (1) in this case and then select Continue (2).
We can change the Cluster name (1) if required and then Launch cluster (2), as shown in Figure 5.
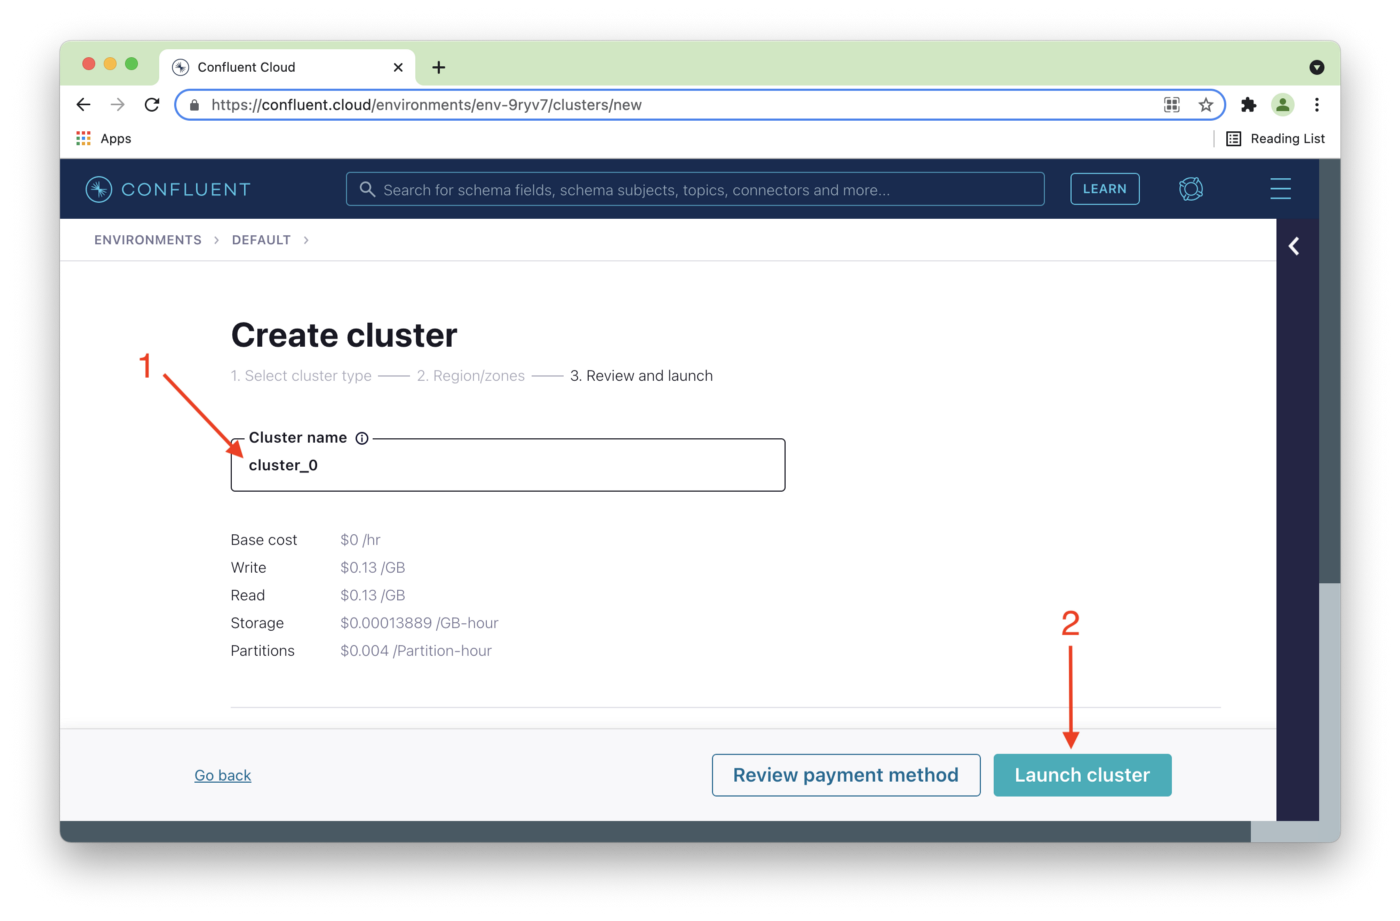
Figure 5. Choose Cluster name.
We'll click on the cluster name on the next page, as shown in Figure 6.
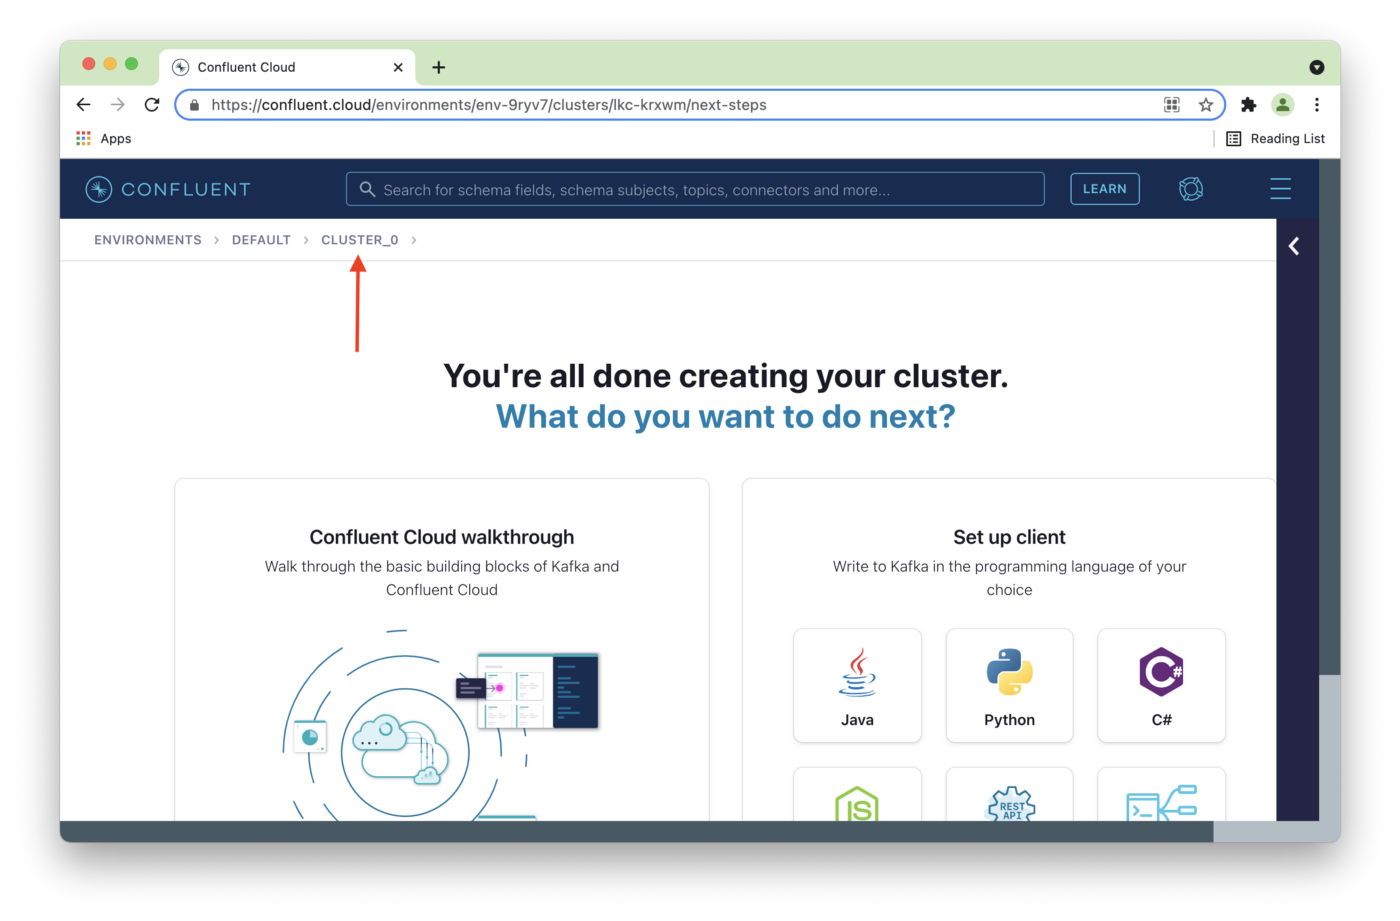
Figure 6. Select Cluster name.
As shown in Figure 7, we'll select Cluster settings from the left navigation pane (1).
In our java.config file, we'll replace {{ BROKER_ENDPOINT }} with the address of the Bootstrap server (2). Use the Bootstrap server value for your cluster.
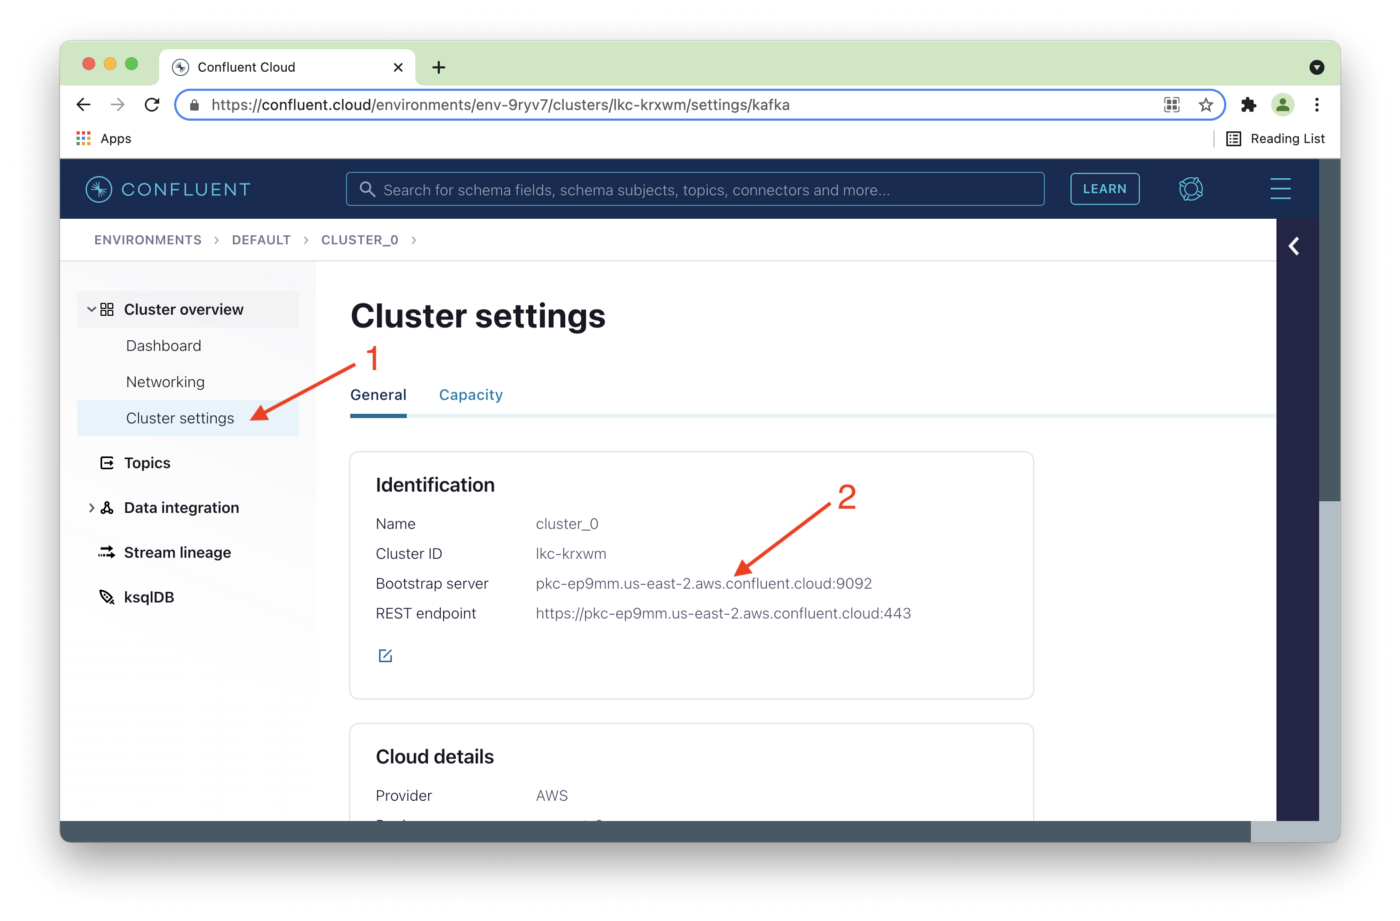
Figure 7. Cluster settings.
Next, we'll select API keys (1) from the left navigation pane and then click Create key (2), as shown in Figure 8.
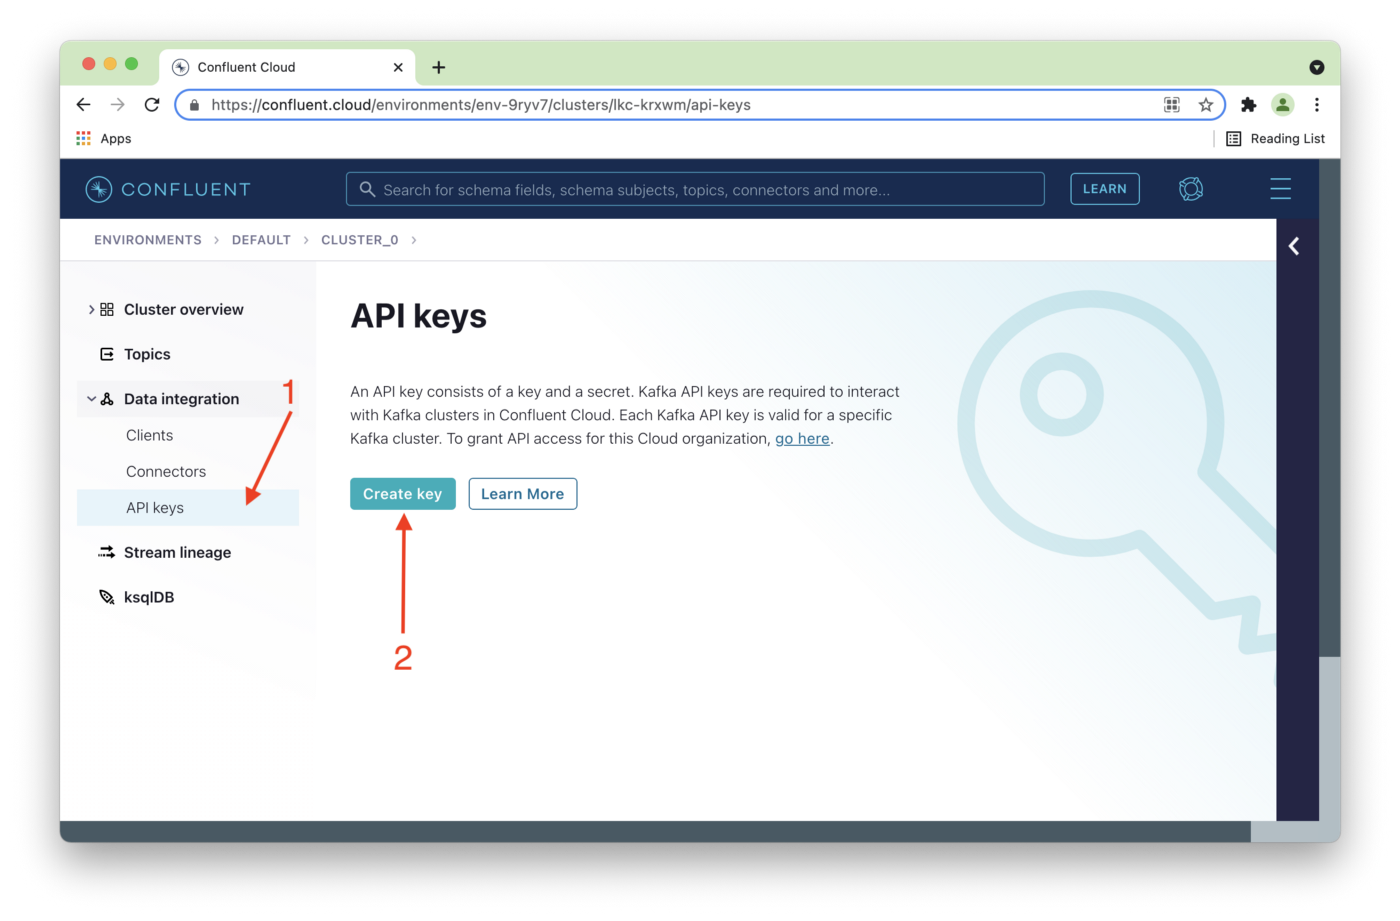
Figure 8. API keys.
Global access (1) will be acceptable for development purposes, and then we'll click Next (2), as shown in Figure 9.
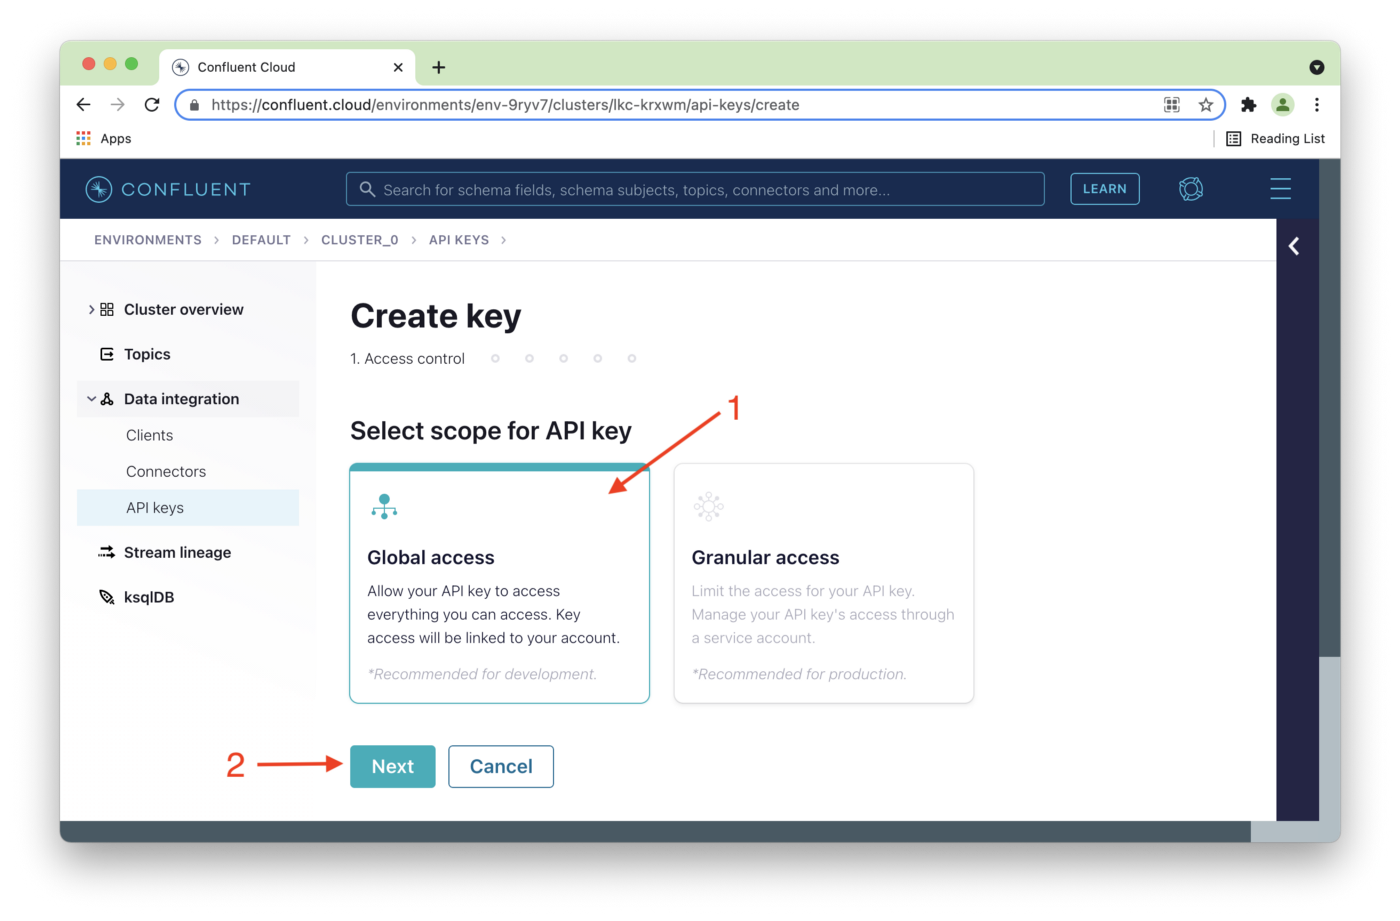
Figure 9. Global access.
In Figure 10, we'll note our Key and Secret (1). Selecting Download and continue (2) will save the Key and Secret details in a local text file. Keep this file safe if you download these details.
In our java.config file, we'll replace {{ CLUSTER_API_KEY }} with the value of Key and {{ CLUSTER_API_SECRET }} with the value of Secret. Use the Key and Secret values for your cluster.
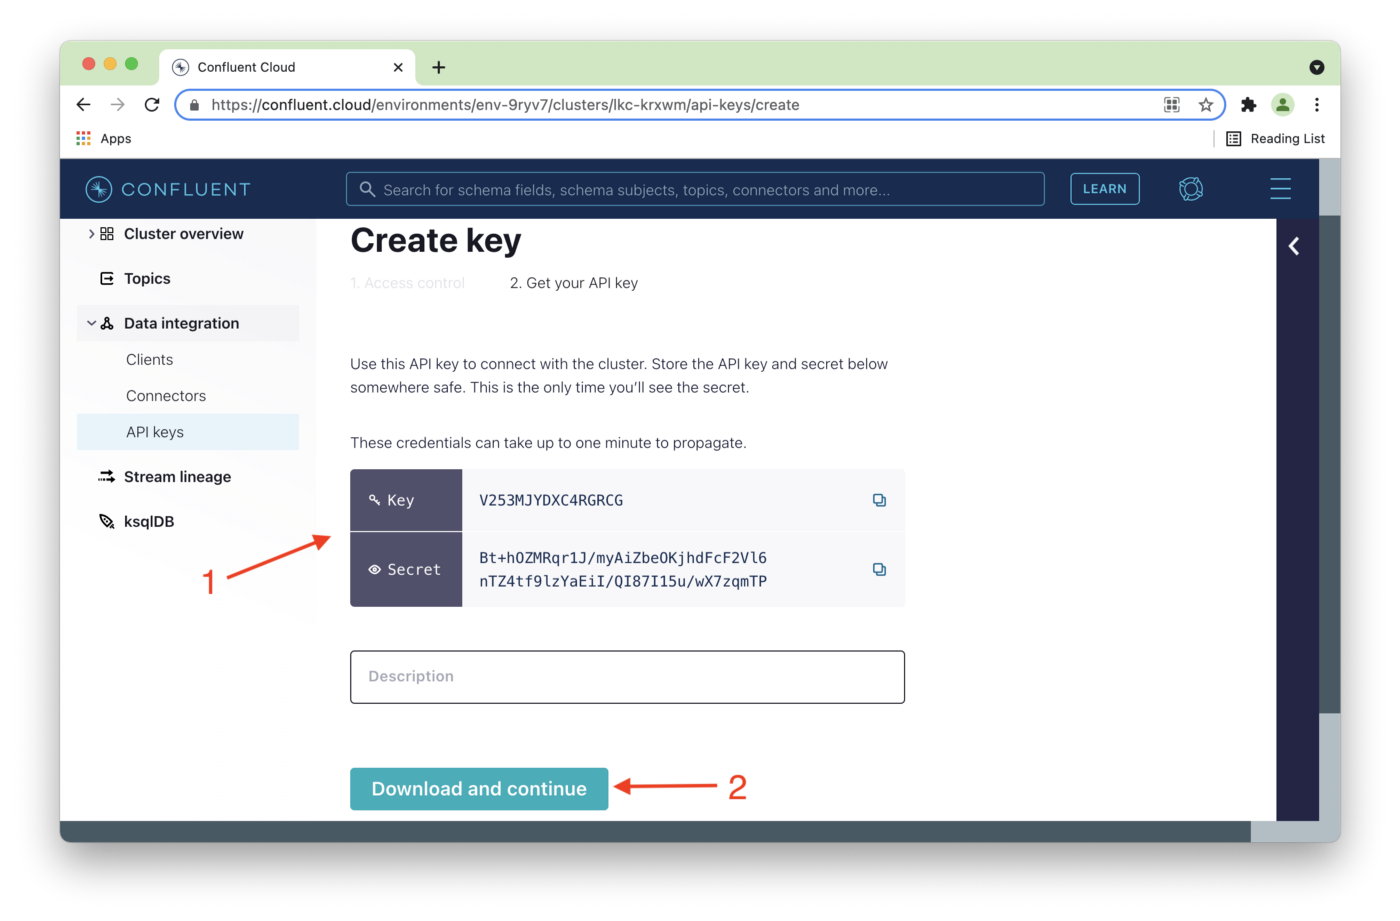
Figure 10. Key and Secret.
We are now ready to build our code.
Build and Run the Code
We can build the code from the command line as follows:
mvn clean package
Once the build is successful, we can run the Producer as follows:
mvn exec:java \
-Dexec.mainClass=\
"io.confluent.examples.clients.cloud.ProducerExample" \
-Dexec.args="$HOME/.confluent/java.config temp 100"
This uses a topic called temp and creates a fixed number of messages. If we pass the value -1 as the number of messages, the application will continue generating messages until it is interrupted:
mvn exec:java \
-Dexec.mainClass=\ "io.confluent.examples.clients.cloud.ProducerExample" \
-Dexec.args="$HOME/.confluent/java.config temp -1"
We can run the Consumer as follows:
mvn exec:java \
-Dexec.mainClass=\
"io.confluent.examples.clients.cloud.ConsumerExample" \
-Dexec.args="$HOME/.confluent/java.config temp"
Once the Consumer application has run, the temperatures table in our SingleStore database should contain data. We can check this with some simple queries, such as:
SELECT COUNT(*) FROM temperatures;
SELECT * FROM temperatures LIMIT 5;
Summary
This Producer-Consumer example shows that we can successfully use JDBC to save temperature readings in our SingleStore database. However, it also involves several "hops":
- The Producer is a local application and writes to a Kafka topic running on a cluster in the Confluent Cloud.
- The Consumer is also a local application and reads from a Kafka topic running on a cluster in the Confluent Cloud.
- The Consumer writes the message data to a SingleStore database also running in the cloud.
Can we simplify this architecture? Yes, we can by using SingleStore Pipelines, and we'll see how to do this in the next article.
Recommend
About Joyk
Aggregate valuable and interesting links.
Joyk means Joy of geeK