

Ubuntu Multipass as Kubernetes Host on Windows
source link: https://dzone.com/articles/adding-windows-nodes-to-bare-bone-kubernetes-clust
Go to the source link to view the article. You can view the picture content, updated content and better typesetting reading experience. If the link is broken, please click the button below to view the snapshot at that time.
Ubuntu Multipass as Kubernetes Host on Windows
Getting a Windows node to join a bare-bone Kubernetes cluster can be a daunting experience. In this post, I will demonstrate an easy way to achieve it.
Join the DZone community and get the full member experience.
Join For FreeGetting a Windows node to join a bare-bone Kubernetes cluster can be a daunting experience. In this posting I will demonstrate an easy way to achieve this using 1) a secondary network adaptor and 2) Ubuntu Multipass to create the required virtual machine on Windows.
This posting requires a working knowledge of Kubernetes, especially how to prepare and join a worker node to the cluster. A practice project to spin up a Kubernetes cluster with Ingress and MetalLB load-balancing using Ansible inspired the write-up and parts of that solution will be used. As such knowledge of Ansible might be beneficial but is not required.
Creating the Multipass VM
After downloading and installing Multipass, open Hyper-V and create a new external switch:

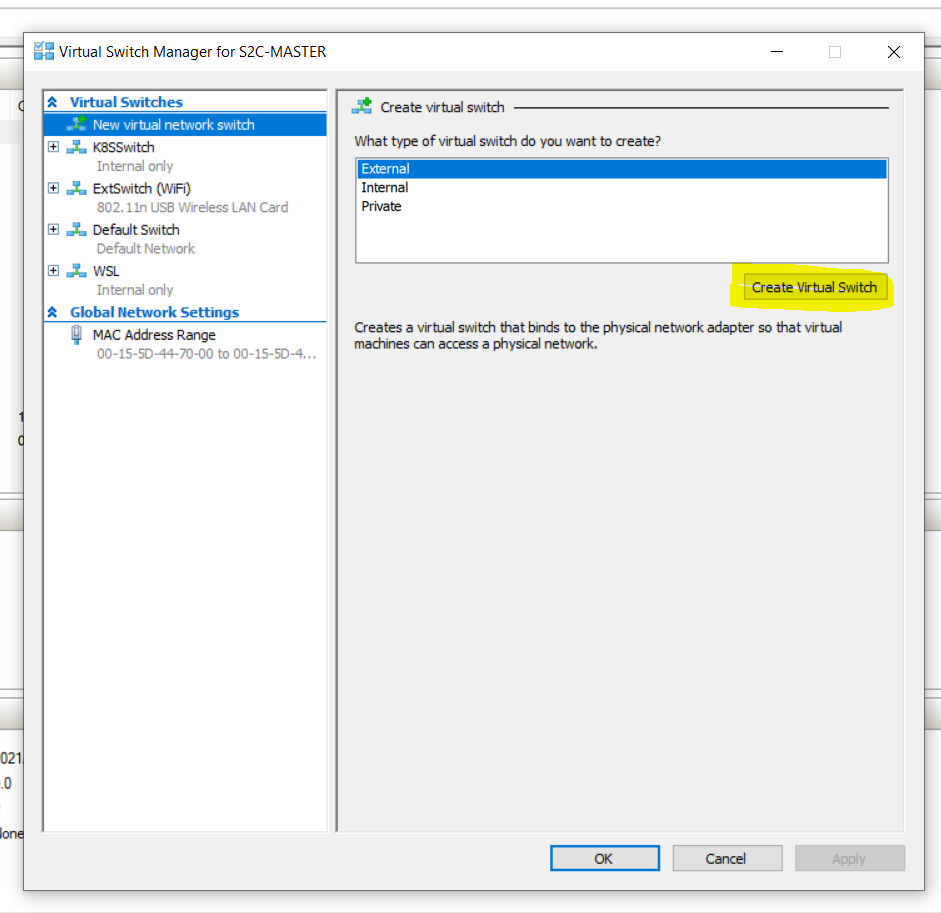
Give the new switch a name, click the "External network" radio button and select the second network adaptor (not your primary adaptor!) from the dropdown box.
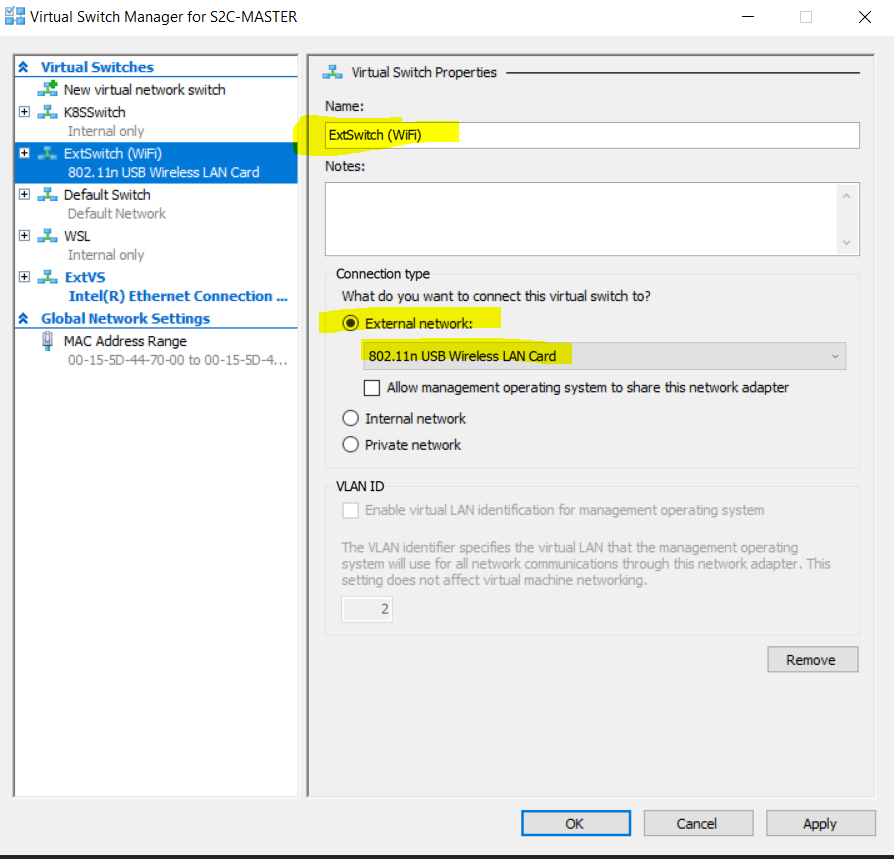
Click OK.
The virtual switch is now ready for use by the Multipass virtual machine. Download this cloud-init script:
users:
- default
- name: vmadmin
sudo: ALL=(ALL) NOPASSWD:ALL
ssh_authorized_keys:
- ssh-rsa: *****************
Note that the public key was replaced by a string of asterisks for the sake of brevity and that this key and its associated private key are available here. The keys can (and probably should), furthermore, be generated using the ssh-keygen command and the asterisk above replaced with the resultant public key.
This cloud-init script can now be used to create the Multipass Virtual machine:
multipass launch --cloud-init cloud_init.yml --cpus 4 --mem 4048M -n zoops1 --network "ExtSwitch (WiFi)"
This command will create a new virtual machine running Ubuntu. The cloud-init script will prepare access for user "vmadmin" which can do without having to provide a password. User "vmadmin" can therefore sign-on using the associated private key. This virtual machine will use the external switch named "ExtSwitch (Wifi)" as its networking adaptor.
Preparing To Join Up
At this point, you might think that the virtual machine is ready to be joined to the Kubernetes cluster in the normal way. However, there is a side-effect that arises from the way Multipass does networking. Get a bash shell on the virtual machine from a Windows prompt and investigate:
multipass exec zoops1 /bin/bash
Run "IP a" inside the bash shell and note that the Multipass created two network adaptors (eth0 and eth1) over and above the loopback device (lo):
ubuntu@zoops1:~$ ip a
1: lo: <LOOPBACK,UP,LOWER_UP> mtu 65536 qdisc noqueue state UNKNOWN group default qlen 1000
    link/loopback 00:00:00:00:00:00 brd 00:00:00:00:00:00
    inet 127.0.0.1/8 scope host lo
       valid_lft forever preferred_lft forever
    inet6 ::1/128 scope host
       valid_lft forever preferred_lft forever
2: eth0: <BROADCAST,MULTICAST,UP,LOWER_UP> mtu 1500 qdisc mq state UP group default qlen 1000
    link/ether 52:54:00:10:fe:96 brd ff:ff:ff:ff:ff:ff
    inet 172.17.243.219/20 brd 172.17.255.255 scope global dynamic eth0
       valid_lft 85948sec preferred_lft 85948sec
    inet6 fe80::5054:ff:fe10:fe96/64 scope link
       valid_lft forever preferred_lft forever
3: eth1: <BROADCAST,MULTICAST,UP,LOWER_UP> mtu 1500 qdisc mq state UP group default qlen 1000
    link/ether 52:54:00:fe:39:e3 brd ff:ff:ff:ff:ff:ff
    inet 192.168.68.121/24 brd 192.168.68.255 scope global dynamic eth1
       valid_lft 6763sec preferred_lft 6763sec
    inet6 fe80::5054:ff:fefe:39e3/64 scope link
       valid_lft forever preferred_lft forever
The first adaptor on the internal subnet (172* here) is always created by Multipass. However, try to ping the IP address from another machine and you will see that it is unreachable. Multipass opened the outgoing traffic by using the host machine as a reverse proxy but did not open it for inward communication. Therefore other nodes in a Kubernetes cluster will not be able to communicate with the virtual machine without the addition of routing rules. The fact that the 192* adaptor listens indirectly on the host machine's LAN, gets us around the need to do these additions to the routing table.
We still have not found the problem, so let us run "IP route" to check that routing has been properly configured:
ubuntu@zoops1:~$ ip route
default via 172.17.240.1 dev eth0 proto dhcp src 172.17.243.219 metric 100
default via 192.168.68.1 dev eth1 proto dhcp src 192.168.68.121 metric 200
172.17.240.0/20 dev eth0 proto kernel scope link src 172.17.243.219
172.17.240.1 dev eth0 proto dhcp scope link src 172.17.243.219 metric 100
192.168.68.0/24 dev eth1 proto kernel scope link src 192.168.68.121
192.168.68.1 dev eth1 proto dhcp scope link src 192.168.68.121 metric 200
Do you see it? There are two default routes. The one on the 172* has a lower metric and will be used. However, we need the second default route to be used at all times so that our virtual machine is directly available from other nodes in the Kubernetes cluster.
Delete this unwanted route:
ubuntu@zoops1:~$ sudo ip route del default via 172.17.240.1 dev eth0 proto dhcp src 172.17.243.219 metric 100
ubuntu@zoops1:~$ ip route
default via 192.168.68.1 dev eth1 proto dhcp src 192.168.68.121 metric 200
172.17.240.0/20 dev eth0 proto kernel scope link src 172.17.243.219
172.17.240.1 dev eth0 proto dhcp scope link src 172.17.243.219 metric 100
192.168.68.0/24 dev eth1 proto kernel scope link src 192.168.68.121
192.168.68.1 dev eth1 proto dhcp scope link src 192.168.68.121 metric 200
Note Should you wish to reboot your Multipass machine you probably need to add this deletion somewhere it runs during bootup, however, I believe it to be safer practice to rather spin up fresh worker nodes than to reuse.
Joining the Worker Node
Since the Windows virtual machine runs Ubuntu, the new node can be prepared in the usual way for Ubuntu so that the "kubeadm join" command can be run on it. You can also try my preparation and joining Ansible scripts (taking care to fill out the "masters" and "vmworkers" sections of the inventory) and let me know how it went.
Check that the new node joined correctly:
vmadmin@bluey:~/atomika/atomika$ kubectl get nodes -o wide
NAME      STATUS   ROLES                  AGE     VERSION   INTERNAL-IP      EXTERNAL-IP   OS-IMAGE             KERNEL-VERSION     CONTAINER-RUNTIME
bluey     Ready    control-plane,master   3d21h   v1.23.1   192.168.68.118   <none>        Ubuntu 20.04.3 LTS   5.4.0-91-generic   containerd://1.4.6
zoops1   Ready    <none>                 2m21s   v1.23.1   192.168.68.121   <none>        Ubuntu 20.04.3 LTS   5.4.0-91-generic   containerd://1.4.6
Should the internal IP reflect as the IP address of the first adaptor (172* in this case), the IP address of the node has to be changed by adding a line to file /var/lib/kubelet//kubeadm-flags.env, taking care to enter the correct IP address for the secondary adaptor at the very end.
KUBELET_EXTRA_ARGS="--node-ip ${ip_address}Conclusion
It proved to be surprisingly easy to join a Windows node to a Kubernetes cluster using Multipass for the virtualization and a dedicated network adaptor to avoid routing rule hell.
Recommend
About Joyk
Aggregate valuable and interesting links.
Joyk means Joy of geeK