

从微信小程序到鸿蒙js开发【07】——menu&toast&dialog
source link: https://my.oschina.net/u/4857646/blog/4957292
Go to the source link to view the article. You can view the picture content, updated content and better typesetting reading experience. If the link is broken, please click the button below to view the snapshot at that time.
1、menu弹出菜单
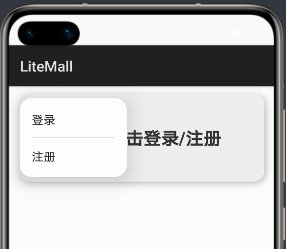
这是微信小程序没有的一个组件,提供了一个可唤起的轻量级弹出菜单。menu的子组件为option。
<menu id="userMenu" onselected="menuSelect">
    <option value="login">登录</option>
    <option value="register">注册</option>
</menu>
在hml中写好菜单,但这时启动app是不会显示出来的,且不会占用任何页面空间。
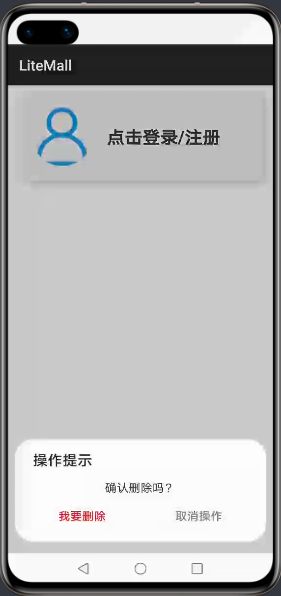
menu需要在方法中被唤起,因此需要设置id属性。这里通过点击“点击登录/注册“文本框唤起菜单:
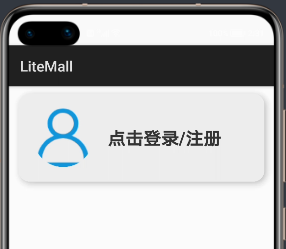
<text if="{{ !userInfo }}" onclick="showUserMenu" class="info_hint">
    点击登录/注册
</text>
showUserMenu() {
this.$element("userMenu").show();
}使用无参的show()方法,菜单在页面的左上角被唤起弹出。
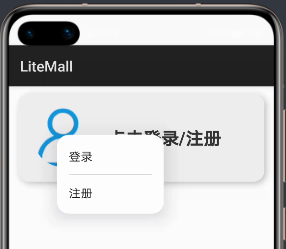
show方法还有一个重载方法,可以设置菜单弹出的x轴和y轴偏移量。x和y需要给数值类型,单位为px。
showUserMenu() {
this.$element("userMenu").show({
x: 100,
y: 100
});
}
菜单项的选中事件通过onselect属性绑定,event.value即为选中的option的value属性。
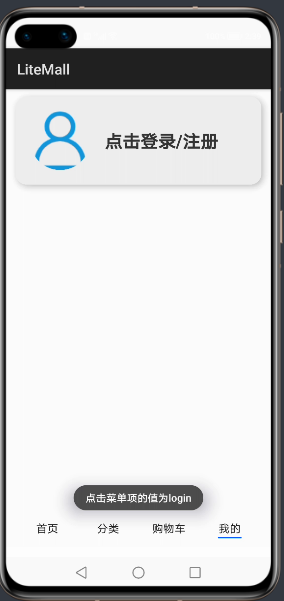
menuSelect(event) {
let value = event.value;
prompt.showToast({
message: "点击菜单项的值为" + value,
duration: 3000
})
}
option一定要设置value属性,否则编译不通过。value重复倒是不会报错,但这样无法判断选中了哪一个菜单项,不建议。

2、Toast提示框
鸿蒙js开发模式至今无法通过console.log()等方法打印日志(mac系统如此),但在写程序时不免要进行调试,提示框就是一种很好的方法。
在js文件中引入prompt模块:
import prompt from '@system.prompt';调用prompt.showToast()弹出提示框:
prompt.showToast({
message: "提示信息",
duration: 3000
});这个方法只能传递message和duration两个参数,弹出位置是在页面接近最下方中间位置,而且字有点小。
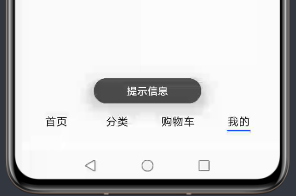
源码注释中说明,duration取值是1500到10000,如果不在范围中会自动更改为边界值。
再看看微信小程序的Toast,使用wx.showToast弹出。
wx.showToast({
title: '提示信息',
duration: 3000
})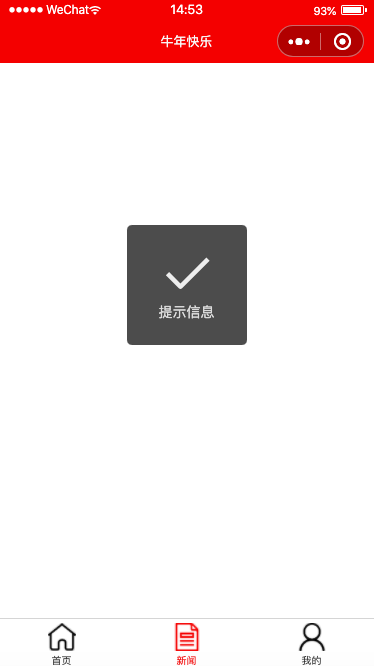
弹出位置在页面正中,且可以切换预置,或自定义图标。
wx.showToast({
title: '常回家看看',
duration: 3000,
icon: 'none',
image: "/icon/index1.png"
})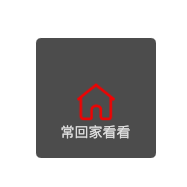
就是这个图标位置怪怪的,但个人感觉这种提示弹窗更加明显,可扩展性也更强。
3、prompt模块的对话框dialog
需要用户确认操作的功能十分常用,比如是否删除,是否下单等。在微信小程序中采用的是wx.showModal(),弹窗内容、按钮内容和颜色都可以自定义,事件在success函数中进行捕获:
wx.showModal({
title: "提示",
content: "确认删除吗?",
confirmColor: "#e20a0b",
confirmText: "对,删了它",
cancelColor: "#777777",
cancelText: "再考虑一下",
success: res => {
if(res.confirm) {
console.log("删除成功!");
} else if(res.cancel) {
console.log("取消删除操作。")
}
}
})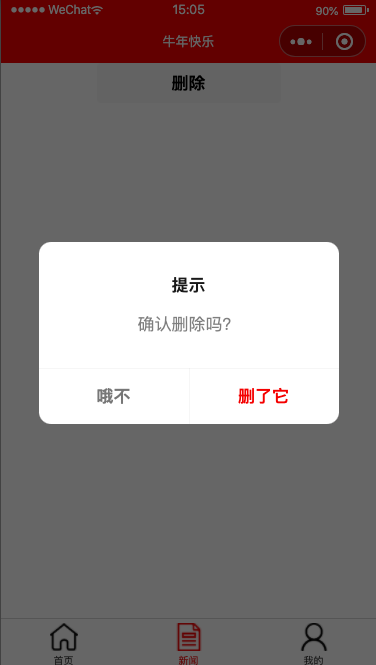
在鸿蒙中,prompt模块的showDialog()方法提供了弹出对话框:
prompt.showDialog({
title: "操作提示",
message: "确认删除吗?",
buttons: [
{
text: "我要删除",
color: "#e20a0b"
},
{
text: "取消操作",
color: "#777777"
}
],
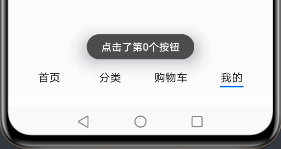
success: res => {
prompt.showToast({
message: "点击了第" + res.index + "个按钮"
})
}
})
对话框也是在底部弹出的,且按钮可以自行定义。点击按钮后,success方法会获取按钮的索引值,根据索引进行业务逻辑的编写。
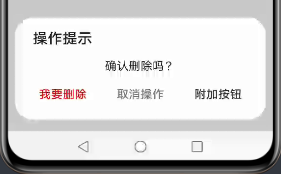
想要设置三个按钮也是可以的,这个功能微信小程序的showModal()是没有的。
prompt.showDialog({
title: "操作提示",
message: "确认删除吗?",
buttons: [
{
text: "我要删除",
color: "#e20a0b"
},
{
text: "取消操作",
color: "#777777"
},
{
text: "附加按钮",
color: "#333333"
}
],
success: res => {
prompt.showToast({
message: "点击了第" + res.index + "个按钮"
})
}
})
3、dialog对话框组件
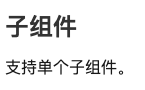
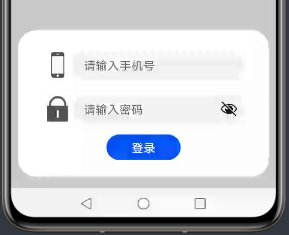
prompt.showDialog()只能弹出具有提示文字和按钮的对话框,如果需要更丰富的模态对话框功能,鸿蒙还提供了dialog组件,这个组件在微信小程序中也是没有的。和menu一样,写在hml中的dialog并不会显示,也不会占用页面空间,需要通过id在方法中被唤起。
<dialog id="loginDialog">
<div class="loginDialog">
<div class="formItem">
<image src="{{ phone ? (imgUrl + 'phone.png') : (imgUrl + 'phone1.png') }}"></image>
<input id="phoneInput" type="number" placeholder="请输入手机号" onchange="inputPhone"></input>
</div>
<div class="formItem">
<image src="{{ pwd ? (imgUrl + 'password.png') : (imgUrl + 'password1.png') }}"></image>
<input id="pwdInput" type="password" placeholder="请输入密码" onchange="inputPwd"></input>
</div>
<button class="inputBtn" onclick="login">登录</button>
</div>
</dialog>这里需注意,官方文档中说的“支持单个子组件”的意思是,dialog中只能有一个直接子组件,即需要用一个div将内容套起来。
同样地,根据id找到元素,使用show()方法唤起对话框。对话框的show()方法无重载,会在页面底部弹出。dialog的大小取决于子组件div的大小,div给样式即可。
menuSelect(event) {
let value = event.value;
if ("login" == value) {
this.phone = "";
this.pwd = "";
this.$element("loginDialog").show();
} else if ("register" == value) {
this.phone = "";
this.pwd = "";
this.$element("registerDialog").show();
}
},
可用close()方法关闭它。
this.$element("registerDialog").close();附上本页面的代码,后台功能自己搭建了Spring Boot服务器进行交互。下篇将讲解表单组件:
<!-- 我的 -->
<div class="myPage">
<div class="userInfo">
<image src="{{ userInfo && userInfo.avatar != '0' ? userInfo.avatar : (imgUrl + 'user.png')}}"></image>
<div class="info_desc">
<text if="{{ !userInfo }}" onclick="showUserMenu" class="info_hint">
点击登录/注册
</text>
<text if="{{ userInfo }}" class="info_name">
{{ userInfo.nickname ? userInfo.nickname : userInfo.username }}
</text>
<text if="{{ userInfo }}" class="info_detail">
{{ userInfo.age }} {{ userInfo.gender == 1 ? '男' : (userInfo.gender == 2 ? '女' : '性别保密') }}
</text>
</div>
</div>
<menu id="userMenu" onselected="menuSelect">
<option value="login">登录</option>
<option value="register">注册</option>
</menu>
<dialog id="loginDialog">
<div class="loginDialog">
<div class="formItem">
<image src="{{ phone ? (imgUrl + 'phone.png') : (imgUrl + 'phone1.png') }}"></image>
<input id="phoneInput" type="number" placeholder="请输入手机号" onchange="inputPhone"></input>
</div>
<div class="formItem">
<image src="{{ pwd ? (imgUrl + 'password.png') : (imgUrl + 'password1.png') }}"></image>
<input id="pwdInput" type="password" placeholder="请输入密码" onchange="inputPwd"></input>
</div>
<button class="inputBtn" onclick="login">登录</button>
</div>
</dialog>
</div>
<!-- 我的end -->/*我的*/
.userInfo {
width: 92%;
height: 240px;
margin: 20px 0 20px 0;
border-radius: 30px;
box-shadow: 5px 5px 15px #bbbbbb;
background-color: #eeeeee;
display: flex;
align-items: center;
}
.userInfo>image {
margin: 0 40px 0 40px;
width: 160px;
height: 160px;
border-radius: 90px;
object-fit: contain;
}
.info_desc {
height: 200px;
margin-right: 20px;
flex: 1;
display: flex;
flex-direction: column;
justify-content: center;
}
.info_hint {
font-size: 48px;
font-weight: bold;
color: #333333;
}
.info_name {
font-size: 40px;
font-weight: 600;
height: 100px;
color: #333333;
}
.info_detail {
font-size: 34px;
color: #666666;
}
.loginDialog {
width: 80%;
height: 400px;
display: flex;
flex-direction: column;
align-items: center;
justify-content: center;
}
.formItem {
width: 100%;
height: 100px;
display: flex;
align-items: center;
justify-content: space-between;
margin-bottom: 20px;
}
.formItem>image {
width: 70px;
height: 70px;
margin: 0 10px 0 10px;
}
input {
flex: 1;
}
.inputBtn {
width: 200px;
height: 70px;
}js:(省略data部分)
// 弹出菜单
showUserMenu() {
    this.$element("userMenu").show();
},
// 菜单选中
menuSelect(event) {
let value = event.value;
if ("login" == value) {
this.phone = "";
this.pwd = "";
this.$element("loginDialog").show();
} else if ("register" == value) {
this.phone = "";
this.pwd = "";
// this.$element("registerDialog").show();
}
},
// 手机号输入框
inputPhone(e) {
this.phone = e.value;
},
// 密码输入框
inputPwd(e) {
this.pwd = e.value;
},
// 登录
login() {
fetch.fetch({
url: this.url + "/litemall/user/login?phone=" + this.phone + "&pwd=" + this.pwd,
responseType: "json",
success: res => {
let data = JSON.parse(res.data);
if (0 != data.code) {
prompt.showToast({
message: data.msg,
duration: 3000
})
} else {
this.userInfo = data.data;
this.$element("loginDialog").close();
}
}
})
}
登录成功效果:
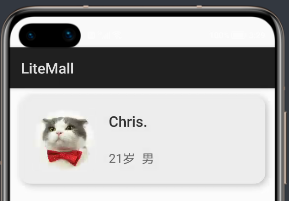
作者:Chris.
想了解更多内容,请访问: 51CTO和华为官方战略合作共建的鸿蒙技术社区https://harmonyos.51cto.com
Recommend
About Joyk
Aggregate valuable and interesting links.
Joyk means Joy of geeK