

Testing 2.5 Gbps Ethernet on the Raspberry Pi CM4
source link: https://www.jeffgeerling.com/blog/2020/testing-25-gbps-ethernet-on-raspberry-pi-cm4
Go to the source link to view the article. You can view the picture content, updated content and better typesetting reading experience. If the link is broken, please click the button below to view the snapshot at that time.
Testing 2.5 Gbps Ethernet on the Raspberry Pi CM4
December 29, 2020
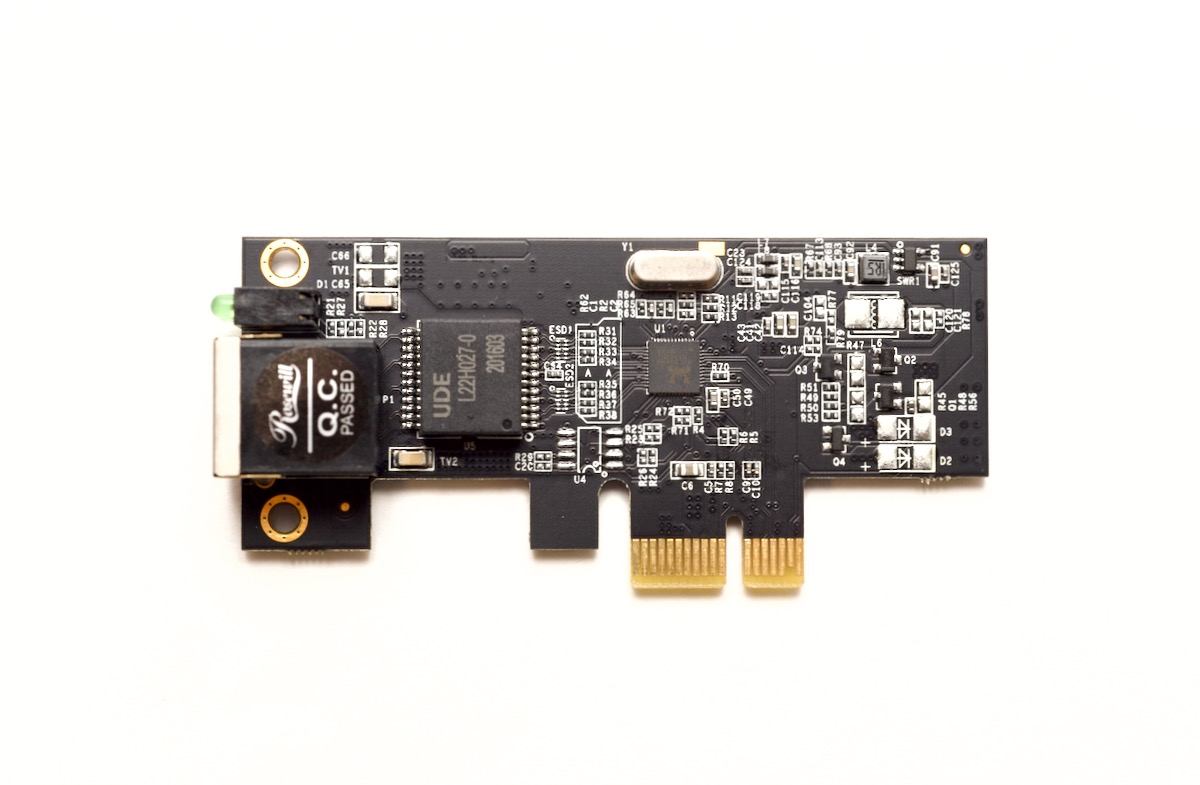
I got this Rosewill RC-20001 PCIe 2.5 Gbps Network Adapter working on the Raspberry Pi Compute Module 4.
Right after I got the card working, though, I tested it in an external powered PCI Express riser, and that test released the card's magic smoke. Oops.
Here's a dramatic re-enactment that's actually pretty accurate to what it looked like in real life:
Luckily, buying a replacment wasn't too bad, since the card is less than $20. But to get it to work on my spiffy new ten gigabit network, I also had to buy a new SFP+ transceiver that was compatible with 1, 2.5, 5, and 10 Gbps data rates, and that cost $60!
I'll get to 10 Gbps networking more in a future post, but on that topic, I didn't have any other computer with 1+ Gbps network interface, so I decided to upgrade my main MacBook Pro with a $150 OWC Thunderbolt 3 10G adapter, too.
With the hardware ready—and my wallet was a bit lighter—it's time to see how the card does!
Video for this post
I also have a companion video for this blog post, for the more visually-inclined:
Pardon the use of Comic Sans...
Only 2.5 Gbps? What about your 5 Gbps post?
"But wait a second," I hear you say, "didn't you already get 4.15 gigabits through the Intel i340 card last month?"
Well, yes. But that was in aggregate, through five separate 1 Gbps interfaces.
And while you can bond interfaces sometimes, life is simpler with a big fat pipe. And 2.5 Gbps, as I'll demonstrate later, is probably about as much as the current BCM2711 Raspberry Pi processor can handle.
So how does it work?
I plugged the card directly into the 1x slot on the IO Board and ran lspci, and the card showed up. dmesg logs showed the card didn't have any trouble allocating BAR space either, so from a hardware perspective, we're good to go!
But ip address didn't show the driver, so it was time to find a driver.
I tried the driver from Realtek's website, but I had trouble compiling it, so it was time to recompile the Linux kernel!
Since I've been cross-compiling a lot this past month, I took some time to optimize the process, and got it from around 30 minutes to 11 on my Core i9 laptop.
In menuconfig, I enabled the driver for the Realtek 8125 chip, which is inside
Device Drivers
  -> Network device support
    -> Ethernet driver support
      -> Realtek devices
        -> Realtek 8169/8168/8101/8125 ethernet support
I cross-compiled the kernel, copied it over to the Pi and rebooted, and found some encouraging new dmesg logs, so I ran ip address and found the brand new eth1 interface!
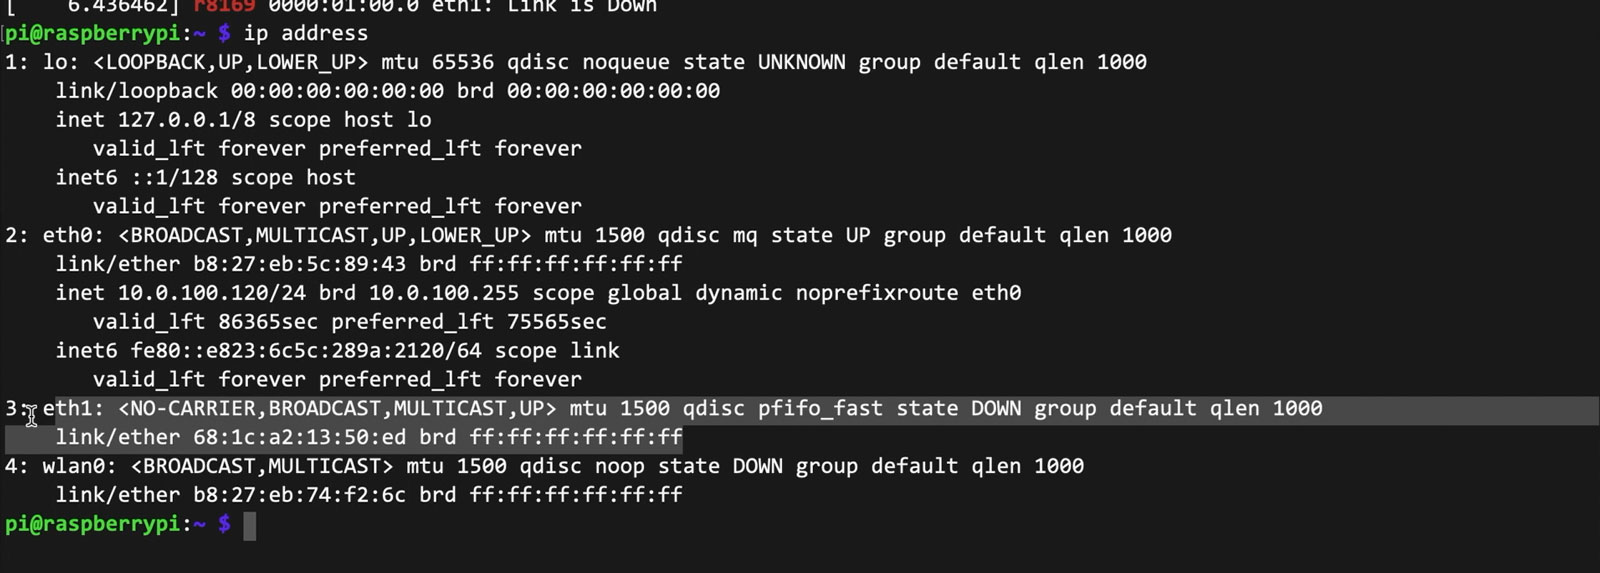
I plugged in a network cable, and got a good connection after a few seconds.
Getting Full Performance
I ran a speed test to my Mac over my 1 Gbps network with iperf3, and it ran at 940 megabits—the same as the internal network chip on the Pi.
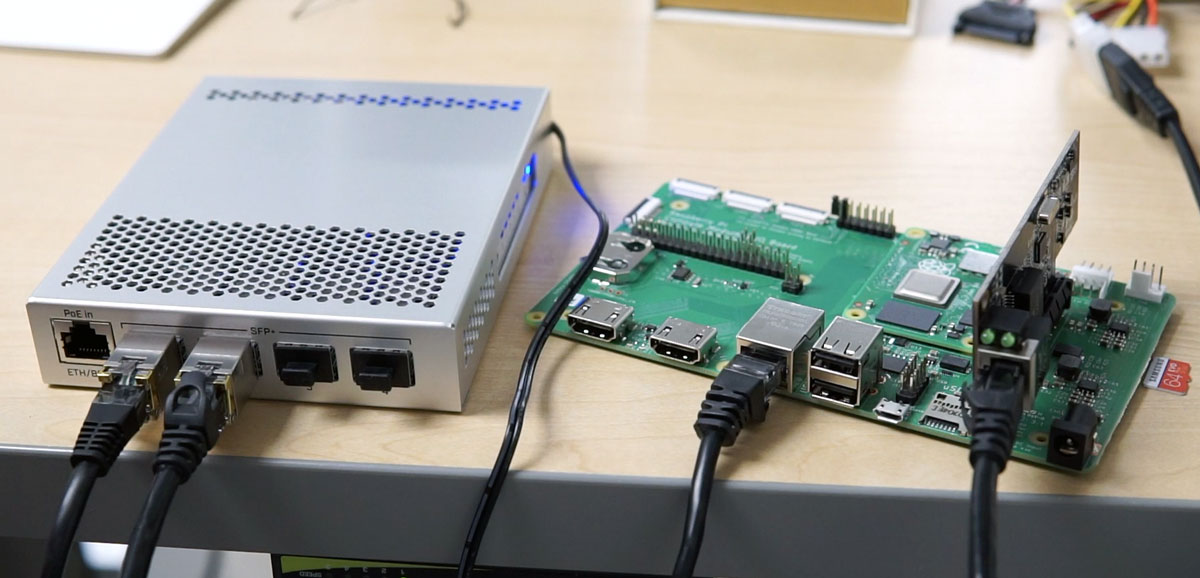
Next I pulled out my MikroTik 10G switch, plugged in two copper transceivers, and plugged the Pi into one port, and my Mac's new 10G adapter into the other port.
I ran iperf3, and my first tests showed just under two gigabits:
[ ID] Interval           Transfer     Bitrate         Retr
[  5]   0.00-10.00  sec  1.10 GBytes   943 Mbits/sec    0             sender
[  5]   0.00-10.00  sec  1.10 GBytes   941 Mbits/sec                  receiver
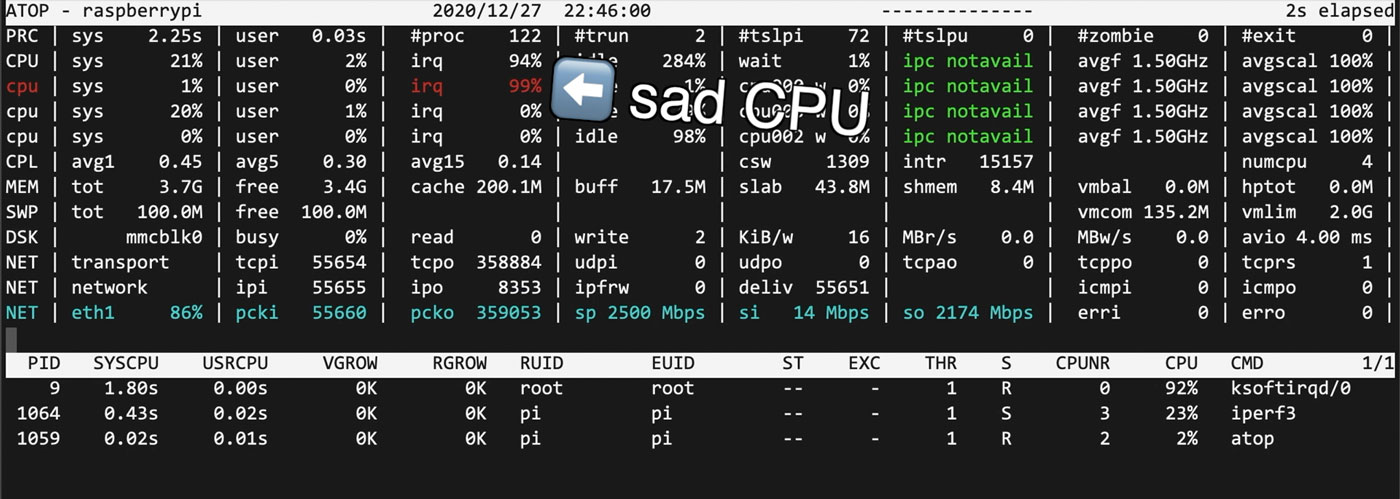
That's not bad... but under 2 gigabits just feels like it's missing something. I learned from running atop that the Pi's little CPU just can't keep up with multiple gigabits of network traffic:
To ease the load on the processor, I set the MTU to 9000 with the command sudo ip link set dev eth1 mtu 9000.
To make a difference though, you have to make sure both ends support MTU 9000, or 'jumbo frames'. So I also edited my Mac's network settings.
Just as an aside, if you want to enable jumbo frames on the Pi's internal Ethernet jack, you can't use ip link set, you actually have to recompile the kernel with a patch. If you want to do that, I wrote up that process (and how to change a Mac's settings) in this blog post: Setting 9000 MTU (Jumbo Frames) on Raspberry Pi OS.
With the MTU set to 9000 on both ends, I ran the iperf3 test again and got:

ZERO BITS PER SECOND?!
Long story short, the MikroTik switch is configured as a router out of the box, with ports limited to MTU 1500. I could've set the ports higher in the router, but instead I switched over to the MicroTik Switch OS ('SwOS').
So another networking lesson learned: if you want to use jumbo frames, you have to consider every network device in the path between your computers!
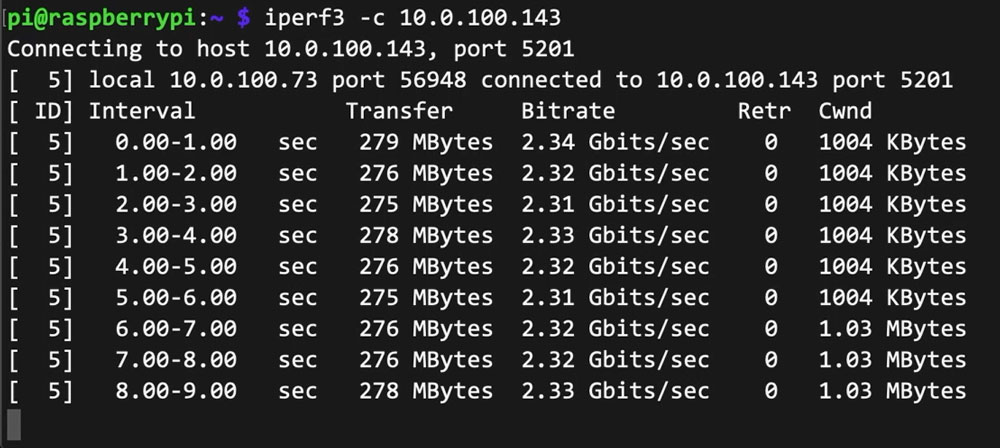
So now that Jumbo Frames were actually a thing on my little baby 10G network, I ran iperf3 again, and this time, I found a much nicer result:
2.48 Gbps is much better.
Overclocking the CPU to avoid clogging IRQs
But if atop showed regular-sized Ethernet frames are bottlenecked by the CPU's IRQ interrupts, wouldn't overclocking the Pi help too?
Well yes, overclocking does actually increase network throughput!
I set the MTU back to 1500, and enabled a 2.147 GHz overclock by editing /boot/config.txt and rebooting the Pi.
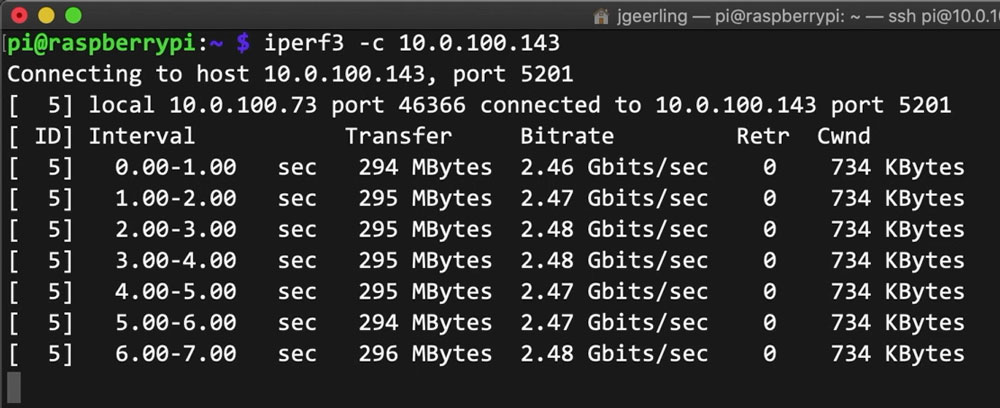
After the reboot, I ran the test again, and this time, I was seeing speeds around 2.3 gigabits—a 20% network speedup.
But if you just need raw throughput for large files and your network supports it, Jumbo Frames are the only way to fully saturate the network interface:
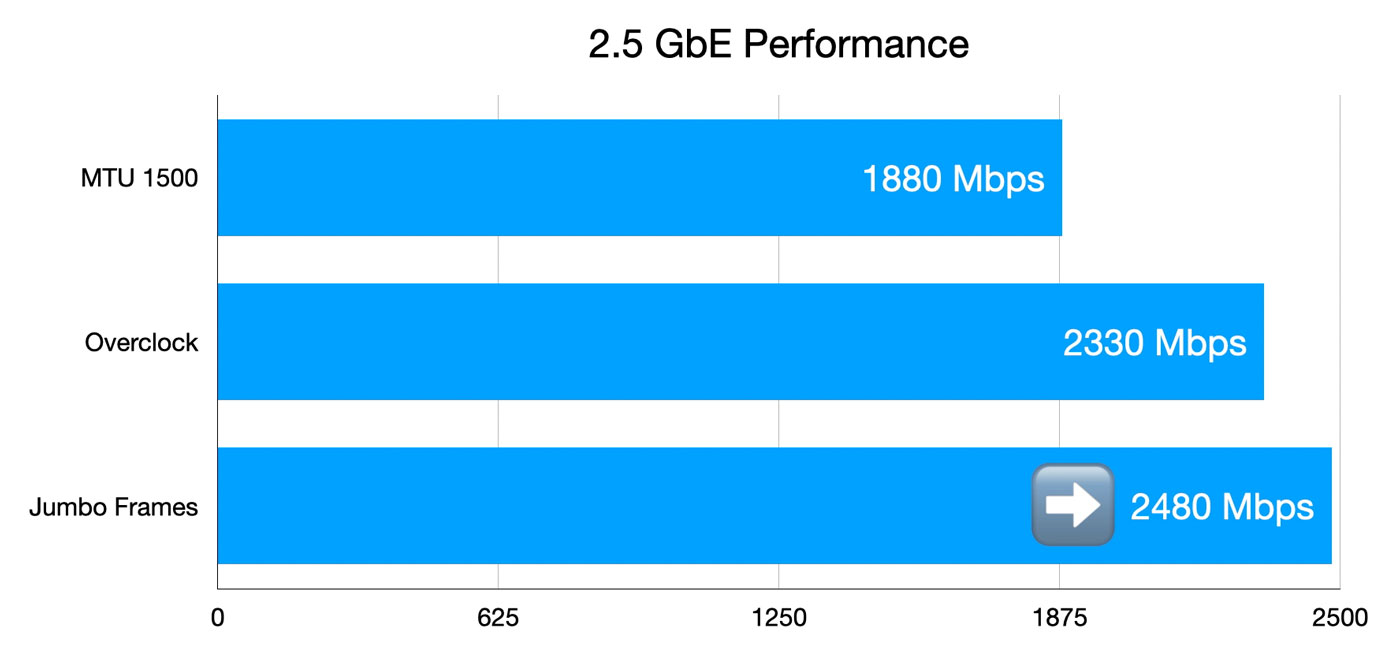
Even if you don't change anything, getting 2.3 Gbps with an overclock isn't bad! That's almost 300 MB/sec—a massive improvement over the built-in network interface.
Testing bidirectional throughput
The last test I ran was bidirectional throughput. I had to compile iperf3 from source to run this test since the version in the Pi OS software repository is too old. You need iperf3 3.7 or later.
To compile from source:
# Download iperf3 source.
wget https://github.com/esnet/iperf/archive/master.zip

# Unzip the download and enter source directory.
unzip master.zip && cd iperf-master/

# Run configure and make.
./configure
make

# Use the compiled version.
cd src/
./iperf3 --help
Since both the Pi and my Mac have Full Duplex network interfaces, traffic should be able to flow in both directions simultaneously.
Unfortunately, it seems bandwidth to and from the Pi isn't quite symmetrical. The receive traffic was still showing about 2.5 Gbps, but simultaneous transmit was limited to 100 Mbps.
Asymetric transfer rates aren't a big issue for most use cases, though, so I'm not too worried.
I also ran UDP tests, and the Pi could pump through 2.5 Gbps without issue. Bidirectional, though, a lot of packets were dropped if operating at full tilt, because the Pi just couldn't keep up with the firehose blasted at it from the 10G interface on my Mac.
Conclusion
You might be wondering at this point, "Why is Jeff testing all these different network cards?"
Don't worry, you're not crazy; my wife keeps asking me the same question.
If you want to keep these experiments going, please subscribe to my YouTube channel and support my work on Patreon or GitHub!
Check out other cards I'm testing on the CM4 on my Raspberry Pi PCI Express device compatibility database.
Recommend
About Joyk
Aggregate valuable and interesting links.
Joyk means Joy of geeK