

Bigfish VSCode 插件开发实践
source link: https://zhuanlan.zhihu.com/p/259344620
Go to the source link to view the article. You can view the picture content, updated content and better typesetting reading experience. If the link is broken, please click the button below to view the snapshot at that time.
Bigfish VSCode 插件开发实践
Bigfish 是蚂蚁集团企业级前端研发框架,基于 umi 微内核框架,Bigfish = umi + preset-react + 内部 presets。
前天发布了 Bigfish VSCode 插件,开发过程中遇到了不少问题,除了官方文档外,没有一个很好的指南,索性将 VSCode 插件开发过程记录下,让后面的同学可以更好地开发 VSCode 插件,因为篇幅有限,讲清楚得来个系列。
同时也有一些思考,可不可以用 umi 直接开发 VSCode 插件?
让我们从零开始开发一个插件吧,首先我们需要先安装一个 VSCode Insiders(类似 VSCode 开发版),这样可以在相对纯净的插件环境进行研发,同时建议用英文版,这样在看 microsoft/vscode 源码时,更容易定位到具体代码。
这里直接使用官方的脚手架生成,用 npx 不用全局 -g 安装
➜ npx --ignore-existing -p yo -p generator-code yo code

     _-----_     ╭──────────────────────────╮
    |       |    │   Welcome to the Visual  │
    |--(o)--|    │   Studio Code Extension  │
   `---------´   │        generator!        │
    ( _´U`_ )    ╰──────────────────────────╯
    /___A___\   /
     |  ~  |
   __'.___.'__
 ´   `  |° ´ Y `

? What type of extension do you want to create? New Extension (TypeScript)
? What's the name of your extension? hello-world
? What's the identifier of your extension? hello-world
? What's the description of your extension?
? Initialize a git repository? Yes
? Which package manager to use? yarn
然后用 VSCode Insiders 打开 hello-world 项目,点击 『Run Extension』会启动一个 [Extension Development Host] 窗口,这个窗口会加载我们的插件
脚手架里插件默认是输入 『Hello World』然后右下角弹窗
至此,一个 VSCode 插件初始化就完成啦 ~
首先我们从项目目录结构来了解下插件开发,组织上和我们 npm 库基本一样
.
├── CHANGELOG.md
├── README.md
├── .vscodeignore # 类似 .npmignore,插件包里不包含的文件
├── out # 产物
│   ├── extension.js
│   ├── extension.js.map
│   └── test
│       ├── runTest.js
│       ├── runTest.js.map
│       └── suite
├── package.json # 插件配置信息
├── src
│   ├── extension.ts # 主入口文件
│   └── test # 测试
│       ├── runTest.ts
│       └── suite
├── tsconfig.json
└── vsc-extension-quickstart.md
package.json
{
  "name": "hello-world",
    "displayName": "hello-world",
    "description": "",
    "version": "0.0.1",
    "engines": {
        "vscode": "^1.49.0"
    },
    "categories": [
        "Other"
    ],
    "activationEvents": [
    "onCommand:hello-world.helloWorld"
    ],
    "main": "./out/extension.js",
    "contributes": {
        "commands": [
            {
                "command": "hello-world.helloWorld",
                "title": "Hello World"
            }
        ]
    },
    "scripts": {
        "vscode:prepublish": "yarn run compile",
        "compile": "tsc -p ./",
        "lint": "eslint src --ext ts",
        "watch": "tsc -watch -p ./",
        "pretest": "yarn run compile && yarn run lint",
        "test": "node ./out/test/runTest.js"
    },
    "devDependencies": {}
}
VSCode 开发配置复用了 npm 包特性,详见 Fields,但有几个比较重要的属性:
main就是插件入口,实际上就是src/extension.ts编译出来的产物contributes可以理解成 功能声明清单,插件有关的命令、配置、UI、snippets 等都需要这个字段
我们来看一下 src/extension.ts
// src/extension.ts

// vscode 模块不需要安装,由插件运行时注入
import * as vscode from 'vscode';

// 插件加载时执行的 activate 钩子方法
export function activate(context: vscode.ExtensionContext) {

    console.log('Congratulations, your extension "hello-world" is now active!');

  // 注册一个命令,返回 vscode.Disposable 对象,该对象包含 dispose 销毁方法
    let disposable = vscode.commands.registerCommand('hello-world.helloWorld', () => {
        // 弹出一个信息框消息
        vscode.window.showInformationMessage('Hello World from hello-world!');
    });

    // context 订阅注册事件
    context.subscriptions.push(disposable);
}

// 插件被用户卸载时调用的钩子
export function deactivate() {}
我们只需要暴露 activate 和 deactivate 两个生命周期方法,插件就能运行了。
作为插件,提供哪些功能呢?这里整理了一个思维导图,同时也可以对照官方文档来看:
这里我们以一个点击『打开页面』 弹出 webview 的例子,来串一下所用到的 VSCode 功能
插件清单声明
插件清单声明(Contribution Points)是我们需要首先关注的,位于 package.json 的 contributes 属性,这里面可以声明 VSCode 大部分配置、UI 扩展、快捷键、菜单等。
为了找到我们对应配置项,VSCode 编辑器布局图会更直观的感受
根据例子,我们需要在 Editor Groups 里添加一个按钮,同时需要注册一个命令,也就是如下配置:
{
  "contributes": {
      "commands": [
        {
           "command": "hello-world.helloWorld",
           "title": "Hello World"
        },
+       {
+           "command": "hello-webview.helloWorld",
+           "title": "打开页面"
+       }
      ],
+     "menus": {
+       "editor/title": [
+           {
+               "command": "hello-webview.helloWorld",
+               "group": "navigation@0"
+           }
+       ]
+   }
    }
}
其中 命令 和 菜单 的类型如下,可以根据需求增加更多个性化配置,配置类型见 menusExtensionPoint.ts#L451-L485。
注册命令(commands)
一个命令可以理解一个功能点,比如打开 webview 就是一个功能,那么我们使用 vscode.commands.registerCommand 注册 打开 webview 这个功能:
// src/extension.ts

export function activate(context: vscode.ExtensionContext) {
    context.subscriptions.push(
    vscode.commands.registerCommand('hello-webview.helloWorld', () => {

    })
  )
}
我们可以看下registerCommand 方法定义:
/**
 * Registers a command that can be invoked via a keyboard shortcut,
 * a menu item, an action, or directly.
 *
 * Registering a command with an existing command identifier twice
 * will cause an error.
 *
 * @param command A unique identifier for the command.
 * @param callback A command handler function.
 * @param thisArg The `this` context used when invoking the handler function.
 * @return Disposable which unregisters this command on disposal.
 */
export function registerCommand(command: string, callback: (...args: any[]) => any, thisArg?: any): Disposable;
其中 command 要与我们前面 package.json 声明的命令要一致, callback 就是调用后做什么事,返回的是一个 Disposable 类型,这个对象很有意思,可在插件退出时执行销毁 dispose 方法。
打开 webview
这里需要用到 Webview API,因为有 webview,扩展了 VSCode UI 和交互,提供了更多的想象力
const panel = vscode.window.createWebviewPanel('helloWorld', 'Hello World', vscode.ViewColumn.One, {
    enableScripts: true,
});
panel.webview.html = `
    <!DOCTYPE html>
    <html lang="en">
    <head>
        <meta charset="UTF-8">
        <meta name="viewport" content="width=device-width, initial-scale=1.0">
        <title>Hello World</title>
    </head>
    <body>
        <iframe width="100%" height="500px" src="https://www.yunfengdie.com/"></iframe>
    </body>
    </html>
`;
panel.onDidDispose(async () => {
    await vscode.window.showInformationMessage('关闭了 webview');
}, null, context.subscriptions);
这里要注意的点是,html 中的本地 url 地址需要转一道,不然无法运行,例如
- <script src="/bar.js"></script>
+ <script src="${panel.webview.asWebviewUri(vscode.Uri.file(path.join(__dirname, 'bar.js')))}"></script>
上面提到的功能只是 VSCode 功能的冰山一角,更多的功能遇到时查文档就会用了,这里有几点进阶的部分。
VSCode 的命令系统是一个很好的设计,优势在于:中心化注册一次,多地扁平化消费
我个人觉得更重要的一点在于:
- 先功能后交互:VSCode 提供的 UI 和交互有限,我们可以先不用纠结交互,先把功能用命令注册,再看交互怎么更好
- 灵活性:比如 VSCode 增加了一种新交互形式,只需要一行配置就可以接入功能,非常方便
另外官网也内置了一些命令,可直接通过 vscode.commands.executeCommand 使用。
when 上下文
如果希望在满足特定条件,才开启插件某个功能/命令/界面按钮,这时候可以借助插件清单里的 when 上下文来处理,例如检测到是 Bigfish 应用( hello.isBigfish )时开启:
"activationEvents": [
  "*"
],
"contributes": {
  "commands": [
    {
      "command": "hello-world.helloWorld",
      "title": "Hello World",
    },
    {
      "command": "hello-webview.helloWorld",
      "title": "打开页面",
    }
  ],
  "menus": {
    "editor/title": [
      {
        "command": "hello-webview.helloWorld",
        "group": "navigation@0",
+       "when": "hello.isBigfish"
      }
    ]
  }
},
如果直接这样写,启动插件时,会看到之前的『打开页面』按钮消失,这个值的设置我们用 VSCode 内置的 setContext 命令:
vscode.commands.executeCommand('setContext', 'hello.isBigfish', true);
这时候我们打开就有按钮了,关于状态什么时候设置,不同插件有自己的业务逻辑,这里不再赘述。
这里的 when 可以有简单的表达式组合,但是有个坑点是不能用 () ,例如:
- "when": "bigfish.isBigfish && (editorLangId == typescriptreact || editorLangId == typescriptreact)"
+ "when": "bigfish.isBigfish && editorLangId =~ /^typescriptreact$|^javascriptreact$/"
结合 umi
webview 的部分,如果单写 HTML 明显回到了 jQuery 时代,能不能将 umi 联系起来呢?实际上是可以的,只是我们需要改一些配置。
首先对 umi,
devServer.writeToDist:需要在 dev 时写文件到输出目录,这样保证开发阶段有 js/css 文件history.type:使用内存路由 MemoryRouter,webview 里是没有 url 的,这时候浏览器路由基本是挂的。
import { defineConfig } from 'umi';

export default defineConfig({
  publicPath: './',
  outputPath: '../dist',
  runtimePublicPath: true,
  history: {
    type: 'memory',
  },
  devServer: {
    writeToDisk: filePath => ['umi.js', 'umi.css'].some(name => filePath.endsWith(name)),
  },
});
加载 webview,这时候就是把 umi.css 和 umi.js 转下路径:
this.panel.webview.html = `
    <!DOCTYPE html>
    <html>
      <head>
        <meta charset="utf-8" />
        <meta name="viewport" content="width=device-width, initial-scale=1, maximum-scale=1, minimum-scale=1, user-scalable=no" />
        <link rel="stylesheet" href="${this.panel.webview.asWebviewUri(
          vscode.Uri.file(path.join(distPath, 'umi.css')),
        )}" />
        <script>window.routerBase = "/";</script>
        <script>//! umi version: 3.2.14</script>
      </head>
      <body>
        <div id="root"></div>
        <script src="${this.panel.webview.asWebviewUri(vscode.Uri.file(path.join(distPath, 'umi.js')))}"></script>
      </body>
    </html>`;
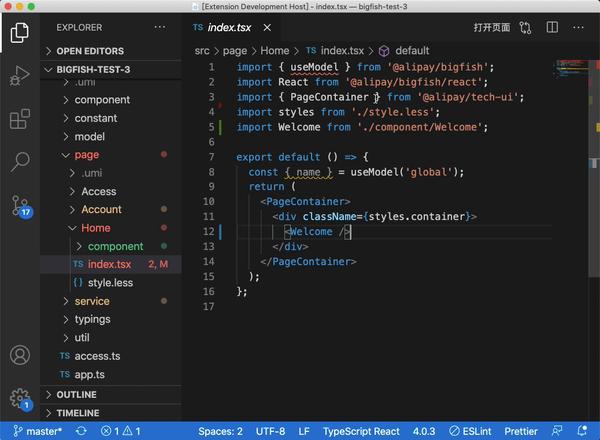
然后就可以用我们的 umi 开发 webview 了
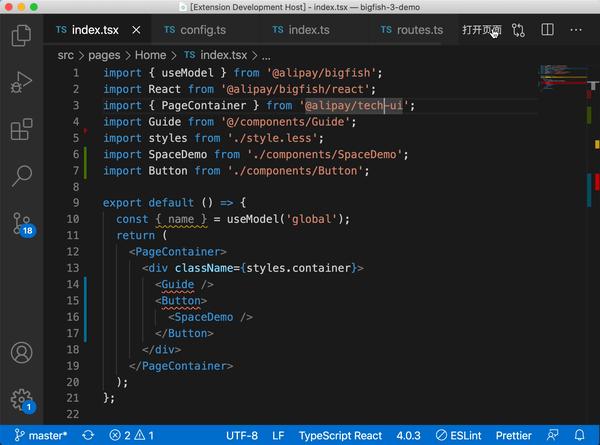
这里的调试分两个:插件调试、webview 调试。
插件调试直接用 VSCode 内置的断点,非常方便
webview 的调试我们通过 command + shift + p 调用 Open Webview Developer Tools 来调试 webview
支持 CloudIDE
CloudIDE 兼容 VSCode API,但也有一些不兼容的 API(如 vscode.ExtensionMode ),为了保证同时兼容,用到了 CloudIDE 团队写的 @ali/ide-extension-check,可直接扫当前是否兼容 CloudIDE,这里把它做成一个 CI 流程,自动化发布、文档同步
Icon 图标
为了更好的体验,可以使用官网内置的图标集,例如:
只需要使用 $(iconIdentifier) 格式来表示具体 icon
{
  "contributes": {
        "commands": [
            {
                "command": "hello-world.helloWorld",
                "title": "Hello World"
            },
           {
            "command": "hello-webview.helloWorld",
            "title": "打开页面",
+           "icon": "$(browser)",
           }
        ],
    }
}
但是在 CloudIDE 中,内置的不是 VSCode icon,而是 antd Icon。为了同时兼容 CloudIDE 和 VSCode,直接下载 vscode-icons,以本地资源形式展现。
{
  "contributes": {
        "commands": [
            {
                "command": "hello-world.helloWorld",
                "title": "Hello World"
            },
        {
            "command": "hello-webview.helloWorld",
            "title": "打开页面",
+           "icon": {
+             "dark": "static/dark/symbol-variable.svg",
+             "light": "static/light/symbol-variable.svg"
+           },
        }
        ],
    }
}
打包、发布
部署上线前需要注册 Azure 账号,具体步骤可以按官方文档操作。
包体积优化
脚手架默认的是 tsc 只做编译不做打包,这样从源文件发布到插件市场包含的文件就有:
- out
  - extension.js
  - a.js
  - b.js
  - ...
- dist
  - umi.js
  - umi.css
  - index.html
- node_modules # 这里的 node_modules,vsce package --yarn 只提取 dependencies 相关包
    - ...
- package.json
那边 Bigfish 插件第一次打包是多大呢? 11709 files, 16.95MB
为了绕过这个 node_modules ,思路是通过 webpack 将不进行 postinstall 编译的依赖全打进 extension.js 里,webpack 配置如下:
'use strict';

const path = require('path');

const tsConfigPath = path.join(__dirname, 'tsconfig.json');
/** @type {import("webpack").Configuration} */
const config = {
  target: 'node',
  devtool: process.env.NODE_ENV === 'production' ? false : 'source-map',
  mode: process.env.NODE_ENV === 'production' ? 'production' : 'development',
  entry: './src/extension.ts',
  externals: {
    vscode: 'commonjs vscode',
  },
  module: {
    rules: [
      {
        test: /\.ts$/,
        exclude: /node_modules/,
        loader: 'ts-loader',
        options: {
          transpileOnly: true,
          configFile: tsConfigPath,
        },
      },
    ],
  },
  output: {
    devtoolModuleFilenameTemplate: '../[resource-path]',
    filename: 'extension.js',
    libraryTarget: 'commonjs2',
    path: path.resolve(__dirname, 'out'),
  },
  resolve: {
    alias: {
      '@': path.join(__dirname, 'src'),
    },
    extensions: ['.ts', '.js'],
  },
  optimization: {
    usedExports: true
  }
};

module.exports = config;
.vscodeignore 里加上 node_modules ,不发到市场,这样包结构就变成了
- out
  - extension.js
- dist
    - umi.js
    - umi.css
    - index.html
- package.json
最后的包大小为: 24 files, 1.11MB ,从 16.95M 到 1.11M ,直接秒级安装。
预编译依赖 & 安全性
之前一直想着把 Bigfish core 包(@umijs/core)打到 插件包里,基本没成功过,原因在于 core 依赖了 fsevents,这个包要根据不同 OS 安装时做编译,所以没办法打到包里:
- [fail] cjs (./src/extension.ts -> out/extension.js)Error: Build failed with 2 errors:
node_modules/fsevents/fsevents.js:13:23: error: File extension not supported:
node_modules/fsevents/fsevents.node
node_modules/@alipay/bigfish-vscode/node_modules/prettier/third-party.js:9871:10:
error: Transforming for-await loops to the configured target environment is not
supported yet
同时像一些内部的 sdk 包(@alipay/oneapi-bigfish-sdk)如果打进包,会有一定的安全风险,毕竟包是发到外部插件市场。
解决这两个问题,采用了动态引用依赖,直接引用户项目已有的依赖(Bigfish 项目内置 oneapi sdk 包),这样一是包体积小,二是包安全性高。
import resolvePkg from 'resolve-pkg';

// origin require module
// https://github.com/webpack/webpack/issues/4175#issuecomment-342931035
export const cRequire = typeof __webpack_require__ === "function" ? __non_webpack_require__ : require;

// 这样引用是为了避免内部包泄露到 外部插件市场
const OneAPISDKPath = resolvePkg('@alipay/oneapi-bigfish-sdk', {
  cwd: this.ctx.cwd,
});
this.OneAPISDK = cRequire(OneAPISDKPath);
直接用官方的 vsce 工具:
vsce publish patch:发 patch 版本vsce package:输出插件包文件.vsix
没有打包依赖的插件:
vsce publish patch --yarn:发 patch 版本,包含生产依赖的 node_modulesvsce package --yarn:输出插件包文件.vsix,包含生产依赖的 node_modules
几乎每个 VSCode 插件的开发方式都不一样,缺少最佳实践(commands、provider 注册、services 的消费、webview 的开发等)
细思下来,能不能借鉴按 SSR 方案,其实仅用一个 umi 是可以编译打包 VSCode 插件 + webview 的(名子想了下,可能是 vsue),觉得比较好的目录结构是:
- snippets
- src
  - commands # 命令,根据文件名自动注册
    - hello-world.ts
    - services # 功能建模,挂载到 ctx 上,通过 ctx.services 调用
    - A.ts
    - B.ts
  - providers # Provider 类,扩展 VSCode 默认交互、UI
    - TreeDataProvider.ts
  - utils # 工具类,ctx.utils.abc 调用
  - constants.ts
    - extension.ts
- static
    - dark
    - a.png
  - light
- webview # webview 应用
    - mock
    - src
    - pages
- test
- .umirc.ts # 同时跑 前端 和 插件 编译和打包
- package.json
umi 配置文件可能就是:
export default defineConfig(
 {
  entry: './webview',
  publicPath: './',
  outputPath: './dist',
  history: {
    type: 'memory',
  },
  devServer: {
    writeToDisk: filePath => ['umi.js', 'umi.css'].some(name => filePath.endsWith(name)),
  },
  // VSCode 插件打包相关配置
  vscode: {
    entry: './src',
    // 插件依赖这个包,没有则提示安装(更多功能扩展)
    globalDeps: ['@alipay/bigfish'],
    // 全量打包
    // bundled: true,
  }
 }
)
最终插件包结构为:
- dist
  - umi.js
  - umi.css
  - index.html
- out
  - extension.js
- package.json
开发过程只需要 umi dev 可将插件端 + webview(如果有)同时编译,直接 VSCode 调试即可,支持热更新(待验证)
有兴趣的同学可以勾搭一起讨论,欢迎联系 [email protected] ~
Recommend
About Joyk
Aggregate valuable and interesting links.
Joyk means Joy of geeK