

Angular Authentication Functionality with ASP.NET Core Identity
source link: https://code-maze.com/angular-authentication-aspnet-identity/
Go to the source link to view the article. You can view the picture content, updated content and better typesetting reading experience. If the link is broken, please click the button below to view the snapshot at that time.
Angular Authentication Functionality with ASP.NET Core Identity
Posted by Marinko Spasojevic | Updated Date Dec 16, 2020 | 2

Want to build great APIs? Or become even better at it? Check our program Ultimate ASP.NET Core 3 Web API and learn how to create a full production-ready ASP.NET Core API using only the latest .NET technologies. Bonus materials included!
For complete navigation through the entire series, you can visit the Angular with ASP.NET Core Identity page.
So, let’s look at the topics for this article:
Let’ get going.
Integrating JWT in the Web API Project
We are going to use tokens to transfer information to the client-side application and back to the server-side. So for that, we have to integrate JWT in our Web API application.
We won’t dive deep into the JWT explanations because we have detailed articles related to that topic (Jwt Authentication Part1, Part2, Part3). So, if you want to read more about JWT, feel free to read them.
That said, let’s start by installing the Microsoft.AspNetCore.Authentication.JwtBearer library in the main project:

After the installation, we are going to add the configuration parameters in the appsettings.json file:
{
  "Logging": {
    "LogLevel": {
      "Default": "Information",
      "Microsoft": "Warning",
      "Microsoft.Hosting.Lifetime": "Information"
    }
  },
  "ConnectionStrings": {
    "sqlConnection": "server=.; database=CompanyEmployees; Integrated Security=true"
  },
  "JWTSettings": {
    "securityKey": "CodeMazeSecretKey",
    "validIssuer": "CodeMazeAPI",
    "validAudience": "https://localhost:5011",
    "expiryInMinutes": 5
  },
  "AllowedHosts": "*"
}
Then, let’s modify the ConfigureServices method and register the JWT authentication right below the AddEntityFrameworkStores<RepositoryContext>() method:
var jwtSettings = Configuration.GetSection("JwtSettings");
services.AddAuthentication(opt =>
{
    opt.DefaultAuthenticateScheme = JwtBearerDefaults.AuthenticationScheme;
    opt.DefaultChallengeScheme = JwtBearerDefaults.AuthenticationScheme;
}).AddJwtBearer(options =>
{
    options.TokenValidationParameters = new TokenValidationParameters
    {
        ValidateIssuer = true,
        ValidateAudience = true,
        ValidateLifetime = true,
        ValidateIssuerSigningKey = true,

        ValidIssuer = jwtSettings.GetSection("validIssuer").Value,
        ValidAudience = jwtSettings.GetSection("validAudience").Value,
        IssuerSigningKey = new SymmetricSecurityKey(Encoding.UTF8.GetBytes(jwtSettings.GetSection("securityKey").Value))
    };
});
Also, we have to modify the Configure method, to add Authentication and Authorization to the request pipeline:
app.UseRouting();

app.UseAuthentication();
app.UseAuthorization();
Lastly, let’s protect the CompaniesController from unauthorized access:
[Route("api/companies")]
[Authorize]
[ApiController]
public class CompaniesController : ControllerBase
That’s all we need.
We can move on to the Login implementation.
Web API’s Login Implementation
Before we start working on the Angular authentication functionality, we need to have a server-side logic to handle the authentication request.
That said, let’s start with two DTO classes inside the Entities/DTO folder:
public class UserForAuthenticationDto
{
    [Required(ErrorMessage = "Email is required.")]
    public string Email { get; set; }
    [Required(ErrorMessage = "Password is required.")]
    public string Password { get; set; }
}

public class AuthResponseDto
{
    public bool IsAuthSuccessful { get; set; }
    public string ErrorMessage { get; set; }
    public string Token { get; set; }
}
Now, in the main project, we are going to create a new JwtFeatures folder and inside a new JwtHandler class:
public class JwtHandler
{
    private readonly IConfiguration _configuration;
    private readonly IConfigurationSection _jwtSettings;

    public JwtHandler(IConfiguration configuration)
    {
        _configuration = configuration;
        _jwtSettings = _configuration.GetSection("JwtSettings");
    }

    public SigningCredentials GetSigningCredentials()
    {
        var key = Encoding.UTF8.GetBytes(_jwtSettings.GetSection("securityKey").Value);
        var secret = new SymmetricSecurityKey(key);

        return new SigningCredentials(secret, SecurityAlgorithms.HmacSha256);
    }

    public List<Claim> GetClaims(IdentityUser user)
    {
        var claims = new List<Claim>
        {
            new Claim(ClaimTypes.Name, user.Email)
        };

        return claims;
    }

    public JwtSecurityToken GenerateTokenOptions(SigningCredentials signingCredentials, List<Claim> claims)
    {
        var tokenOptions = new JwtSecurityToken(
            issuer: _jwtSettings.GetSection("validIssuer").Value,
            audience: _jwtSettings.GetSection("validAudience").Value,
            claims: claims,
            expires: DateTime.Now.AddMinutes(Convert.ToDouble(_jwtSettings.GetSection("expiryInMinutes").Value)),
            signingCredentials: signingCredentials);

        return tokenOptions;
    }
}
In this class, we create several methods to help us with the authentication process. We fetch the SigningCredentials, the list of claims, and create a JwtSecurityToken. Again all of these are explained in our Jwt with ASP.NET Core article.
Now, we can register this class in the ConfigureServices method:
services.AddScoped<JwtHandler>();
After that, we can inject this service inside the AccountsController:
private readonly UserManager<User> _userManager;
private readonly IMapper _mapper;
private readonly JwtHandler _jwtHandler;

public AccountsController(UserManager<User> userManager, IMapper mapper, JwtHandler jwtHandler)
{
    _userManager = userManager;
    _mapper = mapper;
    _jwtHandler = jwtHandler;
}
And we can add the Login action to the same controller:
[HttpPost("Login")]
public async Task<IActionResult> Login([FromBody] UserForAuthenticationDto userForAuthentication)
{
    var user = await _userManager.FindByNameAsync(userForAuthentication.Email);

    if (user == null || !await _userManager.CheckPasswordAsync(user, userForAuthentication.Password))
        return Unauthorized(new AuthResponseDto { ErrorMessage = "Invalid Authentication" });

    var signingCredentials = _jwtHandler.GetSigningCredentials();
    var claims = _jwtHandler.GetClaims(user);
    var tokenOptions = _jwtHandler.GenerateTokenOptions(signingCredentials, claims);
    var token = new JwtSecurityTokenHandler().WriteToken(tokenOptions);

    return Ok(new AuthResponseDto { IsAuthSuccessful = true, Token = token });
}
With the help of UserManager, we fetch the user by calling the FindByNameAsync method. If the user doesn’t exist, we return an unauthorized response. Otherwise, we use our JwtHandler class to get all the information we require, create a token, and return it as a part of our response.
Now, we can test this functionality:
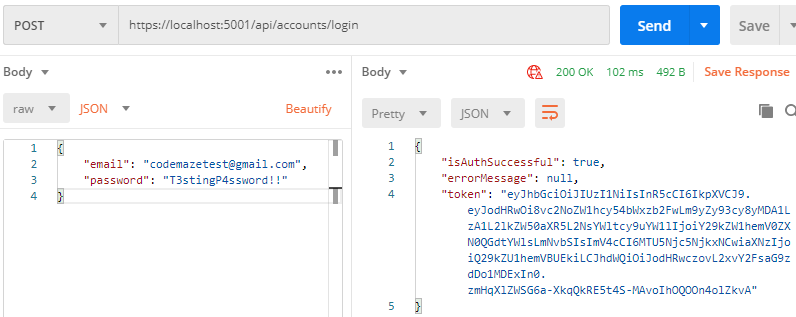
With this out of the way, we can move on to the Angular authentication functionality.
Angular Authentication Functionality – Creating the Login Action
Let’s start with the interface creation.
In the _interfaces/user folder, we are going to create the userForAuthenticationDto interface:
export interface UserForAuthenticationDto {
    email: string;
    password: string;
}
We need one more interface under the _interfaces/response folder:
export interface AuthResponseDto {
    isAuthSuccessful: boolean;
    errorMessage: string;
    token: string;
}
After this, we have to modify the authentication.service.ts file by adding a new loginUser function:
public loginUser = (route: string, body: UserForAuthenticationDto) => {
  return this._http.post(this.createCompleteRoute(route, this._envUrl.urlAddress), body);
}
Now, we are going to create the Login component files:
ng g c authentication/login --skipTests
Before we move on with the Login component implementation, let’s add the route to this component inside the authentication.module.ts file:
RouterModule.forChild([
  { path: 'register', component: RegisterUserComponent },
  { path: 'login', component: LoginComponent }
])
Excellent.
We are ready to modify the login.component.ts file:
import { UserForAuthenticationDto } from './../../_interfaces/user/userForAuthenticationDto.model';
import { Router, ActivatedRoute } from '@angular/router';
import { AuthenticationService } from './../../shared/services/authentication.service';
import { Component, OnInit } from '@angular/core';
import { FormGroup, FormControl, Validators } from '@angular/forms';

@Component({
  selector: 'app-login',
  templateUrl: './login.component.html',
  styleUrls: ['./login.component.css']
})
export class LoginComponent implements OnInit {
  public loginForm: FormGroup;
  public errorMessage: string = '';
  public showError: boolean;
  private _returnUrl: string;

  constructor(private _authService: AuthenticationService, private _router: Router, private _route: ActivatedRoute) { }

  ngOnInit(): void {
    this.loginForm = new FormGroup({
      username: new FormControl("", [Validators.required]),
      password: new FormControl("", [Validators.required])
    })

    this._returnUrl = this._route.snapshot.queryParams['returnUrl'] || '/';
  }

  public validateControl = (controlName: string) => {
    return this.loginForm.controls[controlName].invalid && this.loginForm.controls[controlName].touched
  }

  public hasError = (controlName: string, errorName: string) => {
    return this.loginForm.controls[controlName].hasError(errorName)
  }

  public loginUser = (loginFormValue) => {
    this.showError = false;
    const login = {... loginFormValue };
    const userForAuth: UserForAuthenticationDto = {
      email: login.username,
      password: login.password
    }

    this._authService.loginUser('api/accounts/login', userForAuth)
    .subscribe(res => {
       localStorage.setItem("token", res.token);
       this._router.navigate([this._returnUrl]);
    },
    (error) => {
      this.errorMessage = error;
      this.showError = true;
    })
  }

}
Here, we create the FormGroup object populated with both controls. Also, we create the _returnUrl parameter to navigate the user to the requested location once they log in successfully. The validateControl and hasError functions are familiar ones. Since these two functions repeat in both the register and login components, you can extract them to a separate class. For the sake of simplicity, we are going to leave this implementation as-is.
In the loginUser function, we extract the value from the Login form and send the request to the API. If it is successful, we store the token in the local storage and redirect the user. Otherwise, we just show the error message.
Of course, we have to modify the login.component.html file:
<div class="card">
    <div class="card-body">
        <h1 class="card-title">Login</h1>

        <div *ngIf="showError" class="alert alert-danger" role="alert">
            {{errorMessage}}
        </div>

        <form [formGroup]="loginForm" autocomplete="off" novalidate (ngSubmit)="loginUser(loginForm.value)">
            <div class="form-group row">
                <label for="username" class="col-form-label col-sm-2">Username:</label>
                <div class="col-md-5">
                    <input type="text" id="username" formControlName="username" class="form-control" />
                </div>
                <div class="col-md-5">
                    <em *ngIf="validateControl('username') && hasError('username', 'required')">Username is required</em>
                </div>
            </div>
            <div class="form-group row">
                <label for="password" class="col-form-label col-sm-2">Password:</label>
                <div class="col-md-5">
                    <input type="password" id="password" formControlName="password" class="form-control" />
                </div>
                <div class="col-md-5">
                    <em *ngIf="validateControl('password') && hasError('password', 'required')">Password is required</em>
                </div>
            </div>
            <br>
            <div class="form-group row">
                <div class="col-md-1">
                    <button type="submit" class="btn btn-info" [disabled]="!loginForm.valid">Login</button>
                </div>
            </div>
        </form>
    </div>
</div>
This is a familiar code, with two controls and the Login button.
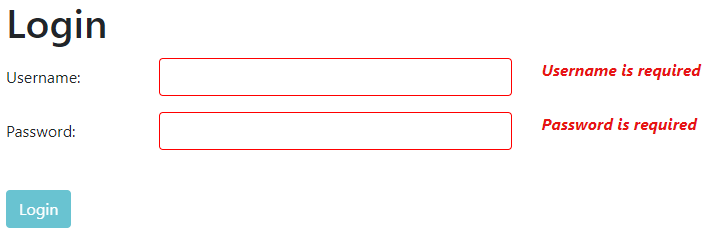
Testing the Login Functionality
Let’s start the API and the Angular application. Then, we have to navigate to the http://localhost:4200/authentication/login because we don’t have the login link yet:

If we try to leave these controls empty, we are going to see validation messages:
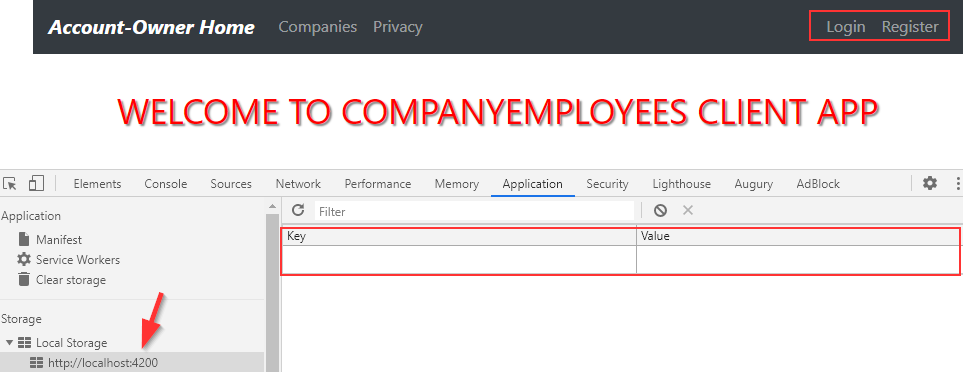
But, if we enter valid credentials, the application navigates us to the Home page with the token stored in the Local Storage:
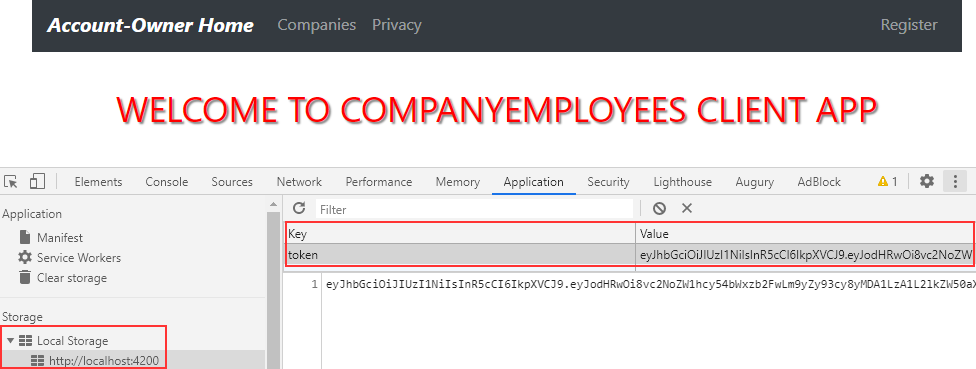
Excellent.
The login action works, but we still have tasks to complete.
Modifying Menu After the Angular Authentication State Changes
Right now, we only have the Register link displayed on the navigation menu. But what we want is to display the Login and Register buttons if the user is not authenticated and otherwise to display the Logout button.
To do that, we are going to start with authentication.service.ts file modification.
First, let’s create an observable to notify all the subscribed components about the Angular authentication state change:
...
import { Subject } from 'rxjs';
@Injectable({
  providedIn: 'root'
})
export class AuthenticationService {
  private _authChangeSub = new Subject<boolean>()
  public authChanged = this._authChangeSub.asObservable();

  constructor(private _http: HttpClient, private _envUrl: EnvironmentUrlService) { }
  ...
  public sendAuthStateChangeNotification = (isAuthenticated: boolean) => {
    this._authChangeSub.next(isAuthenticated);
  }
  private createCompleteRoute = (route: string, envAddress: string) => {
    return `${envAddress}/${route}`;
  }
}
With this in place, we can modify the loginUser function:
this._authService.loginUser('api/accounts/login', userForAuth)
.subscribe(res => {
   localStorage.setItem("token", res.token);
   this._authService.sendAuthStateChangeNotification(res.isAuthSuccessful);
   this._router.navigate([this._returnUrl]);
},
Here, we send the notification to the subscribed components.
Now, let’s continue with the menu.component.ts modification:
import { AuthenticationService } from './../shared/services/authentication.service';
import { Component, OnInit } from '@angular/core';

@Component({
  selector: 'app-menu',
  templateUrl: './menu.component.html',
  styleUrls: ['./menu.component.css']
})
export class MenuComponent implements OnInit {
  public isUserAuthenticated: boolean;

  constructor(private _authService: AuthenticationService) { }

  ngOnInit(): void {
    this._authService.authChanged
    .subscribe(res => {
      this.isUserAuthenticated = res;
    })
  }

}
We inject the Authentication service and subscribe to the observable notification sent from that service.
Now, we can modify the menu.component.html file:
<form class="form-inline my-2 my-lg-0">
  <ul *ngIf='!isUserAuthenticated' class="navbar-nav mr-auto mt-2 mt-lg-0">
    <li class="nav-item">
      <a class="nav-link"[routerLink]="['/authentication/login']" routerLinkActive="active"
        [routerLinkActiveOptions]="{exact: true}">Login</a>
    </li>
    <li class="nav-item">
      <a class="nav-link"[routerLink]="['/authentication/register']" routerLinkActive="active"
        [routerLinkActiveOptions]="{exact: true}">Register</a>
    </li>
  </ul>
  <ul *ngIf='isUserAuthenticated' class="navbar-nav mr-auto mt-2 mt-lg-0">
    <li class="nav-item">
      <button class="btn btn-link" style="color: #ffffff80;">Logout</button>
    </li>
  </ul>
</form>
And that’s it.
If we log in successfully, we are going to see the Logout button for sure:

Great job.
Modifying Registration Logic
Since we have the Login component in place, we don’t have to log the success message after successful registration, we can navigate to the Login page.
All we have to do is to inject the Router class in the register-user.component.ts file:
constructor(private _authService: AuthenticationService, private _passConfValidator: PasswordConfirmationValidatorService,
    private _router: Router) { }
And to modify the subscribe part of the registerUser function:
this._router.navigate(["/authentication/login"]);
As you can see, it doesn’t get easier than that.
We can move on to the Logout implementation.
Angular Authentication Functionality – Implementing the Logout Action
To implement the Logout action in our Angular application, we have to add a new function in the Authentication service:
public logout = () => {
  localStorage.removeItem("token");
  this.sendAuthStateChangeNotification(false);
}
Here, we just remove the token from the storage and send authentication change notification to the subscribed components (in this case only the menu component).
That said, we are going to modify the menu.component.ts file:
constructor(private _authService: AuthenticationService, private _router: Router) { }

ngOnInit(): void {
  this._authService.authChanged
  .subscribe(res => {
    this.isUserAuthenticated = res;
  })
}

public logout = () => {
  this._authService.logout();
  this._router.navigate(["/"]);
}
And finally, we have to modify the HTML file:
<ul *ngIf='isUserAuthenticated' class="navbar-nav mr-auto mt-2 mt-lg-0">
  <li class="nav-item">
    <button class="btn btn-link" style="color: #ffffff80;" (click)="logout()">Logout</button>
  </li>
</ul>
That’s it.
Now, as soon as we click the Logout link, the token will be removed from the storage, the Logout link will disappear and our application will redirect the user to the Home page:
Let’s move on.
Handling Angular Authentication Errors
We have working Login and Logout actions prepared for the Angular Authentication process, but there are still missing pieces. One of those is error handling and showing an error message on the Login page.
We are going to handle the rest of the missing pieces in the next article (Roles, Guards, Refresh app state…).
If we try to log in with invalid credentials, we are going to see a red empty square on the page:
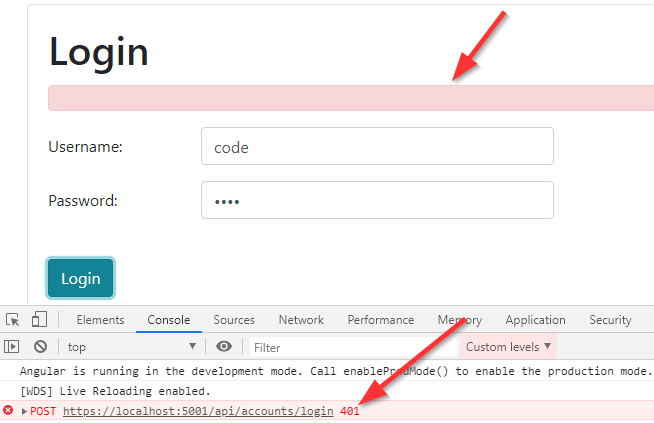
Right away, we can see why the error message is not displayed on the page. It’s because we only handle the 404 and 400 errors, and this error is 401 – Unauthorized.
To fix this, we have to modify the error-handler.service.ts file:
private handleError = (error: HttpErrorResponse) : string => {
  if(error.status === 404) {
    return this.handleNotFound(error);
  }
  else if(error.status === 400) {
    return this.handleBadRequest(error);
  }
  else if(error.status === 401) {
    return this.handleUnauthorized(error);
  }
}

private handleUnauthorized = (error: HttpErrorResponse) => {
  if(this._router.url === '/authentication/login') {
    return 'Authentication failed. Wrong Username or Password';
  }
  else {
    this._router.navigate(['/authentication/login']);
    return error.message;
  }
}
If our service intercepts the response with the 401 error message, it will check whether we are already on the Login page or not. If we are on the Login page, we just return the error message. Otherwise, we redirect the user to the Login page.
Now if we test this:
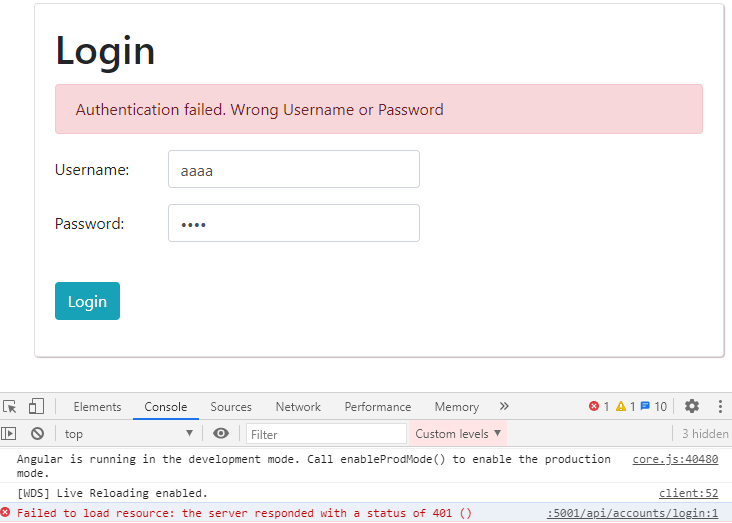
We can see the error message in place.
Nicely done.
Conclusion
We could say that we have everything in place regarding the Login and Logout actions and partially we would be right. We have implemented a lot of actions in this article but there are still things that need to be covered.
So, in the next article, we are going to learn how to work with Roles, how to protect our routes with Guards, and also how to preserve Angular Authentication state upon the application refresh.
As you can see a lot more to work with.
That said, see you in the next article.
Want to build great APIs? Or become even better at it? Check our program Ultimate ASP.NET Core 3 Web API and learn how to create a full production-ready ASP.NET Core API using only the latest .NET technologies. Bonus materials included!
Recommend
About Joyk
Aggregate valuable and interesting links.
Joyk means Joy of geeK