

Vue.js User Authentication and the new Azure SDKs
source link: https://devblogs.microsoft.com/azure-sdk/vue-js-user-authentication/?WT_mc_id=DOP-MVP-4025064
Go to the source link to view the article. You can view the picture content, updated content and better typesetting reading experience. If the link is broken, please click the button below to view the snapshot at that time.
Vue.js User Authentication and the new Azure SDKs

Christos
December 14th, 2020
Working with Vue.js and the Azure SDKs
The new Azure SDKs are available for the most popular languages to enable developers to quickly and efficiently build apps that consume Azure services. To interact with Azure resources securely, the Azure SDK includes a library called Azure.Identity that handles the authentication and token management for the users. However, there are scenarios where you may want to use an already authenticated user and existing tokens to pass to the Azure SDK instead of requiring the user to authenticate twice.
In this blog, we’ll examine how to build a Vue.js (Single Page app) that uses the new Azure SDKs to communicate securely with Azure Storage to retrieve a list of containers. We will be using MSAL.js, the Microsoft Authentication Library to authenticate users to Azure AD and then acquire access tokens. We will be passing these tokens to the Azure Storage clientby creating a custom token provider tailored to our needs.
Prerequisites
You’ll need to have the following available:
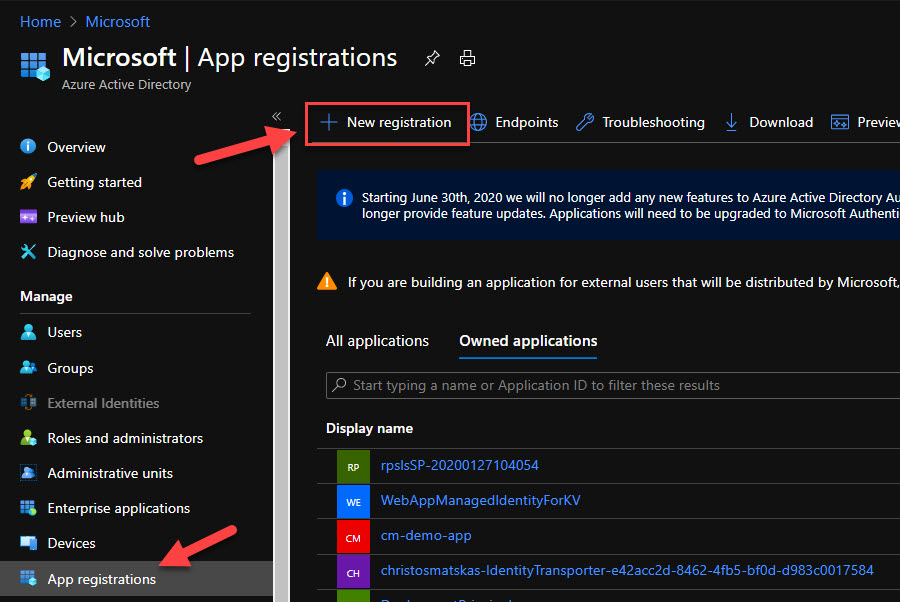
Create the Azure AD App Registration
To be able to authenticate users and acquire access tokens to work with Azure resources, we need an Azure AD app registration. In the Azure Portal, navigate to your Azure AD tenant and select the App Registrations blade to create a new app registration:
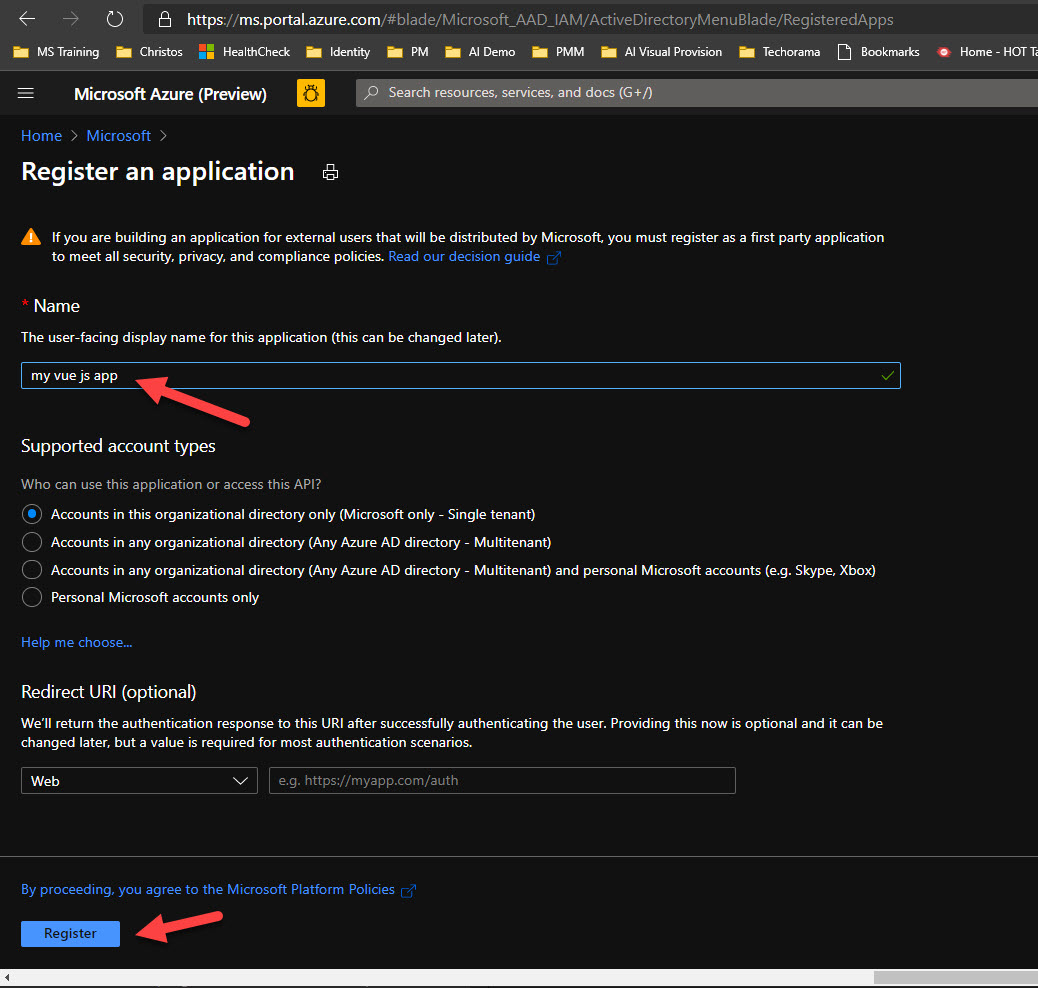
Type a meaningful name for the app registration and click the Register button
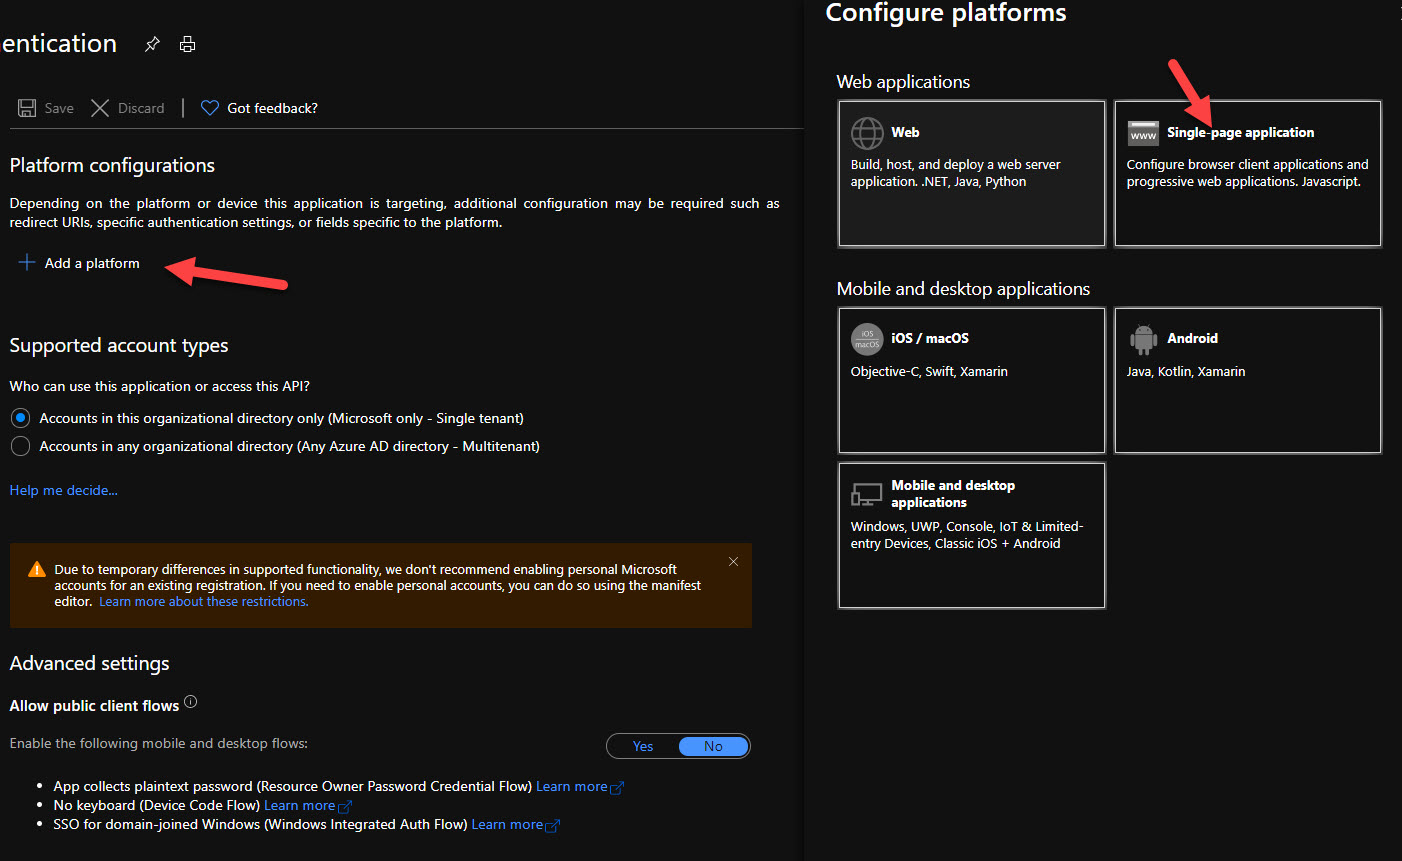
Next, we need to add an authentication platform. This instructs Azure AD about what kind of app we will be using to authenticate our users. In this instance, since we will be working with Vue.js, we should select Single Page App.
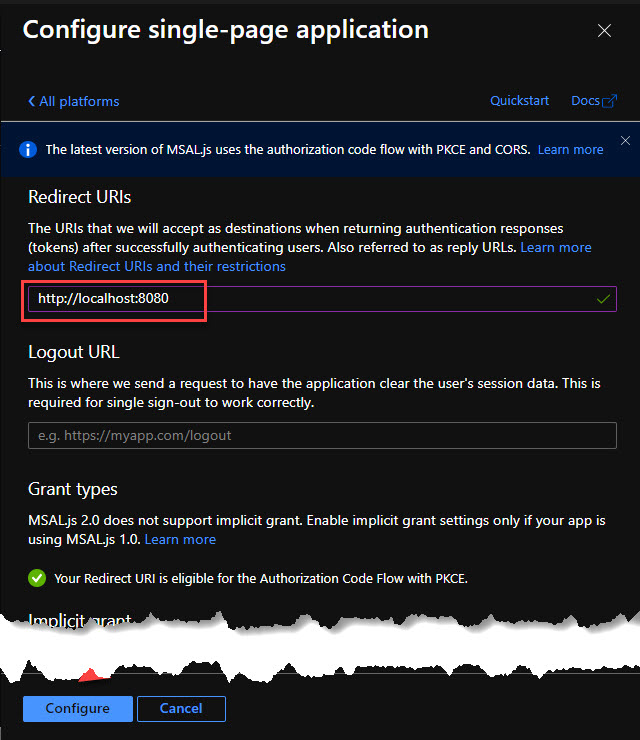
On the next step, we need to provide the Redirect URI and make sure to press Configure at the end to persist the changes.
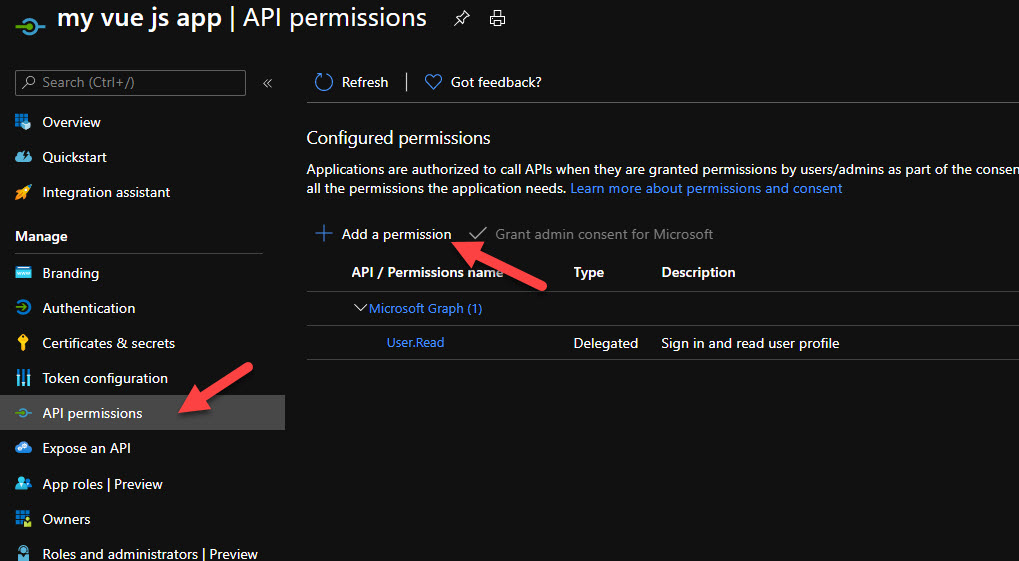
The final step is to configure the app registration to allow authenticated users to acquire tokens the Azure Storage Account. Open the API Permissions blade and click on the Add a permission button.
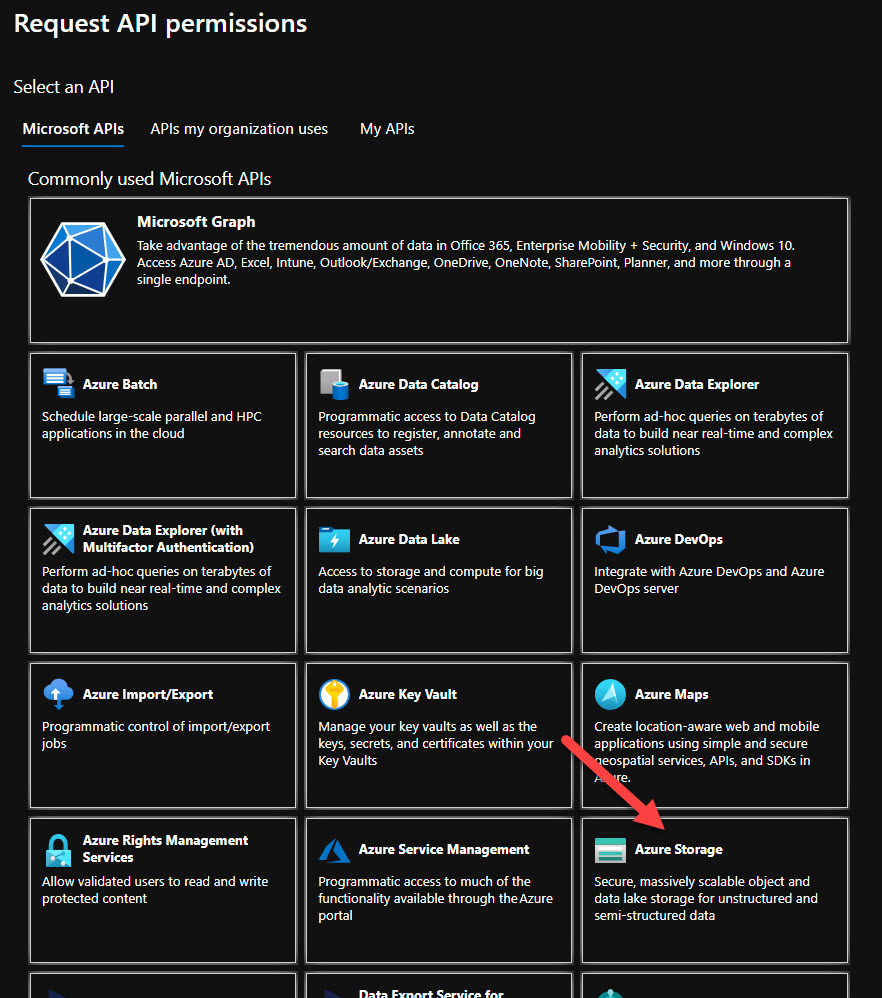
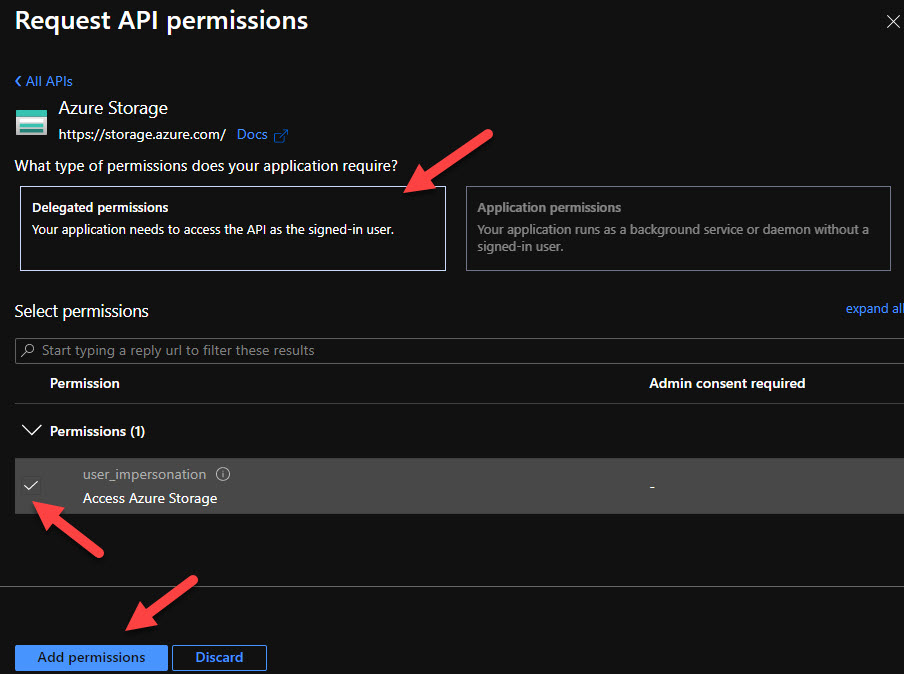
In the Request API Permissions, select Azure Storage from the Delegated permissions and select the default permission, i.e user_impersonation before clicking Add permissions
This is all we need to configure the app registration in Azure AD. Next, we will code our Vue.js app to authenticate users.
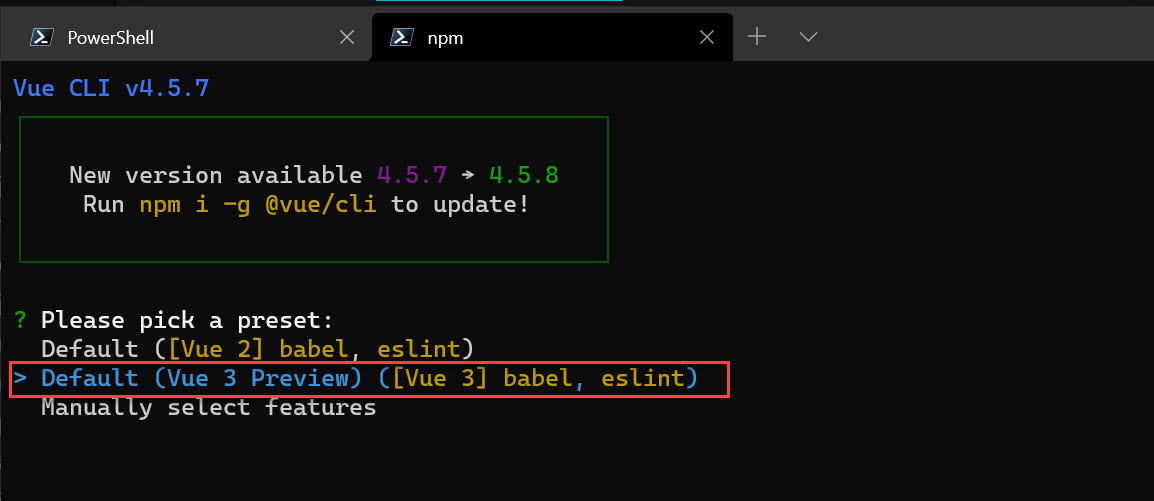
Create the Vue.js project
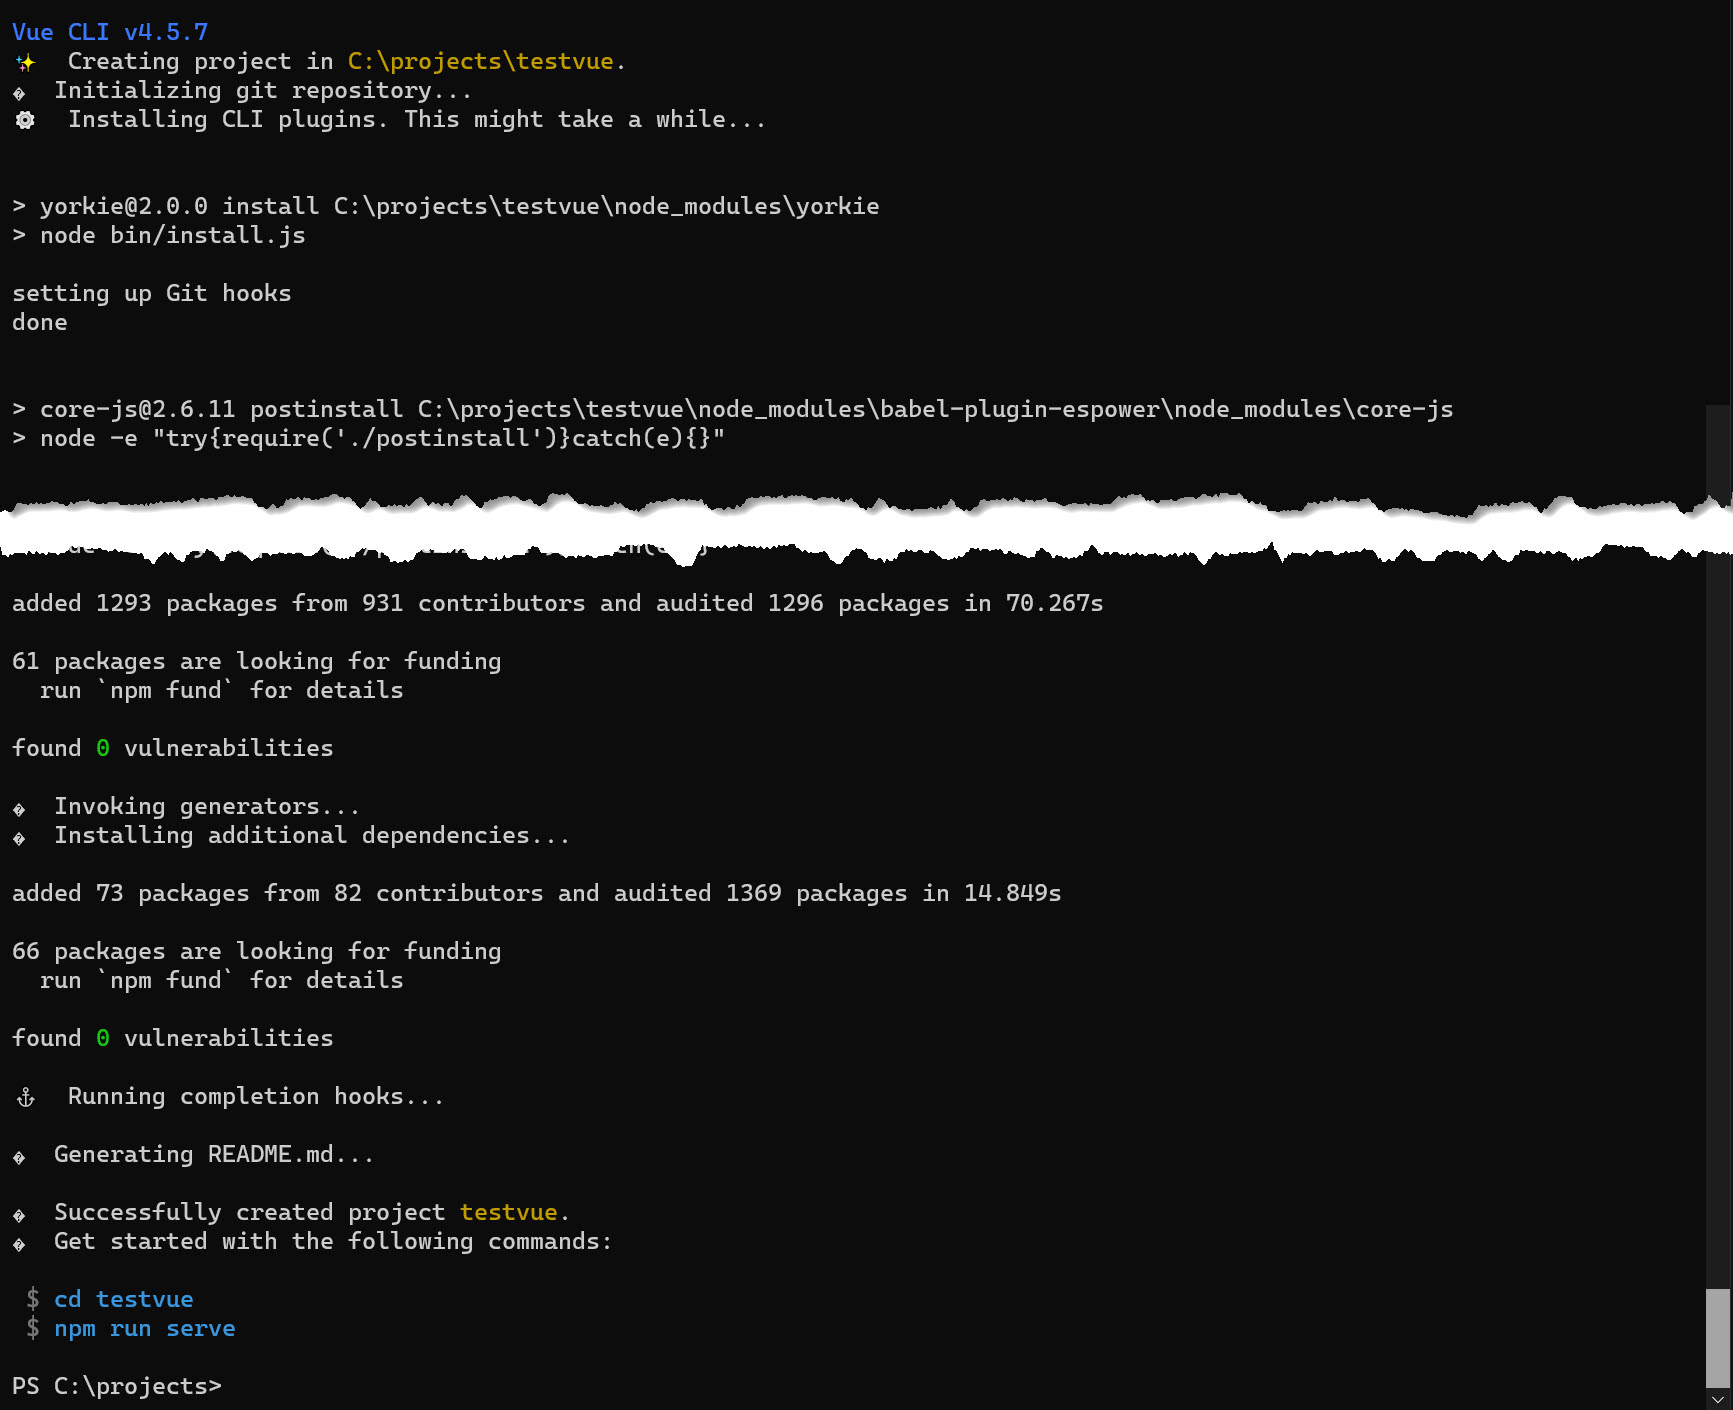
We will be using the Vue CLI to create a standard Hello World project that we will be extending with authentication. Open your favorite command-line tool and run the following command:
vue create <YourProjectName>Choose the defaults settings for Vue 3 and hit Enter
This should create our application code and download the npm packages. At this point we can use npm run serve to run our application and test that everything is in order.
Implement authentication with MSAL.js 2.0
To be able to authenticate against Azure AD, we need to use a library. You can use any OIDC/OAuth2 compliant library but to make things easier, we also have MSAL.js. MSAL.js is Microsoft’s official authentication library for Azure AD and B2C. With version 2.0 we eliminated the need to use implicit flow for logging in users in SPAs, which means that we don’t need to use a client secret in our app, making our solution much more secure. We will use msal-browser in order to implement our authentication code and add the ability to acquire tokens.
Open the package.json file and update the dependencies as per the code below:
"dependencies": {
    "@azure/core-http": "1.1.8",
    "@azure/msal-browser": "^2.3.1",
    "@azure/storage-blob": "12.2.1",
    "@fortawesome/fontawesome-svg-core": "^1.2.18",
    "@fortawesome/free-solid-svg-icons": "^5.8.2",
    "@fortawesome/vue-fontawesome": "^0.1.6",
    "bulma": "^0.7.5",
    "core-js": "^3.6.5",
    "tiny-emitter": "^2.1.0",
    "vue": "^3.0.2",
    "vuex": "^4.0.0-beta.4"
  },
  "devDependencies": {
    "@vue/cli-plugin-babel": "~4.5.0",
    "@vue/cli-plugin-eslint": "~4.5.0",
    "@vue/cli-service": "~4.5.0",
    "@vue/compiler-sfc": "^3.0.0",
    "babel-eslint": "^10.1.0",
    "eslint": "^6.7.2",
    "eslint-plugin-vue": "^7.0.0-0",
    "node-sass": "^4.9.0",
    "sass-loader": "^10.0.3"
  },
Some of these packages are used for other reasons such as linting, compling CSS, messaging etc. I will skip explaining these for now and focus on the following:
- azure/core-http -> needed by the Azure storage sdk
- azure/msal-browser -> the authentication and token management library
- azure/storage-blob -> the Azure SDK library for working with blobs and containers in Azure Storage
- tiny-emitter -> messaging library (Vue 3 doesn’t have built in messaging)
- vuex -> used for a global store to manage state
Open main.js and add the following code:
import { createApp } from 'vue';
import App from './App.vue';
import Emitter from 'tiny-emitter';
import store from './store';

const app = createApp(App);
app.config.globalProperties.$msalInstance = {};
app.config.globalProperties.$emitter = new Emitter();

app.use(store).mount('#app');
Create a new folder called store and add an index.js file. Update the index.js file with the following code:
import { createStore } from 'vuex';

const store = createStore({
  state() {
    return {
      msalConfig: {
        auth: {
          clientId: '5def4d67-7693-4a08-a71f-f3ff47182412',
          authority:
            'https://login.microsoftonline.com/e801a3ad-3690-4aa0-a142-1d77cb360b07',
        },
        cache: {
          cacheLocation: 'localStorage',
        },
      },
      accessToken: ''
    };
  },
  mutations :{
    setAccessToken(state, token){
      state.accessToken = token;
    }
  }
});

export default store;
This code contains the settings necessary for MSAL to be able to communicate with Azure AD and a property for storing the accessToken which will be used later to access our Azure Storage account.
To implement the code the performs the user authentication, we will use one of the header component so that when the user is signed in, we can display their name, as well as a Sign out button.
The overall header consists of 3 Vue components:
- header-bar-brand.vue (contains the title and the burger menu button)
- header-bar-links.vue (contains the links and sign in/sign out buttons)
- header-bar.vue (wraps the two previous components)
The important component is the header-bar-link.vue where we will implement the code for signing in using MSAL. The script tag should look like this:
<script>
import { PublicClientApplication } from '@azure/msal-browser';

export default {
  name: 'HeaderBar',
  data() {
    return {
      account: undefined,
      github: 'https://github.com/cmatskas',
      twitter: 'https://twitter.com/christosmatskas',
      signin: 'https://microsoft.com',
    };
  },
  async created() {
    this.$msalInstance = new PublicClientApplication(
      this.$store.state.msalConfig,
    );
  },
  mounted() {
    const accounts = this.$msalInstance.getAllAccounts();
    if (accounts.length == 0) {
      return;
    }
    this.account = accounts[0];
    this.$emitter.emit('login', this.account);
  },
  methods: {
    async SignIn() {
      await this.$msalInstance
        .loginPopup({})
        .then(() => {
          const myAccounts = this.$msalInstance.getAllAccounts();
          this.account = myAccounts[0];
          this.$emitter.emit('login', this.account);
        })
        .catch(error => {
          console.error(`error during authentication: ${error}`);
        });
    },
    async SignOut() {
      await this.$msalInstance
        .logout({})
        .then(() => {
          this.$emitter.emit('logout', 'logging out');
        })
        .catch(error => {
          console.error(error);
        });
    },
  },
};
</script>
The final piece, to complete the sign in/signout process is to update our main HelloWorld.vue component. For now, the code will respond to sign in and sign out events and update the UI accordingly. Later we will the necessary code to pull the Azure Storage blobs.
Open the HelloWorld.vue component and add the following code:
<template>
  <div class="content-container">
    <div class="section content-title-group">
      <h2 class="title">Welcome to the Azure AD + Storage app with Vue.js</h2>
    </div>
    <div v-if="account">
      <div class="level">
        <div class="level-item title">
          You are logged in as {{ account.name }}
        </div>
      </div>
    </div>
    <div v-else>You need to authenticate to access your Azure Storage data</div>
  </div>
</template>
1`

<script>
import { mapMutations } from 'vuex';

export default {
  name: 'HelloWorld',
  data() {
    return {
      account: undefined,
      containers: [],
    };
  },
  created() {
    this.$emitter.on(
      'login', (account) => {
        this.account = account;
        console.log(this.account);
      }.bind(this),
    ),
    this.$emitter.on('logout', () => {
        console.log('logging out');
        this.account = undefined;
      }.bind(this)
    );
  },
  methods: {
    ...mapMutations(['setAccessToken']),

  },
};
</script>

<!-- Add "scoped" attribute to limit CSS to this component only -->
<style scoped>
h3 {
  margin: 40px 0 0;
}
ul {
  list-style-type: none;
  padding: 0;
}
li {
  display: inline-block;
  margin: 0 10px;
}
a {
  color: #42b983;
}
</style>
If we run the app now using npm run serve and navigating to localhost:8080 we should be able to sign in successfully as shown below:
Create a custom Token provider for the Azure SDK
At this point, the app can authenticate the user and acquire an ID token. The ID token verifies who the user is. To interact with Storage, though, we also need an Access token. The Access token informs the app about what the user can do (in this instance: access the blob). So far so good. There is, however, one tricky part here. The default Azure Storage client doesn’t work directly with MSAL (for now), so even though our user has already authenticated, we would need to reauthenticate them in order to interact with the Azure Storage account. This is not a particularly smooth user experience. To address this, we will build a custom Token provider to directly pass our own Access token and avoid multiple round trips to Azure AD.
At the root of the src directory, create a new file: CustomTokenProvider.js. Open the file and paste the following code:
export default class CustomTokenCredential {
  token;
  expiresOn;

  constructor(token, expiresOn) {
    this.token = token;
    if (expiresOn == undefined) {
      this.expiresOn = Date.now() + 60 * 60 * 1000;
    } else {
      this.expiresOn = expiresOn.getTime();
    }
  }

  async getToken(_scopes, _options) {
    console.log(_scopes, _options);
    return {
      token: this.token,
      expiresOnTimestamp: this.expiresOn,
    };
  }
}
The getToken is the main override as we pass directly the acquired token instead of prompting the user to authenticate again.
Note This is currently being worked on by the Azure SDK team so in the future you will not need to provide a custom Token provider and you’ll be able to work directly with MSAL
Working with Azure Storage via the Azure SDK
Our package.json already contains a dependency to the Azure Storage SDK for js: "@azure/storage-blob": "12.2.1" and the Azure AD App Registration has also been configured to acquire permission to interact with Azure Storage. This means that we have all we need to interact with our Azure Storage.
Let’s go back to the HelloWorld.vue component to update it so that we can acquire the appropriate access token and retrieve the blob data.
First, let’s update the HTML to display the Storage container information:
<template>
  <div class="content-container">
    <div class="section content-title-group">
      <h2 class="title">Welcome to the Azure AD + Storage app with Vue.js</h2>
    </div>
    <div v-if="account">
      <div class="level">
        <div class="level-item title">
          You are logged in as {{ account.name }}
        </div>
      </div>
      <div class="level">
        <div class="level-item">
          <ul>
            <li v-for="container in containers" :key="container.id">
              {{ container.name }}
            </li>
          </ul>
        </div>
      </div>
    </div>
    <div v-else>You need to authenticate to access your Azure Storage data</div>
  </div>
</template>
We are using a v-for to list the Container names.
Next, let’s update the code to acquire the access tokens and retrieve the Storage account containers:
<script>
import customTokenCredential from '../CustomTokenProvider';
import { BlobServiceClient } from '@azure/storage-blob';
import { PublicClientApplication } from '@azure/msal-browser';
import { mapMutations } from 'vuex';

const storageAccountName = 'cmatskasbackup';

export default {
  name: 'HelloWorld',
  data() {
    return {
      account: undefined,
      containers: [],
    };
  },
  async created() {
    this.$emitter.on(
      'login',
      async function (account) {
        this.account = account;
        console.log(this.account);
        console.log('Getting storage data');
        await this.getAzureStorageData();
      }.bind(this),
    ),
      this.$emitter.on('logout', () => {
        console.log('logging out');
        this.account = undefined;
      });
  },
  methods: {
    ...mapMutations(['setAccessToken']),

    async getAzureStorageData() {
      if(this.$store.state.accessToken == ''){
        await this.getAccessToken();
      }
      let tokenCredential = new customTokenCredential(this.$store.state.accessToken);
      const blobClient = new BlobServiceClient(
        `https://${storageAccountName}.blob.core.windows.net`,
        tokenCredential,
      );

      let i = 1;
      const iter = blobClient.listContainers();
      let containerItem = await iter.next();
      while (!containerItem.done) {
        console.log(`Container ${i++}: ${containerItem.value.name}`);
        this.containers.push({
          id: containerItem.value.properties.etag,
          name: containerItem.value.name,
        });
        containerItem = await iter.next();
      }
    },
    async getAccessToken(){
      let request = {
        scopes: ['https://storage.azure.com/user_impersonation'],
      };
      const msalInstance = new PublicClientApplication(
        this.$store.state.msalConfig,
      );
      try {
        let tokenResponse = await msalInstance.acquireTokenSilent(request);
        this.$store.commit('setAccessToken', tokenResponse.accessToken);
      } catch (error) {
          console.error( 'Silent token acquisition failed. Using interactive mode' );
          let tokenResponse = await msalInstance.acquireTokenPopup(request);
          console.log(`Access token acquired via interactive auth ${tokenResponse.accessToken}`)
          this.$store.commit('setAccessToken',tokenResponse.accessToken);
      }
    }
  },
};
</script>
If we rerun the app and sign in, we should be presented with a list of Azure Storage containers as per the image below:
As you can see acquire the Access token, accessing and interacting with Azure Storage is pretty straightforward. We instantiate a StorageClient and we can use the Storage API as needed.
Source Code
If you want to grab a copy of the full working solution, the whole project is on GitHub
Conclusion
I hope that this blog post provides a good guide on how to authenticate users in Vue.js using the Microsoft Identity platform as well as using the Azure SDK to interact with Azure resources.
Azure SDK Blog Contributions
Thank you for reading this Azure SDK blog post! We hope that you learned something new and welcome you to share this post. We are open to Azure SDK blog contributions. Please contact us at [email protected] with your topic and we’ll get you set up as a guest blogger.
Azure SDK Links
Christos Matskas
Senior Program Manager, CxP Microsoft Identity
Follow
Recommend
About Joyk
Aggregate valuable and interesting links.
Joyk means Joy of geeK