

谈谈surging 微服务引擎 2.0的链路跟踪和其它新增功能 - fanly11
source link: https://www.cnblogs.com/fanliang11/p/11373087.html
Go to the source link to view the article. You can view the picture content, updated content and better typesetting reading experience. If the link is broken, please click the button below to view the snapshot at that time.
一、前言
surging是基于.NET CORE 服务引擎。初始版本诞生于2017年6月份,经过NCC社区二年的孵化,2.0版本将在2019年08月28日进行发布,经历二年的发展,已经全部攘括了微服务架构的技术栈,覆盖了从服务注册、服务发现、中间件、协议主机再到链路跟踪,并且制定了一套微服务的规则,形成了一套统一的规范。以下是surging的服务引擎架构图
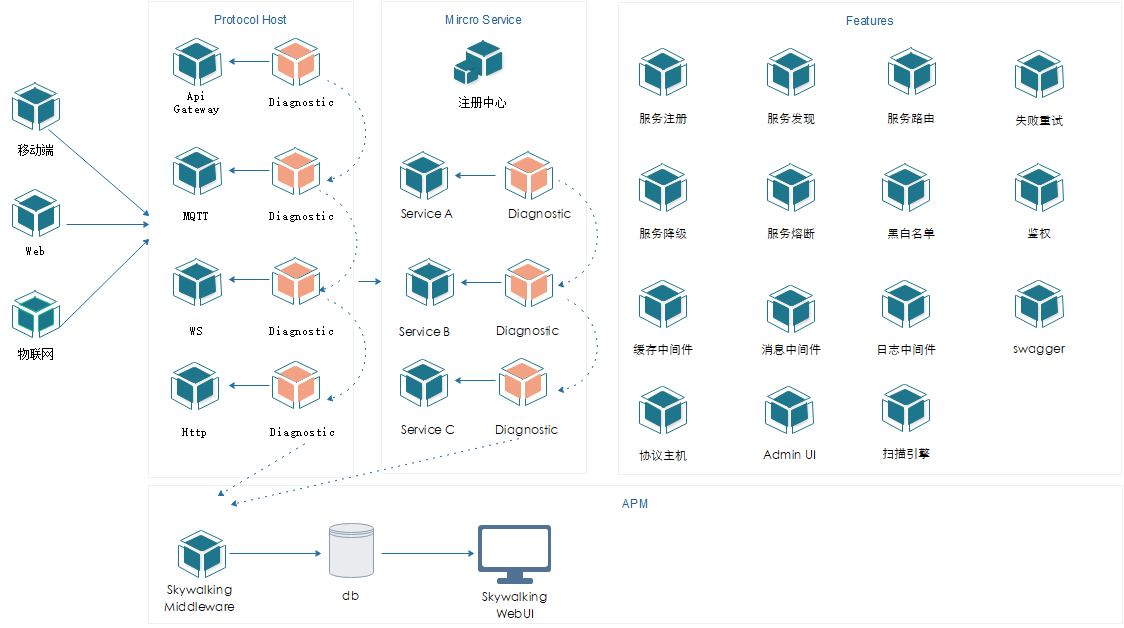
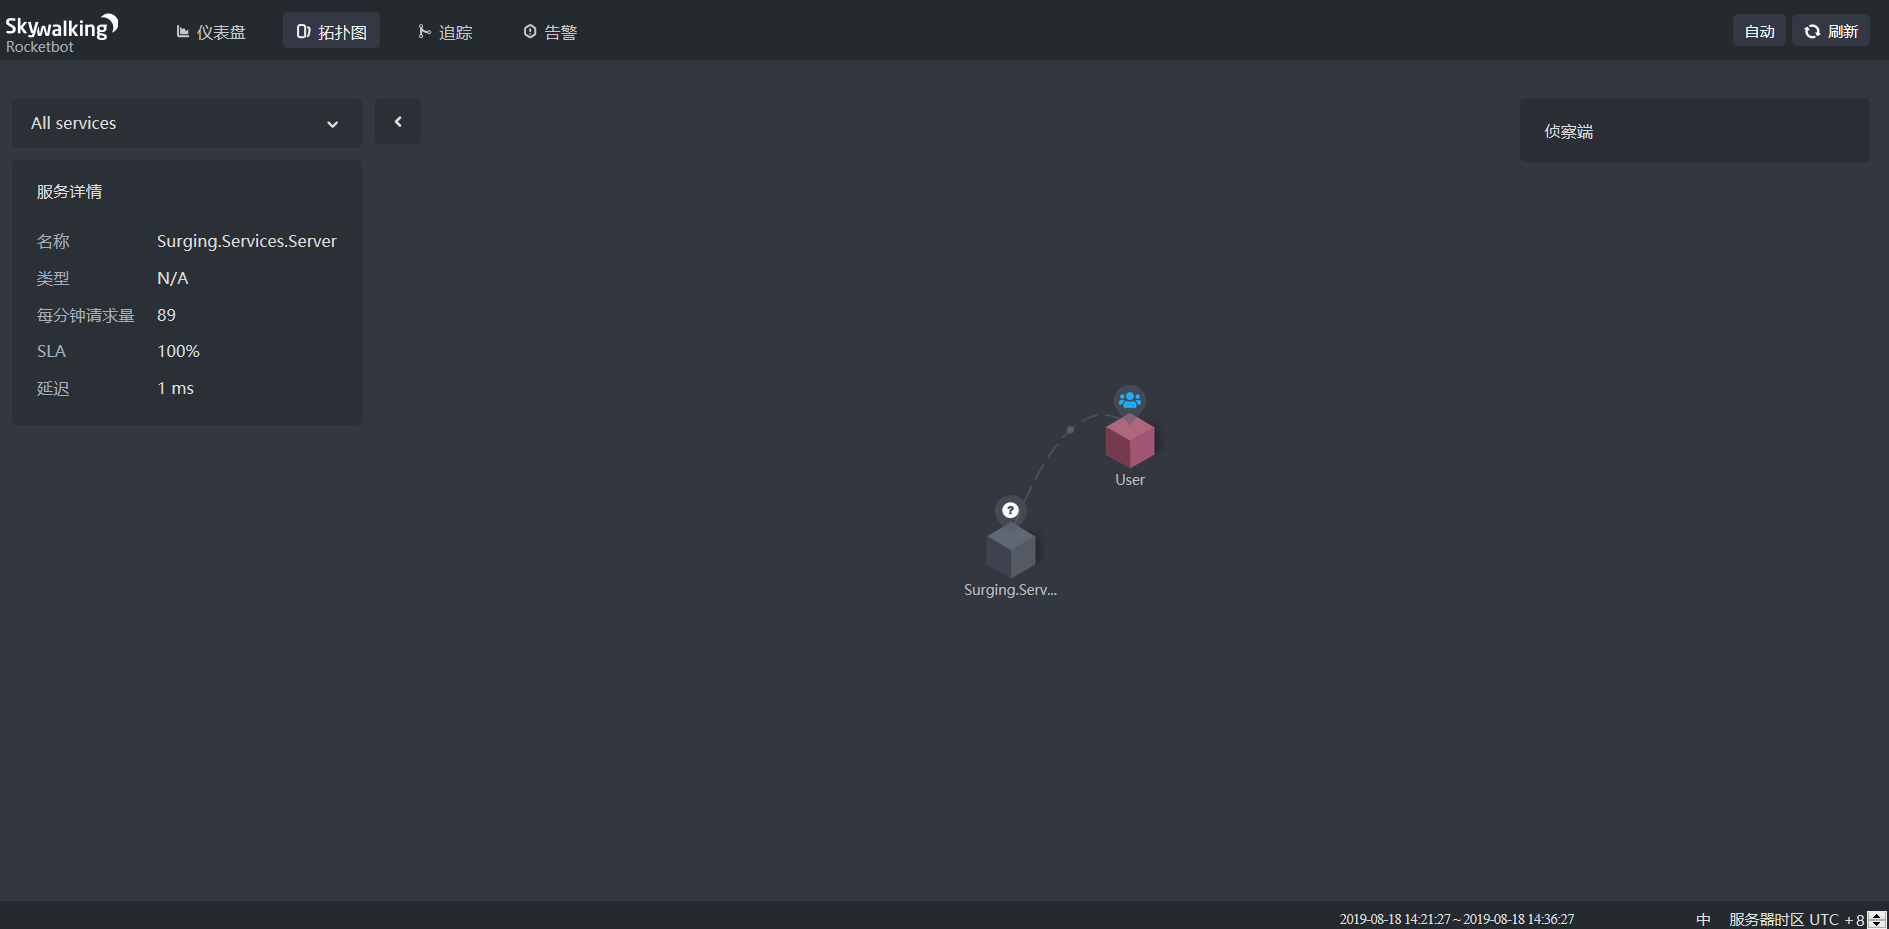
上图Diagnostic能够实现整个服务链路的各种信息采集。
比如来源地址、远程地址、报错、执行时间、调用链路、协议类型以及参数的信息采集,采集完之后通过Skywaking Middleware 中间件的Grpc 推给Skywaking,再通过Skywaking WebUI进行展示。
前面的协议是针对于移动端、Web端和物联网的解决方案。
后面是服务引擎提供的功能。
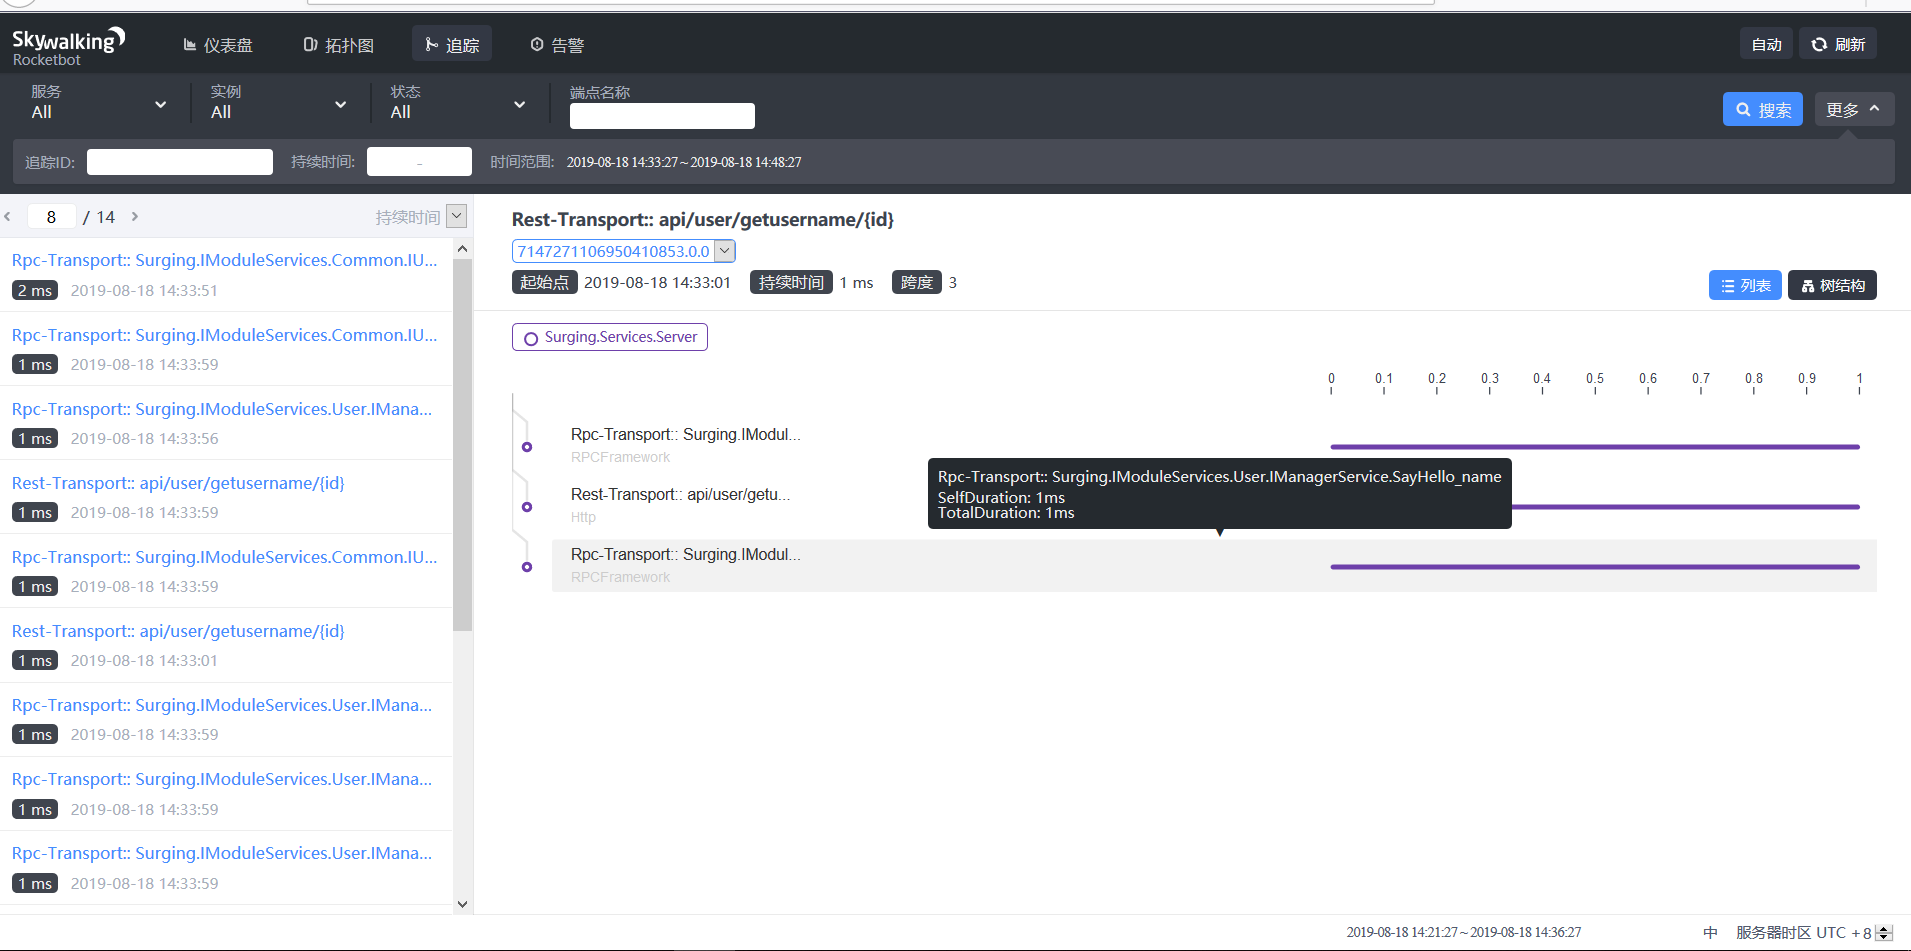
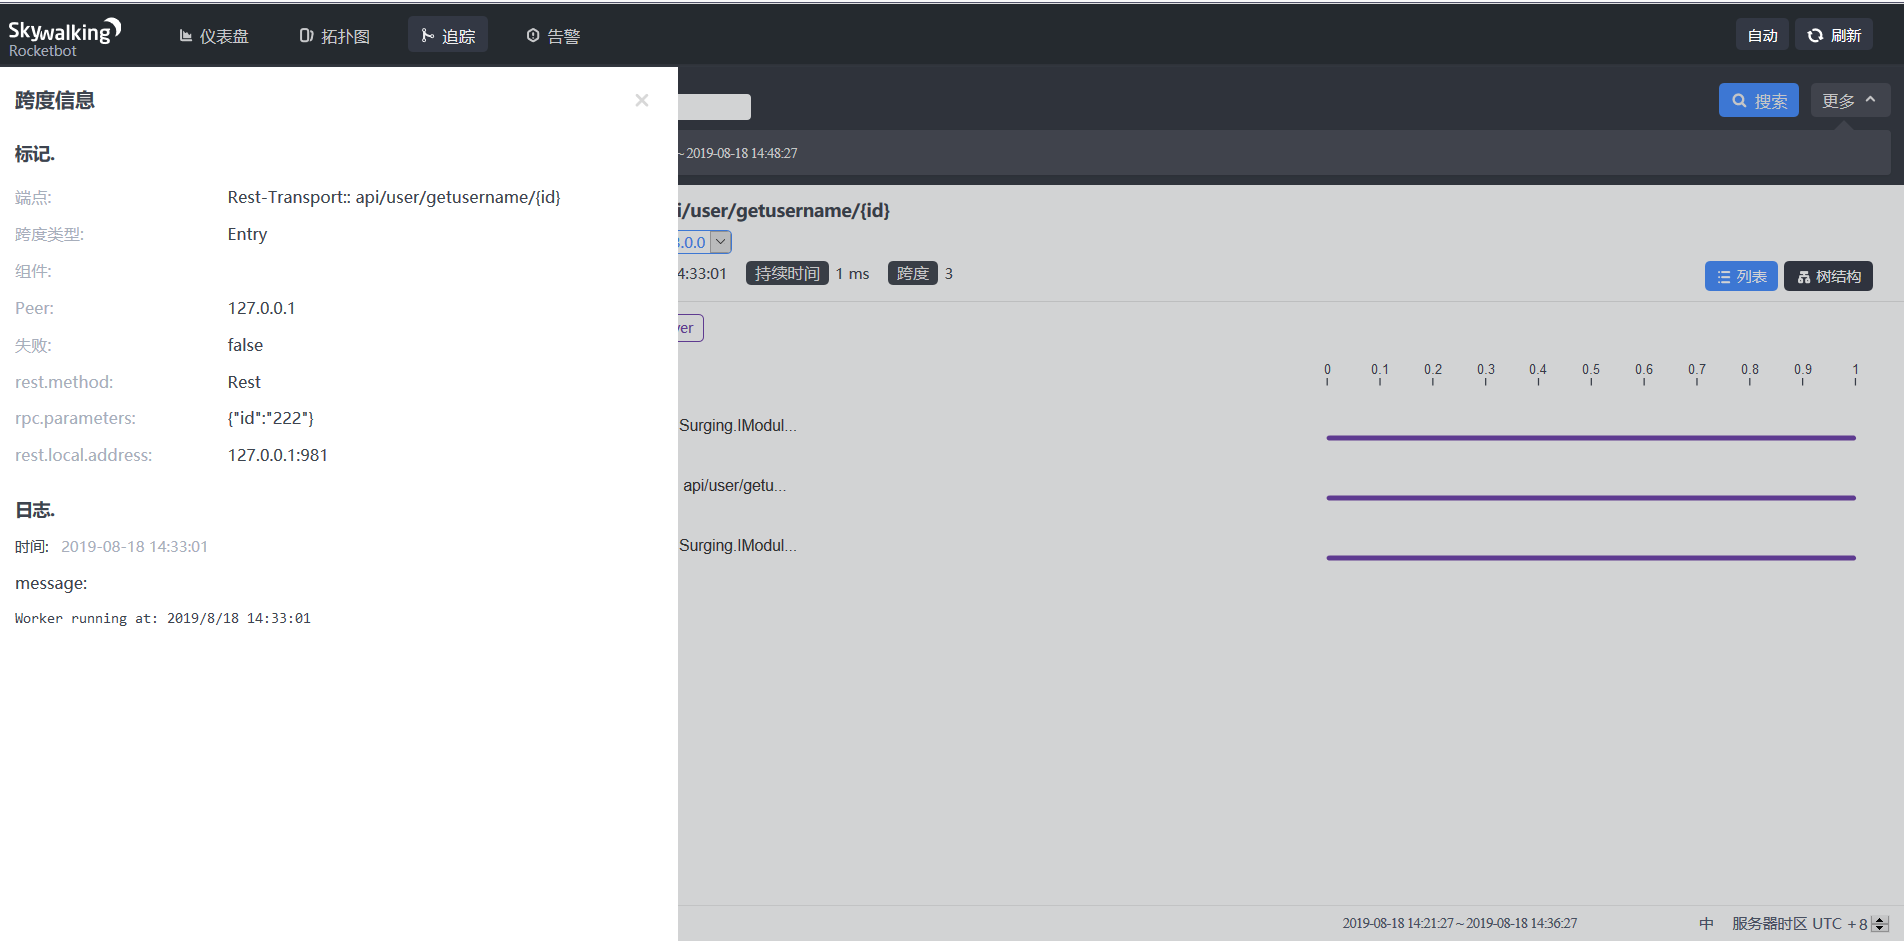
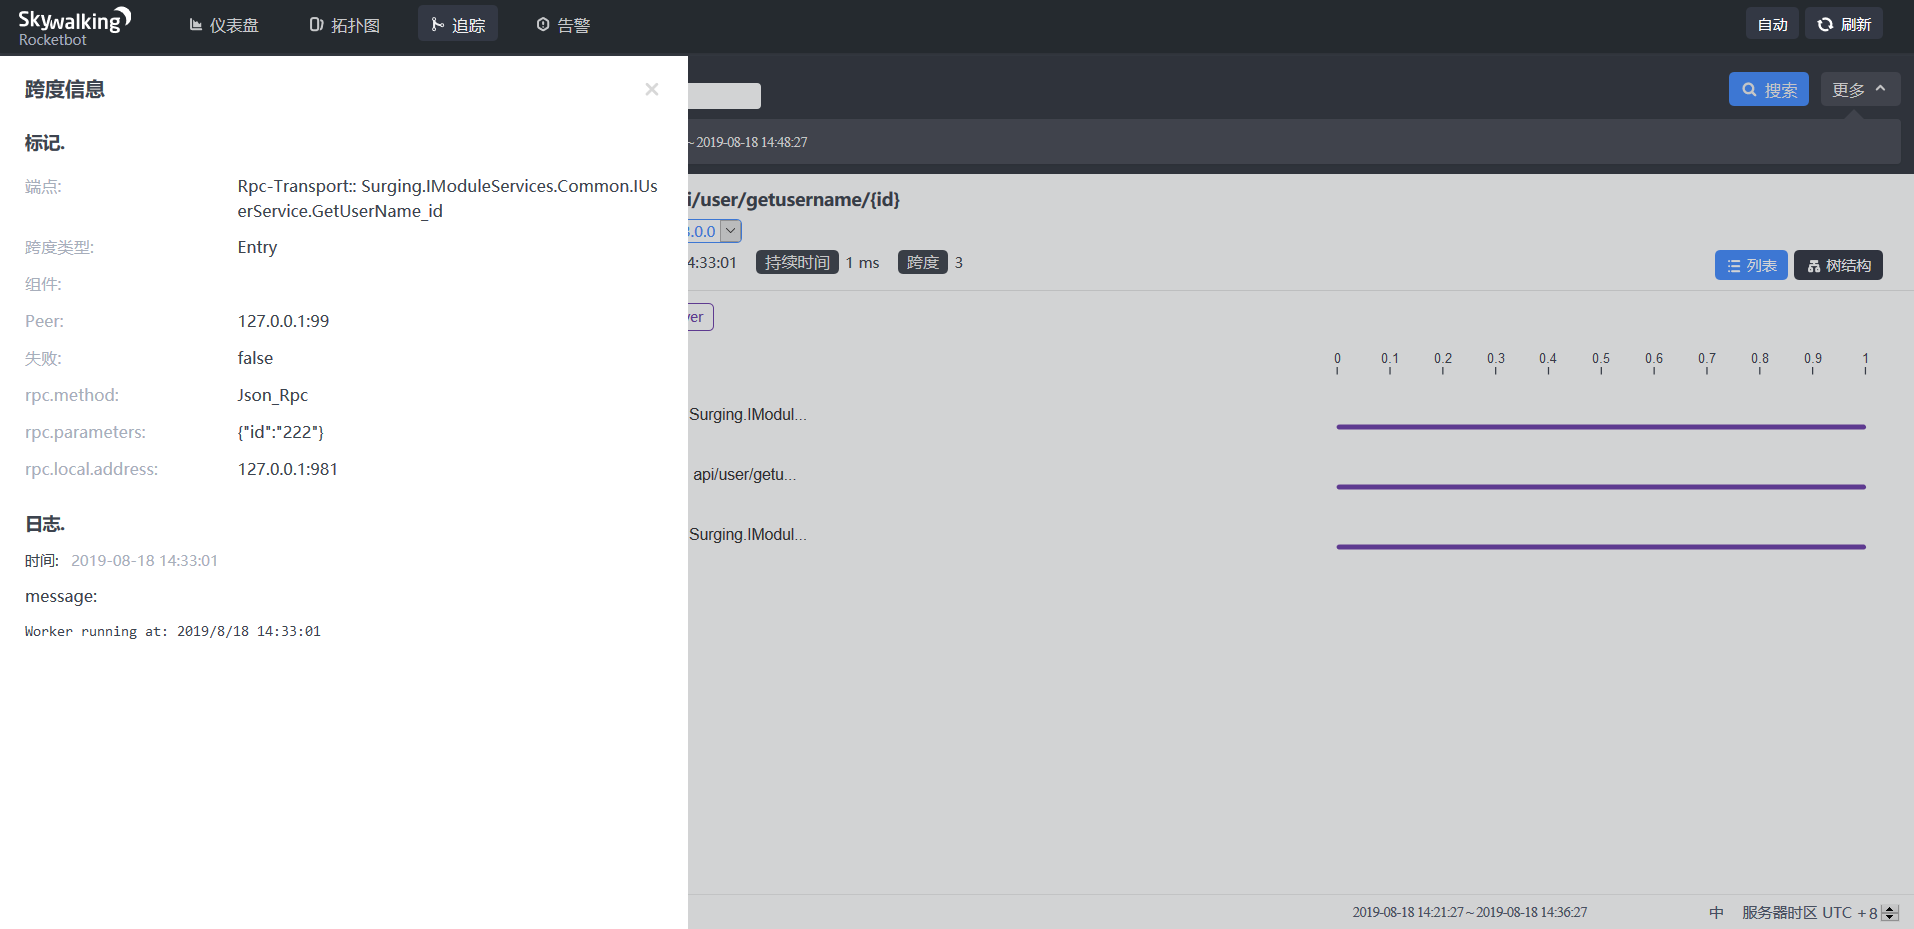
二、服务调用链路跟踪
链路跟踪集成了Skywalking, 参考了SkyAPM-dotnet 而扩展的Surging.Apm.Skywalking引擎组件,而2.0版本只实现rpc 和rest 调用进行链路跟踪,具体配置如下
1.首先创建文件skyapm.json,放在引擎根目录下或者是指定的rootpath根目录下,配置代码如下
{"SkyWalking": {"ServiceName": "Surging.Services.Server","Namespace": "","HeaderVersions": ["sw6"],"Sampling": {"SamplePer3Secs": -1,"Percentage": -1.0},"Logging": {"Level": "Information","FilePath": "logs/skyapm-{Date}.log"},"Transport": {"Interval": 3000,"ProtocolVersion": "v6","QueueSize": 30000,"BatchSize": 3000,"gRPC": {"Servers": "localhost:11800","Timeout": 100000,"ConnectTimeout": 100000,"ReportTimeout": 600000}}}} |
2.然后添加引用或者扫描引用Surging.Apm.Skywalking组件,就能把采集的数据提交到Skywalking
3.或者可以通过配置项DisableDiagnostic禁用数据采集,配置如下
{"Surging": {"DisableDiagnostic": true,}} |
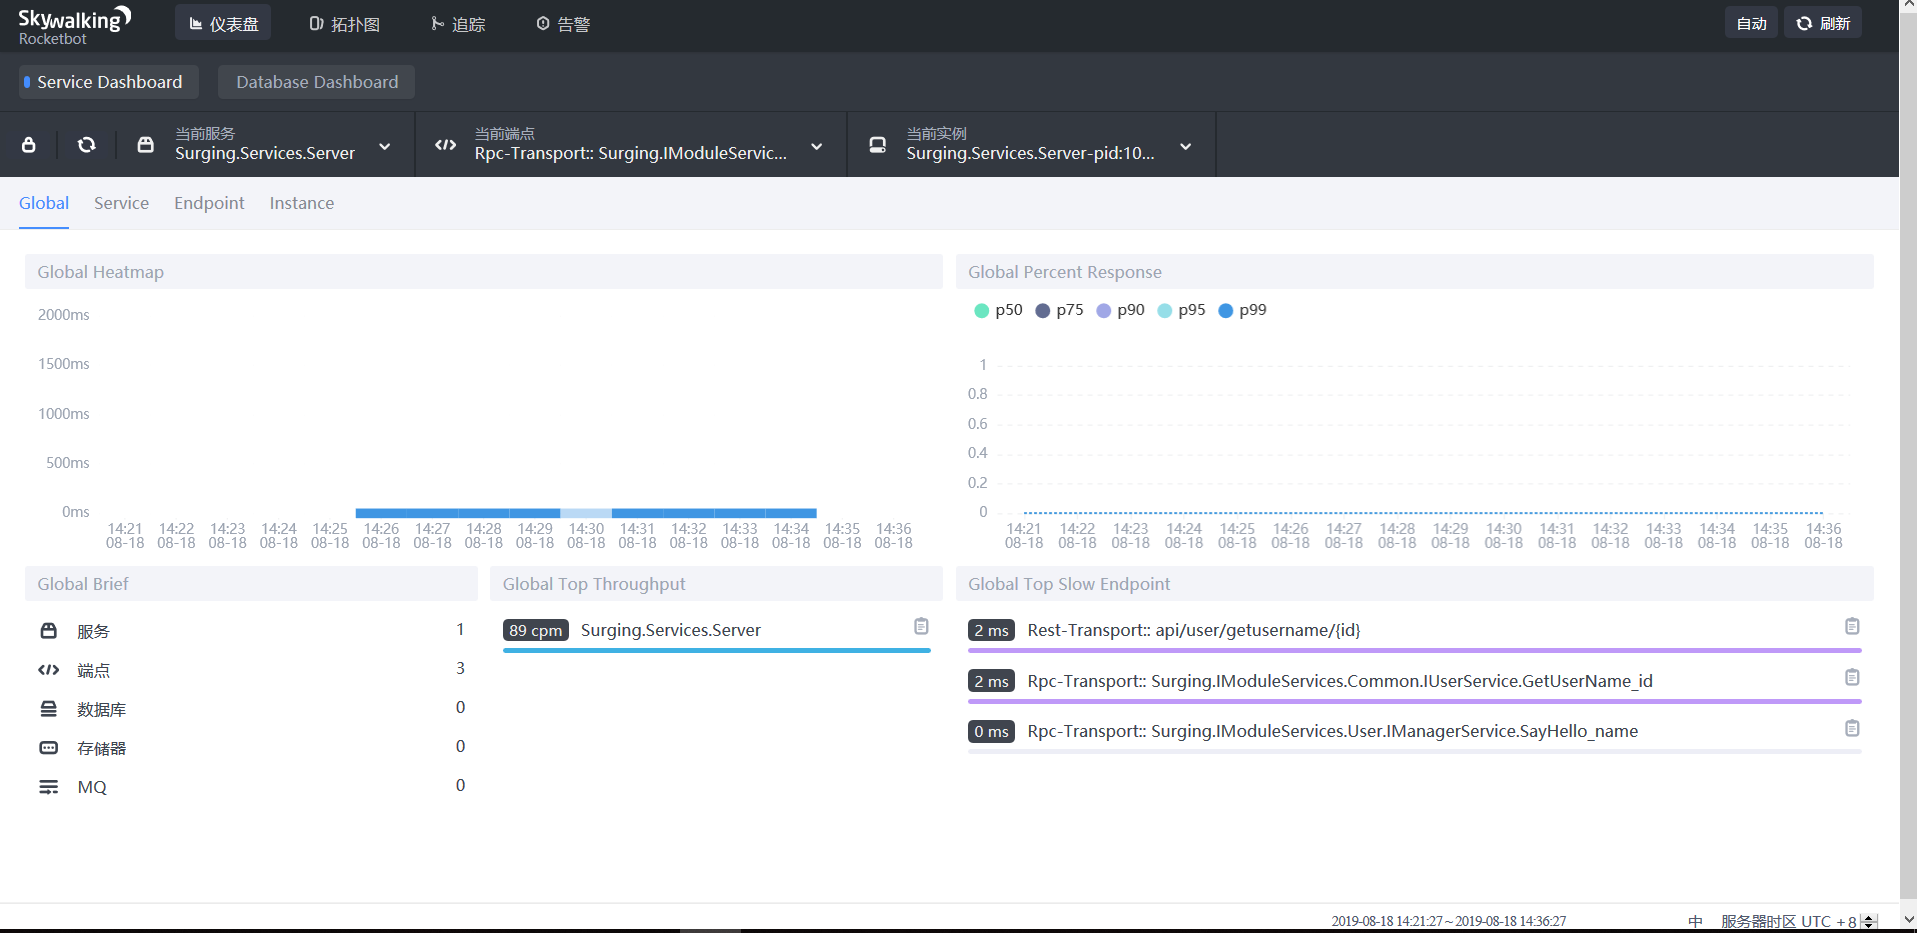
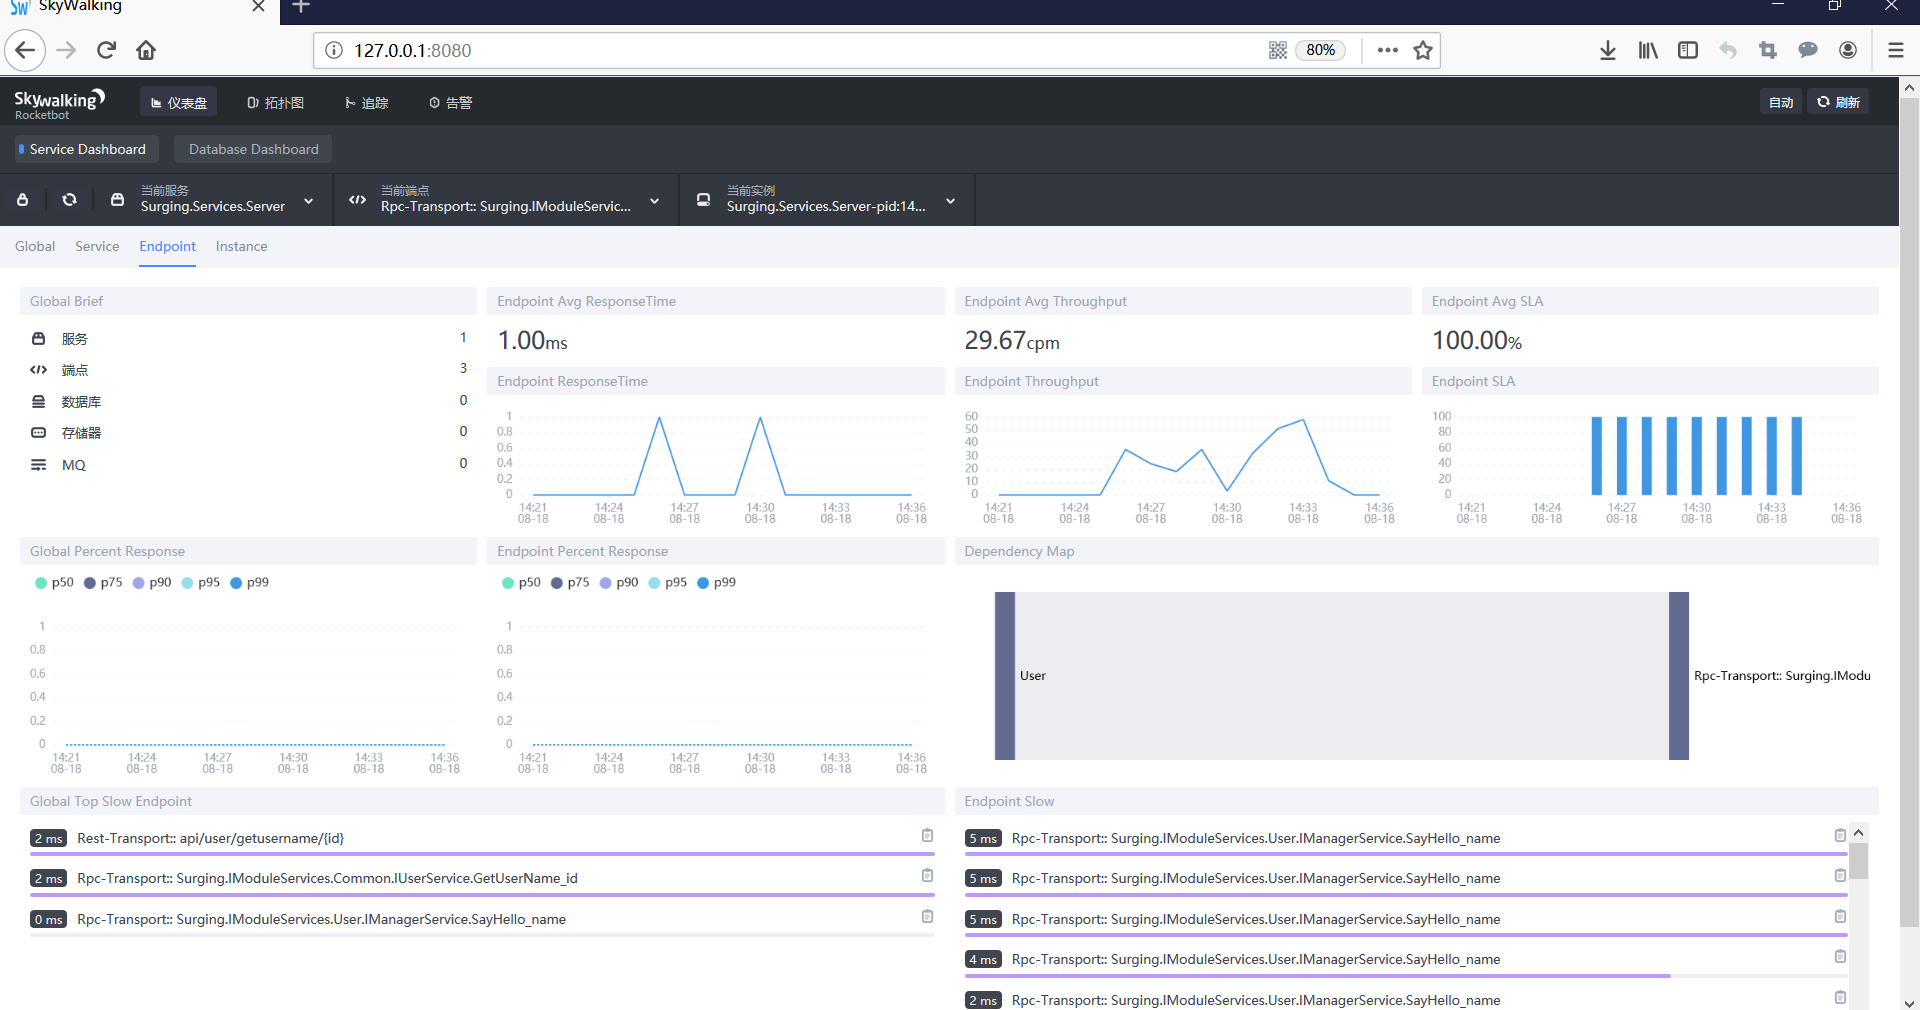
然后通过stage 组件GET 调用http://127.0.0.1:281/api/user/getusername/222?serviceKey=User 地址,就能通过Skywalking WebUI 看到以下界面
三、Stage支持白黑名单、HttpMethod规则的设定
1.白黑名单可以指定RoutePath,全局配置通过不指定RoutePath进行配置,白名单的配置要高于黑名单的配置,也就说有重合的IP, 白名单会进行覆盖,代码配置具体如下
"Stage": {"AccessSetting": [{"BlackList": "${blacklist}|127.0.0.1","Enable": false},{"WhiteList": "${whitelist}|192.168.10.50,192.168.43.0/24,127.0.0.1","BlackList": "${blacklist}|192.168.2.50,192.168.1.0/16","RoutePath": "api/user/exists","Enable": true}]} |
2. 通过配置HttpPost ,HttpPut , HttpDelete 和 HttpGet就能配置rest的请求方式,如果不配置,所有请求都支持。而 设置isRegisterMetadata为True,就会把httpmethod注册为服务元数据。如果是微服务可以设置为true ,如果只是加载业务接口,中转服务或者聚合服务可以设置为false
[ServiceBundle("api/{Service}/{Method}")]//[ServiceBundle("api/{Service}")]//[ServiceBundle("api/{Service}/{Method}/test")]//[ServiceBundle("api/{Service}/{Method}/test",false)]public interface IUserService: IServiceKey{/// <summary>/// 判断是否存在/// </summary>/// <param name="id">用户编号</param>/// <returns></returns>[ServiceRoute("{id}")][HttpPost(),HttpPut(), HttpDelete(), HttpGet()]// [ServiceBundle("api/{Service}/{id}", false)]Task<bool> Exists(int id);/// <summary>/// 报错用户/// </summary>/// <param name="requestData">请求参数</param>/// <returns></returns>[Authorization(AuthType = AuthorizationType.JWT)][HttpPost(true),HttpPut(true)]Task<IdentityUser> Save(IdentityUser requestData);} |
2019年08月28日发布2.0版本,敬请期待
Recommend
About Joyk
Aggregate valuable and interesting links.
Joyk means Joy of geeK