

elasticsearch实战三部曲之二:文档操作 - boling_cavalry的博客 - CSDN博客
source link: https://blog.csdn.net/boling_cavalry/article/details/86379882?
Go to the source link to view the article. You can view the picture content, updated content and better typesetting reading experience. If the link is broken, please click the button below to view the snapshot at that time.
本文是《elasticsearch实战三部曲》系列的第二篇,上一篇文章我们动手熟悉了索引相关的基本操作,现在一起来熟悉文档相关的操作;
系列文章链接
- 本次实战用到的elasticsearch版本是6.5.4,安装在Ubuntu 16.04.5 LTS,客户端工具是postman6.6.1;
- 如果您需要搭建elasticsearch环境,请参考《Linux环境快速搭建elasticsearch6.5.4集群和Head插件》;
基本情况介绍
本次实战的elasticsearch环境以及搭建完毕,是由两个机器搭建的集群,并且elasticsearch-head也搭建完成:
- 一号机器,IP地址:192.168.119.152;
- 二号机器:IP地址:192.168.119.153;
- elasticsearch-head安装在一号机器,访问地址:http://192.168.119.152:9100
- 已经建立了索引test001;
数据格式说明
为了便于和读者沟通,我们来约定一下如何在文章中表达请求和响应的信息:
- 假设通过Postman工具向服务器发送一个PUT类型的请求,地址是:http://192.168.119.152:9200/test001/article/1
- 请求的内容是JSON格式的,内容如下:
{
	“id”:1,
	"title":"标题a",
	"posttime":"2019-01-12",
	"content":"一起来熟悉文档相关的操作"
}
对于上面的请求,我在文章中就以如下格式描述:
PUT test001/article/1

{
	“id”:1,
	"title":"标题a",
	"posttime":"2019-01-12",
	"content":"一起来熟悉文档相关的操作"
}
读者您看到上述内容,就可以在postman中发起PUT请求,地址是"test001/article/1"前面加上您的服务器地址,内容是上面的JSON;
在索引test001下创建一个文档,类型是article,id为1:
PUT test001/article/1

{
	"id":1,
	"title":"标题a",
	"posttime":"2019-01-12",
	"star":100,
	"content":"一起来熟悉文档相关的操作"
}
收到返回码201,body内容如下,可见version为1:
{
    "_index": "test001",
    "_type": "article",
    "_id": "1",
    "_version": 1,
    "result": "created",
    "_shards": {
        "total": 2,
        "successful": 2,
        "failed": 0
    },
    "_seq_no": 2,
    "_primary_term": 3
}
根据id查找刚刚创建的那一条文档:
GET test001/article/1
收到返回码200,body内容如下,索引、类型、id、版本号等全部返回了:
{
    "_index": "test001",
    "_type": "article",
    "_id": "1",
    "_version": 1,
    "found": true,
    "_source": {
        "id": 1,
        "title": "标题a",
        "posttime": "2019-01-12",
        "star": 100,
        "content": "一起来熟悉文档相关的操作"
    }
}
如果查找的文档不存在,返回码为400,返回内容如下:
{
    "_index": "test001",
    "_type": "article",
    "_id": "11",
    "found": false
}
检查文档是否存在
HEAD test001/article/1
该请求的响应没有body,只有返回码,存在时返回200,不存在返回404
根据id一次获取多个文档(_mget命令)
一次查询三条记录,id为1和2的记录真实存在,id为999的记录不存在,请求报文如下:
GET test001/_mget

{
	"docs":[
		{
			"_id":"1"
		},
		{
			"_id":"2"
		},
		{
			"_id":"999"
		}
	]
}
返回内容如下所示,可见id为999的记录,found字段为false,表示不存在:
{
    "docs": [
        {
            "_index": "test001",
            "_type": "article",
            "_id": "1",
            "_version": 1,
            "found": true,
            "_source": {
                "id": 1,
                "title": "标题a",
                "posttime": "2019-01-12",
                "star": 100,
                "content": "一起来熟悉文档相关的操作"
            }
        },
        {
            "_index": "test001",
            "_type": "article",
            "_id": "2",
            "_version": 1,
            "found": true,
            "_source": {
                "id": 2,
                "title": "标题b",
                "posttime": "2019-01-13",
                "star": 20,
                "content": "Ubuntu16安装nodejs10"
            }
        },
        {
            "_index": "test001",
            "_type": null,
            "_id": "999",
            "found": false
        }
    ]
}
根据id一次获取多个文档(元字段_id)
除了使用_mget命令,还可以通过_search命令的方式,以元字段"_id"作为搜索条件,一次获取多个文档:
GET test001/_search

{
	"query":{
		"terms":{"_id":["1", "2"]}
	}
}
返回码200表示成功,body是搜索结果:
{
    "took": 20,
    "timed_out": false,
    "_shards": {
        "total": 5,
        "successful": 5,
        "skipped": 0,
        "failed": 0
    },
    "hits": {
        "total": 2,
        "max_score": 1,
        "hits": [
            {
                "_index": "test001",
                "_type": "article",
                "_id": "2",
                "_score": 1,
                "_source": {
                    "id": 2,
                    "title": "标题b",
                    "posttime": "2019-01-13",
                    "content": "elasticsearch实战三部曲之二"
                }
            },
            {
                "_index": "test001",
                "_type": "article",
                "_id": "1",
                "_score": 1,
                "_source": {
                    "id": 1,
                    "title": "标题1",
                    "posttime": "2019-01-13",
                    "content": "Flink消费kafka消息实战"
                }
            }
        ]
    }
}
更新文档(doc方式)
对于id为1的文档,如果要更新其title字段,请求报文如下,根节点名为"doc",可以对指定字段进行替换:
POST test001/article/1/_update

{
 "doc":{
 	"title":"abc"
 }
}
更新成功后,返回码200,返回body:
{
    "_index": "test001",
    "_type": "article",
    "_id": "1",
    "_version": 4,
    "result": "updated",
    "_shards": {
        "total": 2,
        "successful": 2,
        "failed": 0
    },
    "_seq_no": 5,
    "_primary_term": 3
}
更新文档(脚本方式)
还有一种更新文档的方式是提交一段elasticsearch支持的脚本,如下所示,“lang”:"painless"表示脚本语言类型为painless,params的内容就是入参,inline的值就是脚本的内容,表示将star字段的值增加100:
POST test001/article/1/_update

{
 "script":{
 	"inline":"ctx._source.star += params.star",
 	"lang":"painless",
 	"params":{
 		"star":100
 	}
 }
}
执行成功的返回码200,报文:
{
    "_index": "test001",
    "_type": "article",
    "_id": "1",
    "_version": 6,
    "result": "updated",
    "_shards": {
        "total": 2,
        "successful": 2,
        "failed": 0
    },
    "_seq_no": 7,
    "_primary_term": 3
}
前面介绍的更新都是指定id的,有的时候我们需要用其他字段查询并更新,例如查找title等于"abc"的记录,将其content字段更新为"123456":
POST test001/_update_by_query

{
 "script":{
 	"inline":"ctx._source.content = '123456'",
 	"lang":"painless"
 },
 "query":{
 	"term":{"title":"abc"}
 }
}
收到返回码200,body内容如下:
{
    "took": 48,
    "timed_out": false,
    "total": 1,
    "updated": 1,
    "deleted": 0,
    "batches": 1,
    "version_conflicts": 0,
    "noops": 0,
    "retries": {
        "bulk": 0,
        "search": 0
    },
    "throttled_millis": 0,
    "requests_per_second": -1,
    "throttled_until_millis": 0,
    "failures": []
}
删除文档(指定ID)
DELETE test001/article/2
删除成功返回码200,body如下:
{
    "_index": "test001",
    "_type": "article",
    "_id": "2",
    "_version": 2,
    "result": "deleted",
    "_shards": {
        "total": 2,
        "successful": 2,
        "failed": 0
    },
    "_seq_no": 3,
    "_primary_term": 2
}
删除文档(带查询条件)
如果想删除title字段等于"abc"的文档:
DELETE test001

{
 "query":{
 	"term":{"title":"abc"}
 }
}
删除成功返回码200,body如下:
{
    "acknowledged": true
}
同样的操作再试一次,就会返回404错误,因为记录已经不存在了;
要新增多个文档,可以将内容写入json文件,再通过批量操作的接口,将数据一次性POST;
- 首先创建一个名为book.json的文件,内容如下:
{"index":{ "_index": "books", "_type": "IT", "_id": "1" }}
{"id":"1","title":"Java编程思想","language":"java","author":"Bruce Eckel","price":70.20,"publish_time":"2007-10-01","description":"Java学习必读经典,殿堂级著作!赢得了全球程序员的广泛赞誉。"}
{"index":{ "_index": "books", "_type": "IT", "_id": "2" }}
{"id":"2","title":"Java程序性能优化","language":"java","author":"葛一鸣","price":46.50,"publish_time":"2012-08-01","description":"让你的Java程序更快、更稳定。深入剖析软件设计层面、代码层面、JVM虚拟机层面的优化方法"}
{"index":{ "_index": "books", "_type": "IT", "_id": "3" }}
{"id":"3","title":"Python科学计算","language":"python","author":"张若愚","price":81.40,"publish_time":"2016-05-01","description":"零基础学python,光盘中作者独家整合开发winPython运行环境,涵盖了Python各个扩展库"}
{"index":{ "_index": "books", "_type": "IT", "_id": "4" }}
{"id":"4","title":"Python基础教程","language":"python","author":"Helant","price":54.50,"publish_time":"2014-03-01","description":"经典的Python入门教程,层次鲜明,结构严谨,内容翔实"}
{"index":{ "_index": "books", "_type": "IT", "_id": "5" }}
{"id":"5","title":"JavaScript高级程序设计","language":"javascript","author":"Nicholas C. Zakas","price":66.40,"publish_time":"2012-10-01","description":"JavaScript技术经典名著"}
如上所示,第一行指定了索引、类型、id等基本信息,第二行就是该记录的各个字段的内容;
2. 如果您的电脑可以使用curl命令,那么在book.json文件所在文件夹下面执行此命令即可提交:
curl -XPOST "http://192.168.119.152:9200/_bulk?pretty" -H 'Content-Type: application/json' --data-binary @books.json
-
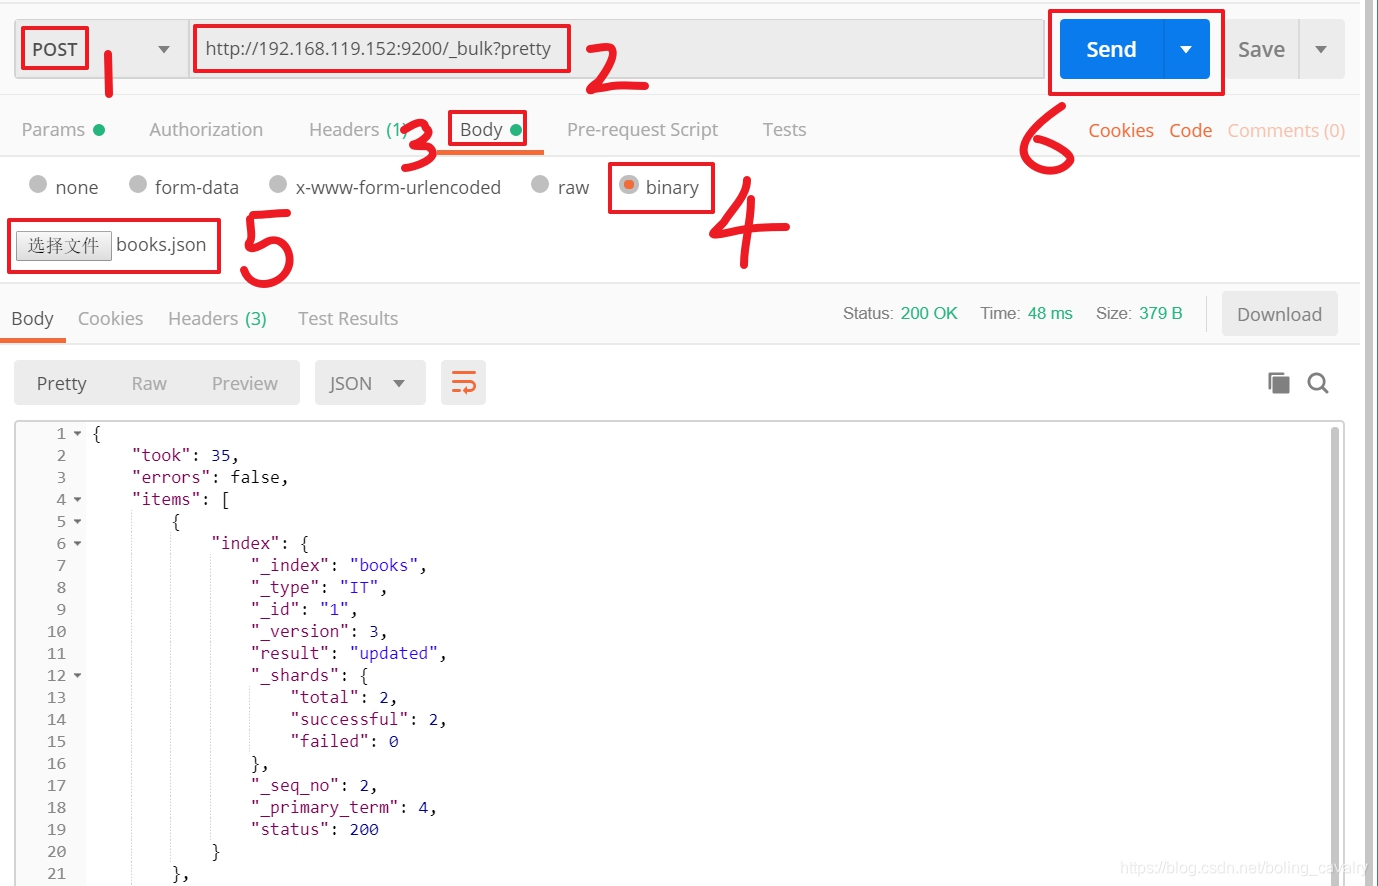
如果您在使用postman软件,请按下图方式提交,请注意操作步骤遵循图中的1到6的顺序,url地址是:_bulk?pretty
-
批量数据提交后,用head可见新增了一个索引,下面有5条记录,如下图:

至此,和文档有关的基本操作实战已经完成了,接下来的文章中,我们会进行搜索相关的实战;
注意:文中用到的book.json文件,来自实体书《从Lucene到Elasticsearch全文检索实战》提供的在线下载源码包中的内容,感谢姚攀大师精心准备的用例和数据,如果您认为我文章中使用的数据有侵权行为,请及时告知我,我会第一时间删除,我的邮箱:[email protected]
欢迎关注我的公众号:程序员欣宸

Recommend
About Joyk
Aggregate valuable and interesting links.
Joyk means Joy of geeK