

Swift Tutorial Part 2: Types and Operations [FREE]
source link: https://www.tuicool.com/articles/hit/NNruqa2
Go to the source link to view the article. You can view the picture content, updated content and better typesetting reading experience. If the link is broken, please click the button below to view the snapshot at that time.
Update note : Lorenzo Boaro updated this tutorial to iOS 12, Xcode 10, and Swift 4.2. Matt Galloway wrote the original.
Welcome to the second part of this mini-series on learning Swift!
This part carries on from Part 1: Expressions, Variables & Constants . We recommend you start with the first part of this tutorial series to get the most out of it.
It’s time to learn more about types ! Formally, a type describes a set of values and the operations that can be performed on them.
In this tutorial, you’ll learn about handling different types that are in the Swift programming language. You’ll learn about converting between types, and you’ll also be introduced to type inference, which makes your life as a programmer a lot simpler.
Finally, you’ll learn about tuples, which allow you to make your own types made up of multiple values of any type.
Getting Started
Sometimes, you’ll have data in one format and need to convert it to another. The naïve way to attempt this would be like so:
var integer: Int = 100
var decimal: Double = 12.5
integer = decimal
Swift will complain if you try to do this and spit out an error on the third line:
Cannot assign value of type 'Double' to type 'Int'
Some programming languages aren’t as strict and will perform conversions like this automatically. Experience shows this kind of automatic conversion is the source of software bugs, and it often hurts performance. Swift prevents you from assigning a value of one type to another and this avoids these issues.
Remember, computers rely on programmers to tell them what to do. In Swift, that includes being explicit about type conversions. If you want the conversion to happen, you have to say so!
Instead of simply assigning, you need to explicitly write that you want to convert the type. You do it like so:
var integer: Int = 100
var decimal: Double = 12.5
integer = Int(decimal)
The assignment on the third line now tells Swift, unequivocally, that you want to convert from the original type, Double
, to the new type, Int
.
Note
: In this case, assigning the decimal value to the integer results in a loss of precision: The integer
variable ends up with the value 12
instead of 12.5
. This is why it’s important to be explicit. Swift wants to make sure that you know what you’re doing and that you may end up losing data by performing the type conversion.
Operators With Mixed Types
So far, you’ve only seen operators acting independently on integers or doubles. But what if you have an integer that you want to multiply by a double?
You might think you could do it like this:
let hourlyRate: Double = 19.5
let hoursWorked: Int = 10
let totalCost: Double = hourlyRate * hoursWorked
If you try that, you’ll get an error on the final line:
Binary operator '*' cannot be applied to operands of type 'Double' and 'Int'
This is because, in Swift, you can’t apply the *
operator to mixed types. This rule also applies to the other arithmetic operators. It may seem surprising at first, but Swift is being rather helpful.
Swift forces you to be explicit about what you mean when you want an Int
multiplied by a Double
, because the result can be only one
type. Do you want the result to be an Int
, converting the Double
to an Int
before performing the multiplication? Or do you want the result to be a Double
, converting the Int
to a Double
before performing the multiplication?
In this example, you want the result to be a Double
. You don’t want an Int
, because, in that case, Swift would convert the hourlyRate
constant into an Int
to perform the multiplication, rounding it down to 19 and losing the precision of the Double
.
You need to tell Swift you want it to consider the hoursWorked
constant to be a Double
, like so:
let hourlyRate: Double = 19.5
let hoursWorked: Int = 10
let totalCost: Double = hourlyRate * Double(hoursWorked)
Now, each of the operands will be a Double
when Swift multiplies them, so totalCost
is a Double
as well.
Type Inference
Up to this point, each time you’ve seen a variable or constant declared, it’s been accompanied by an associated type, like this:
let integer: Int = 42
let double: Double = 3.14159
You may be asking yourself: “Why must I write the : Int
and : Double
, when the right-hand side of the assignment is already
an Int
or a Double
?” It’s redundant, to be sure; you can see this without too much work.
It turns out that the Swift compiler can deduce this as well. It doesn’t need you to tell it the type all the time — it can figure it out on its own. This is done through a process called type inference . Not all programming languages have this, but Swift does, and it’s a key component of Swift’s power as a language.
So you can simply drop the type in most places where you see one.
For example, consider the following constant declaration:
let typeInferredInt = 42
Sometimes, it’s useful to check the inferred type of a variable or constant. You can do this in a playground by holding down the Option key and clicking on the variable’s or constant’s name. Xcode will display a popover like this:
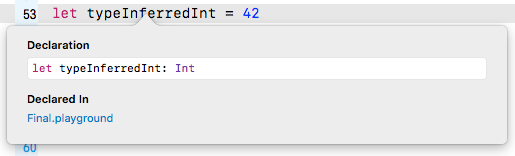
Xcode tells you the inferred type by giving you the declaration that you would have had to use if there were no type inference. In this case, the type is Int
.
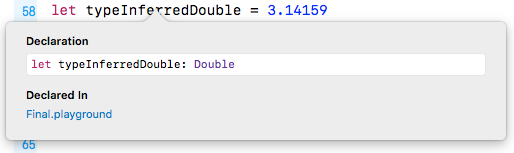
It works for other types, too:
let typeInferredDouble = 3.14159
Option-clicking on this reveals the following:
Type inference isn’t magic. Swift is simply doing what your brain does very easily. Programming languages that don’t use type inference can often feel verbose, because you need to specify the often obvious type each time you declare a variable or constant.
Sometimes, you want to define a constant or variable and ensure it’s a certain type, even though what you’re assigning to it is a different type. You saw earlier how you can convert from one type to another. For example, consider the following:
let wantADouble = 3
Here, Swift infers the type of wantADouble
as Int
. But what if you wanted Double
instead?
What you could do is the following:
let actuallyDouble = Double(3)
This is the same as you saw before with type conversion.
Another option would be not to use type inference at all and do the following:
let actuallyDouble: Double = 3
There is a third option, like so:
let actuallyDouble = 3 as Double
This uses a new keyword you haven’t seen before, as
, which also performs a type conversion.
3
don’t have a type. It’s only when using them in an expression, or assigning them to a constant or variable, that Swift infers a type for them.
A literal number value that doesn’t contain a decimal point can also be used as an Int
and as a Double
. This is why you’re allowed to assign the value 3
to constant actuallyDouble
.
Literal number values that do contain a decimal point cannot be integers. This means you could have avoided this entire discussion had you started with:
let wantADouble = 3.0
Sorry! (Not sorry!) :]
Strings
Numbers are essential in programming, but they aren’t the only type of data that you need to work with in your apps. Text is also an extremely common data type, such as people’s names, their addresses or even the words of a book. All of these are examples of text that an app might need to handle.
Most computer programming languages store text in a data type called a string . This part of the tutorial introduces you to strings, first by giving you background on the concept of strings and then by showing you how to use them in Swift.
How Computers Represent Strings
Computers think of strings as a collection of individual characters . All code, in whatever programming language, can be reduced to raw numbers. Strings are no different!
That may sound very strange. How can characters be numbers? At its base, a computer needs to be able to translate a character into the computer’s own language, and it does so by assigning each character a different number. This forms a two-way mapping from character to number that is called a character set .
When you press a character key on your keyboard, you are actually communicating the number of the character to the computer. Your word processor application converts that number into a picture of the character and, finally, presents that picture to you.
Unicode
In isolation, a computer is free to choose whatever character set mapping it likes. If the computer wants the letter a to equal the number 10, then so be it. But when computers start talking to each other, they need to use a common character set. If two computers used different character sets, then, when one computer transferred a string to the other, they would end up thinking the strings contained different characters.
There have been several standards over the years, but the most modern standard is Unicode . It defines the character set mapping that almost all computers use today.
Note : You can read more about Unicode at its official website, http://unicode.org .
Consider the word cafe . The Unicode standard tells you that the letters of this word should be mapped to numbers like so:

The number associated with each character is called a code point . So, in the example above, c uses code point 99, a uses code point 97, and so on.
Of course, Unicode is not just for the simple Latin characters used in English, such as c , a , f and e . It also lets you map characters from languages around the world. The word cafe is derived from French, in which it’s written as café . Unicode maps these characters like so:

And here’s an example using Chinese characters (this, according to Google translate, means “Computer Programming”):

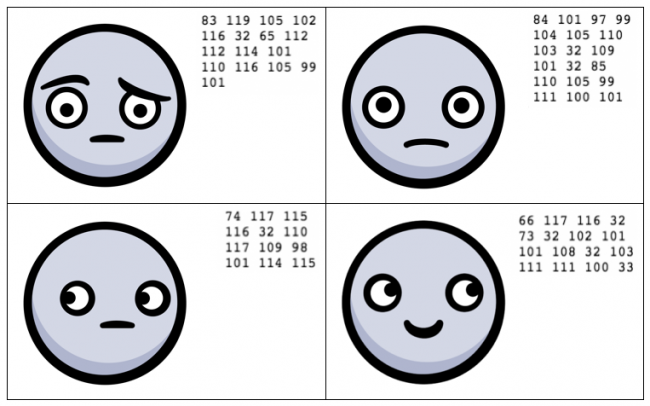
You’ve probably heard of emojis, which are small pictures that you can use in your text. These pictures are, in fact, just normal characters and are also mapped by Unicode. For example:

These are only two characters. The code points for them are very large numbers, but each is still only a single code point. The computer considers these as no different than any other two characters.
Note : The word “emoji” comes from Japanese: “e” means picture and “moji” means character.
Strings in Swift
Swift, like any good programming language, can work directly with characters and strings. It does so through the data types Character
and String
, respectively. In this section, you’ll learn about these data types and how to work with them.
Characters and Strings
The Character
data type can store a single character. For example:
let characterA: Character = "a"
This stores the character a . It can hold any character — even an emoji:
let characterDog: Character = ":dog:"
But this data type is designed to hold only single characters. The String
data type, on the other hand, stores multiple characters. For example:
let stringDog: String = "Dog"
The right-hand side of this expression is what’s known as a string literal ; it’s the Swift syntax for representing a string.
Of course, type inference applies here as well. If you remove the type in the above declaration, then Swift does the right thing and makes the stringDog
a String
constant:
let stringDog = "Dog" // Inferred to be of type String
Note
: There’s no such thing as a character literal in Swift. A character is simply a string of length one. However, Swift infers the type of any string literal to be String
, so if you want a Character
instead, you must make the type explicit.
Concatenation
You can do much more than create simple strings. Sometimes, you need to manipulate a string, and one common way to do so is to combine it with another string.
In Swift, you do this in a rather simple way: by using the addition operator. Just as you can add numbers, you can add strings:
var message = "Hello" + " my name is "
let name = "Lorenzo"
message += name // "Hello my name is Lorenzo"
You need to declare message
as a variable rather than a constant because you want to modify it. You can add string literals together, as in the first line, and you can add string variables or constants together, as in the last line.
It’s also possible to add characters to a string. However, Swift’s strictness with types means you have to be explicit when doing so, just as you have to be when you work with numbers if one is an Int
and the other is a Double
.
To add a character to a string, you do this:
let exclamationMark: Character = "!"
message += String(exclamationMark) // "Hello my name is Lorenzo!"
With this code, you explicitly convert the Character
to a String
before you add it to message
.
Interpolation
You can also build up a string by using interpolation , which is a special Swift syntax that lets you build a string in a way that’s easy to read:
let name = "Lorenzo"
let messageInOne = "Hello my name is \(name)!" // "Hello my name is Lorenzo!"
The above is much more readable than the example from the previous section. It’s an extension of the string literal syntax, whereby you replace certain parts of the string with other values. You enclose the value you want to give the string in parentheses preceded by a backslash.
This syntax works in just the same way to build a string from other data types, such as numbers:
let oneThird = 1.0 / 3.0
let oneThirdLongString = "One third is \(oneThird) as a decimal."
Here, you use a Double
in the interpolation. At the end of this code, your oneThirdLongString
constant will contain the following:
One third is 0.3333333333333333 as a decimal.
Of course, it would actually take infinite characters to represent one third as a decimal, because it’s a repeating decimal. String interpolation with a Double
gives you no way to control the precision of the resulting string.
This is an unfortunate consequence of using string interpolation; it’s simple to use, but offers no ability to customize the output.
Multi-line Strings
Swift has a neat way to express strings that contain multiple lines. This can be rather useful when you need to put a very long string in your code.
You do it like so:
let bigString = """
  You can have a string
  that contains multiple
  lines
  by
  doing this.
  """
print(bigString)
The three double-quotes signify that this is a multi-line string. Handily, the first and final new lines do not become part of the string. This makes it more flexible as you don’t have to have the three double-quotes on the same line as the string.
In the case above, it will print the following:
You can have a string
that contains multiple
lines
by
doing this.
Notice that the two-space margin in the multi-line string literal is stripped out of the result. Swift looks at the number of leading spaces on the final three double-quotes line. Using this as a baseline, Swift requires that all lines above it have at least that much space so that it can remove it from each line. This lets you format your code with pretty indentation without affecting the output.
Tuples
Sometimes, data comes in pairs or triplets. An example of this is a pair of (x, y) coordinates on a 2D grid. Similarly, a set of coordinates on a 3D grid is comprised of an x-value, a y-value and a z-value.
In Swift, you can represent such related data in a very simple way through the use of a tuple .
A tuple is a type that represents data composed of more than one value of any type. You can have as many values in your tuple as you like. For example, you can define a pair of 2D coordinates wherein each axis value is an integer, like so:
let coordinates: (Int, Int) = (2, 3)
The type of coordinates
is a tuple containing two Int
values. The types of the values within the tuple, in this case Int
, are separated by commas surrounded by parentheses. The code for creating the tuple is much the same, with each value separated by commas and surrounded by parentheses.
Type inference can infer tuple types, too:
let coordinatesInferred = (2, 3) // Inferred to be of type (Int, Int)
You could similarly create a tuple of Double
values, like so:
let coordinatesDoubles = (2.1, 3.5) // Inferred to be of type (Double, Double)
Or you could mix and match the types comprising the tuple, like so:
let coordinatesMixed = (2.1, 3) // Inferred to be of type (Double, Int)
And here’s how to access the data inside a tuple:
let coordinates = (2, 3)
let x1 = coordinates.0
let y1 = coordinates.1
You can reference each item in the tuple by its position in the tuple, starting with zero. So, in this example, x1
will equal 2
and y1
will equal 3
.
Note : Starting with zero is a common practice in computer programming and is called zero indexing .
In the previous example, it may not be immediately obvious that the first value, at index 0
, is the x-coordinate and the second value, at index 1
, is the y-coordinate. This is another demonstration of why it’s important to always name your variables in a way that avoids confusion.
Fortunately, Swift allows you to name the individual parts of a tuple and you can be explicit about what each part represents. For example:
let coordinatesNamed = (x: 2, y: 3) // Inferred to be of type (x: Int, y: Int)
Here, the code annotates the values of coordinatesNamed
to contain a label for each part of the tuple.
Then, when you need to access each part of the tuple, you can access it by its name:
let x2 = coordinatesNamed.x
let y2 = coordinatesNamed.y
This is much clearer and easier to understand. More often than not, it’s helpful to name the components of your tuples.
If you want to access multiple parts of the tuple at the same time, as in the examples above, you can also use a shorthand syntax to make it easier:
let coordinates3D = (x: 2, y: 3, z: 1)
let (x3, y3, z3) = coordinates3D
This declares three new constants, x3
, y3
and z3
, and assigns each part of the tuple to them in turn. The code is equivalent to the following:
let coordinates3D = (x: 2, y: 3, z: 1)
let x3 = coordinates3D.x
let y3 = coordinates3D.y
let z3 = coordinates3D.z
If you want to ignore a certain element of the tuple, you can replace the corresponding part of the declaration with an underscore. For example, if you were performing a 2D calculation and wanted to ignore the z-coordinate of coordinates3D
, then you’d write the following:
let (x4, y4, _) = coordinates3D
This line of code only declares x4
and y4
. The _
is special and simply means that you’re ignoring this part for now.
Note : You’ll find that you can use the underscore — also called the wildcard operator — throughout Swift to ignore a value.
A Whole Lot of Number Types
You’ve been using Int
to represent whole numbers. An Int
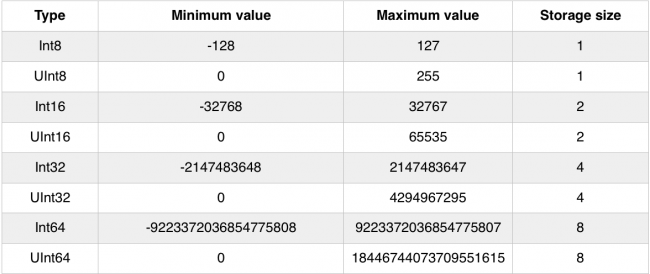
is represented with 64-bits on most modern hardware and with 32-bits on older — or more resource-constrained — systems. Swift provides many more number types that use different amounts of storage. For whole numbers, you can use the explicit signed
types Int8
, Int16
, Int32
and Int64
. These types consume 1, 2, 4 and 8 bytes of storage, respectively. Each of these types use 1-bit to represent the sign.
If you are only dealing with non-negative values, there are a set of explicit unsigned
types that you can use. These include UInt8
, UInt16
, UInt32
and UInt64
. While you cannot represent negative values with these, the extra 1-bit lets you represent values that are twice as big as their signed
counterparts.
Here is a summary of the different integer types and their storage characteristics. Most of the time, you’ll just want to use an Int
. These become useful if your code is interacting with another piece of software that uses one of these more exact sizes, or if you need to optimize for storage size.
You’ve been using Double
to represent fractional numbers. Swift offers a Float
type, which has less range and precision than Double
, but requires half as much storage. Modern hardware has been optimized for Double
, so it is the one that you should reach for unless you have good reason not to.

Most of the time, you will just use Int
and Double
to represent numbers but, every once in a while, you might encounter the other types. You already know how to deal with them. For example, suppose you need to add together an Int16
with a UInt8
and an Int32
. You can do that like so:
let a: Int16 = 12
let b: UInt8 = 255
let c: Int32 = -100000

let answer = Int(a) + Int(b) + Int(c) // Answer is an Int
A Peek Behind the Curtains: Protocols
Even though there are a dozen different numeric types, they are pretty easy to understand and use. This is because they all roughly support the same operations. In other words, once you know how to use an Int
, using any one of the flavors is very straightforward.
One of the truly great features of Swift is how it formalizes the idea of type commonality using what are called protocols . By learning a protocol, you instantly understand how an entire family of types that use that protocol work.
In the case of integers, the functionality can be diagrammed like so:
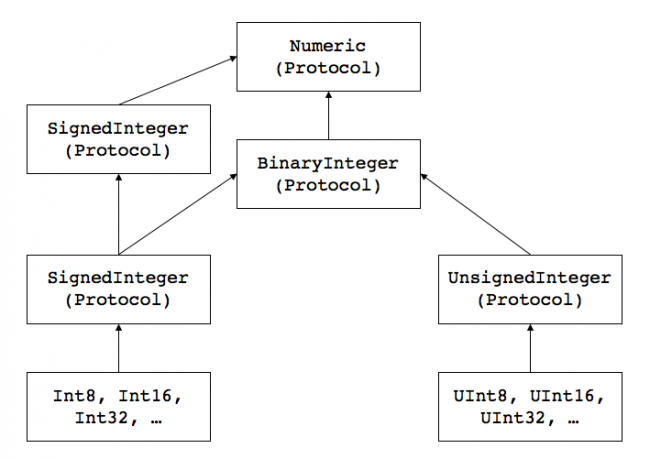
The arrows indicate conformance to (sometimes called adoption of ) a protocol. While this graph does not show all of the protocols that integer types conform to, it gives you insight into how things are organized.
Swift is the first protocol-based language. As you begin to understand the protocols that underly the types, you can start leveraging the system in ways not possible with other languages.
Where to Go From Here?
You can download the final playground using the Download Materials button at the top or bottom of this tutorial. To improve your Swift skills, you will find some mini-exercises to complete. If you are stuck or you need some help, feel free to take advantage of companion solutions.
In this tutorial, you’ve learned that types are a fundamental part of programming. They’re what allow you to correctly store your data. You’ve seen a few more here, including strings and tuples, as well as a bunch of numeric types.
In the next part, you’ll learn about Boolean logic and simple control flow. Head on toPart 3: Flow Control to carry on with this series.
If have any questions or comments, please tell us in the discussion below!
This tutorial was taken from Chapter 3 of Swift Apprentice, Fourth Edition , available from the raywenderlich.com store.
Check it out and let us know what you think!
Recommend
About Joyk
Aggregate valuable and interesting links.
Joyk means Joy of geeK